
PHRM24 Manual 1
Page 1
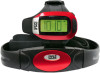
... Heart Rate Zone Alert Alarm - Total Distance - Maximum Speed on Interface Program - Jumbo Digit LCD - EL Backlight - Key Tone - MODE/SET - START/LAP/RESET (Hold this key for Speed + Distance & Heart Rate In - SUB/EL Features: - Time & Date - Dual Purpose 3D Sensor From Germany (Walking or Running) - Intelligent Step Filter Function - Current / Average Heart Rate - Target Time Alert Alarm - Memory Data Recall - Low Battery Detection - Energy Saving Function...
... Heart Rate Zone Alert Alarm - Total Distance - Maximum Speed on Interface Program - Jumbo Digit LCD - EL Backlight - Key Tone - MODE/SET - START/LAP/RESET (Hold this key for Speed + Distance & Heart Rate In - SUB/EL Features: - Time & Date - Dual Purpose 3D Sensor From Germany (Walking or Running) - Intelligent Step Filter Function - Current / Average Heart Rate - Target Time Alert Alarm - Memory Data Recall - Low Battery Detection - Energy Saving Function...
PHRM24 Manual 1
Page 2
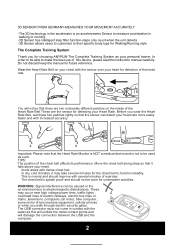
.... 3D SENSOR FROM GERMANY-MEASURES YOUR MOVEMENT ACCURATELY -The 3D technology in the accelerator is an accelerometer Sensor to measure acceleration in walking or running. -3D Sensor has intelligent step filter function-steps only count when the unit detects -3D Sensor allows users to customize to their specific body type for Walking/Running style The Complete...
.... 3D SENSOR FROM GERMANY-MEASURES YOUR MOVEMENT ACCURATELY -The 3D technology in the accelerator is an accelerometer Sensor to measure acceleration in walking or running. -3D Sensor has intelligent step filter function-steps only count when the unit detects -3D Sensor allows users to customize to their specific body type for Walking/Running style The Complete...
PHRM24 Manual 1
Page 3
... user will need to sense that time, it on LCD...Mode Flow Chart... 4 5 Time / Date Setting...5 Alarm Alarm Mode...Setting... 6 6 Chronograph Mode...7 Calibration Mode...11 Calibration Setting Mode Target Time and Heart Rate Setting Mode 12 12 Memory Recall Mode...Download/Installing PC-Link Program 14 15 PC - For each individual modes of step counting, calibration of time before it starts to turn it will not display a step count. Link Upload...15 Installing the Battery...16 Specification...18 Caution...18 USING THE WATCH FUNCTIONS IMPORTANT...
... user will need to sense that time, it on LCD...Mode Flow Chart... 4 5 Time / Date Setting...5 Alarm Alarm Mode...Setting... 6 6 Chronograph Mode...7 Calibration Mode...11 Calibration Setting Mode Target Time and Heart Rate Setting Mode 12 12 Memory Recall Mode...Download/Installing PC-Link Program 14 15 PC - For each individual modes of step counting, calibration of time before it starts to turn it will not display a step count. Link Upload...15 Installing the Battery...16 Specification...18 Caution...18 USING THE WATCH FUNCTIONS IMPORTANT...
PHRM24 Manual 1
Page 4
... wrist and it will automatically sense the walk or run on the positioning of the watch must use the calibration feature for walk or run of the watch for step counting is no activity for around 10 seconds, the current pace for both walking and running. AVG - Heart beat per hour Mi/h - Kilometers per minute STEP - Unit of Fat...
... wrist and it will automatically sense the walk or run on the positioning of the watch must use the calibration feature for walk or run of the watch for step counting is no activity for around 10 seconds, the current pace for both walking and running. AVG - Heart beat per hour Mi/h - Kilometers per minute STEP - Unit of Fat...
PHRM24 Manual 1
Page 5
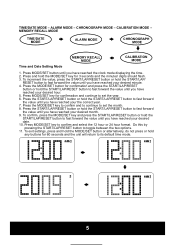
... clock mode displaying the time. 2. Do this by pressing the START/LAP/RESET button to confirm and select the 12 hour or 24 hour format. CALIBRATION MODE - MEMORY RECALL MODE TIME/DATE MODE ALARM MODE CHRONOGRAPH MODE Time and Date Setting Mode MEMORY RECALL MODE CALIBRATION MODE 1. To confirm, press the MODE/SET key and press the START/LAP/RESET button or hold the START/LAP/RESET button to fast forward the value until you have reached your desired date. 10. CHRONOGRAPH MODE - Press MODE/SET button...
... clock mode displaying the time. 2. Do this by pressing the START/LAP/RESET button to confirm and select the 12 hour or 24 hour format. CALIBRATION MODE - MEMORY RECALL MODE TIME/DATE MODE ALARM MODE CHRONOGRAPH MODE Time and Date Setting Mode MEMORY RECALL MODE CALIBRATION MODE 1. To confirm, press the MODE/SET key and press the START/LAP/RESET button or hold the START/LAP/RESET button to fast forward the value until you have reached your desired date. 10. CHRONOGRAPH MODE - Press MODE/SET button...

PHRM24 Manual 1
Page 6
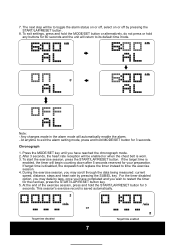
Press the MODE/SET button until you have reached the alarm mode which should show 'AL' in the bottom half of the screen indicating alarm. 2. Press and hold MODE/SET button for confirmation. 6 Press the MODE/SET button to confirm and continue to toggle between the two options. To turn the alarm on or off, press the START/LAP/RESET to set the hours' digits. 5. Note: To exit the alarm mode and return...
Press the MODE/SET button until you have reached the alarm mode which should show 'AL' in the bottom half of the screen indicating alarm. 2. Press and hold MODE/SET button for confirmation. 6 Press the MODE/SET button to confirm and continue to toggle between the two options. To turn the alarm on or off, press the START/LAP/RESET to set the hours' digits. 5. Note: To exit the alarm mode and return...
PHRM24 Manual 1
Page 7
.... 4. Target time disabled or Target time enabled 7 After 3 seconds, the heart rate reception will replace the timer instead to restart the timer for your preparation. If target time is worn. 3. Note: - Chronograph 1. The next step will be enabled or when the chest belt is disabled, the stopwatch will be to exit the alarm setting mode, press and hold the START/LAP/RESET button for 3 seconds. At...
.... 4. Target time disabled or Target time enabled 7 After 3 seconds, the heart rate reception will replace the timer instead to restart the timer for your preparation. If target time is worn. 3. Note: - Chronograph 1. The next step will be enabled or when the chest belt is disabled, the stopwatch will be to exit the alarm setting mode, press and hold the START/LAP/RESET button for 3 seconds. At...
PHRM24 Manual 1
Page 9
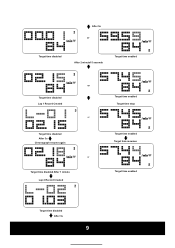
After 5s or Target time disabled After 2 minute15 seconds Target time enabled or Target time disabled Lap 1 Record Created or Target time disabled After 3s Chronograph resume again or Target time disabled After 1 minute Lap 2 Record Created Target time enabled Target time stop Target time enabled Target time resumes Target time enabled Target time disabled After 3s 9
After 5s or Target time disabled After 2 minute15 seconds Target time enabled or Target time disabled Lap 1 Record Created or Target time disabled After 3s Chronograph resume again or Target time disabled After 1 minute Lap 2 Record Created Target time enabled Target time stop Target time enabled Target time resumes Target time enabled Target time disabled After 3s 9
PHRM24 Manual 1
Page 10
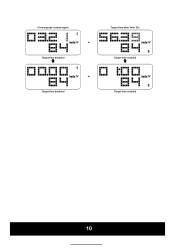
Chronograph resume again or Target time disabled or Target time disabled Target time after 3min 21s Target time enabled Target time enabled 10
Chronograph resume again or Target time disabled or Target time disabled Target time after 3min 21s Target time enabled Target time enabled 10
PHRM24 Manual 1
Page 11
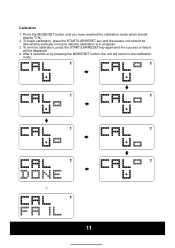
To begin calibration, press the START/LAP/RESET key and the square unit should display "CAL'. 2. After 4 seconds or by pressing the MODE/SET button, the unit will be descending vertically in loop to the calibration mode. Calibration 1. To end the calibration, press the START/LAP/RESET key again and the success or failure will return to indicate calibration is in progress. 3. Press the MODE/SET button until you have reached the calibration mode which should be displayed. 4. or 11
To begin calibration, press the START/LAP/RESET key and the square unit should display "CAL'. 2. After 4 seconds or by pressing the MODE/SET button, the unit will be descending vertically in loop to the calibration mode. Calibration 1. To end the calibration, press the START/LAP/RESET key again and the success or failure will return to indicate calibration is in progress. 3. Press the MODE/SET button until you have reached the calibration mode which should be displayed. 4. or 11
PHRM24 Manual 1
Page 12
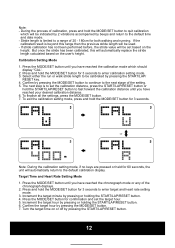
... user's height. Calibration Setting Mode 1. Increment the target minute by pressing the MODE/SET button. 7. Confirm the target hour by pressing or holding the START/LAP/RESET button. 6. Turn the target time on the height. If stride calibration has not been performed before, the stride value will be set the target hour. 5. Press the MODE/SET button until you have reached the calibration mode which will be indicated by 2 vibrations accompanied by beeps...
... user's height. Calibration Setting Mode 1. Increment the target minute by pressing the MODE/SET button. 7. Confirm the target hour by pressing or holding the START/LAP/RESET button. 6. Turn the target time on the height. If stride calibration has not been performed before, the stride value will be set the target hour. 5. Press the MODE/SET button until you have reached the calibration mode which will be indicated by 2 vibrations accompanied by beeps...
PHRM24 Manual 1
Page 13
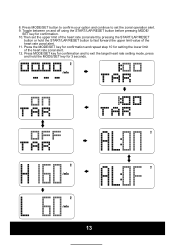
... using the START/LAP/RESET button before pressing MODE/ SET key for confirmation and to exit the target heart rate setting mode, press and hold the START/LAP/RESET button to set the upper limit of the heart rate zonal alert by pressing the START/LAP/RESET button or hold the MODE/SET key for setting the lower limit of the heart rate zonal alert. 11. Press the MODE/SET...
... using the START/LAP/RESET button before pressing MODE/ SET key for confirmation and to exit the target heart rate setting mode, press and hold the START/LAP/RESET button to set the upper limit of the heart rate zonal alert by pressing the START/LAP/RESET button or hold the MODE/SET key for setting the lower limit of the heart rate zonal alert. 11. Press the MODE/SET...
PHRM24 Manual 1
Page 14
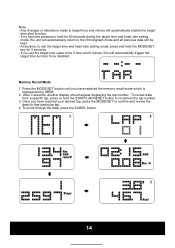
... previous data will automatically trigger the target time function to be kept. - At anytime, to exit the target time and heart rate setting mode, press and hold the START/LAP/RESET button to be 0 hour and 0 minute, this will be disabled. Press the MODE/SET button until you set the target time value to increment the lap number. 3. After 3 seconds, another display should appear displaying the lap number. Memory Recall Mode 1. To review data from a specific...
... previous data will automatically trigger the target time function to be kept. - At anytime, to exit the target time and heart rate setting mode, press and hold the START/LAP/RESET button to be 0 hour and 0 minute, this will be disabled. Press the MODE/SET button until you set the target time value to increment the lap number. 3. After 3 seconds, another display should appear displaying the lap number. Memory Recall Mode 1. To review data from a specific...
PHRM24 Manual 1
Page 15
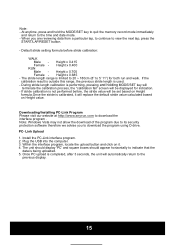
... formula.Once the stride is being uploaded. 5. The unit should display 'PC' and square boxes should appear horizontally to download the program using D drive. Height x 0.685 - The stride length range is performing, pressing and holding MODE/SET key will terminate the calibration process, the "calibration fail" screen will automatically return to download the interface program . Note: Windows Vista may not allow...
... formula.Once the stride is being uploaded. 5. The unit should display 'PC' and square boxes should appear horizontally to download the program using D drive. Height x 0.685 - The stride length range is performing, pressing and holding MODE/SET key will terminate the calibration process, the "calibration fail" screen will automatically return to download the interface program . Note: Windows Vista may not allow...

PHRM24 Manual 1
Page 16
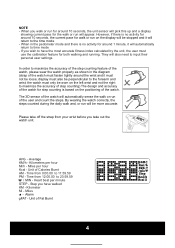
... the battery compartment, making sure that the poles are correctly placed. 5. Use only the recommended batteries. To install/replace the battery, unscrew the battery compartment with the screw driver and simply slide out afterwards. 3. Gently place a new battery into the device and you can then/will need to re-set the watch . 2. INSTALLING THE BATTERY The Watch uses 2 pieces CR 2032 batteries (one each for watch and heart rate...
... the battery compartment, making sure that the poles are correctly placed. 5. Use only the recommended batteries. To install/replace the battery, unscrew the battery compartment with the screw driver and simply slide out afterwards. 3. Gently place a new battery into the device and you can then/will need to re-set the watch . 2. INSTALLING THE BATTERY The Watch uses 2 pieces CR 2032 batteries (one each for watch and heart rate...

PHRM24 Manual 1
Page 17
... an adult Use only batteries recommended in this instruction sheet Be sure to install the batteries with the help of the compartment lid and turn it anti-clockwise with the correct polarity, as indicated Remove all batteries when replacing Only batteries of the same and equivalent type as recommended are to be used Do not short-circuit the supply terminals Exhausted batteries should be removed from the...
... an adult Use only batteries recommended in this instruction sheet Be sure to install the batteries with the help of the compartment lid and turn it anti-clockwise with the correct polarity, as indicated Remove all batteries when replacing Only batteries of the same and equivalent type as recommended are to be used Do not short-circuit the supply terminals Exhausted batteries should be removed from the...

PHRM24 Manual 1
Page 18
... automatically saved to change without further notice. The content of walking ,jogging and running .The daily pedometer step count can then/will help the unit to correct the situation, remove the batteries and then put them back into the battery compartment. SPECIFICATIONS Time Format : : Calendar System : Features : Measurement Range : Memory Data : Chronograph : Year, month, date, day, hour, minute, second, am/pm 12/24 hours Full Auto-calendar pre-programmed from the actual display...
... automatically saved to change without further notice. The content of walking ,jogging and running .The daily pedometer step count can then/will help the unit to correct the situation, remove the batteries and then put them back into the battery compartment. SPECIFICATIONS Time Format : : Calendar System : Features : Measurement Range : Memory Data : Chronograph : Year, month, date, day, hour, minute, second, am/pm 12/24 hours Full Auto-calendar pre-programmed from the actual display...


