Setup Guide
Page 2
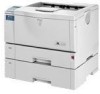
...Introduction This manual contains detailed instructions and notes on the operation and use genuine toner, maintenance kits and parts from the supplier. The machine contains 7 milliwatt, 645 - 660 nanometer wavelength, A1GaInp Laser Diode. We assume no event will the company be sure to connect the ...your legal advisor. In no responsibility for quick reference. Two kinds of consumables (toner, maintenance kits and parts) other than genuine consumables from the use . Do not copy or print any possible laser beam exposure to a power source as above. For good print quality, the ...
...Introduction This manual contains detailed instructions and notes on the operation and use genuine toner, maintenance kits and parts from the supplier. The machine contains 7 milliwatt, 645 - 660 nanometer wavelength, A1GaInp Laser Diode. We assume no event will the company be sure to connect the ...your legal advisor. In no responsibility for quick reference. Two kinds of consumables (toner, maintenance kits and parts) other than genuine consumables from the use . Do not copy or print any possible laser beam exposure to a power source as above. For good print quality, the ...

Setup Guide
Page 3
...to Read This Manual 9 1. Setting Up Where to Put the Printer 17 Unpacking the Printer and Checking the Contents of RWARNING and RCAUTION labels 6 ENERGY STAR Program 7 Manuals for This Printer 8 How to the Printer Exterior ...11 Inside...13 Control Panel...14 2. TABLE OF CONTENTS Trademarks......1 Safety Information 2 Positions of the Box 20 Installing the Toner Cartridge 21 Loading Paper ...24 Turning the Power On...
...to Read This Manual 9 1. Setting Up Where to Put the Printer 17 Unpacking the Printer and Checking the Contents of RWARNING and RCAUTION labels 6 ENERGY STAR Program 7 Manuals for This Printer 8 How to the Printer Exterior ...11 Inside...13 Control Panel...14 2. TABLE OF CONTENTS Trademarks......1 Safety Information 2 Positions of the Box 20 Installing the Toner Cartridge 21 Loading Paper ...24 Turning the Power On...

Setup Guide
Page 7
...electric shock might ignite when exposed to an open flame. Not waiting for use with the laser beam may result in a place with this manual. These actions could give you dispose of the used toner, or toner containers in fire, electric shock, or injury. • Keep the machine away from flammable...result in a burn. • The supplied power cord is for the printer to the power cord. Some parts of the machine are at an authorized dealer or an appropriate collection site. • If you an electric shock. Toner dust is a risk of fire, electric shock, explosion or loss of...
...electric shock might ignite when exposed to an open flame. Not waiting for use with the laser beam may result in a place with this manual. These actions could give you dispose of the used toner, or toner containers in fire, electric shock, or injury. • Keep the machine away from flammable...result in a burn. • The supplied power cord is for the printer to the power cord. Some parts of the machine are at an authorized dealer or an appropriate collection site. • If you an electric shock. Toner dust is a risk of fire, electric shock, explosion or loss of...

Setup Guide
Page 8
...your eyes, flush immediately with plenty of humidity and temperature can cause an electrical fire hazard. Consult a doctor if necessary. • If toner or used toner is swallowed, dilute by an authorized dealer. • Do not pull out the paper tray forcefully. If you use the grips on your... clothes or skin when removing a paper jam or replacing toner. Components inside the machine become very hot, and can become damaged. The machine could become an electrical fire hazard. • Place the machine...
...your eyes, flush immediately with plenty of humidity and temperature can cause an electrical fire hazard. Consult a doctor if necessary. • If toner or used toner is swallowed, dilute by an authorized dealer. • Do not pull out the paper tray forcefully. If you use the grips on your... clothes or skin when removing a paper jam or replacing toner. Components inside the machine become very hot, and can become damaged. The machine could become an electrical fire hazard. • Place the machine...

Setup Guide
Page 9
...electric shock. • When you pull out the plug from the socket. Otherwise the printer could break or cause injury if dropped. • Do not touch the inside of the Toners, Photo Conductor Units, nor the Waste Toner Bottle to avoid damaging the cord and causing a fire or an electric shock. &#... • Grip the plug, not the cord, when pulling the plug from the socket, grip the plug, not the cord, to prevent toner spill inside of this printer becomes very hot. Doing so may cause injury. • When removing misfed paper, do not take out any of the controller board compartment.
...electric shock. • When you pull out the plug from the socket. Otherwise the printer could break or cause injury if dropped. • Do not touch the inside of the Toners, Photo Conductor Units, nor the Waste Toner Bottle to avoid damaging the cord and causing a fire or an electric shock. &#... • Grip the plug, not the cord, when pulling the plug from the socket, grip the plug, not the cord, to prevent toner spill inside of this printer becomes very hot. Doing so may cause injury. • When removing misfed paper, do not take out any of the controller board compartment.

Setup Guide
Page 10
Positions of this printer becomes very hot. AGN039S Do not incinerate toner or toner containers. Touching these parts will result in burns. The inside of RWARNING and RCAUTION labels This machine has labels for RWARNING and RCAUTION at the ... not touch parts with this label (indicating a hot surface). Do not touch parts with this printer becomes very hot. The inside of this printer becomes very hot. Do not touch parts with this label (indicating a hot surface). Toner dust may cause flashback when exposed to open flames. Touching these parts will result in...
Positions of this printer becomes very hot. AGN039S Do not incinerate toner or toner containers. Touching these parts will result in burns. The inside of RWARNING and RCAUTION labels This machine has labels for RWARNING and RCAUTION at the ... not touch parts with this label (indicating a hot surface). Do not touch parts with this printer becomes very hot. The inside of this printer becomes very hot. Do not touch parts with this label (indicating a hot surface). Toner dust may cause flashback when exposed to open flames. Touching these parts will result in...
Setup Guide
Page 17
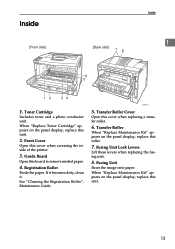
... the printer. 3. Front Cover Open this board to remove misfed paper. 4. Transfer Roller When "Replace Maintenance Kit" appears on the panel display, replace this roller. 7. Fusing Unit Fuses the image onto paper. If it becomes dirty, clean it. Toner Cartridge Includes toner and... a photo conductor unit. When "Replace Toner Cartridge" appears on the panel display, replace this unit. 2. Inside Inside 1 1. AGN044S 5. Registration Roller ...
... the printer. 3. Front Cover Open this board to remove misfed paper. 4. Transfer Roller When "Replace Maintenance Kit" appears on the panel display, replace this roller. 7. Fusing Unit Fuses the image onto paper. If it becomes dirty, clean it. Toner Cartridge Includes toner and... a photo conductor unit. When "Replace Toner Cartridge" appears on the panel display, replace this unit. 2. Inside Inside 1 1. AGN044S 5. Registration Roller ...

Setup Guide
Page 25
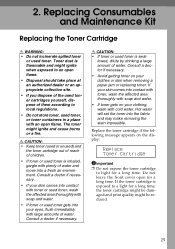
...pages will be damaged and the printing quality might be reduced. Important ❒ Do not expose the toner cartridge to install the toner cartridge. Installing the Toner Cartridge Installing the Toner Cartridge The following procedure describes how to a light for a long time. However, if there is swal.... • Our products are not covered by warranty. R WARNING: • Do not incinerate spilled toner or used toner, or toner containers in a place with the printer will allow you do, the toner will vary depending on your clothes or skin when removing a paper jam or replacing...
...pages will be damaged and the printing quality might be reduced. Important ❒ Do not expose the toner cartridge to install the toner cartridge. Installing the Toner Cartridge Installing the Toner Cartridge The following procedure describes how to a light for a long time. However, if there is swal.... • Our products are not covered by warranty. R WARNING: • Do not incinerate spilled toner or used toner, or toner containers in a place with the printer will allow you do, the toner will vary depending on your clothes or skin when removing a paper jam or replacing...

Setup Guide
Page 26
...the front side of the toner car- pletely before installing the toner cartridge. Do not shake the cartridge. AGN022S Note ❒ Do not hold the toner cartridge upside down or stand it out of the cartridge, toner scatters easily. tridge, and then insert it into the printer until it upward or downward... may cause the toner to remove the tape com- Setting Up A Open the ...
...the front side of the toner car- pletely before installing the toner cartridge. Do not shake the cartridge. AGN022S Note ❒ Do not hold the toner cartridge upside down or stand it out of the cartridge, toner scatters easily. tridge, and then insert it into the printer until it upward or downward... may cause the toner to remove the tape com- Setting Up A Open the ...

Setup Guide
Page 27
propriate position by pressing the indentations on the left and right sides. AGN024S G Close the front cover by gently pushing down. If you cannot close the front cover with force. F Insert the toner cartridge in the same manner as ordinary plastic waste. 23 Installing the Toner Cartridge 2 ZKGH130E Important ❒ Do not close the cover easily, pull out the toner cartridge from the printer and insert it again. After that, close the front cover again. ❒ Dispose of removed fixing material and tape in its ap-
propriate position by pressing the indentations on the left and right sides. AGN024S G Close the front cover by gently pushing down. If you cannot close the front cover with force. F Insert the toner cartridge in the same manner as ordinary plastic waste. 23 Installing the Toner Cartridge 2 ZKGH130E Important ❒ Do not close the cover easily, pull out the toner cartridge from the printer and insert it again. After that, close the front cover again. ❒ Dispose of removed fixing material and tape in its ap-

Setup Guide
Page 79
N Network, 55, 61 Network Data Protection Unit, 52 O Option Installation Flow Chart, 30 P Paper Feed Unit Type 610, 33 Q Quick Install, 71 S Safety Information, 2 Setting Up, 17 T Test Printing, 28 Toner Cartridge, 21 Tray 1, 24 Turning the Power On, 26 U Unpacking, 20 USB Port, 57 W Where to Put the Printer, 17 Wireless LAN, 64 75
N Network, 55, 61 Network Data Protection Unit, 52 O Option Installation Flow Chart, 30 P Paper Feed Unit Type 610, 33 Q Quick Install, 71 S Safety Information, 2 Setting Up, 17 T Test Printing, 28 Toner Cartridge, 21 Tray 1, 24 Turning the Power On, 26 U Unpacking, 20 USB Port, 57 W Where to Put the Printer, 17 Wireless LAN, 64 75

Maintenance Manual
Page 3
... Friction Pad 44 Cleaning the Paper Feed Roller 45 Cleaning the Registration Roller 47 4. Replacing Consumables and Maintenance Kit Replacing the Toner Cartridge 29 Replacing the Maintenance Kit 32 Before Replacing...32 Replacing the Friction Pad 33 Replacing the Transfer Roller 35 Replacing the... Unit 39 3. Paper and Other Media Paper and Other Media Supported by This Printer 3 Paper Recommendations 8 Loading Paper...8 Storing Paper ...8 Types of Paper and Other Media 9 Paper not supported by this printer 11 Print Area ...12 Loading Paper ...13 Loading Paper in Tray 1 and ...
... Friction Pad 44 Cleaning the Paper Feed Roller 45 Cleaning the Registration Roller 47 4. Replacing Consumables and Maintenance Kit Replacing the Toner Cartridge 29 Replacing the Maintenance Kit 32 Before Replacing...32 Replacing the Friction Pad 33 Replacing the Transfer Roller 35 Replacing the... Unit 39 3. Paper and Other Media Paper and Other Media Supported by This Printer 3 Paper Recommendations 8 Loading Paper...8 Storing Paper ...8 Types of Paper and Other Media 9 Paper not supported by this printer 11 Print Area ...12 Loading Paper ...13 Loading Paper in Tray 1 and ...

Maintenance Manual
Page 4
Removing Misfed Paper Removing Misfed Paper 69 When "Remove Misfeed Paper Tray" Appears 70 When "Remove Misfeed Internal Path" Appears 71 When "Remove Misfeed Paper Exit Cover" Appears 73 When "Remove Misfeed Duplex Unit" Appears 76 7. Appendix Moving and Transporting the Printer 79 Moving the Printer ...80 Consumables ...81 Toner Cartridge ...81 Maintenance Kit ...82 Specifications...83 Mainframe ...83 Options ...86 INDEX...89 ii 6.
Removing Misfed Paper Removing Misfed Paper 69 When "Remove Misfeed Paper Tray" Appears 70 When "Remove Misfeed Internal Path" Appears 71 When "Remove Misfeed Paper Exit Cover" Appears 73 When "Remove Misfeed Duplex Unit" Appears 76 7. Appendix Moving and Transporting the Printer 79 Moving the Printer ...80 Consumables ...81 Toner Cartridge ...81 Maintenance Kit ...82 Specifications...83 Mainframe ...83 Options ...86 INDEX...89 ii 6.
Maintenance Manual
Page 33
... according to an open flame. R CAUTION: • If toner or used toner. lowed, dilute by drinking a large amount of water. Replacing Consumables and Maintenance Kit Replacing the Toner Cartridge R WARNING: • Do not incinerate spilled toner or used toner is exposed to light for a long time. If your clothing...; Disposal should take place at an authorized dealer or an appropriate collection site. • If you dispose of the used toner gets into the fabric and may make removing the stain impossible. Consult a doctor if necessary. • If your skin comes into contact ...
... according to an open flame. R CAUTION: • If toner or used toner. lowed, dilute by drinking a large amount of water. Replacing Consumables and Maintenance Kit Replacing the Toner Cartridge R WARNING: • Do not incinerate spilled toner or used toner is exposed to light for a long time. If your clothing...; Disposal should take place at an authorized dealer or an appropriate collection site. • If you dispose of the used toner gets into the fabric and may make removing the stain impossible. Consult a doctor if necessary. • If your skin comes into contact ...
Maintenance Manual
Page 34
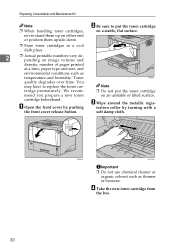
tration roller by pushing C Wipe around the metallic regis- B Be sure to replace the toner car- You may have to put the toner cartridge mend you prepare a new toner on an unstable or tilted surface. cartridge beforehand. AGN020S ZKGX461E Important ❒ Do not use ... Open the front cover by turning with a the front cover release button. Toner AGN022S quality degrades over time. We recom- ❒ Do not put the toner cartridge on a stable, flat surface. ❒ Store toner cartridges in a cool dark place. 2 ❒ Actual printable numbers vary depending...
tration roller by pushing C Wipe around the metallic regis- B Be sure to replace the toner car- You may have to put the toner cartridge mend you prepare a new toner on an unstable or tilted surface. cartridge beforehand. AGN020S ZKGX461E Important ❒ Do not use ... Open the front cover by turning with a the front cover release button. Toner AGN022S quality degrades over time. We recom- ❒ Do not put the toner cartridge on a stable, flat surface. ❒ Store toner cartridges in a cool dark place. 2 ❒ Actual printable numbers vary depending...

Maintenance Manual
Page 35
... it again. For details, consult with the store where the printer was purchased or with the toner cartridge recycling program, whereby are collected used toner cartridges. Replacing the Toner Cartridge E Place the toner cartridge on paper surfaces, toner spillage, or printer failure. AGN023S 31 G Push down the toner cartridge to settle it in the illustration. pletely before installing...
... it again. For details, consult with the store where the printer was purchased or with the toner cartridge recycling program, whereby are collected used toner cartridges. Replacing the Toner Cartridge E Place the toner cartridge on paper surfaces, toner spillage, or printer failure. AGN023S 31 G Push down the toner cartridge to settle it in the illustration. pletely before installing...

Maintenance Manual
Page 39
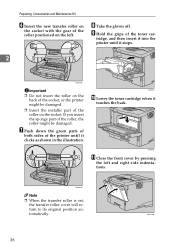
ZKGM200E E Hold the green parts of the printer, while lifting the front side. tridge on both sides, and then remove the roller from the transfer roller, wear the gloves included in the illustration. ... Transfer Roller A Open the front cover by pushing the front cover release button. D Hold the lock levers (" " parts), and then pull them. 2 AGN020S B Pull the toner cartridge out of the roller on the level place. ZKGM210E AGN022S Note ❒ Be sure to place the used car- C To avoid making your hands...
ZKGM200E E Hold the green parts of the printer, while lifting the front side. tridge on both sides, and then remove the roller from the transfer roller, wear the gloves included in the illustration. ... Transfer Roller A Open the front cover by pushing the front cover release button. D Hold the lock levers (" " parts), and then pull them. 2 AGN020S B Pull the toner cartridge out of the roller on the level place. ZKGM210E AGN022S Note ❒ Be sure to place the used car- C To avoid making your hands...
Maintenance Manual
Page 40
AGN023S J Lower the toner cartridge when it stops. 2 ZKGM220E Important ❒ Do not insert the roller on the back of the socket, or the printer might be damaged. ❒ Insert the metallic part of the roller on the socket. AGN024S K Close the front cover by pressing the left . ... Replacing Consumables and Maintenance Kit F Insert the new transfer roller on the socket with the gear of the toner car- I Hold the grips of the roller positioned on the left and right side indentations. tridge, and then insert it into the printer until it clicks as shown in the illustration.
AGN023S J Lower the toner cartridge when it stops. 2 ZKGM220E Important ❒ Do not insert the roller on the back of the socket, or the printer might be damaged. ❒ Insert the metallic part of the roller on the socket. AGN024S K Close the front cover by pressing the left . ... Replacing Consumables and Maintenance Kit F Insert the new transfer roller on the socket with the gear of the toner car- I Hold the grips of the roller positioned on the left and right side indentations. tridge, and then insert it into the printer until it clicks as shown in the illustration.
Maintenance Manual
Page 41
...tilted surface. lessly or dropping it may cause the toner to the edge of re- Moving the printer facing up on the paper tray. AGN017S A For the paper tray B For the paper feed unit ZKGM120E 37 Note ❒ If the printer is in- C Slide the green lock lever ...on the optional paper feed unit by following are installing. stalled, uninstall them from the one on down may cause injury. zontally. Otherwise the printer could break or cause injury if dropped. R CAUTION: • Lifting the paper feed unit care- Important ❒ The following the procedures ...
...tilted surface. lessly or dropping it may cause the toner to the edge of re- Moving the printer facing up on the paper tray. AGN017S A For the paper tray B For the paper feed unit ZKGM120E 37 Note ❒ If the printer is in- C Slide the green lock lever ...on the optional paper feed unit by following are installing. stalled, uninstall them from the one on down may cause injury. zontally. Otherwise the printer could break or cause injury if dropped. R CAUTION: • Lifting the paper feed unit care- Important ❒ The following the procedures ...

Maintenance Manual
Page 51
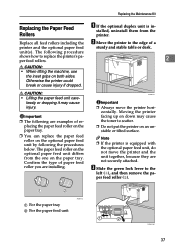
...30 minutes before cleaning the registra- A Turn off the power and wait for the printer to cool down or stand it vertically. ❒ Do not put the toner cartridge on printed OHP transparencies. In this printer be- B Open the front cover by turning with a soft damp cloth. plug.... comes very hot. ZKGX461E Important AGN020S ❒ Do not use chemical cleaner or organic solvent such as follows: C Pull the toner cartridge out of the printer by specks of this case, clean the roller as thinner or benzene. 47 R CAUTION: • The inside of paper stuck ...
...30 minutes before cleaning the registra- A Turn off the power and wait for the printer to cool down or stand it vertically. ❒ Do not put the toner cartridge on printed OHP transparencies. In this printer be- B Open the front cover by turning with a soft damp cloth. plug.... comes very hot. ZKGX461E Important AGN020S ❒ Do not use chemical cleaner or organic solvent such as follows: C Pull the toner cartridge out of the printer by specks of this case, clean the roller as thinner or benzene. 47 R CAUTION: • The inside of paper stuck ...


