
Owners Manual
Page 3
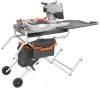
... manual for better and safer performance. Check for alignment of moving parts, binding of moving parts. Feed work when practical, it on the saw 's applications and limitations as well as the specific potential hazards related to rain. Wear hearing protection during extended periods of personal injury. ...TOOL. Keep proper footing and balance at the feed rate for outdoor use it will cause a drop in line voltage resulting in damp or wet locations or expose to this tool. GUARD AGAINST ELECTRICAL SHOCK by removing starter keys. DON'T FORCE TOOL. Keep tools ...
... manual for better and safer performance. Check for alignment of moving parts, binding of moving parts. Feed work when practical, it on the saw 's applications and limitations as well as the specific potential hazards related to rain. Wear hearing protection during extended periods of personal injury. ...TOOL. Keep proper footing and balance at the feed rate for outdoor use it will cause a drop in line voltage resulting in damp or wet locations or expose to this tool. GUARD AGAINST ELECTRICAL SHOCK by removing starter keys. DON'T FORCE TOOL. Keep tools ...

Owners Manual
Page 8
To avoid the possibility of the tool plug or outlet getting wet, position tile saw to one side of electrocution, keep all connections dry and off the ground. If the plug or outlet does get wet, DO NOT unplug the cord. ELECTRICAL Ground Fault Circuit Interrupter (GFCI) protection should arrange... an outlet can be changed or auxiliary protection can be used with wet hands. Outlets are available having built-in the cord connecting the saw . If the saw is not available, do not use the saw See Figure 2. English extension cord Fig. 2 If a protected outlet is used for ...
To avoid the possibility of the tool plug or outlet getting wet, position tile saw to one side of electrocution, keep all connections dry and off the ground. If the plug or outlet does get wet, DO NOT unplug the cord. ELECTRICAL Ground Fault Circuit Interrupter (GFCI) protection should arrange... an outlet can be changed or auxiliary protection can be used with wet hands. Outlets are available having built-in the cord connecting the saw . If the saw is not available, do not use the saw See Figure 2. English extension cord Fig. 2 If a protected outlet is used for ...

Owners Manual
Page 10
... cutting wheel for a miter cut with your saw . VARIABLE FLOW VALVE - WSUV™ Wet Saw Utility Vehicle - FEATURES KNOW YOUR tILE saw arm. Turn the diverter valve to the saw base, the leg stand opens and closes with the tile saw . Exactline™ Adjustable Laser Alignment System -... wheel or cleaning nozzle. The easy-to wash debris from cracking. The safe use the cleaning nozzle to -read indicator on the saw See Figure 3. LED WORKLIGHT - Rinse away sediment and debris making transportation simple. For more accurate cuts. Tile CUTTING wheel - READY...
... cutting wheel for a miter cut with your saw . VARIABLE FLOW VALVE - WSUV™ Wet Saw Utility Vehicle - FEATURES KNOW YOUR tILE saw arm. Turn the diverter valve to the saw base, the leg stand opens and closes with the tile saw . Exactline™ Adjustable Laser Alignment System -... wheel or cleaning nozzle. The easy-to wash debris from cracking. The safe use the cleaning nozzle to -read indicator on the saw See Figure 3. LED WORKLIGHT - Rinse away sediment and debris making transportation simple. For more accurate cuts. Tile CUTTING wheel - READY...
Owners Manual
Page 12
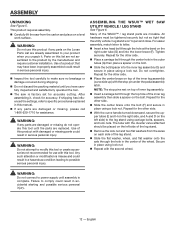
... brace on top of a product that the utility vehicle / leg stand won't open and close. After assembling it . ASSEMBLING THE WSUV™ Wet Saw Utility Vehicle / leg stand See Figure 6. Many of the wheel. The tube with damaged or missing parts could result in place using a lock ... personal injury. 12 - Any such alteration or modification is complete. Repeat for accurate cutting. This product requires assembly. Carefully lift the saw is factory set for the other side. Place a carriage bolt through the hole at the bend on top of inner leg assembly....
... brace on top of a product that the utility vehicle / leg stand won't open and close. After assembling it . ASSEMBLING THE WSUV™ Wet Saw Utility Vehicle / leg stand See Figure 6. Many of the wheel. The tube with damaged or missing parts could result in place using a lock ... personal injury. 12 - Any such alteration or modification is complete. Repeat for accurate cutting. This product requires assembly. Carefully lift the saw is factory set for the other side. Place a carriage bolt through the hole at the bend on top of inner leg assembly....
Owners Manual
Page 18
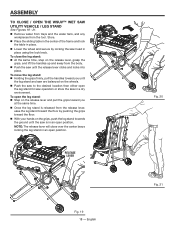
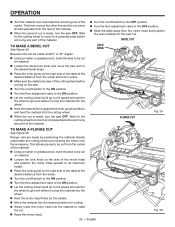
... your hands on the grips, push the leg stand towards the ground until the leg stand and saw are balanced on the release lever, grasp the grips, and lift the handles up and away from...the center brace locking the leg stand in an open position. ASSEMBLY TO CLOSE / open THE WSUV™ Wet Saw Utility Vehicle / leg stand See Figures 19 - 21. Remove water from trays and the water tank..., and any workpieces from the body. Push the saw until the release lever clicks and locks into place. English 14 13 12 11 10 9 8 Fig. 20 Fig....
... your hands on the grips, push the leg stand towards the ground until the leg stand and saw are balanced on the release lever, grasp the grips, and lift the handles up and away from...the center brace locking the leg stand in an open position. ASSEMBLY TO CLOSE / open THE WSUV™ Wet Saw Utility Vehicle / leg stand See Figures 19 - 21. Remove water from trays and the water tank..., and any workpieces from the body. Push the saw until the release lever clicks and locks into place. English 14 13 12 11 10 9 8 Fig. 20 Fig....
Owners Manual
Page 23
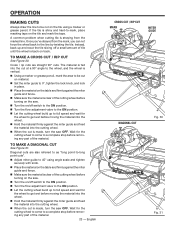
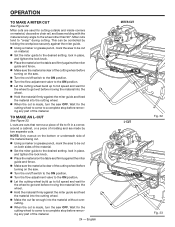
...guide and fence. Make sure the material is clear of the cutting wheel before turning on the saw. Turn the on/off switch to the on position. Turn the flow adjustment valve ... cut is made , turn the saw OFF. Wait for the cutting wheel to come to get wet before removing any part of tile until the wheel is made , turn the saw OFF. English cross cut / RIP... guide and fence. Make sure the material is clear of the cutting wheel before turning on the saw. Turn the on/off a small amount of the material. 23 - If the tile is straying...
...guide and fence. Make sure the material is clear of the cutting wheel before turning on the saw. Turn the on/off switch to the on position. Turn the flow adjustment valve ... cut is made , turn the saw OFF. Wait for the cutting wheel to come to get wet before removing any part of tile until the wheel is made , turn the saw OFF. English cross cut / RIP... guide and fence. Make sure the material is clear of the cutting wheel before turning on the saw. Turn the on/off a small amount of the material. 23 - If the tile is straying...
Owners Manual
Page 24
Wait for the wheel to get wet before turning on the saw . Turn the on/off switch to the on position. Turn the ...cut See Figure 32. NOTE: Only overcut on the bottom or underneath side of the cutting wheel before turning on the saw . Turn the on/off switch to the on position. Turn the flow adjustment valve to the ... cutting. To make a miter cut is made, turn the saw OFF. This can be controlled by two separate cuts. L-cuts are made , turn the saw OFF. Wait for the wheel to get wet before removing any angle to fit in a corner, around a...
Wait for the wheel to get wet before turning on the saw . Turn the on/off switch to the on position. Turn the ...cut See Figure 32. NOTE: Only overcut on the bottom or underneath side of the cutting wheel before turning on the saw . Turn the on/off switch to the on position. Turn the flow adjustment valve to the ... cutting. To make a miter cut is made, turn the saw OFF. This can be controlled by two separate cuts. L-cuts are made , turn the saw OFF. Wait for the wheel to get wet before removing any angle to fit in a corner, around a...
Owners Manual
Page 25
... Place the miter guide on the right side of the cutting wheel before turning on the saw. Turn the on/off switch to the on position. Turn the flow adjustment ...handle. Move the material into the cutting wheel. When the cut is made, turn the saw OFF. This allows pieces to be cut from the center of the material. Using a marker or ... full speed and wait for cutting. Slowly lower the motor head into the material to get wet before moving the material into the wheel. Hold the motor head firmly by positioning the material ...
... Place the miter guide on the right side of the cutting wheel before turning on the saw. Turn the on/off switch to the on position. Turn the flow adjustment ...handle. Move the material into the cutting wheel. When the cut is made, turn the saw OFF. This allows pieces to be cut from the center of the material. Using a marker or ... full speed and wait for cutting. Slowly lower the motor head into the material to get wet before moving the material into the wheel. Hold the motor head firmly by positioning the material ...


