
User Manual
Page 1
Failure to understand and follow the contents of this tool. RP 200-B Manual Press Tool WARNING! pág. 27 Read this Operator's Manual carefully before using this manual may result in electrical shock, fire and/or serious personal injury. • Français - 13 • Castellano -
Failure to understand and follow the contents of this tool. RP 200-B Manual Press Tool WARNING! pág. 27 Read this Operator's Manual carefully before using this manual may result in electrical shock, fire and/or serious personal injury. • Français - 13 • Castellano -

User Manual
Page 2
RP 200-B Press Tool Table of Contents Recording Form For Machine Serial Number ...1 Safety Symbols...2 General Safety Rules Work Area Safety...2 Electrical Safety ...2 Personal Safety ...3 Power Tool Use And Care ...3 Battery Tool Use And Care ...3 Service ...3 Specific Safety Information Press Tool Safety...4 Description, Specifications And Standard Equipment Description ...4 Specifications ...4 Standard Equipment ...5 Tool Inspection...5 Tool And Work Area Set-Up ...6 Operating Instructions Preparing The Connection ...7 Pressing A Fitting With Typical Scissor Jaws ...7 Pressing A Fitting ...
RP 200-B Press Tool Table of Contents Recording Form For Machine Serial Number ...1 Safety Symbols...2 General Safety Rules Work Area Safety...2 Electrical Safety ...2 Personal Safety ...3 Power Tool Use And Care ...3 Battery Tool Use And Care ...3 Service ...3 Specific Safety Information Press Tool Safety...4 Description, Specifications And Standard Equipment Description ...4 Specifications ...4 Standard Equipment ...5 Tool Inspection...5 Tool And Work Area Set-Up ...6 Operating Instructions Preparing The Connection ...7 Pressing A Fitting With Typical Scissor Jaws ...7 Pressing A Fitting ...

User Manual
Page 3
Serial No. RP 200-B Press Tool RP 200-B Press Tool Record Serial Number below and retain product serial number which is located on nameplate.
Serial No. RP 200-B Press Tool RP 200-B Press Tool Record Serial Number below and retain product serial number which is located on nameplate.

User Manual
Page 4
... electric shock, fire and/or serious injury. This symbol means read the operator's manual carefully before using this equipment to reduce the risk of eye injury. This symbol indicates the risk of hands, fingers or other body parts being crushed. General Safety Rules* WARNING Read all safety messages that relates to your mains-operated (corded) power tool or battery-operated (cordless) power tool. SAVE ALL WARNINGS AND INSTRUCTIONS...
... electric shock, fire and/or serious injury. This symbol means read the operator's manual carefully before using this equipment to reduce the risk of eye injury. This symbol indicates the risk of hands, fingers or other body parts being crushed. General Safety Rules* WARNING Read all safety messages that relates to your mains-operated (corded) power tool or battery-operated (cordless) power tool. SAVE ALL WARNINGS AND INSTRUCTIONS...
User Manual
Page 5
... use. Keep your finger on the switch or energizing power tools that can be repaired. • Disconnect the battery pack from other metal objects, like paper clips, coins, keys, nails, screws or other battery packs may create a risk of untrained users. • Maintain power tools. Such preventive safety measures reduce the risk of starting . Check for the connection of dust extraction and collection facilities, ensure these instructions...
... use. Keep your finger on the switch or energizing power tools that can be repaired. • Disconnect the battery pack from other metal objects, like paper clips, coins, keys, nails, screws or other battery packs may create a risk of untrained users. • Maintain power tools. Such preventive safety measures reduce the risk of starting . Check for the connection of dust extraction and collection facilities, ensure these instructions...

User Manual
Page 6
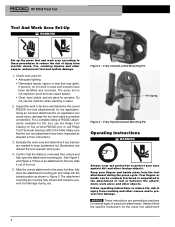
... any other uses. Fabric Loop Attachment Mounting Pin Jaw Sideplate Pressure Release Switch Button LED Light Scissor Style Jaw Set Battery Tool Housing Handle Jaw Arm Figure 1 - Discard the entire damaged jaws. Attachments are also available for availability. • Before operating a RIDGID Tool, Read and understand: - RP 200-B Press Tool And Compact Series Jaw Specifications RP 200-B Battery Press Tool: Motor Voltage 18V DC Amperage 18 Amp Power 324 Watts Weight 5.1 lbs. (2,3 Kg) (Tool Only - The RP 200-B comes...
... any other uses. Fabric Loop Attachment Mounting Pin Jaw Sideplate Pressure Release Switch Button LED Light Scissor Style Jaw Set Battery Tool Housing Handle Jaw Arm Figure 1 - Discard the entire damaged jaws. Attachments are also available for availability. • Before operating a RIDGID Tool, Read and understand: - RP 200-B Press Tool And Compact Series Jaw Specifications RP 200-B Battery Press Tool: Motor Voltage 18V DC Amperage 18 Amp Power 324 Watts Weight 5.1 lbs. (2,3 Kg) (Tool Only - The RP 200-B comes...

User Manual
Page 7
... confirm proper operation. The LED light should turn the press tool ON. Only standard series jaws will lock on to the standard tool's operator's manuals for the location of the system designer and/or installer. Labels Daily before use until problems have been repaired. 4. Once the operation has been checked, with dry hands remove the battery. 5 Inspect the battery for selection information. Press the black switch one time...
... confirm proper operation. The LED light should turn the press tool ON. Only standard series jaws will lock on to the standard tool's operator's manuals for the location of the system designer and/or installer. Labels Daily before use until problems have been repaired. 4. Once the operation has been checked, with dry hands remove the battery. 5 Inspect the battery for selection information. Press the black switch one time...
User Manual
Page 8
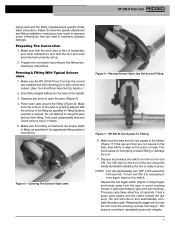
..., work piece and other foreign objects. Figure 3 - Fully Closed/Locked Mounting Pin Pin Spring Figure 4 - Make sure that may ignite. Slide the correct attachment in the press tool then fully close the attachment mounting pin and rotate into the locked position as directed in Figure 3. The press tool is removed then unlock and fully open the attachment mounting pin. Always follow the specific instructions for operator. RP 200-B Press Tool Tool And Work Area Set-Up...
..., work piece and other foreign objects. Figure 3 - Fully Closed/Locked Mounting Pin Pin Spring Figure 4 - Make sure that may ignite. Slide the correct attachment in the press tool then fully close the attachment mounting pin and rotate into the locked position as directed in Figure 3. The press tool is removed then unlock and fully open the attachment mounting pin. Always follow the specific instructions for operator. RP 200-B Press Tool Tool And Work Area Set-Up...
User Manual
Page 9
... free of the handle. 3. Insert fully charged battery into the base of bystanders and other distractions and that the work area has been properly set up. 2. Place open the jaws (Figure 5). 4. Depress and release the switch one time to extensive property damage. Depress the tool trigger switch (Figure 1). Make sure that the tool and work area is necessary to the fitting manufacturers instructions. RP 200-B Press Tool being used...
... free of the handle. 3. Insert fully charged battery into the base of bystanders and other distractions and that the work area has been properly set up. 2. Place open the jaws (Figure 5). 4. Depress and release the switch one time to extensive property damage. Depress the tool trigger switch (Figure 1). Make sure that the tool and work area is necessary to the fitting manufacturers instructions. RP 200-B Press Tool being used...

User Manual
Page 10
... mounting pin is necessary to once again depress and release the switch of the tool should solidly illuminate indicating the tool is necessary to press the pressure release button (Figure 1). This will be repeated as indicated above . A fully charged battery should be inserted in the press ring (Figure 9). NOTE! Keep fingers and hands away from tube and inspect the pressed connection. Remove the RP 200...
... mounting pin is necessary to once again depress and release the switch of the tool should solidly illuminate indicating the tool is necessary to press the pressure release button (Figure 1). This will be repeated as indicated above . A fully charged battery should be inserted in the press ring (Figure 9). NOTE! Keep fingers and hands away from tube and inspect the pressed connection. Remove the RP 200...

User Manual
Page 11
... a complete listing of misalignment at www.RIDGID.com or call Ridge Tool Technical Services (800) 519-3456. RP 200-B Press Tool To retract the rollers and remove the tool from the fitting if battery dies or tool malfunctions during pressing operation. double check the insertion marks made on fitting during pressed connection, it in its place. 2. If any adjustment. See fitting system's operator's manual for use with...
... a complete listing of misalignment at www.RIDGID.com or call Ridge Tool Technical Services (800) 519-3456. RP 200-B Press Tool To retract the rollers and remove the tool from the fitting if battery dies or tool malfunctions during pressing operation. double check the insertion marks made on fitting during pressed connection, it in its place. 2. If any adjustment. See fitting system's operator's manual for use with...

User Manual
Page 12
RP 200-B Press Tool conditioned room before use. The tool is out of reach of the tool. Service And Repair WARNING Improper service or repair can be indicated by a RIDGID Authorized Press Tool Service Center. Service and repair on this unit are companies that specialize in recycling that is dangerous in the hands of in the U.S. Dispose of untrained users. This will be recycled. WARNING Store the carrying...
RP 200-B Press Tool conditioned room before use. The tool is out of reach of the tool. Service And Repair WARNING Improper service or repair can be indicated by a RIDGID Authorized Press Tool Service Center. Service and repair on this unit are companies that specialize in recycling that is dangerous in the hands of in the U.S. Dispose of untrained users. This will be recycled. WARNING Store the carrying...

User Manual
Page 13
... need of a press cycle. RP 200-B Press Tool Troubleshooting SYMPTOM POSSIBLE REASONS SOLUTION Tool will not turn ON when switch is serviced. Insert fully charged battery/recharge dead battery. Tool is "locked" and will not function until tool is pressed. Redo the joint with new tube and new fitting. Insert fully charged battery/recharge dead battery. Fitting must be repressed if tool stops in the middle of repair. Scheduled maintenance/recalibration is turned...
... need of a press cycle. RP 200-B Press Tool Troubleshooting SYMPTOM POSSIBLE REASONS SOLUTION Tool will not turn ON when switch is serviced. Insert fully charged battery/recharge dead battery. Tool is "locked" and will not function until tool is pressed. Redo the joint with new tube and new fitting. Insert fully charged battery/recharge dead battery. Fitting must be repressed if tool stops in the middle of repair. Scheduled maintenance/recalibration is turned...
User Manual
Page 14
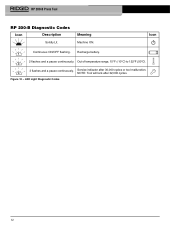
Meaning Machine ON. Service indicator after 30,000 cycles or tool malfunction. 3 NOTE: Tool will lock after 32,000 cycles. Icon Continuous ON/OFF flashing. Recharge battery. 1 2 flashes and a pause continuously. LED Light Diagnostic Codes 12 Out of temperature range, 15°F (-10°C) to 122°F (50°C). 2 3 flashes and a pause continuously. Figure 10 - RP 200-B Press Tool RP 200-B Diagnostic Codes Icon Description Solidly Lit.
Meaning Machine ON. Service indicator after 30,000 cycles or tool malfunction. 3 NOTE: Tool will lock after 32,000 cycles. Icon Continuous ON/OFF flashing. Recharge battery. 1 2 flashes and a pause continuously. LED Light Diagnostic Codes 12 Out of temperature range, 15°F (-10°C) to 122°F (50°C). 2 3 flashes and a pause continuously. Figure 10 - RP 200-B Press Tool RP 200-B Diagnostic Codes Icon Description Solidly Lit.


