
User Guide
Page 3
Contents Chapter 1 Welcome 1 What's in the box 1 Overview 2 Player inputs 2 Remote control 3 Inserting the batteries in the remote control 4 Chapter 2 Connecting Your Player 5 Connecting your player to your TV 5 Viewing HD video 6 Video connections 7 Audio connections 9 Connecting your player to your home network 11 Connecting your player to a power source 12 Chapter 3 Setting Up Your Player 13 Accessing your player 13 Selecting your network type 14 • • • • iii • •
Contents Chapter 1 Welcome 1 What's in the box 1 Overview 2 Player inputs 2 Remote control 3 Inserting the batteries in the remote control 4 Chapter 2 Connecting Your Player 5 Connecting your player to your TV 5 Viewing HD video 6 Video connections 7 Audio connections 9 Connecting your player to your home network 11 Connecting your player to a power source 12 Chapter 3 Setting Up Your Player 13 Accessing your player 13 Selecting your network type 14 • • • • iii • •

User Guide
Page 6
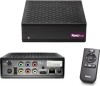
Overview Before you set up your player, get familiar with the inputs on the player and the buttons on the remote control. Player inputs Status light IR receiver Optical audio Component video Power • • 2 • • • • Chapter 1 S-Video Reset button Composite Audio video HDMI Ethernet
Overview Before you set up your player, get familiar with the inputs on the player and the buttons on the remote control. Player inputs Status light IR receiver Optical audio Component video Power • • 2 • • • • Chapter 1 S-Video Reset button Composite Audio video HDMI Ethernet

User Guide
Page 8
... on the back, press the button and then slide the top panel upward to open the remote. • If your remote doesn't have a battery door release button, just slide the top panel upward to open the remote. 2 Insert 2 AAA batteries (included) into the battery compartment. 3 Align the top edge ...of the battery door with the notches near the top of the remote, and then slide the battery door onto the back of the remote control until it clicks into place. Notches • • 4 • • • • Chapter 1 Battery...
... on the back, press the button and then slide the top panel upward to open the remote. • If your remote doesn't have a battery door release button, just slide the top panel upward to open the remote. 2 Insert 2 AAA batteries (included) into the battery compartment. 3 Align the top edge ...of the battery door with the notches near the top of the remote, and then slide the battery door onto the back of the remote control until it clicks into place. Notches • • 4 • • • • Chapter 1 Battery...

User Guide
Page 17
...wireless network connection (if applicable). Chapter 3 Setting Up Your Player After you connect your player, as described in the previous chapter, you see the Roku logo followed by the Welcome screen. 2 When the Welcome screen appears, point your remote at your player, and press select . • • •... • 13 • • You simply access your player through your TV. 1 Turn on...
...wireless network connection (if applicable). Chapter 3 Setting Up Your Player After you connect your player, as described in the previous chapter, you see the Roku logo followed by the Welcome screen. 2 When the Welcome screen appears, point your remote at your player, and press select . • • •... • 13 • • You simply access your player through your TV. 1 Turn on...
User Guide
Page 18
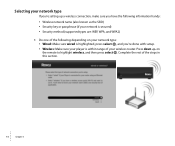
...; • Chapter 3 Selecting your network type If you're setting up a wireless connection, make sure you 're done with setup. • Wireless: Make sure your player is within range of your network is highlighted, press select , and you have the following depending on the...
...; • Chapter 3 Selecting your network type If you're setting up a wireless connection, make sure you 're done with setup. • Wireless: Make sure your player is within range of your network is highlighted, press select , and you have the following depending on the...
User Guide
Page 19
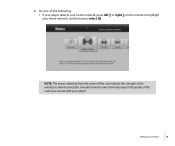
NOTE: The waves radiating from the center of the icon indicate the strength of the wireless network connection. A weak network connection may impact the quality of the video you receive with your home network, and then press select . 2 Do one of the following: • If your player detects your home network, press left or right on the remote to highlight your player. • • Setting Up Your Player • • 15 • •
NOTE: The waves radiating from the center of the icon indicate the strength of the wireless network connection. A weak network connection may impact the quality of the video you receive with your home network, and then press select . 2 Do one of the following: • If your player detects your home network, press left or right on the remote to highlight your player. • • Setting Up Your Player • • 15 • •

User Guide
Page 20
... entering your network doesn't broadcast its name (also known as the SSID), press left or right on the remote to highlight not shown, and then press select . • If your player doesn't detect your network and your network broadcasts its name (it has a hidden SSID), press left or right... on the remote to highlight not shown, and then press select . Make sure your player is within range of your wireless router, highlight scan again, and then press select . • If your network's...
... entering your network doesn't broadcast its name (also known as the SSID), press left or right on the remote to highlight not shown, and then press select . • If your player doesn't detect your network and your network broadcasts its name (it has a hidden SSID), press left or right... on the remote to highlight not shown, and then press select . Make sure your player is within range of your wireless router, highlight scan again, and then press select . • If your network's...

User Guide
Page 21
Repeat this process to enter the rest of the characters in the box at the top of the key or passphrase and then press select to enter it in the key or passphrase. 4 After you enter the security key or passphrase, press down to highlight the first character of the screen. 3 If your network requires a security key or passphrase, use the remote to highlight done, and then press select . • • Setting Up Your Player • • 17 • •
Repeat this process to enter the rest of the characters in the box at the top of the key or passphrase and then press select to enter it in the key or passphrase. 4 After you enter the security key or passphrase, press down to highlight the first character of the screen. 3 If your network requires a security key or passphrase, use the remote to highlight done, and then press select . • • Setting Up Your Player • • 17 • •

User Guide
Page 23
If you need help setting up an account for a channel, go to select a channel. NOTE: Some channels require account setup the first time you 're ready to www.roku.com/support. • • • • 19 • • You'll be amazed at how quick and easy it is! Chapter 4 Using Your Player After you setup your TV. You can then use your player's remote to select and watch videos on your player, you access the channel.
If you need help setting up an account for a channel, go to select a channel. NOTE: Some channels require account setup the first time you 're ready to www.roku.com/support. • • • • 19 • • You'll be amazed at how quick and easy it is! Chapter 4 Using Your Player After you setup your TV. You can then use your player's remote to select and watch videos on your player, you access the channel.

User Guide
Page 24
...; Press select to view details for the selected video, and then press up or down to choose any of the menu items. 6 Press up your player you want to watch, and then press select . 4 Press left or right to highlight the channel you can browse and watch on your TV After... you set up to return to the video list for a specific channel, go to www.roku.com/support. 1 Turn on your TV, and if necessary, select the input on your TV that displays the player. 2 On the player remote, press home . • • 20 • • • • Chapter 4 3 Press left or right to...
...; Press select to view details for the selected video, and then press up or down to choose any of the menu items. 6 Press up your player you want to watch, and then press select . 4 Press left or right to highlight the channel you can browse and watch on your TV After... you set up to return to the video list for a specific channel, go to www.roku.com/support. 1 Turn on your TV, and if necessary, select the input on your TV that displays the player. 2 On the player remote, press home . • • 20 • • • • Chapter 4 3 Press left or right to...
User Guide
Page 25
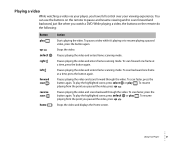
... backward through the video. Stops the video and displays the Home screen. • • Using Your Player • • 21 • • While playing a video, the buttons on the remote to pause and resume viewing and to resume playing a paused video, press the button again. Stops the video... again. Playing a video While watching a video via your viewing experience. To resume playing from the point you have full control over your player, you paused the video, press up . To scan backward one frame at a time, press the button again. You can use the buttons on...
... backward through the video. Stops the video and displays the Home screen. • • Using Your Player • • 21 • • While playing a video, the buttons on the remote to pause and resume viewing and to resume playing a paused video, press the button again. Stops the video... again. Playing a video While watching a video via your viewing experience. To resume playing from the point you have full control over your player, you paused the video, press up . To scan backward one frame at a time, press the button again. You can use the buttons on...
User Guide
Page 30
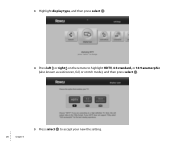
3 Highlight display type, and then press select . 4 Press left or right on the remote to highlight HDTV, 4:3 standard, or 16:9 anamorphic (also known as widescreen, full, or stretch mode), and then press select . • • 26 • • • • Chapter 5 5 Press select to accept your new the setting.
3 Highlight display type, and then press select . 4 Press left or right on the remote to highlight HDTV, 4:3 standard, or 16:9 anamorphic (also known as widescreen, full, or stretch mode), and then press select . • • 26 • • • • Chapter 5 5 Press select to accept your new the setting.

User Guide
Page 42
Repeat this process to highlight done, and then press select . 2 Highlight enter wireless network name (SSID) manually, and then press select . 3 Use the remote to highlight the first character of the network name, and then press select to enter it in the network name. • • 38 • • • • Chapter 6 4 After you enter the network name, press down to enter the rest of the characters in the box at the top of the screen.
Repeat this process to highlight done, and then press select . 2 Highlight enter wireless network name (SSID) manually, and then press select . 3 Use the remote to highlight the first character of the network name, and then press select to enter it in the network name. • • 38 • • • • Chapter 6 4 After you enter the network name, press down to enter the rest of the characters in the box at the top of the screen.
