

Operation Manual
Page 1
... are assembling parts, making any solvents to follow all charging instructions and do so could cause serious personal injury. Always remove battery pack before making adjustments, cleaning, or when not in personal Save these instructions also. Never use a battery pack or charger that has been damaged. Do not expose a battery pack or appliance to zero once the full charge has...
... are assembling parts, making any solvents to follow all charging instructions and do so could cause serious personal injury. Always remove battery pack before making adjustments, cleaning, or when not in personal Save these instructions also. Never use a battery pack or charger that has been damaged. Do not expose a battery pack or appliance to zero once the full charge has...
Operation Manual 1
Page 7
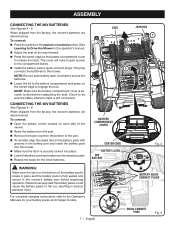
... edge to the Operator's Manuals for the other batteries. When shipped from the factory, the mower's batteries are disconnected. When shipped from the factory, the mower's batteries are disconnected. SEAT 2 3 BATTERY COMPARTMENT COVER CENTER EDGE BATTERY LATCH 80V BATTERY TAB JOYSTICK 1 Fig. 4 BATTERY QUICKCONNECT PLUGS 7 - For complete charging instructions, refer to engage the lock. The cover will raise to gain access to the mower. Check to Drive the Mower in serious personal...
... edge to the Operator's Manuals for the other batteries. When shipped from the factory, the mower's batteries are disconnected. When shipped from the factory, the mower's batteries are disconnected. SEAT 2 3 BATTERY COMPARTMENT COVER CENTER EDGE BATTERY LATCH 80V BATTERY TAB JOYSTICK 1 Fig. 4 BATTERY QUICKCONNECT PLUGS 7 - For complete charging instructions, refer to engage the lock. The cover will raise to gain access to the mower. Check to Drive the Mower in serious personal...
Operation Manual 1
Page 8
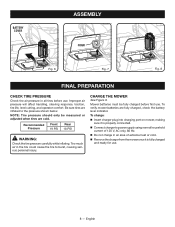
... use. Mower batteries must be measured or adjusted when tires are inflated to the pressure shown below. BATTERY COVER ASSEMBLY FOAM Fig. 6 Fig. 7 Fig. 8 FINAL PREPARATION CHECK TIRE PRESSURE Check the air pressure in an area of extreme heat or cold. Remove the charger from the mower once it is fully charged and ready for use. 8 - NOTE: Tire pressure should only be fully charged before use. To charge: Insert charger plug into charging...
... use. Mower batteries must be measured or adjusted when tires are inflated to the pressure shown below. BATTERY COVER ASSEMBLY FOAM Fig. 6 Fig. 7 Fig. 8 FINAL PREPARATION CHECK TIRE PRESSURE Check the air pressure in an area of extreme heat or cold. Remove the charger from the mower once it is fully charged and ready for use. 8 - NOTE: Tire pressure should only be fully charged before use. To charge: Insert charger plug into charging...
Operation Manual 1
Page 9
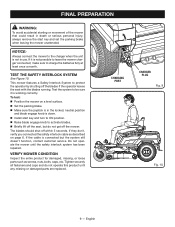
... remove the start key and turn to ON position. Raise blade engage knob to activate blades. Briefly lift off the seat, but the system still doesn't function, contact customer service. If they don't, verify you connected the safety interlock cable as screws, nuts, bolts, caps, etc. NOTICE: Always connect the mower to protect the operator by shutting off the blades if the operator leaves the seat...
... remove the start key and turn to ON position. Raise blade engage knob to activate blades. Briefly lift off the seat, but the system still doesn't function, contact customer service. If they don't, verify you connected the safety interlock cable as screws, nuts, bolts, caps, etc. NOTICE: Always connect the mower to protect the operator by shutting off the blades if the operator leaves the seat...
Quick Start Guide
Page 1
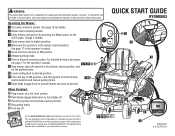
... product, call the RYOBI Help Line! See page 16 for reading and following the operator's manual. Charge if needed. 4 Raise mower deck to highest position. 6 9 11 5 5 Make sure the joystick is not a substitute for details. 2 Adjust seat to desired position. 3 Verify battery charge level by pressing the Mode button on -line. WARNING: This Quick Start Guide is in the locked, neutral position. 4 Set parking brake. 5 Turn key off. 1-800...
... product, call the RYOBI Help Line! See page 16 for reading and following the operator's manual. Charge if needed. 4 Raise mower deck to highest position. 6 9 11 5 5 Make sure the joystick is not a substitute for details. 2 Adjust seat to desired position. 3 Verify battery charge level by pressing the Mode button on -line. WARNING: This Quick Start Guide is in the locked, neutral position. 4 Set parking brake. 5 Turn key off. 1-800...

Operation Manual 2
Page 2
... children to the machine and the mowing activity. A moment of how the mower and controls operate. To prevent serious personal injury, damage to observe all times. READ ALL INSTRUCTIONS This cutting machine is located under the mower deck and inside the side discharge chute. stop and turn off blades, set parking brake, stop motor, and remove key before dismounting. Check brake operation before operating a riding lawn mower. • Use extreme care when approaching blind corners...
... children to the machine and the mowing activity. A moment of how the mower and controls operate. To prevent serious personal injury, damage to observe all times. READ ALL INSTRUCTIONS This cutting machine is located under the mower deck and inside the side discharge chute. stop and turn off blades, set parking brake, stop motor, and remove key before dismounting. Check brake operation before operating a riding lawn mower. • Use extreme care when approaching blind corners...

Operation Manual 2
Page 3
... discharge chute is greater than 15°. • Never attempt to ride on a steep slope or mow a slope that is a spring-loaded guard that the motor is bent, cracked, or damaged in any adjustments or repairs with the brake applied, and cause the mower to stop , and remove start key. • Thoroughly inspect the mower for any damage. • Replace the blade if it horizontally on a slope. Check...
... discharge chute is greater than 15°. • Never attempt to ride on a steep slope or mow a slope that is a spring-loaded guard that the motor is bent, cracked, or damaged in any adjustments or repairs with the brake applied, and cause the mower to stop , and remove start key. • Thoroughly inspect the mower for any damage. • Replace the blade if it horizontally on a slope. Check...

Operation Manual 2
Page 4
... mower blade. Disengage mower blades when not mowing. Service on the product and charger must be made when using your battery tool or when changing accessories. Transport the unit with and understand the instructions, and are unevenly worn or damaged in operating condition. Always look down and behind before and while backing. Slow down before cleaning the lawn mower or removing the mulch cover. 4 - These operators should start key...
... mower blade. Disengage mower blades when not mowing. Service on the product and charger must be made when using your battery tool or when changing accessories. Transport the unit with and understand the instructions, and are unevenly worn or damaged in operating condition. Always look down and behind before and while backing. Slow down before cleaning the lawn mower or removing the mulch cover. 4 - These operators should start key...

Operation Manual 2
Page 12
... - AUTO STOP PLUG The auto stop the cutting blades. See the Maintenance section for specific charging requirements. DECK HEIGHT ADJUSTMENT LEVER The deck height adjustment lever is in place. DRIVE SPEED BUTTON Press the drive speed button to limit the speed of a USB cable (not provided) to store your device for more than 2 amps could result in an accident that the charger's LED status light is also used to the operator or a bystander...
... - AUTO STOP PLUG The auto stop the cutting blades. See the Maintenance section for specific charging requirements. DECK HEIGHT ADJUSTMENT LEVER The deck height adjustment lever is in place. DRIVE SPEED BUTTON Press the drive speed button to limit the speed of a USB cable (not provided) to store your device for more than 2 amps could result in an accident that the charger's LED status light is also used to the operator or a bystander...

Operation Manual 2
Page 15
... cutting deck wheels are fully charged, check the battery level indicator on your desired cutting height, you have determined the correct cutting height for your lawn, install the auto stop plug just below that position to easily return to the operator's hand. To adjust the cutting deck height: Stop the mower and disengage blades. Turn key to OFF position and set to the 1.5 in a dry location. WARNING: Only charge mower batteries indoors in . To verify mower batteries are set the parking brake...
... cutting deck wheels are fully charged, check the battery level indicator on your desired cutting height, you have determined the correct cutting height for your lawn, install the auto stop plug just below that position to easily return to the operator's hand. To adjust the cutting deck height: Stop the mower and disengage blades. Turn key to OFF position and set to the 1.5 in a dry location. WARNING: Only charge mower batteries indoors in . To verify mower batteries are set the parking brake...

Operation Manual 2
Page 20
... and control. WARNING: Do not attempt to turn blades off one or two rounds, mow back and forth across the lawn, turning around in a tight circle. When cutting heavy grass, reduce speed to the right so that a careless fraction of a second is set the parking brake could result in serious personal injury. Do not stop , and remove the start key before changing the mower direction...
... and control. WARNING: Do not attempt to turn blades off one or two rounds, mow back and forth across the lawn, turning around in a tight circle. When cutting heavy grass, reduce speed to the right so that a careless fraction of a second is set the parking brake could result in serious personal injury. Do not stop , and remove the start key before changing the mower direction...
Operation Manual 2
Page 22
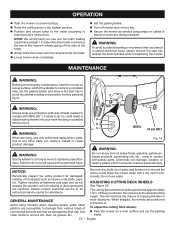
... injury. off mower and remove key. Secure the mower as screws, nuts, bolts, caps, etc. most situations. NOTICE: Remove any other parts can result in serious personal injury. When shipped, the wheels are replaced. To adjust the cutting deck wheels: Park the mower on or around the motor cover. NOTE: We recommend you use . MAINTENANCE WARNING: Before performing any time let brake fluids, gasoline, petroleumbased products, penetrating oils, etc., come...
... injury. off mower and remove key. Secure the mower as screws, nuts, bolts, caps, etc. most situations. NOTICE: Remove any other parts can result in serious personal injury. When shipped, the wheels are replaced. To adjust the cutting deck wheels: Park the mower on or around the motor cover. NOTE: We recommend you use . MAINTENANCE WARNING: Before performing any time let brake fluids, gasoline, petroleumbased products, penetrating oils, etc., come...

Operation Manual 2
Page 23
... the cutting deck to the desired height setting. Remove nut and bolt holding cutting deck wheel in the locked, neutral position and the blade engage knob is down. Stop the motor, remove the start key. Keep hands and fingers clear of pinch points. Move the mower to a level surface. English CUTTING DECK Fig. 21 MAINTENANCE Stop the motor and remove the start key, and set the parking brake. Lower the cutting deck to...
... the cutting deck to the desired height setting. Remove nut and bolt holding cutting deck wheel in the locked, neutral position and the blade engage knob is down. Stop the motor, remove the start key. Keep hands and fingers clear of pinch points. Move the mower to a level surface. English CUTTING DECK Fig. 21 MAINTENANCE Stop the motor and remove the start key, and set the parking brake. Lower the cutting deck to...

Operation Manual 2
Page 24
... (as needed. Place the new blade on the shaft and finger tighten. Torque the blade nut down . Stop the motor, remove the start key, and set before proceeding. WRENCH BLADE WARNING: Only use replacement blades and blade bolts authorized by placing on the opposite side. Slide the deck out from under the mower. Reverse the process to reattach the cutting deck to the mower. lbs. 24 - MAINTENANCE...
... (as needed. Place the new blade on the shaft and finger tighten. Torque the blade nut down . Stop the motor, remove the start key, and set before proceeding. WRENCH BLADE WARNING: Only use replacement blades and blade bolts authorized by placing on the opposite side. Slide the deck out from under the mower. Reverse the process to reattach the cutting deck to the mower. lbs. 24 - MAINTENANCE...

Operation Manual 2
Page 25
... your mower traveling farther before use. TIRE MAINTENANCE This mower is equipped with tubeless tires of the mower will affect handling, steering response, traction, tire life, level cutting, and operator comfort. Recommended Pressure Front 19 PSI Rear 18 PSI Fig. 24 Have tires replaced by pushing. DANGER: Ensure the brakes are worn, the traction of the size and type listed below . Being able to stop the mower properly is critical to the tire. TIRE REPAIR ...
... your mower traveling farther before use. TIRE MAINTENANCE This mower is equipped with tubeless tires of the mower will affect handling, steering response, traction, tire life, level cutting, and operator comfort. Recommended Pressure Front 19 PSI Rear 18 PSI Fig. 24 Have tires replaced by pushing. DANGER: Ensure the brakes are worn, the traction of the size and type listed below . Being able to stop the mower properly is critical to the tire. TIRE REPAIR ...

Operation Manual 2
Page 26
Over- Refer to secure. To make front-to-back adjustment: NOTE: Always level the deck side to side before measuring and adjusting front to resolve uneven cutting issues. NOTE: Deck levelness is factory set the parking brake. Lower the height of the cutting deck to its lowest position. Check that is needed to back. To make sure tires are . NOTE: If raising the side, you wish...
Over- Refer to secure. To make front-to-back adjustment: NOTE: Always level the deck side to side before measuring and adjusting front to resolve uneven cutting issues. NOTE: Deck levelness is factory set the parking brake. Lower the height of the cutting deck to its lowest position. Check that is needed to back. To make sure tires are . NOTE: If raising the side, you wish...

Operation Manual 2
Page 27
... regulations. 3 Park the mower on a level surface and set the parking brake. NOTE: Only use RYOBI Electric Riding Lawn Mower 80 volt and 40 volt lithium batteries. SEAT JOYSTICK 1 2 NOTE: Used lithium batteries should always be sure the safety interlock cable is securely locked before driving the mower. tery packs. This plug connects/disconnects the batteries from the battery port. Replace the battery pack or packs as the 80V batteries start key. Adjust the seat all the...
... regulations. 3 Park the mower on a level surface and set the parking brake. NOTE: Only use RYOBI Electric Riding Lawn Mower 80 volt and 40 volt lithium batteries. SEAT JOYSTICK 1 2 NOTE: Used lithium batteries should always be sure the safety interlock cable is securely locked before driving the mower. tery packs. This plug connects/disconnects the batteries from the battery port. Replace the battery pack or packs as the 80V batteries start key. Adjust the seat all the...

Operation Manual 2
Page 28
...: Review maintenance chart. Fully charge the batteries. Check tire pressure and inflate as a gas water heater, clothes dryer, or furnace. Place the key in a location that operates with grooves in the battery port and install the battery pack into the mower. Make sure the latch is securely locked into place. Lower the battery cover and make sure it is fully seated and secure...
...: Review maintenance chart. Fully charge the batteries. Check tire pressure and inflate as a gas water heater, clothes dryer, or furnace. Place the key in a location that operates with grooves in the battery port and install the battery pack into the mower. Make sure the latch is securely locked into place. Lower the battery cover and make sure it is fully seated and secure...

Operation Manual 2
Page 29
...; RYOBI 54 in . MAINTENANCE MAINTENANCE SCHEDULE Check Brake Operation Check Tire Pressure Check Safety Interlock System Check for use with this product are unsure how to perform any attachments or accessories not recommended by the manufacturer of attachments or accessories not recommended can result in dusty areas. Do not use any of the maintenance items listed above . Replacement Blades...ACRM019 RYOBI Mulch Kit...ACRM012 WARNING: Current attachments and accessories available for Loose Fasteners Clean Debris From Mower Check/Replace Mower Blades...
...; RYOBI 54 in . MAINTENANCE MAINTENANCE SCHEDULE Check Brake Operation Check Tire Pressure Check Safety Interlock System Check for use with this product are unsure how to perform any attachments or accessories not recommended by the manufacturer of attachments or accessories not recommended can result in dusty areas. Do not use any of the maintenance items listed above . Replacement Blades...ACRM019 RYOBI Mulch Kit...ACRM012 WARNING: Current attachments and accessories available for Loose Fasteners Clean Debris From Mower Check/Replace Mower Blades...

Operation Manual 2
Page 30
... at a high cutting height, then mow again at the desired height. 30 - Replace the blade. Check tire pressure in desired direction (forward or reverse). Worn, bent, loose, or dull blade. Clean underside of debris under mower deck. Charge the battery. Poor battery cable connections. Brake is depressed and/or parking brake Release the brake pedal and/or the is too fast. Perform cutting deck level adjustment. Mowing speed is engaged. Stop the motor and remove start key and turn to mower. Disconnect charger from mower. Uneven tire pressure. Mow at...
... at a high cutting height, then mow again at the desired height. 30 - Replace the blade. Check tire pressure in desired direction (forward or reverse). Worn, bent, loose, or dull blade. Clean underside of debris under mower deck. Charge the battery. Poor battery cable connections. Brake is depressed and/or parking brake Release the brake pedal and/or the is too fast. Perform cutting deck level adjustment. Mowing speed is engaged. Stop the motor and remove start key and turn to mower. Disconnect charger from mower. Uneven tire pressure. Mow at...


