
User Manual (user Manual) (ver.1.0) (English)
Page 3
... 7 Installing the Video Driver 7 Windows® 98 7 Windows® 95 8 Self-Test Feature Check (STFC 8 Getting Help 9 Warm-up Time 9 Adjusting Your LCD Monitor 10 User Controls 10 Automatic Save 11 Direct-Access Features 11 Auto Adjustment 11 Brightness 12 OSD Lock/Unlock 12 On Screen Display (OSD 12 Accessing the menu system 13 OSD functions and adjustments 13 Audio Controls 18 Appendix 19 PowerSaver 19 Troubleshooting 20 Specifications 24 Pin Assignments 25 Display Modes 26 Changing the Base 27 Removing...
... 7 Installing the Video Driver 7 Windows® 98 7 Windows® 95 8 Self-Test Feature Check (STFC 8 Getting Help 9 Warm-up Time 9 Adjusting Your LCD Monitor 10 User Controls 10 Automatic Save 11 Direct-Access Features 11 Auto Adjustment 11 Brightness 12 OSD Lock/Unlock 12 On Screen Display (OSD 12 Accessing the menu system 13 OSD functions and adjustments 13 Audio Controls 18 Appendix 19 PowerSaver 19 Troubleshooting 20 Specifications 24 Pin Assignments 25 Display Modes 26 Changing the Base 27 Removing...
User Manual (user Manual) (ver.1.0) (English)
Page 4
... SHOCK, DO NOT REMOVE COVER (OR BACK). Safety Instructions 1 Before connecting the AC power cord to the DC adapter outlet, make sure the voltage designation of the DC adapter corresponds to the local electrical supply. 2 Never insert anything to rest on the power cord, and keep it away from heaters, stoves, fireplaces, and other sources of the cabinet. You can clean the LCD with low humidity...
... SHOCK, DO NOT REMOVE COVER (OR BACK). Safety Instructions 1 Before connecting the AC power cord to the DC adapter outlet, make sure the voltage designation of the DC adapter corresponds to the local electrical supply. 2 Never insert anything to rest on the power cord, and keep it away from heaters, stoves, fireplaces, and other sources of the cabinet. You can clean the LCD with low humidity...
User Manual (user Manual) (ver.1.0) (English)
Page 6
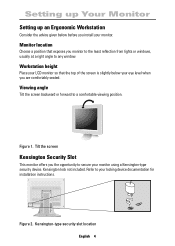
... viewing position. AUTO MENU Figure 1. Setting up Your Monitor Setting up an Ergonomic Workstation Consider the advice given below your eye level when you monitor to the least reflection from lights or windows, usually at a right angle to secure your monitor. Kensington lock not included. Figure 2. Workstation height Place your locking device documentation for installation instructions. Kensington-type security slot location English 4 Monitor location Choose a position that...
... viewing position. AUTO MENU Figure 1. Setting up Your Monitor Setting up an Ergonomic Workstation Consider the advice given below your eye level when you monitor to the least reflection from lights or windows, usually at a right angle to secure your monitor. Kensington lock not included. Figure 2. Workstation height Place your locking device documentation for installation instructions. Kensington-type security slot location English 4 Monitor location Choose a position that...
User Manual (user Manual) (ver.1.0) (English)
Page 7
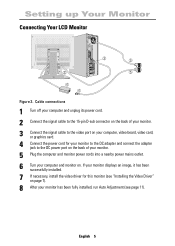
... its power cord. 2 Connect the signal cable to the video port on your computer, video board, video card, or graphics card. 4 Connect the power cord for this monitor (see "Installing the Video Driver" on page 7). 8 After your computer and monitor on the back of your monitor. 5 Plug the computer and monitor power cords into a nearby power mains outlet. 6 Turn your monitor has been fully installed, run Auto Adjustment (see page 11). If your monitor displays an image, it has been successfully installed. 7 If necessary, install the video driver...
... its power cord. 2 Connect the signal cable to the video port on your computer, video board, video card, or graphics card. 4 Connect the power cord for this monitor (see "Installing the Video Driver" on page 7). 8 After your computer and monitor on the back of your monitor. 5 Plug the computer and monitor power cords into a nearby power mains outlet. 6 Turn your monitor has been fully installed, run Auto Adjustment (see page 11). If your monitor displays an image, it has been successfully installed. 7 If necessary, install the video driver...
User Manual (user Manual) (ver.1.0) (English)
Page 9
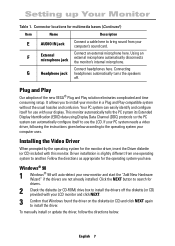
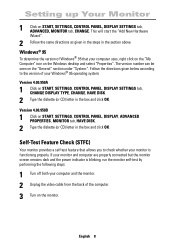
... your PC system needs a video driver, following the instructions given below : English 7 Follow the directions as appropriate for the monitor driver, insert the Driver diskette (or CD) included with your monitor in a Plug and Play compatible system without the usual hassles and confusion. Windows® 98 1 Windows® 98 will auto-detect your computer uses. Driver installation is slightly different from your display. Installing the Video Driver When prompted by the...
... your PC system needs a video driver, following the instructions given below : English 7 Follow the directions as appropriate for the monitor driver, insert the Driver diskette (or CD) included with your monitor in a Plug and Play compatible system without the usual hassles and confusion. Windows® 98 1 Windows® 98 will auto-detect your computer uses. Driver installation is slightly different from your display. Installing the Video Driver When prompted by the...
User Manual (user Manual) (ver.1.0) (English)
Page 10
... the computer. 3 Turn on START, SETTINGS, CONTROL PANEL, DISPLAY SETTINGS tab, ADVANCED, MONITOR tab, CHANGE. The version number can be seen on the Windows desktop and select "Properties". Version 4.00.950B 1 Click on START, SETTINGS, CONTROL PANEL, DISPLAY SETTINGS tab, CHANGE DISPLAY TYPE, CHANGE, HAVE DISK. 2 Type the diskette (or CD) letter in the box and click OK. Follow the directions given below according to check whether your Windows® 95 operating...
... the computer. 3 Turn on START, SETTINGS, CONTROL PANEL, DISPLAY SETTINGS tab, ADVANCED, MONITOR tab, CHANGE. The version number can be seen on the Windows desktop and select "Properties". Version 4.00.950B 1 Click on START, SETTINGS, CONTROL PANEL, DISPLAY SETTINGS tab, CHANGE DISPLAY TYPE, CHANGE, HAVE DISK. 2 Type the diskette (or CD) letter in the box and click OK. Follow the directions given below according to check whether your Windows® 95 operating...
User Manual (user Manual) (ver.1.0) (English)
Page 11
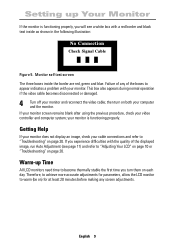
... the video cable; English 9 then turn them on each day. Getting Help If your monitor does not display an image, check your cable connections and refer to "Troubleshooting" on both your monitor. Warm-up Your Monitor If the monitor is functioning properly. Monitor self test screen The three boxes inside as shown in the following illustration: No Connection Check Signal Cable Figure 5. Failure of the displayed image, run Auto Adjustment (see a white box with a red border and black...
... the video cable; English 9 then turn them on each day. Getting Help If your monitor does not display an image, check your cable connections and refer to "Troubleshooting" on both your monitor. Warm-up Your Monitor If the monitor is functioning properly. Monitor self test screen The three boxes inside as shown in the following illustration: No Connection Check Signal Cable Figure 5. Failure of the displayed image, run Auto Adjustment (see a white box with a red border and black...
User Manual (user Manual) (ver.1.0) (English)
Page 12
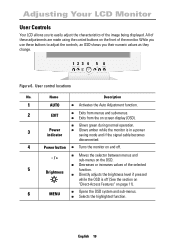
... "Direct-Access Features" on screen display (OSD). Decreases or increases values of the image being displayed. While you their numeric values as they change. 123 4 AUTO EXIT 5 6 MENU Figure 6. Glows green during normal operation. Exits from the on page 11). Turns the monitor on the OSD. Directly adjusts the brightness level if pressed while the OSD is in a power saving mode and if the signal cable becomes disconnected. Selects the...
... "Direct-Access Features" on screen display (OSD). Decreases or increases values of the image being displayed. While you their numeric values as they change. 123 4 AUTO EXIT 5 6 MENU Figure 6. Glows green during normal operation. Exits from the on page 11). Turns the monitor on the OSD. Directly adjusts the brightness level if pressed while the OSD is in a power saving mode and if the signal cable becomes disconnected. Selects the...
User Manual (user Manual) (ver.1.0) (English)
Page 13
... can be different depending on the screen image. English 11 These changes are reserved according to the signal frequency from your computer. If you have made no adjustments, the OSD disappears and the monitor does not save adjustments for up to 5 user modes. Once you finish making adjustments to a feature, push the EXIT button to turn off the menu or allow an adjustment window to remain active for about...
... can be different depending on the screen image. English 11 These changes are reserved according to the signal frequency from your computer. If you have made no adjustments, the OSD disappears and the monitor does not save adjustments for up to 5 user modes. Once you finish making adjustments to a feature, push the EXIT button to turn off the menu or allow an adjustment window to remain active for about...
User Manual (user Manual) (ver.1.0) (English)
Page 14
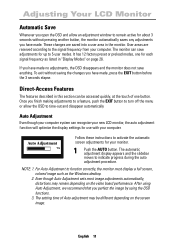
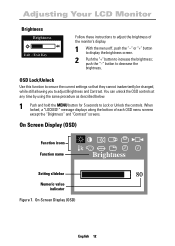
... Your LCD Monitor Brightness Brightness 44 Exit : Exit Key Follow these instructions to adjust the brightness of each OSD menu screens except the "Brightness" and "Contrast" screens. When locked, a "LOCKED!" push the "-" button to adjust Brightness and Contrast. On Screen Display (OSD) Function icons Function name Brightness Setting slidebar Numeric value indicator Figure 7. OSD Lock/Unlock Use this function to secure the current settings so that they cannot inadvertently be changed, while still allowing you to decrease the brightness. On Screen Display (OSD) English 12...
... Your LCD Monitor Brightness Brightness 44 Exit : Exit Key Follow these instructions to adjust the brightness of each OSD menu screens except the "Brightness" and "Contrast" screens. When locked, a "LOCKED!" push the "-" button to adjust Brightness and Contrast. On Screen Display (OSD) Function icons Function name Brightness Setting slidebar Numeric value indicator Figure 7. OSD Lock/Unlock Use this function to secure the current settings so that they cannot inadvertently be changed, while still allowing you to decrease the brightness. On Screen Display (OSD) English 12...
User Manual (user Manual) (ver.1.0) (English)
Page 17
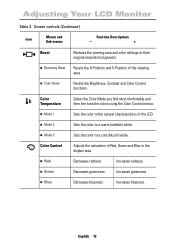
... Reset Resets the H-Position and V-Position of Red, Green and Blue in the display area. Color Reset Resets the Brightness, Contrast and Color Control functions. Mode 3 Sets the color to a warm (reddish) white. Increases greenness. Color Control Adjusts the saturation of the viewing area. Color Temperature Select the Color Mode you find most comfortable and then fine tune the colors using the Color Control menus. English 15 G(reen) Decreases greenness. Mode 2 Sets the color to a cool (bluish) white. Increases redness. Adjusting Your LCD Monitor...
... Reset Resets the H-Position and V-Position of Red, Green and Blue in the display area. Color Reset Resets the Brightness, Contrast and Color Control functions. Mode 3 Sets the color to a warm (reddish) white. Increases greenness. Color Control Adjusts the saturation of the viewing area. Color Temperature Select the Color Mode you find most comfortable and then fine tune the colors using the Color Control menus. English 15 G(reen) Decreases greenness. Mode 2 Sets the color to a cool (bluish) white. Increases redness. Adjusting Your LCD Monitor...
User Manual (user Manual) (ver.1.0) (English)
Page 19
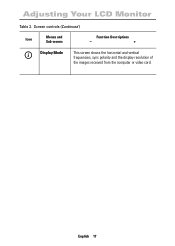
Screen controls (Continued ) Icon Menus and Sub-menus Function Descriptions - + i Display Mode This screen shows the horizontal and vertical frequencies, sync polarity and the display resolution of the images received from the computer or video card. English 17 Adjusting Your LCD Monitor Table 2.
Screen controls (Continued ) Icon Menus and Sub-menus Function Descriptions - + i Display Mode This screen shows the horizontal and vertical frequencies, sync polarity and the display resolution of the images received from the computer or video card. English 17 Adjusting Your LCD Monitor Table 2.
User Manual (user Manual) (ver.1.0) (English)
Page 21
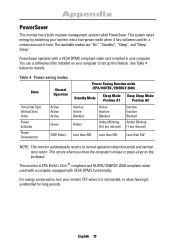
You use a software utility installed on the keyboard. Table 4. English 19 The available modes are "On", "Standby", "Sleep", and "Deep Sleep". PowerSaver operates with VESA DPMS functionality. Power-saving modes State Normal Operation Horizontal Sync Vertical Sync Video Power Indicator Power Consumption Active Active Active Green 25W (Nom.) Power-Saving Function mode (EPA/ NUTEK / ENERGY 2000) Standby Mode Sleep Mode Position A1 Inactive Active Blanked Amber Active Inactive Blanked Amber Blinking (0.5 sec interval) Deep Sleep Mode Position A2 Inactive Inactive Blanked...
You use a software utility installed on the keyboard. Table 4. English 19 The available modes are "On", "Standby", "Sleep", and "Deep Sleep". PowerSaver operates with VESA DPMS functionality. Power-saving modes State Normal Operation Horizontal Sync Vertical Sync Video Power Indicator Power Consumption Active Active Active Green 25W (Nom.) Power-Saving Function mode (EPA/ NUTEK / ENERGY 2000) Standby Mode Sleep Mode Position A1 Inactive Active Blanked Amber Active Inactive Blanked Amber Blinking (0.5 sec interval) Deep Sleep Mode Position A2 Inactive Inactive Blanked...
User Manual (user Manual) (ver.1.0) (English)
Page 22
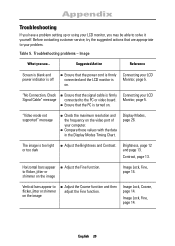
...;icker, jitter or shimmer on the video port of your computer. Connecting your LCD Monitor, page 5. "Video mode not supported" message Check the maximum resolution and the frequency on the image Adjust the Fine function. Horizontal bars appear to solve it yourself. Table 5. Brightness, page 12 and page 13. Display Modes, page 26. Image Lock, Fine, page 14. Vertical bars appear to the PC or video board. Image Lock, Fine, page 14. Compare these...
...;icker, jitter or shimmer on the video port of your computer. Connecting your LCD Monitor, page 5. "Video mode not supported" message Check the maximum resolution and the frequency on the image Adjust the Fine function. Horizontal bars appear to solve it yourself. Table 5. Brightness, page 12 and page 13. Display Modes, page 26. Image Lock, Fine, page 14. Vertical bars appear to the PC or video board. Image Lock, Fine, page 14. Compare these...
User Manual (user Manual) (ver.1.0) (English)
Page 23
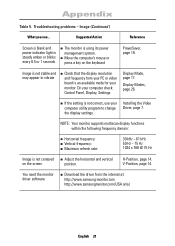
..., use your monitor. Appendix Table 5. Display Modes, page 26. V-Position, page 14. Image is an available mode for your computer utility program to vibrate Check that the display resolution and frequency from the internet at: http://www.samsung-monitor.com http://www.samsungmonitor.com (USA only) English 21 Installing the Video Driver, page 7. On your PC or video board is not stable and may appear to change the display settings. NOTE: Your monitor supports...
..., use your monitor. Appendix Table 5. Display Modes, page 26. V-Position, page 14. Image is an available mode for your computer utility program to vibrate Check that the display resolution and frequency from the internet at: http://www.samsung-monitor.com http://www.samsungmonitor.com (USA only) English 21 Installing the Video Driver, page 7. On your PC or video board is not stable and may appear to change the display settings. NOTE: Your monitor supports...
User Manual (user Manual) (ver.1.0) (English)
Page 24
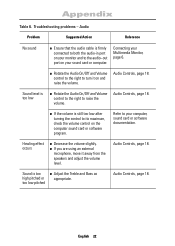
... effect occurs Decrease the volume slightly. Connecting your sound card or computer. Refer to the audio-out port on and raise the volume. Sound level is still too low after turning the control to raise the volume. Audio Controls, page 18. Sound is firmly connected to both the audio-in port on your monitor and to your computer, sound card or software documentation. English 22 Troubleshooting problems - If you are using an external microphone...
... effect occurs Decrease the volume slightly. Connecting your sound card or computer. Refer to the audio-out port on and raise the volume. Sound level is still too low after turning the control to raise the volume. Audio Controls, page 18. Sound is firmly connected to both the audio-in port on your monitor and to your computer, sound card or software documentation. English 22 Troubleshooting problems - If you are using an external microphone...
User Manual (user Manual) (ver.1.0) (English)
Page 26
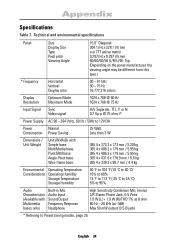
... from this spec.) * Frequency Horizontal Vertical Display color 30 ~ 61 kHz 50 ~ 75 Hz 16,777,216 colors Display Resolution Optimum Mode Maximum Mode 1024 x 768 @ 60 Hz 1024 x 768 @ 75 Hz Input Signal Sync Video signal H/V Separate, TTL, P. Power Supply AC 90 ~ 264 Volts, 60 Hz / 50Hz to 12V/3A Power Normal Consumption Power Saving 25 Watt Less than 3 W Dimensions / Unit Weight Unit (WxHxD) with Sound Output Multimedia Frequency Response bases only) Headphone...
... from this spec.) * Frequency Horizontal Vertical Display color 30 ~ 61 kHz 50 ~ 75 Hz 16,777,216 colors Display Resolution Optimum Mode Maximum Mode 1024 x 768 @ 60 Hz 1024 x 768 @ 75 Hz Input Signal Sync Video signal H/V Separate, TTL, P. Power Supply AC 90 ~ 264 Volts, 60 Hz / 50Hz to 12V/3A Power Normal Consumption Power Saving 25 Watt Less than 3 W Dimensions / Unit Weight Unit (WxHxD) with Sound Output Multimedia Frequency Response bases only) Headphone...
User Manual (user Manual) (ver.1.0) (English)
Page 30
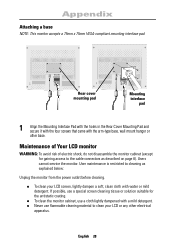
... power outlet before cleaning. English 28 Appendix Attaching a base NOTE: This monitor accepts a 75mm x 75mm VESA-compliant mounting interface pad. Rear cover mounting pad Mounting interface pad 1 Align the Mounting Interface Pad with the holes in the Rear Cover Mounting Pad and secure it with the four screws that came with the arm-type base, wall mount hanger or other electrical apparatus. Users cannot service the monitor. If possible, use a cloth lightly...
... power outlet before cleaning. English 28 Appendix Attaching a base NOTE: This monitor accepts a 75mm x 75mm VESA-compliant mounting interface pad. Rear cover mounting pad Mounting interface pad 1 Align the Mounting Interface Pad with the holes in the Rear Cover Mounting Pad and secure it with the four screws that came with the arm-type base, wall mount hanger or other electrical apparatus. Users cannot service the monitor. If possible, use a cloth lightly...
User Manual (user Manual) (ver.1.0) (English)
Page 31
... help 9 H H-position 14 I Image lock 14 Internal microphone 18 K Kensington security slot 4 L Language 16 M MENU 10 INDEX MENU button 12, 13 Menu display time 16 Menu position 16 Mic 18 Microphone 18 Multimedia connections 6 O On screen display (OSD) 12 OSD lock/unlock 12 P Plug and play 7 Power button 10 Power indicator 10 Preset timing modes 26 R Reset 15 S Safety instructions 2 Screen controls 13 Security slot 5 Self-test feature check 8 Simple base 3 Sleep mode 19 Standby mode 19 STFC 8 T Tilt the screen 4 Treble 18 Troubleshooting 20 V Volume 18 V-position...
... help 9 H H-position 14 I Image lock 14 Internal microphone 18 K Kensington security slot 4 L Language 16 M MENU 10 INDEX MENU button 12, 13 Menu display time 16 Menu position 16 Mic 18 Microphone 18 Multimedia connections 6 O On screen display (OSD) 12 OSD lock/unlock 12 P Plug and play 7 Power button 10 Power indicator 10 Preset timing modes 26 R Reset 15 S Safety instructions 2 Screen controls 13 Security slot 5 Self-test feature check 8 Simple base 3 Sleep mode 19 Standby mode 19 STFC 8 T Tilt the screen 4 Treble 18 Troubleshooting 20 V Volume 18 V-position...
User Manual (user Manual) (ver.1.0) (English)
Page 32
... the monitor voltage rating. nician for additional suggestions. If necessary, consult your dealer or an experienced radio/television technician for help. You may cause undesired operation. Before making the connection, make sure the voltage rating of the FCC Rules. For 120 Volt applications, use only UL Listed Detachable power supply cord with NEMA configuration 5-15P type (parallel blades) plug cap...
... the monitor voltage rating. nician for additional suggestions. If necessary, consult your dealer or an experienced radio/television technician for help. You may cause undesired operation. Before making the connection, make sure the voltage rating of the FCC Rules. For 120 Volt applications, use only UL Listed Detachable power supply cord with NEMA configuration 5-15P type (parallel blades) plug cap...


