
User Manual (user Manual) (ver.1.0) (English)
Page 4
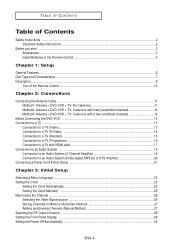
... Audio System ...19 Connection to an Audio System (2 Channel Amplifier 19 Connection to an Audio System (Dolby digital, MPEG2 or DTS Amplifier 20 Connecting a Power Cord & Auto Setup ...21 Chapter 3: Initial Setup Selecting a Menu Language ...22 Setting the Clock ...23 Setting the Clock Automatically...23 Setting the Clock Manually ...25 Memorizing the Channel ...26 Selecting the Video Signal-source ...26 Storing Channels in Memory (Automatic Method 27 Adding and Erasing Channels (Manual Method 27 Selecting the RF Output Channel ...28 Setting the Front Panel Display ...29 Setting the Power...
... Audio System ...19 Connection to an Audio System (2 Channel Amplifier 19 Connection to an Audio System (Dolby digital, MPEG2 or DTS Amplifier 20 Connecting a Power Cord & Auto Setup ...21 Chapter 3: Initial Setup Selecting a Menu Language ...22 Setting the Clock ...23 Setting the Clock Automatically...23 Setting the Clock Manually ...25 Memorizing the Channel ...26 Selecting the Video Signal-source ...26 Storing Channels in Memory (Automatic Method 27 Adding and Erasing Channels (Manual Method 27 Selecting the RF Output Channel ...28 Setting the Front Panel Display ...29 Setting the Power...
User Manual (user Manual) (ver.1.0) (English)
Page 5
... Playback ...52 Using the Setup Menu ...54 Setting Up the Language Features ...55 Setting Up the Audio Options ...57 Setting Up the Display Options ...59 Setting Up the Parental Control ...62 Chapter 5: VCR Operations Inserting and Ejecting a Video Cassette Tape 65 Playing a Pre-Recorded Video Cassette Tape 66 Special VCR Playback Features ...67 Using Automatic Tracking ...68 Selecting the Cassette Type ...69 Setting the Auto Play ...70 Setting the Auto Repeat ...71 Using the Tape Counter ...72 Using the Assemble Edit Function ...73 Selecting the Audio Output Mode...
... Playback ...52 Using the Setup Menu ...54 Setting Up the Language Features ...55 Setting Up the Audio Options ...57 Setting Up the Display Options ...59 Setting Up the Parental Control ...62 Chapter 5: VCR Operations Inserting and Ejecting a Video Cassette Tape 65 Playing a Pre-Recorded Video Cassette Tape 66 Special VCR Playback Features ...67 Using Automatic Tracking ...68 Selecting the Cassette Type ...69 Setting the Auto Play ...70 Setting the Auto Repeat ...71 Using the Tape Counter ...72 Using the Assemble Edit Function ...73 Selecting the Audio Output Mode...
User Manual (user Manual) (ver.1.0) (English)
Page 6
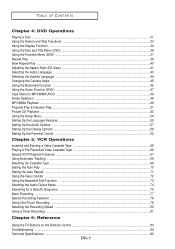
... YOUR TV SET COMPATIBILITY WITH THIS MODEL 525p DVDVCR, PLEASE CONTACT SAMSUNG'S CUSTOMER SERVICE CENTER." s Enjoy a DVD movie while recording a TV show to a VCR results in a distorted picture from copyprotected DVD discs. s Auto Setup instantly finds the time and runs channel search. s Remote control provides full operation on recording conditions. - s On-Screen Program (English/French/Spanish). DVD Features s 10-bit video digital to play back may depend on DVD-VCR. s Superior slow motion and stop action (with copy protection. s Playback of this...
... YOUR TV SET COMPATIBILITY WITH THIS MODEL 525p DVDVCR, PLEASE CONTACT SAMSUNG'S CUSTOMER SERVICE CENTER." s Enjoy a DVD movie while recording a TV show to a VCR results in a distorted picture from copyprotected DVD discs. s Auto Setup instantly finds the time and runs channel search. s Remote control provides full operation on recording conditions. - s On-Screen Program (English/French/Spanish). DVD Features s 10-bit video digital to play back may depend on DVD-VCR. s Superior slow motion and stop action (with copy protection. s Playback of this...

User Manual (user Manual) (ver.1.0) (English)
Page 7
... sound and video due to play . CD is recorded as a Digital Signal with the corresponding logos: Disc Types (Logos) Recording Types Disc Size Max. These regional codes must only insert one DVD disc at a time. If the codes do not match, the disc will not allow playback and may not be easily selected through the on the rear panel of the player. SETUP Disc Type and Characteristics This DVD-VCR is capable of playing the following types of discs with better audio...
... sound and video due to play . CD is recorded as a Digital Signal with the corresponding logos: Disc Types (Logos) Recording Types Disc Size Max. These regional codes must only insert one DVD disc at a time. If the codes do not match, the disc will not allow playback and may not be easily selected through the on the rear panel of the player. SETUP Disc Type and Characteristics This DVD-VCR is capable of playing the following types of discs with better audio...
User Manual (user Manual) (ver.1.0) (English)
Page 8
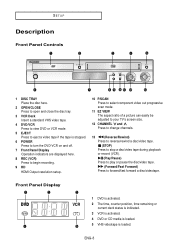
... loaded. ˆ 5 VHS videotape is stopped. 6 POWER Press to turn the DVD-VCR on and off. 7 Front Panel Display Operation indicators are displayed here. 8 REC (VCR) Press to begin recording. 9 HD HDMI Output resolution setup. 10 P.SCAN Press to select component video out progressive scan mode. 11 EZ VIEW The aspect ratio of a picture can easily be adjusted to your TV's screen size. 12 CHANNEL and Press to change channels. 13 (Reverse/Rewind) Press to reverse/rewind a disc/video tape. (STOP) Press to stop a disc/video tape during playback or record (VCR). (Play...
... loaded. ˆ 5 VHS videotape is stopped. 6 POWER Press to turn the DVD-VCR on and off. 7 Front Panel Display Operation indicators are displayed here. 8 REC (VCR) Press to begin recording. 9 HD HDMI Output resolution setup. 10 P.SCAN Press to select component video out progressive scan mode. 11 EZ VIEW The aspect ratio of a picture can easily be adjusted to your TV's screen size. 12 CHANNEL and Press to change channels. 13 (Reverse/Rewind) Press to reverse/rewind a disc/video tape. (STOP) Press to stop a disc/video tape during playback or record (VCR). (Play...

User Manual (user Manual) (ver.1.0) (English)
Page 9
... coaxial digital audio cable to connect to a compatible Dolby Digital receiver. - Use these jacks if you want to use the Alt Video Out menu. These jacks provide PR, PB and Y video. - Use the HDMI cable to connect this jack to the S-Video input jack on how to use a Video, S-Video or Component Output, unplug HDMI cable. 6 RF OUT (TO TV) Connect your DVD-VCR to a TV. 7 LINE OUT (VIDEO/AUDIO) Use a Video/Audio cables to connect to the Video/Audio input jacks on your television for higher picture quality. SETUP Rear Panel Œ...
... coaxial digital audio cable to connect to a compatible Dolby Digital receiver. - Use these jacks if you want to use the Alt Video Out menu. These jacks provide PR, PB and Y video. - Use the HDMI cable to connect this jack to the S-Video input jack on how to use a Video, S-Video or Component Output, unplug HDMI cable. 6 RF OUT (TO TV) Connect your DVD-VCR to a TV. 7 LINE OUT (VIDEO/AUDIO) Use a Video/Audio cables to connect to the Video/Audio input jacks on your television for higher picture quality. SETUP Rear Panel Œ...

User Manual (user Manual) (ver.1.0) (English)
Page 10
.../Stop/Play/ Pause 9 SUBTITLE button ' Use to display the DVD's ˝ subtitle language. 10 MENU button Ô Brings up the Disc menu. (DVD) ≠ - 25 EZVIEW - The aspect ratio of a picture can easily be adjusted according to the screen size of the Remote Control 1 POWER button Turns the DVD-VCR's power on and off. 2 NUMBER buttons Œ 3 100+ button 4 DVD button Use to operate DVD. ´ 5 VCR button Use to operate VCR. ˇ 6 AUDIO/TV MUTE button Use this to access various ¨ audio functions on a disc. (DVD) Displays the Manual Clock menu. SETUP...
.../Stop/Play/ Pause 9 SUBTITLE button ' Use to display the DVD's ˝ subtitle language. 10 MENU button Ô Brings up the Disc menu. (DVD) ≠ - 25 EZVIEW - The aspect ratio of a picture can easily be adjusted according to the screen size of the Remote Control 1 POWER button Turns the DVD-VCR's power on and off. 2 NUMBER buttons Œ 3 100+ button 4 DVD button Use to operate DVD. ´ 5 VCR button Use to operate VCR. ˇ 6 AUDIO/TV MUTE button Use this to access various ¨ audio functions on a disc. (DVD) Displays the Manual Clock menu. SETUP...
User Manual (user Manual) (ver.1.0) (English)
Page 11
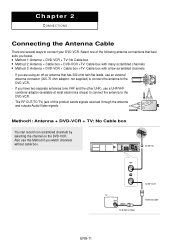
... OUT To Antenna Input Antenna cable Chapter 2 CONNECTIONS Connecting the Antenna Cable There are using an off-air antenna that best suits you below. Also use a UHF/VHF combiner-adaptor (available at most electronics shops) to connect the antenna to the DVD-VCR. - If you watch channels without cable box. Select one VHF and the other UHF), use this product sends signals received through the antenna and outputs Audio/Video signals.
... OUT To Antenna Input Antenna cable Chapter 2 CONNECTIONS Connecting the Antenna Cable There are using an off-air antenna that best suits you below. Also use a UHF/VHF combiner-adaptor (available at most electronics shops) to connect the antenna to the DVD-VCR. - If you watch channels without cable box. Select one VHF and the other UHF), use this product sends signals received through the antenna and outputs Audio/Video signals.
User Manual (user Manual) (ver.1.0) (English)
Page 13
... other components before you press the P.SCAN button when DVD-VCR is in stop mode or no disc is inserted, the Alt Video Out mode changes in Display Setup menu is one audio input terminal on your TV set to the AUDIO OUT Left (white) terminal of your TV. 2 Turn on the DVD-VCR and TV. 3 Press the input selector on your TV. - Please refer to 20) - Progressive) - If you connect or disconnect any cables. - If...
... other components before you press the P.SCAN button when DVD-VCR is in stop mode or no disc is inserted, the Alt Video Out mode changes in Display Setup menu is one audio input terminal on your TV set to the AUDIO OUT Left (white) terminal of your TV. 2 Turn on the DVD-VCR and TV. 3 Press the input selector on your TV. - Please refer to 20) - Progressive) - If you connect or disconnect any cables. - If...
User Manual (user Manual) (ver.1.0) (English)
Page 16
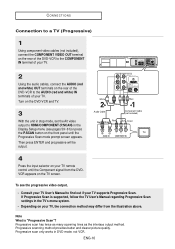
... the Component signal from the illustration above. To see pages 59~61)or press the P.SCAN button on the TV screen. Depending on the DVD-VCR and TV. 3 With the unit in DVD mode, not VCR. Consult your TV User's Manual to HDMI/COMPONENT (P.SCAN) in the TV's menu system. - If Progressive Scan is "Progressive Scan"? Note What is supported, follow the TV User's Manual regarding Progressive Scan settings in the Display Setup menu (see the progressive video output, - Turn on your TV remote control...
... the Component signal from the illustration above. To see pages 59~61)or press the P.SCAN button on the TV screen. Depending on the DVD-VCR and TV. 3 With the unit in DVD mode, not VCR. Consult your TV User's Manual to HDMI/COMPONENT (P.SCAN) in the TV's menu system. - If Progressive Scan is "Progressive Scan"? Note What is supported, follow the TV User's Manual regarding Progressive Scan settings in the Display Setup menu (see the progressive video output, - Turn on your TV remote control...
User Manual (user Manual) (ver.1.0) (English)
Page 17
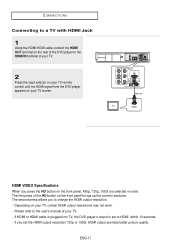
... remote control until the HDMI signal from the DVD player appears on your TV screen. CONNECTIONS Connecting to a TV with HDMI Jack 1 Using the HDMI-HDMI cable connect the HDMI OUT terminal on the rear of the DVD player to change the HDMI output resolution. - Please refer to HDMI within 10 seconds. - ENG-17 Depending on your TV. - If you press the HD button on the front panel brings up the current resolution. HDMI cable HDMI VIDEO Specifications When you set to the user's manual...
... remote control until the HDMI signal from the DVD player appears on your TV screen. CONNECTIONS Connecting to a TV with HDMI Jack 1 Using the HDMI-HDMI cable connect the HDMI OUT terminal on the rear of the DVD player to change the HDMI output resolution. - Please refer to HDMI within 10 seconds. - ENG-17 Depending on your TV. - If you press the HD button on the front panel brings up the current resolution. HDMI cable HDMI VIDEO Specifications When you set to the user's manual...
User Manual (user Manual) (ver.1.0) (English)
Page 20
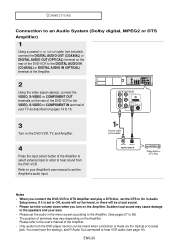
... to the user's manual of the Amplifier to select external input in Audio Setup menu. Only audio from the DVD player section can be a loud sound. - Please set the Amplifier's audio input. The position of terminals may cause damage to the speakers and your ears. - ENG-20 Notes - When you turn the volume down when you connect the DVD-VCR to DTS Amplifier and play a DTS disc, set to Off, sound will not...
... to the user's manual of the Amplifier to select external input in Audio Setup menu. Only audio from the DVD player section can be a loud sound. - Please set the Amplifier's audio input. The position of terminals may cause damage to the speakers and your ears. - ENG-20 Notes - When you turn the volume down when you connect the DVD-VCR to DTS Amplifier and play a DTS disc, set to Off, sound will not...
User Manual (user Manual) (ver.1.0) (English)
Page 26
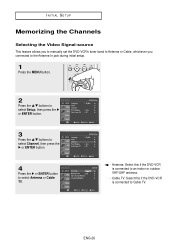
ENG-26 INITIAL SETUP Memorizing the Channels Selecting the Video Signal-source This feature allows you to manually set the DVD-VCR's tuner band to Antenna or Cable, whichever you connected to the Antenna In jack during initial setup. 1 Press the MENU button. 2 Press the .../† buttons to select Setup, then press the √ or ENTER button. 3 Press the .../† buttons to select Channel, then press the √ or ENTER button. 4 Press the √...
ENG-26 INITIAL SETUP Memorizing the Channels Selecting the Video Signal-source This feature allows you to manually set the DVD-VCR's tuner band to Antenna or Cable, whichever you connected to the Antenna In jack during initial setup. 1 Press the MENU button. 2 Press the .../† buttons to select Setup, then press the √ or ENTER button. 3 Press the .../† buttons to select Channel, then press the √ or ENTER button. 4 Press the √...

User Manual (user Manual) (ver.1.0) (English)
Page 28
ENG-28 INITIAL SETUP Selecting the RF Output Channel Use this feature if DVD-VCR is connected to TV using RF antenna cable. 1 Press the MENU button. 2 Press the .../† buttons to select Setup, then press the √ or ENTER button. 3 Press the .../† buttons to select Channel, then press the √ or ENTER button. 4 Press the .../† buttons to select RF Output CH, then press the √ or ENTER button to select CH3 or CH4. 5 Press the MENU button to exit.
ENG-28 INITIAL SETUP Selecting the RF Output Channel Use this feature if DVD-VCR is connected to TV using RF antenna cable. 1 Press the MENU button. 2 Press the .../† buttons to select Setup, then press the √ or ENTER button. 3 Press the .../† buttons to select Channel, then press the √ or ENTER button. 4 Press the .../† buttons to select RF Output CH, then press the √ or ENTER button to select CH3 or CH4. 5 Press the MENU button to exit.

User Manual (user Manual) (ver.1.0) (English)
Page 61
..., see the user's manual of the DVD-V9500 to appear. • If you set the HDMI output's digital data RGB range. - DVD OPERATIONS HDMI This setting is used to fine-tune the output of your TV or projector. • When the resolution is changed during playback, it may be used when the unit is connected by HDMI with Display devices (TV, projector, etc). - CbCr : 0~255 - Limited range Black/White and color level are displayed within Limited...
..., see the user's manual of the DVD-V9500 to appear. • If you set the HDMI output's digital data RGB range. - DVD OPERATIONS HDMI This setting is used to fine-tune the output of your TV or projector. • When the resolution is changed during playback, it may be used when the unit is connected by HDMI with Display devices (TV, projector, etc). - CbCr : 0~255 - Limited range Black/White and color level are displayed within Limited...

User Manual (user Manual) (ver.1.0) (English)
Page 77
..., break off the tab using a small screwdriver. VCR OPERATIONS Basic Recording You can record a TV show in 30-minute increments up to the record speed. (See page 80) 2 Use the Number buttons or the CH ... To re-record over the tape. Recording 1 Insert a blank VHS tape into the VCR deck. You can even add time in progress by pressing the REC button repeatedly; Note Be sure your...
..., break off the tab using a small screwdriver. VCR OPERATIONS Basic Recording You can record a TV show in 30-minute increments up to the record speed. (See page 80) 2 Use the Number buttons or the CH ... To re-record over the tape. Recording 1 Insert a blank VHS tape into the VCR deck. You can even add time in progress by pressing the REC button repeatedly; Note Be sure your...
User Manual (user Manual) (ver.1.0) (English)
Page 81
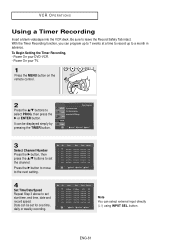
... the MENU button on the remote control. 2 Press the .../† buttons to set start time, end time, date and record speed. Be sure to a month in advance. It can be displayed simply by pressing the TIMER button. 3 Select Channel Number Press the √ button, then press the .../† buttons to select PROG, then press the √ or ENTER button. ENG-81 With the Timer Recording function, you can select external input directly (L1) using INPUT SEL. VCR OPERATIONS Using a Timer Recording Insert...
... the MENU button on the remote control. 2 Press the .../† buttons to set start time, end time, date and record speed. Be sure to a month in advance. It can be displayed simply by pressing the TIMER button. 3 Select Channel Number Press the √ button, then press the .../† buttons to select PROG, then press the √ or ENTER button. ENG-81 With the Timer Recording function, you can select external input directly (L1) using INPUT SEL. VCR OPERATIONS Using a Timer Recording Insert...
User Manual (user Manual) (ver.1.0) (English)
Page 82
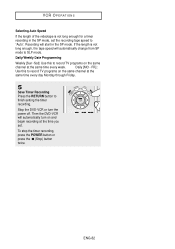
...-82 Daily/Weekly Date Programming Weekly [Sun~Sat]: Use this to "Auto". Then the DVD-VCR will automatically change from SP mode to finish setting the timer recording. Stop the DVD-VCR or turn on and begin recording at the same time every day Monday through Friday. 5 Save Timer Recording Press the RETURN button to SLP mode. To stop the timer recording, press the POWER button or press the (Stop) button twice. VCR OPERATIONS Selecting Auto Speed If the length of...
...-82 Daily/Weekly Date Programming Weekly [Sun~Sat]: Use this to "Auto". Then the DVD-VCR will automatically change from SP mode to finish setting the timer recording. Stop the DVD-VCR or turn on and begin recording at the same time every day Monday through Friday. 5 Save Timer Recording Press the RETURN button to SLP mode. To stop the timer recording, press the POWER button or press the (Stop) button twice. VCR OPERATIONS Selecting Auto Speed If the length of...
User Manual (user Manual) (ver.1.0) (English)
Page 84
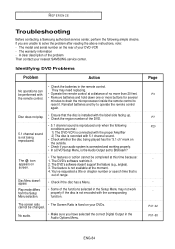
... Audio Options Menu. The feature is fixed on the outside. • Check if your nearest SAMSUNG service center. Identifying DVD Problems Problem Action No operations can be performed with the corresponding function. A clear description of the DVD. 5.1 channel sound is not being played has the "5.1 ch" mark on your DVD-VCR - Reinstall batteries and try to reset it . 2. If you have selected the correct Digital Output in the remote control. The screen ratio • The Screen Ratio...
... Audio Options Menu. The feature is fixed on the outside. • Check if your nearest SAMSUNG service center. Identifying DVD Problems Problem Action No operations can be performed with the corresponding function. A clear description of the DVD. 5.1 channel sound is not being played has the "5.1 ch" mark on your DVD-VCR - Reinstall batteries and try to reset it . 2. If you have selected the correct Digital Output in the remote control. The screen ratio • The Screen Ratio...
User Manual (user Manual) (ver.1.0) (English)
Page 85
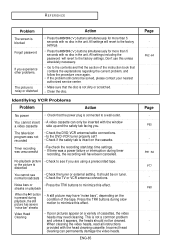
... or scratched. • Clean the disc. Timer recording was unsuccessful • Re-check the recording start/stop time settings. • If there was not recorded • Check the DVD-VCR antenna/cable connections. • Is the DVD-VCR tuner properly set? • Check if the safety tab is pressed during playback, the still picture has severe "noise bar" streaks • A still picture may need cleaning. Video Head Cleaning • If poor...
... or scratched. • Clean the disc. Timer recording was unsuccessful • Re-check the recording start/stop time settings. • If there was not recorded • Check the DVD-VCR antenna/cable connections. • Is the DVD-VCR tuner properly set? • Check if the safety tab is pressed during playback, the still picture has severe "noise bar" streaks • A still picture may need cleaning. Video Head Cleaning • If poor...


