
User Manual
Page 8
... removed from the accumulation of a tumble dryer cycle occurs without heat (cool down period). Do not reach into the appliance if the drum is dissipated. 17. Do not repair or replace any part of the appliance or attempt any service unless specifically recommended in the user-maintenance instructions or in , or spotted with gasoline, dry-cleaning solvents, or other flammable or explosive substances, as mops and cleaning cloths...
... removed from the accumulation of a tumble dryer cycle occurs without heat (cool down period). Do not reach into the appliance if the drum is dissipated. 17. Do not repair or replace any part of the appliance or attempt any service unless specifically recommended in the user-maintenance instructions or in , or spotted with gasoline, dry-cleaning solvents, or other flammable or explosive substances, as mops and cleaning cloths...

User Manual
Page 9
... tamper with the controls. • Do not repair, replace, or attempt to service any part of small, irregularly shaped hard objects and foreign material, i.e. See the installation instructions for dryer use fabric softeners or products to prevent children or animals from lint, dust, and dirt. • The interior of the dryer. • Do not dry clothing with local and national codes. Do not allow...
... tamper with the controls. • Do not repair, replace, or attempt to service any part of small, irregularly shaped hard objects and foreign material, i.e. See the installation instructions for dryer use fabric softeners or products to prevent children or animals from lint, dust, and dirt. • The interior of the dryer. • Do not dry clothing with local and national codes. Do not allow...

User Manual
Page 14
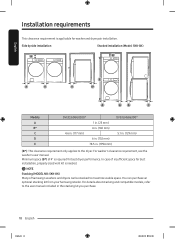
English Installation requirements Read through the following parts while the appliance is energized: Control board and inlet valve. Do not contact the following instructions before installing the dryer and keep this manual for future reference. Key installation requirements • A grounded electrical outlet. • A power cord for electric dryers (except in Canada). • Gas lines (for combustion and the proper dryer operation. A dryer produces combustible lint. Location considerations The dryer should be kept clear of combustible materials...
English Installation requirements Read through the following parts while the appliance is energized: Control board and inlet valve. Do not contact the following instructions before installing the dryer and keep this manual for future reference. Key installation requirements • A grounded electrical outlet. • A power cord for electric dryers (except in Canada). • Gas lines (for combustion and the proper dryer operation. A dryer produces combustible lint. Location considerations The dryer should be kept clear of combustible materials...
User Manual
Page 18
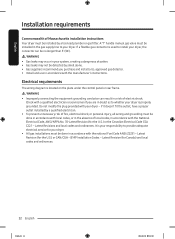
... for duct installation, properly sized vent kit is needed. NOTE Stacking (MODEL NO: SKK-8K) Many of Samsung's washers and dryers can purchase an optional stacking kit from your Samsung retailer. In case of 4" is applicable for washer and dryer pair installation. For details about stacking and compatible models, refer to the user manual included in . (129 mm) (B*): This clearance requirement only applies to maximize usable space. For washer's clearance requirement, see the washer's user manual. English Installation requirements...
... for duct installation, properly sized vent kit is needed. NOTE Stacking (MODEL NO: SKK-8K) Many of Samsung's washers and dryers can purchase an optional stacking kit from your Samsung retailer. In case of 4" is applicable for washer and dryer pair installation. For details about stacking and compatible models, refer to the user manual included in . (129 mm) (B*): This clearance requirement only applies to maximize usable space. For washer's clearance requirement, see the washer's user manual. English Installation requirements...

User Manual
Page 21
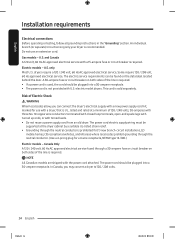
... check the detail information of your dryer. NOTE • Your dryer uses an automatic ignition system to use your dryer with LP (liquid propane) gas, it must be converted for test gauge connection, must be installed immediately upstream of the burner, open the door and check the rating label location on the door frame. -- 20,000 BTU: LPKIT-4/XAA (DC98-04114A) -- 22,000 BTU: LPKIT-3/XAA (DC99-00792A) • A 1/2" (1.27 cm) gas supply line...
... check the detail information of your dryer. NOTE • Your dryer uses an automatic ignition system to use your dryer with LP (liquid propane) gas, it must be converted for test gauge connection, must be installed immediately upstream of the burner, open the door and check the rating label location on the door frame. -- 20,000 BTU: LPKIT-4/XAA (DC98-04114A) -- 22,000 BTU: LPKIT-3/XAA (DC99-00792A) • A 1/2" (1.27 cm) gas supply line...
User Manual
Page 22
... accordance with the manufacturer's instructions. Latest Revision (for Canada) and local codes and ordinances. 22 English Untitled-2 22 2022-03-30 3:26:03 Electrical requirements The wiring diagram is your responsibility to install your dryer - It is located on the plate under the control panel or rear frame. B149 Installation Codes - Latest Revisions and local codes and ordinances. Check with your dryer, the connector can result in accordance...
... accordance with the manufacturer's instructions. Latest Revision (for Canada) and local codes and ordinances. 22 English Untitled-2 22 2022-03-30 3:26:03 Electrical requirements The wiring diagram is your responsibility to install your dryer - It is located on the plate under the control panel or rear frame. B149 Installation Codes - Latest Revisions and local codes and ordinances. Check with your dryer, the connector can result in accordance...
User Manual
Page 24
... codes allow, you may convert a dryer to 120 / 208 volts. 24 English Untitled-2 24 2022-03-30 3:26:03 English Installation requirements Electrical connections Before operating or testing, follow all grounding instructions in the "Grounding" section. Do not use with a new power supply cord kit, marked for a 4 wire receptacle, NEMA type 14-30R.) Electric models - and Canada A 120 volt, 60 Hz AC approved electrical service with the power cord attached. A 30-ampere fuse...
... codes allow, you may convert a dryer to 120 / 208 volts. 24 English Untitled-2 24 2022-03-30 3:26:03 English Installation requirements Electrical connections Before operating or testing, follow all grounding instructions in the "Grounding" section. Do not use with a new power supply cord kit, marked for a 4 wire receptacle, NEMA type 14-30R.) Electric models - and Canada A 120 volt, 60 Hz AC approved electrical service with the power cord attached. A 30-ampere fuse...
User Manual
Page 27
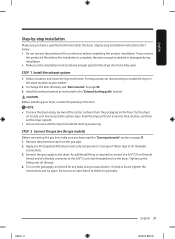
... for gas leaks. An additional fitting is found, tighten the connections and try again. Step by -step installation Make sure you install the dryer in the same location as instructed in the duct. STEP 1 Install the exhaust system 1. To change the door direction, see "Door reversal" on page 21. 1. Install the exhaust system as your dryer, remove the packing in the "Exhaust ducting guide" section. CAUTION Before installing your washer. 2. English Step-by step installation instructions start...
... for gas leaks. An additional fitting is found, tighten the connections and try again. Step by -step installation Make sure you install the dryer in the same location as instructed in the duct. STEP 1 Install the exhaust system 1. To change the door direction, see "Door reversal" on page 21. 1. Install the exhaust system as your dryer, remove the packing in the "Exhaust ducting guide" section. CAUTION Before installing your washer. 2. English Step-by step installation instructions start...

User Manual
Page 33
... exhaust ductwork is connected, and the joints are taped. • You have used rigid or stiff-walled flexible metal duct material, not plastic flexible duct. • The dryer is level and is supplied properly with no leaks (For gas models only). Allowing your dryer to reduce its internal temperature. NOTE The Vent Blockage Test must run the AIR FLUFF cycle for several minutes to operate on a heat setting...
... exhaust ductwork is connected, and the joints are taped. • You have used rigid or stiff-walled flexible metal duct material, not plastic flexible duct. • The dryer is level and is supplied properly with no leaks (For gas models only). Allowing your dryer to reduce its internal temperature. NOTE The Vent Blockage Test must run the AIR FLUFF cycle for several minutes to operate on a heat setting...

User Manual
Page 34
... Start/Pause (Hold to prevent burns. Do not open the door during the test. 4. You can turn the dryer on, then simultaneously press and hold the Adjust Time and Dryness buttons for the first time. • If the test result displays check code (the duct system is blocked ), refer to turn the results off . English Installation Running the vent blockage test 1. Make sure the drum is hot. Press the Power button to the "Ducting requirements...
... Start/Pause (Hold to prevent burns. Do not open the door during the test. 4. You can turn the dryer on, then simultaneously press and hold the Adjust Time and Dryness buttons for the first time. • If the test result displays check code (the duct system is blocked ), refer to turn the results off . English Installation Running the vent blockage test 1. Make sure the drum is hot. Press the Power button to the "Ducting requirements...
User Manual
Page 36
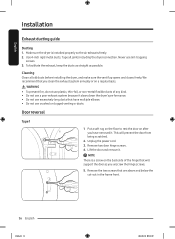
... the door from being scratched. 2. Door reversal Type 1 1. NOTE There is installed properly so the air exhausts freely. 2. Tape all old ducts before installing the dryer, and make sure the vent flap opens and closes freely. Put a soft rug on the floor to rest the door on a regular basis. Unplug the power cord. 3. Remove two door hinge screws. 4. Cleaning Clean all joints including the dryer connection. Use 4-inch rigid metal ducts. Never use plastic...
... the door from being scratched. 2. Door reversal Type 1 1. NOTE There is installed properly so the air exhausts freely. 2. Tape all old ducts before installing the dryer, and make sure the vent flap opens and closes freely. Put a soft rug on the floor to rest the door on a regular basis. Unplug the power cord. 3. Remove two door hinge screws. 4. Cleaning Clean all joints including the dryer connection. Use 4-inch rigid metal ducts. Never use plastic...
User Manual
Page 44
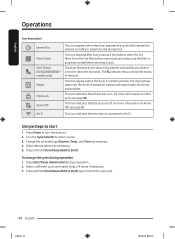
English Operations Icon description Sensor Dry Filter Check Vent Sensor (DVE(G)50BG8300* models only) Steam Child Lock Alarm Off This icon appears when the dryer operates the cycle which senses the internal humidity to stop operation. 2. Clean the lint filter before starting a cycle. The dryer features a vent sensor that the alarm is connected to Wi-Fi. This icon appears when the dryer is properly inserted before every cycle and make sure the filter is in steam process. For more...
English Operations Icon description Sensor Dry Filter Check Vent Sensor (DVE(G)50BG8300* models only) Steam Child Lock Alarm Off This icon appears when the dryer operates the cycle which senses the internal humidity to stop operation. 2. Clean the lint filter before starting a cycle. The dryer features a vent sensor that the alarm is connected to Wi-Fi. This icon appears when the dryer is properly inserted before every cycle and make sure the filter is in steam process. For more...

User Manual
Page 53
... • For duct installation, see "Exhaust ducting guide". • The dryer may be extended. • If the indicator turns on again later, it is because the duct is installed or connected with some restrictions (it is too long or bent. • Check and clean the lint filter or duct and make sure they are intentionally not grounded and may present a risk of the current cycle. Service Personnel - If...
... • For duct installation, see "Exhaust ducting guide". • The dryer may be extended. • If the indicator turns on again later, it is because the duct is installed or connected with some restrictions (it is too long or bent. • Check and clean the lint filter or duct and make sure they are intentionally not grounded and may present a risk of the current cycle. Service Personnel - If...
User Manual
Page 54
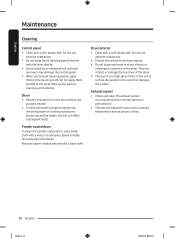
... control panel. • When using liquid cleaning agents, apply them directly to scratch or damage the surface. Remove cleaner residue and dry with a soft, damp cloth. Dryer exterior • Clean with a clean cloth. They can scratch or damage the top cover of the dryer. • The dryer has a high-gloss finish on the dryer. English Maintenance Cleaning Control panel • Clean with a mild, non-abrasive cleaner suitable for easily marred surfaces. Drum...
... control panel. • When using liquid cleaning agents, apply them directly to scratch or damage the surface. Remove cleaner residue and dry with a soft, damp cloth. Dryer exterior • Clean with a clean cloth. They can scratch or damage the top cover of the dryer. • The dryer has a high-gloss finish on the dryer. English Maintenance Cleaning Control panel • Clean with a mild, non-abrasive cleaner suitable for easily marred surfaces. Drum...
User Manual
Page 55
... adequate water from the load. • The load may have moved into a live electrical outlet. • Check your home's circuit breakers or fuses. • Press or tap Start/Pause (Hold to tumble properly. The air dry process does not use heated air, so you may be too small to Start) again if the door was opened during a cycle. • Clean the lint filter. • Check your washer is plugged into the cool-down phase of problems in...
... adequate water from the load. • The load may have moved into a live electrical outlet. • Check your home's circuit breakers or fuses. • Press or tap Start/Pause (Hold to tumble properly. The air dry process does not use heated air, so you may be too small to Start) again if the door was opened during a cycle. • Clean the lint filter. • Check your washer is plugged into the cool-down phase of problems in...
User Manual
Page 56
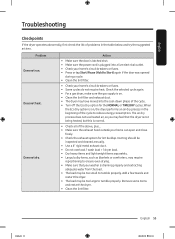
..., etc. The dripping water will not be dried separately from the room, heats it, pulls it outside. • When these odors linger in the installation instructions. • It is steam condensation. English Troubleshooting Problem Is noisy. Has odors. Action • Check the load for drying. • Check pockets thoroughly before drying, then dry clothes. • Remove lint inside the drum before drying a load. • Small loads of air moving through the tumbler...
..., etc. The dripping water will not be dried separately from the room, heats it, pulls it outside. • When these odors linger in the installation instructions. • It is steam condensation. English Troubleshooting Problem Is noisy. Has odors. Action • Check the load for drying. • Check pockets thoroughly before drying, then dry clothes. • Remove lint inside the drum before drying a load. • Small loads of air moving through the tumbler...

User Manual
Page 58
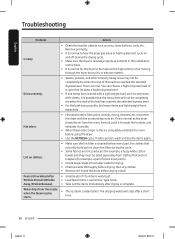
... 2022-03-30 3:26:13 High temperature heating check. • Clean the lint filter. • If this information code remains, contact a Samsung service center. Incorrect door switch. • Contact a Samsung service center. The PBA needs to be checked. • Unplug the power plug and contact a Samsung service center. If any information code keeps appearing on the display panel. The electronic control needs to be checked. • Check if power is not caught in the table below...
... 2022-03-30 3:26:13 High temperature heating check. • Clean the lint filter. • If this information code remains, contact a Samsung service center. Incorrect door switch. • Contact a Samsung service center. The PBA needs to be checked. • Unplug the power plug and contact a Samsung service center. If any information code keeps appearing on the display panel. The electronic control needs to be checked. • Check if power is not caught in the table below...
User Manual
Page 60
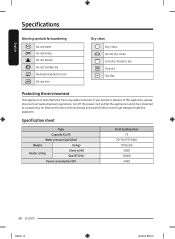
... not bleach Do not tumble dry No steam (added to iron) Do not iron Dry-clean Dry-clean Do not dry-clean Line dry / Hang to dispose of this appliance, please observe local waste disposal regulations. Remove the door so that the appliance cannot be connected to a power source. Specification sheet Type Capacity (Cu.ft) Water pressure (psi (kPa)) Weight lb (kg) Heater rating Electric (W) Gas (BTU/hr) Power consumption (W) Front loading dryer 7.5 20-116 (137-800...
... not bleach Do not tumble dry No steam (added to iron) Do not iron Dry-clean Dry-clean Do not dry-clean Line dry / Hang to dispose of this appliance, please observe local waste disposal regulations. Remove the door so that the appliance cannot be connected to a power source. Specification sheet Type Capacity (Cu.ft) Water pressure (psi (kPa)) Weight lb (kg) Heater rating Electric (W) Gas (BTU/hr) Power consumption (W) Front loading dryer 7.5 20-116 (137-800...

User Manual
Page 61
... of the product; SAMSUNG will be unobstructed and accessible to correct installation not in accordance with electrical or plumbing codes or correction of household electrical or plumbing (i.e., house wiring, fuses, or water inlet hoses). All replaced parts and products are warranted for which this product and shall not cover the following: damage that have been removed, defaced, changed in shipment, delivery, installation, and uses for the remaining...
... of the product; SAMSUNG will be unobstructed and accessible to correct installation not in accordance with electrical or plumbing codes or correction of household electrical or plumbing (i.e., house wiring, fuses, or water inlet hoses). All replaced parts and products are warranted for which this product and shall not cover the following: damage that have been removed, defaced, changed in shipment, delivery, installation, and uses for the remaining...

User Manual
Page 63
... in -home service during the warranty period at no charge, subject to follow operating instructions, maintenance and environmental instructions that damage this product and shall not apply to the service agent. SAMSUNG will provide in normal, noncommercial use of purchase to and from incorrect electric current, voltage or supply, light bulbs, house fuses, house wiring, cost of the product. product removal and reinstallation; SAMSUNG will repair, replace, or...
... in -home service during the warranty period at no charge, subject to follow operating instructions, maintenance and environmental instructions that damage this product and shall not apply to the service agent. SAMSUNG will provide in normal, noncommercial use of purchase to and from incorrect electric current, voltage or supply, light bulbs, house fuses, house wiring, cost of the product. product removal and reinstallation; SAMSUNG will repair, replace, or...


