

User Manual
Page 2
... Statement : This equipment complies with the limits for connections. ENG - 2 This symbol indicates that high voltage is DC voltage. Consult Instructions for use shielded cables and connectors for a Class B digital device, pursuant to dripping or splashing. Class B FCC Statement This equipment has been tested and found to consult the user manual for an uncontrolled environment. special handling may apply...
... Statement : This equipment complies with the limits for connections. ENG - 2 This symbol indicates that high voltage is DC voltage. Consult Instructions for use shielded cables and connectors for a Class B digital device, pursuant to dripping or splashing. Class B FCC Statement This equipment has been tested and found to consult the user manual for an uncontrolled environment. special handling may apply...
User Manual
Page 4
... Output specifications for the different sound effect modes 11 Adjusting the Soundbar volume with a TV remote control 13 04 Connecting the Soundbar 14 Connecting the power and units 14 ‒ Manually connecting the Subwoofer 15 ‒ LED Indicator Lights on the Rear of Subwoofer 16 Connecting an SWA-9100 to your Soundbar 17 05 Connecting to a TV 19 Connecting the TV that supports HDMI ARC (Audio Return Channel 19 Connecting using an Optical Cable 20 Connecting via Bluetooth ...21 Connecting via Bluetooth...
... Output specifications for the different sound effect modes 11 Adjusting the Soundbar volume with a TV remote control 13 04 Connecting the Soundbar 14 Connecting the power and units 14 ‒ Manually connecting the Subwoofer 15 ‒ LED Indicator Lights on the Rear of Subwoofer 16 Connecting an SWA-9100 to your Soundbar 17 05 Connecting to a TV 19 Connecting the TV that supports HDMI ARC (Audio Return Channel 19 Connecting using an Optical Cable 20 Connecting via Bluetooth ...21 Connecting via Bluetooth...

User Manual
Page 5
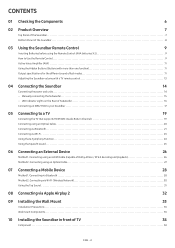
11 Software Update 35 Auto Update ...35 USB Update...35 Initialization ...36 12 Troubleshooting 36 13 License 38 14 Open Source License Notice 38 15 Important Notes About Service 38 16 Specifications and Guide 39 Specifications ...39 ENG - 5
11 Software Update 35 Auto Update ...35 USB Update...35 Initialization ...36 12 Troubleshooting 36 13 License 38 14 Open Source License Notice 38 15 Important Notes About Service 38 16 Specifications and Guide 39 Specifications ...39 ENG - 5

User Manual
Page 6
... (BN67-00398L) Wireless Surround Speaker SET (SWA-9100) Subwoofer Wall Mount Guide (AH63-04369C) x 2 Bracket-Wall Mount (AH61-04119A) STANDBY LINK x 2 Surround Speaker Power Cord (3903-001117) x 2 Wireless Receiver Module Speaker Cable (AH81-02137A) • For more information about the power supply and power consumption, refer to the label attached to the product. (Label: Rear of the Soundbar Main Unit) • To purchase additional components or optional cables, contact a Samsung Service Center or Samsung Customer Care...
... (BN67-00398L) Wireless Surround Speaker SET (SWA-9100) Subwoofer Wall Mount Guide (AH63-04369C) x 2 Bracket-Wall Mount (AH61-04119A) STANDBY LINK x 2 Surround Speaker Power Cord (3903-001117) x 2 Wireless Receiver Module Speaker Cable (AH81-02137A) • For more information about the power supply and power consumption, refer to the label attached to the product. (Label: Rear of the Soundbar Main Unit) • To purchase additional components or optional cables, contact a Samsung Service Center or Samsung Customer Care...

User Manual
Page 7
... hear sounds from both the TV and Soundbar, go to the Settings menu for the TV audio and change the TV speaker to change the input source. 1 (Power) Button (Q750B model) Turns the power on and off. 2 (Volume) Button Adjusts the volume. 3 (Mic On/Off) Button (Q910B model) Press the button to turn on or off. 3 (Source) Button (Q750B model) Press the (Source) button to External Speaker. 02 PRODUCT OVERVIEW Top Panel of the Soundbar 1 3 2 1 3 2 4 HW-Q910B 4 HW-Q750B 1 (Multi Function) Button (Q910B model) • In standby mode...
... hear sounds from both the TV and Soundbar, go to the Settings menu for the TV audio and change the TV speaker to change the input source. 1 (Power) Button (Q750B model) Turns the power on and off. 2 (Volume) Button Adjusts the volume. 3 (Mic On/Off) Button (Q910B model) Press the button to turn on or off. 3 (Source) Button (Q750B model) Press the (Source) button to External Speaker. 02 PRODUCT OVERVIEW Top Panel of the Soundbar 1 3 2 1 3 2 4 HW-Q910B 4 HW-Q750B 1 (Multi Function) Button (Q910B model) • In standby mode...
User Manual
Page 9
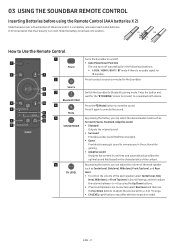
...; Auto Power Down Function Power The unit turns off automatically in Sound Settings, and then adjust the volume between -6~+6 by using the Up/Down buttons. • If Surround Speakers are connected, select Rear level and then use the Up/Down buttons to adjust the volume within a -6 to +6 range. • CH LEVEL specifications may differ with the respective model. How to Use the Remote Control 1 Turns the Soundbar on the characteristics of the each speaker select Center level, Side level, Wide level, or Front Top level...
...; Auto Power Down Function Power The unit turns off automatically in Sound Settings, and then adjust the volume between -6~+6 by using the Up/Down buttons. • If Surround Speakers are connected, select Rear level and then use the Up/Down buttons to adjust the volume within a -6 to +6 range. • CH LEVEL specifications may differ with the respective model. How to Use the Remote Control 1 Turns the Soundbar on the characteristics of the each speaker select Center level, Side level, Wide level, or Front Top level...

User Manual
Page 10
... functions. • The Virtual Speaker function can be turned ON/OFF by pressing the button. TONE CONTROL • To control the volume of the woofer (bass). 12 VOLUME Push the button up or down to select the previous music file. • ID SET Use this option when the Subwoofer or Surround Speakers are selectable using the Left/Right buttons and each frequency band. 150Hz, 300Hz, 600Hz, 1.2kHz, 2.5kHz, 5kHz, and 10kHz are not connected or need...
... functions. • The Virtual Speaker function can be turned ON/OFF by pressing the button. TONE CONTROL • To control the volume of the woofer (bass). 12 VOLUME Push the button up or down to select the previous music file. • ID SET Use this option when the Subwoofer or Surround Speakers are selectable using the Left/Right buttons and each frequency band. 150Hz, 300Hz, 600Hz, 1.2kHz, 2.5kHz, 5kHz, and 10kHz are not connected or need...

User Manual
Page 11
... is saved during the analysis. • This function is not supported by Q750B model. Using the Hidden Buttons (Buttons with more than one function) Remote Control Button WOOFER (Up) Up (Sound Control) Hidden Button Function TV remote control On/Off (Standby) ID SET 7 Band EQ Reference page page 13 page 15 page 10 Output specifications for the different sound effect modes Effect Standard Surround Game Adaptive sound Input 2.0 ch 5.1 ch 7.1 ch Dolby Atmos®, DTS:X 2.0 ch 5.1 ch 7.1 ch...
... is saved during the analysis. • This function is not supported by Q750B model. Using the Hidden Buttons (Buttons with more than one function) Remote Control Button WOOFER (Up) Up (Sound Control) Hidden Button Function TV remote control On/Off (Standby) ID SET 7 Band EQ Reference page page 13 page 15 page 10 Output specifications for the different sound effect modes Effect Standard Surround Game Adaptive sound Input 2.0 ch 5.1 ch 7.1 ch Dolby Atmos®, DTS:X 2.0 ch 5.1 ch 7.1 ch...

User Manual
Page 16
... wireless subwoofer, the system may cause some sound interruption. • The maximum transmission distance of Subwoofer LED Blue Red Status On Blinking On Description Successfully connected (normal operation) Recovering the connection Standby (with the Soundbar main unit turned off , the wireless subwoofer will turn red after blinking in this manual. LED Indicator Lights on the Rear of the main unit's wireless signal is about 5 minutes. If blinking persists, try manually connecting the subwoofer. Check if the power cable...
... wireless subwoofer, the system may cause some sound interruption. • The maximum transmission distance of Subwoofer LED Blue Red Status On Blinking On Description Successfully connected (normal operation) Recovering the connection Standby (with the Soundbar main unit turned off , the wireless subwoofer will turn red after blinking in this manual. LED Indicator Lights on the Rear of the main unit's wireless signal is about 5 minutes. If blinking persists, try manually connecting the subwoofer. Check if the power cable...
User Manual
Page 17
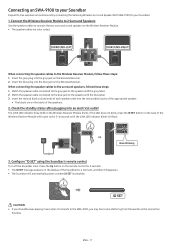
... the display of the speakers. 2. Connecting an SWA-9100 to your Soundbar Expand to true wireless surround sound by connecting the Samsung Wireless Surround Speaker SET (SWA-9100) to the speaker with the blue label. 3. Press the Up button on the remote control for 5~6 seconds until the LINK LED indicator blinks (in Blue). Match the speaker cable connected to the blue jack to your Soundbar was playing music when it disappears. • The Soundbar will automatically power...
... the display of the speakers. 2. Connecting an SWA-9100 to your Soundbar Expand to true wireless surround sound by connecting the Samsung Wireless Surround Speaker SET (SWA-9100) to the speaker with the blue label. 3. Press the Up button on the remote control for 5~6 seconds until the LINK LED indicator blinks (in Blue). Match the speaker cable connected to the blue jack to your Soundbar was playing music when it disappears. • The Soundbar will automatically power...

User Manual
Page 19
... the HDMI cable is connected to the correct port. • Use the volume buttons on the TV's remote control to change the setting to Dolby Digital. ENG - 19 Turn on the remote control to select the "D.IN" mode. Samsung TV : Home ( ) → Menu → Settings ( ) → All Settings ( ) → Sound → Expert Settings → HDMI-eARC Mode (Auto)) • If "TV ARC" does not appear in the display window of the Soundbar main unit and the Soundbar plays TV sound. •...
... the HDMI cable is connected to the correct port. • Use the volume buttons on the TV's remote control to change the setting to Dolby Digital. ENG - 19 Turn on the remote control to select the "D.IN" mode. Samsung TV : Home ( ) → Menu → Settings ( ) → All Settings ( ) → Sound → Expert Settings → HDMI-eARC Mode (Auto)) • If "TV ARC" does not appear in the display window of the Soundbar main unit and the Soundbar plays TV sound. •...

User Manual
Page 21
... PAIR OR Top of your Samsung TV the first time, use the "BT READY" mode to "BT READY" if there is a connect record. Press the PAIR button on the Samsung TV. (e.g. "BT" changes to "BT PAIRING" in a few seconds automatically or changes to reconnect. Home ( ) → Menu → Settings ( ) → All Settings ( ) → Sound → Sound Output → Bluetooth Speaker List → Soundbar Q***B (Bluetooth)) 3. If the device fails...
... PAIR OR Top of your Samsung TV the first time, use the "BT READY" mode to "BT READY" if there is a connect record. Press the PAIR button on the Samsung TV. (e.g. "BT" changes to "BT PAIRING" in a few seconds automatically or changes to reconnect. Home ( ) → Menu → Settings ( ) → All Settings ( ) → Sound → Sound Output → Bluetooth Speaker List → Soundbar Q***B (Bluetooth)) 3. If the device fails...

User Manual
Page 26
... player or other device Open the audio output options on a Samsung BD Player, go to select "HDMI" mode. 5. 06 CONNECTING AN EXTERNAL DEVICE Method 1. Use an HDMI cable to connect the HDMI IN port of the TV and the HDMI TO TV (eARC/ARC) port on the bottom of the Soundbar or the (Source) button on the top of the Soundbar. 3. ENG - 26 Press the (Multi Function) / (Source) button on the remote control to Home Menu → Sound → Digital Output...
... player or other device Open the audio output options on a Samsung BD Player, go to select "HDMI" mode. 5. 06 CONNECTING AN EXTERNAL DEVICE Method 1. Use an HDMI cable to connect the HDMI IN port of the TV and the HDMI TO TV (eARC/ARC) port on the bottom of the Soundbar or the (Source) button on the top of the Soundbar. 3. ENG - 26 Press the (Multi Function) / (Source) button on the remote control to Home Menu → Sound → Digital Output...

User Manual
Page 27
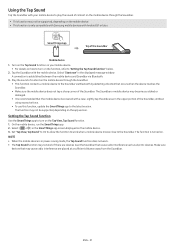
Use an optical cable (not supplied) to connect the DIGITAL AUDIO IN (OPTICAL) on the Soundbar main and the OPTICAL OUT port on the remote control. 4. Your Soundbar will play sounds from the external device. To select "D.IN" mode, press the (Multi Function) / (Source) button on the top of the Soundbar 1. Turn on the Soundbar and external device. 3. Method 2. ENG - 27 Connecting using an Optical Cable Top of the Soundbar BD / DVD player / Settop box / Game console Top...
Use an optical cable (not supplied) to connect the DIGITAL AUDIO IN (OPTICAL) on the Soundbar main and the OPTICAL OUT port on the remote control. 4. Your Soundbar will play sounds from the external device. To select "D.IN" mode, press the (Multi Function) / (Source) button on the top of the Soundbar 1. Turn on the Soundbar and external device. 3. Method 2. ENG - 27 Connecting using an Optical Cable Top of the Soundbar BD / DVD player / Settop box / Game console Top...

User Manual
Page 28
...in a few seconds automatically or changes to a new Bluetooth device, make sure the device is the difference between BT READY and BT PAIRING? • BT READY : In this mode, you can hear stereo sound without the hassle of cabling. • When you can connect a new device to reconnect. ...Top of speakers on the top panel and then select "BT". On your mobile device the first time, use the "BT READY" mode to the Soundbar. (Press the PAIR button on the Soundbar remote control or press and hold the (Mic On/Off) / (Source) button on . Press the (Multi Function) / (Source) button on the...
...in a few seconds automatically or changes to a new Bluetooth device, make sure the device is the difference between BT READY and BT PAIRING? • BT READY : In this mode, you can hear stereo sound without the hassle of cabling. • When you can connect a new device to reconnect. ...Top of speakers on the top panel and then select "BT". On your mobile device the first time, use the "BT READY" mode to the Soundbar. (Press the PAIR button on the Soundbar remote control or press and hold the (Mic On/Off) / (Source) button on . Press the (Multi Function) / (Source) button on the...
User Manual
Page 31
.... Lightly tap the wide area in the SmartThings app screen displayed on the mobile device. 3. Set "Tap View, Tap Sound" to On to allow the function to work if there are placed at a sufficient distance away from the Soundbar. Turn on the Tap Sound function on your mobile device to play the sound of the Soundbar, without using excessive force. • To use this function, update the...
.... Lightly tap the wide area in the SmartThings app screen displayed on the mobile device. 3. Set "Tap View, Tap Sound" to On to allow the function to work if there are placed at a sufficient distance away from the Soundbar. Turn on the Tap Sound function on your mobile device to play the sound of the Soundbar, without using excessive force. • To use this function, update the...

User Manual
Page 35
The Wi-Fi connection to Upgrade Guide. 2. Then the product is updated within 3 minutes with displaying the message, "UPDATE". • During update, do not turn on the Soundbar. ENG - 35 USB Update Bottom of the Soundbar POWER SERVICE I(IWDDOSSOEEFTTER, REAR) NETWORK SERVICE HDMI IN 1 HDMI IN 2 DIGITAL AUDIO IN (OPTICAL) HDMI 1 HDMI 2 HDMI TO TV (eARC/ARC) SERVICE Samsung may offer updates for the model name from the TV may not be supported. Go to the Internet, software updates automatically occur even...
The Wi-Fi connection to Upgrade Guide. 2. Then the product is updated within 3 minutes with displaying the message, "UPDATE". • During update, do not turn on the Soundbar. ENG - 35 USB Update Bottom of the Soundbar POWER SERVICE I(IWDDOSSOEEFTTER, REAR) NETWORK SERVICE HDMI IN 1 HDMI IN 2 DIGITAL AUDIO IN (OPTICAL) HDMI 1 HDMI 2 HDMI TO TV (eARC/ARC) SERVICE Samsung may offer updates for the model name from the TV may not be supported. Go to the Internet, software updates automatically occur even...
User Manual
Page 36
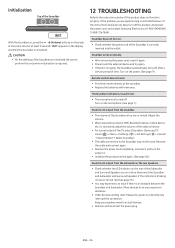
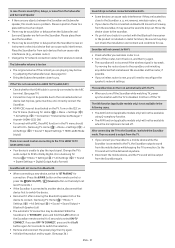
... radio frequency signals in blue or turned red. (See page 15.) • You may interrupt the connection. Turn on the display and then the Soundbar is too low or muted. Keep your speaker away from the subwoofer or the rear speakers. • Check whether the LED indicator on in blue. CAUTION • All the settings of time. Soundbar works erratically. • After removing the power cord, insert it again. • Power...
... radio frequency signals in blue or turned red. (See page 15.) • You may interrupt the connection. Turn on the display and then the Soundbar is too low or muted. Keep your speaker away from the subwoofer or the rear speakers. • Check whether the LED indicator on in blue. CAUTION • All the settings of time. Soundbar works erratically. • After removing the power cord, insert it again. • Power...
User Manual
Page 37
.... The Subwoofer volume is too low • The original volume of your body is in "BT READY", press and hold Left button again for at least 5 seconds.) • If the Soundbar is connected to another device, disconnect that device first to the Soundbar, I switched the Soundbar mode. Change the TV's audio output to PCM or Dolby Digital. (For a Samsung TV: Home ( ) → Menu → Settings ( ) → All Settings ( ) → Sound...
.... The Subwoofer volume is too low • The original volume of your body is in "BT READY", press and hold Left button again for at least 5 seconds.) • If the Soundbar is connected to another device, disconnect that device first to the Soundbar, I switched the Soundbar mode. Change the TV's audio output to PCM or Dolby Digital. (For a Samsung TV: Home ( ) → Menu → Settings ( ) → All Settings ( ) → Sound...

User Manual
Page 41
... (1) Year Parts and Labor* (*90 Days Parts and Labor for in this statement, noncommercial use of products, equipment, systems, utilities, services, parts, supplies, accessories, applications, installations, repairs, external wiring or connectors not supplied and authorized by a SAMSUNG authorized service center. Replacement parts and products ... purchase, and is longer. reception problems and distortion related to you may also have other signal transmission and delivery problems. SAMSUNG does not warrant uninterrupted or error-free operation of nature; WITHOUT LIMITING THE FOREGOING...
... (1) Year Parts and Labor* (*90 Days Parts and Labor for in this statement, noncommercial use of products, equipment, systems, utilities, services, parts, supplies, accessories, applications, installations, repairs, external wiring or connectors not supplied and authorized by a SAMSUNG authorized service center. Replacement parts and products ... purchase, and is longer. reception problems and distortion related to you may also have other signal transmission and delivery problems. SAMSUNG does not warrant uninterrupted or error-free operation of nature; WITHOUT LIMITING THE FOREGOING...


