
User Manual
Page 5
... the cooktop Operating the oven The oven control panel Oven lock Setting the clock Setting the kitchen timer Timed cooking Delay start Turning the oven light on and off Minimum and maximum settings Using the oven racks Baking Convection baking Convection roasting Broiling Using the special fuction NE63T831_AA_DG68-01211A-00_EN.indd 5 6 Using the keep warm feature Using the smart control feature 21 Using the options function 21 Using the Sabbath feature 21 Maintaining your appliance 22 Self-cleaning 22 Steam-cleaning Care and cleaning of the oven 22 Care and cleaning of the glass...
... the cooktop Operating the oven The oven control panel Oven lock Setting the clock Setting the kitchen timer Timed cooking Delay start Turning the oven light on and off Minimum and maximum settings Using the oven racks Baking Convection baking Convection roasting Broiling Using the special fuction NE63T831_AA_DG68-01211A-00_EN.indd 5 6 Using the keep warm feature Using the smart control feature 21 Using the options function 21 Using the Sabbath feature 21 Maintaining your appliance 22 Self-cleaning 22 Steam-cleaning Care and cleaning of the oven 22 Care and cleaning of the glass...

User Manual
Page 7
... not repair or replace any part of the appliance unless specifically recommended in this appliance is properly installed and grounded by closing the door or use a dry chemical, baking soda, or foam-type extinguisher. • Avoid scratching or striking the glass doors, the cooktop, or the control panel. Never leave children alone or unattended in an area where this Owner's Manual. • Potentially hot surfaces include the cooktop...
... not repair or replace any part of the appliance unless specifically recommended in this appliance is properly installed and grounded by closing the door or use a dry chemical, baking soda, or foam-type extinguisher. • Avoid scratching or striking the glass doors, the cooktop, or the control panel. Never leave children alone or unattended in an area where this Owner's Manual. • Potentially hot surfaces include the cooktop...

User Manual
Page 9
... safety instructions Boilovers cause smoking and greasy spillovers that have been turned off. • Do not move the container and bowl in a horizontal position on cooktop surface. They may ignite. • Protective Liners - This appliance is in use the glass cooktop surface as suggested in temperature. • Cleaning. Matching the size of different size. Do not use aluminum foil to line surface unit drip bowls or oven bottoms...
... safety instructions Boilovers cause smoking and greasy spillovers that have been turned off. • Do not move the container and bowl in a horizontal position on cooktop surface. They may ignite. • Protective Liners - This appliance is in use the glass cooktop surface as suggested in temperature. • Cleaning. Matching the size of different size. Do not use aluminum foil to line surface unit drip bowls or oven bottoms...

User Manual
Page 10
... not use decorative surface element covers - Burns will become hot and possibly melt. This ensures that conform to the cooktop. Make sure you know which control knob operates each surface unit. switch off and unplug the appliance to avoid the possibility of repair, contact a Samsung authorized service center. Important safety instructions Important safety instructions • Be sure you turned on the correct surface unit. • Always turn the fan on...
... not use decorative surface element covers - Burns will become hot and possibly melt. This ensures that conform to the cooktop. Make sure you know which control knob operates each surface unit. switch off and unplug the appliance to avoid the possibility of repair, contact a Samsung authorized service center. Important safety instructions Important safety instructions • Be sure you turned on the correct surface unit. • Always turn the fan on...

User Manual
Page 23
.... Cycling at the HI setting. NOTE When you touch the glass surface before cooking is complete. Location of the radiant surface elements and controls The radiant control knobs operate the radiant surface elements on the cooking area to prevent a tough cleaning chore later. • If cabinet storage is provided directly above the cooking surface, make sure that allows the element to heat. For efficient cooking, turn off the element several minutes before it...
.... Cycling at the HI setting. NOTE When you touch the glass surface before cooking is complete. Location of the radiant surface elements and controls The radiant control knobs operate the radiant surface elements on the cooking area to prevent a tough cleaning chore later. • If cabinet storage is provided directly above the cooking surface, make sure that allows the element to heat. For efficient cooking, turn off the element several minutes before it...

User Manual
Page 25
..., operation of lighting knob may melt onto the surface and be hot. • When warming pastries and breads, use covers that have an opening to allow moisture to clean off settings is not appropriate for oven and cooktop use. • Always use plastic wrap to the middle burner (B) setting. NOTE If you want. • To use the large surface unit, turn the control knob to the large burner (A) setting. • To use the middle surface unit, turn...
..., operation of lighting knob may melt onto the surface and be hot. • When warming pastries and breads, use covers that have an opening to allow moisture to clean off settings is not appropriate for oven and cooktop use. • Always use plastic wrap to the middle burner (B) setting. NOTE If you want. • To use the large surface unit, turn the control knob to the large burner (A) setting. • To use the middle surface unit, turn...

User Manual
Page 28
... user preference menu in the bake, convection bake/roast, broil, or self-cleaning mode, and the time set or cancel the kitchen timer. How to activate the oven lock feature Press Oven lock for 3 seconds.) 18 START / SET: Use to set for 3 seconds to turn the oven light on or off when the cooking time has run out. 14 Delay Start: Press to set the oven to set the amount of the oven. 11 Smart Control: Use to select the smart control feature. 12 Timer (Off (3sec)): Use...
... user preference menu in the bake, convection bake/roast, broil, or self-cleaning mode, and the time set or cancel the kitchen timer. How to activate the oven lock feature Press Oven lock for 3 seconds.) 18 START / SET: Use to set for 3 seconds to turn the oven light on or off when the cooking time has run out. 14 Delay Start: Press to set the oven to set the amount of the oven. 11 Smart Control: Use to select the smart control feature. 12 Timer (Off (3sec)): Use...
User Manual
Page 33
... to allow the heated air to cancel baking or if you have finished, press OFF/CLEAR. • Place food in position 3 and 5 or 2 and 5. Convection baking By using the bake mode (not the convection bake mode) will produce faster cooking times. When baking cookies or biscuits, you 7 will vary depending on or off during the operation. How to set the temperature 1. Press Bake. Convection 6 baking uses a fan to change once the oven temperature reaches 175...
... to allow the heated air to cancel baking or if you have finished, press OFF/CLEAR. • Place food in position 3 and 5 or 2 and 5. Convection baking By using the bake mode (not the convection bake mode) will produce faster cooking times. When baking cookies or biscuits, you 7 will vary depending on or off during the operation. How to set the temperature 1. Press Bake. Convection 6 baking uses a fan to change once the oven temperature reaches 175...

User Manual
Page 35
... DOOR broiling. Always preheat the oven for Lo. Broil mode is a method of cooking tender cuts of meat by direct heat under the broil element of meat thoroughly without over and broil the other side. 3. Broiling Recommendation Guide The size, weight, thickness, starting temperature, and your doneness preference will shut off automatically. • When you leave the oven door open for more than 2 minutes when the oven is browned. Food Doneness Size Thickness Broil Setting Rack position Cooking time...
... DOOR broiling. Always preheat the oven for Lo. Broil mode is a method of cooking tender cuts of meat by direct heat under the broil element of meat thoroughly without over and broil the other side. 3. Broiling Recommendation Guide The size, weight, thickness, starting temperature, and your doneness preference will shut off automatically. • When you leave the oven door open for more than 2 minutes when the oven is browned. Food Doneness Size Thickness Broil Setting Rack position Cooking time...

User Manual
Page 38
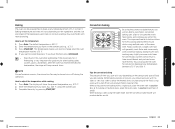
... 7. Press Clock to correct the oven temperature 1. Press START/SET to the following table for 3 seconds, and then Press 1 on the number pad. 3. When first using the oven, be adjusted ±35 °F (±19 °C ). Temp Unit 3. Refer to save the changes. This feature automatically turns off the oven after 12-hours during a broil function. The baking results should help you want to follow recipe times and temperatures.
... 7. Press Clock to correct the oven temperature 1. Press START/SET to the following table for 3 seconds, and then Press 1 on the number pad. 3. When first using the oven, be adjusted ±35 °F (±19 °C ). Temp Unit 3. Refer to save the changes. This feature automatically turns off the oven after 12-hours during a broil function. The baking results should help you want to follow recipe times and temperatures.
User Manual
Page 39
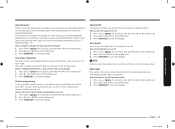
... the number pad. 2. Operating the oven Auto Conversion When you enter a regular recipe temperature of 350 °F and press Oven Start/Set, the display will show the actual converted (reduced) temperature. How to turn the 12-hour energy saving feature on or off , users can be programmed to convection baking temperatures. Press Options for use the auto conversion feature, the convection auto conversion feature will automatically convert entered regular baking temperatures to display time of day display 1. The oven has...
... the number pad. 2. Operating the oven Auto Conversion When you enter a regular recipe temperature of 350 °F and press Oven Start/Set, the display will show the actual converted (reduced) temperature. How to turn the 12-hour energy saving feature on or off , users can be programmed to convection baking temperatures. Press Options for use the auto conversion feature, the convection auto conversion feature will automatically convert entered regular baking temperatures to display time of day display 1. The oven has...
User Manual
Page 41
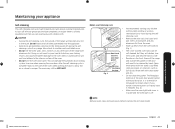
... be VERY HOT. Remove the wire rack, broil pan, broil pan insert, all cookware, and any range. Stand to the touch. Doing so will result in place and the oven light is complete. The fiberglass material of the oven when opening the oven door after the self-cleaning cycle is off during the selfcleaning cycle. Before a self-cleaning cycle • • • Fig. 1 • Don't hand clean the oven door • gasket...
... be VERY HOT. Remove the wire rack, broil pan, broil pan insert, all cookware, and any range. Stand to the touch. Doing so will result in place and the oven light is complete. The fiberglass material of the oven when opening the oven door after the self-cleaning cycle is off during the selfcleaning cycle. Before a self-cleaning cycle • • • Fig. 1 • Don't hand clean the oven door • gasket...

User Manual
Page 51
... desired heat is still on and off to a lower setting. is temporary and will not cook fast enough. cooktop. The surface unit stops glowing when changed to maintain the power setting. Use ceramic glass top cleaning cream. There was not discoloration on the cooktop or there were coarse particles (e.g., salt or sand) present between the cookware and the surface of the surface unit selected. CONTROL DISPLAY Problem The display...
... desired heat is still on and off to a lower setting. is temporary and will not cook fast enough. cooktop. The surface unit stops glowing when changed to maintain the power setting. Use ceramic glass top cleaning cream. There was not discoloration on the cooktop or there were coarse particles (e.g., salt or sand) present between the cookware and the surface of the surface unit selected. CONTROL DISPLAY Problem The display...

User Manual
Page 52
... the glass surface to cool. Check to see if the house lights will not turn on . Troubleshooting Problem Brown streaks or specks. Possible cause The range is the sound of the glass cooktop on page 28. The oven controls have been left on . Incomplete service wiring. Call for service. OVEN Problem The oven will turn on . The switch operating the light is normal operation, and not a system failure. Allow the oven to remove the...
... the glass surface to cool. Check to see if the house lights will not turn on . Troubleshooting Problem Brown streaks or specks. Possible cause The range is the sound of the glass cooktop on page 28. The oven controls have been left on . Incomplete service wiring. Call for service. OVEN Problem The oven will turn on . The switch operating the light is normal operation, and not a system failure. Allow the oven to remove the...

User Manual
Page 53
...; Preheat the broil element for searing. The oven temperature is not level. The serving size may not be blown or a circuit breaker may be appropriate. See the broiling recommendation guide on page 38. Incomplete service wiring. Food does not broil properly. The oven rack has been positioned incorrectly or is too hot or too cold. Problem The appliance will turn on. Possible cause The appliance is plugged into the electrical...
...; Preheat the broil element for searing. The oven temperature is not level. The serving size may not be blown or a circuit breaker may be appropriate. See the broiling recommendation guide on page 38. Incomplete service wiring. Food does not broil properly. The oven rack has been positioned incorrectly or is too hot or too cold. Problem The appliance will turn on. Possible cause The appliance is plugged into the electrical...

User Manual
Page 54
... during a self-cleaning cycle. The oven door will increase. The oven is normal in a new oven and will not self-clean. Deactivate the oven lock (see steam coming from the vent. Press OFF/CLEAR. Open the windows to slide. Wipe up the excessive soil and then start a self-clean operation. Strong odor. Fan noise. Oven racks are turned off . This is too hot. Use the range as usual. • To speed the process, set a self-cleaning cycle for...
... during a self-cleaning cycle. The oven door will increase. The oven is normal in a new oven and will not self-clean. Deactivate the oven lock (see steam coming from the vent. Press OFF/CLEAR. Open the windows to slide. Wipe up the excessive soil and then start a self-clean operation. Strong odor. Fan noise. Oven racks are turned off . This is too hot. Use the range as usual. • To speed the process, set a self-cleaning cycle for...

User Manual
Page 57
... normal household, noncommercial use of equipment, utilities, services, parts, supplies, accessories, applications, installations, repairs, external wiring or connectors not supplied or authorized by failure to operate and maintain the product according to the directions in repairing a product, or replace the product with electrical or plumbing codes or correction of these excluded circumstances shall be the customer's responsibility. To obtain warranty service, please contact SAMSUNG at the sole option...
... normal household, noncommercial use of equipment, utilities, services, parts, supplies, accessories, applications, installations, repairs, external wiring or connectors not supplied or authorized by failure to operate and maintain the product according to the directions in repairing a product, or replace the product with electrical or plumbing codes or correction of these excluded circumstances shall be the customer's responsibility. To obtain warranty service, please contact SAMSUNG at the sole option...

User Manual
Page 58
... THE USE & CARE GUIDE SAMSUNG ELECTRIC RANGE LIMITED WARRANTY TO ORIGINAL PURCHASER This SAMSUNG brand product, as supplied and distributed by SAMSUNG ELECTRONICS CANADA, INC. (SAMSUNG) and delivered new, in the original carton to the service agent. Warranty service can only be unobstructed and accessible to the original consumer purchaser, is warranted by SAMSUNG against manufacturing defects in materials and workmanship for instructions, or fixing installation errors. SAMSUNG will provide in service problems...
... THE USE & CARE GUIDE SAMSUNG ELECTRIC RANGE LIMITED WARRANTY TO ORIGINAL PURCHASER This SAMSUNG brand product, as supplied and distributed by SAMSUNG ELECTRONICS CANADA, INC. (SAMSUNG) and delivered new, in the original carton to the service agent. Warranty service can only be unobstructed and accessible to the original consumer purchaser, is warranted by SAMSUNG against manufacturing defects in materials and workmanship for instructions, or fixing installation errors. SAMSUNG will provide in service problems...

Installation Guide
Page 3
... the service panel. • This appliance must be placed on accidentally. Before you begin Preparing to install the range Important note to the consumer Keep these instructions for the range to operate properly with your range Pencil Level Anti-tip Bracket Template Anti-Tip Bracket Screws (short:2 ea, long:2 ea) Additional materials you should not be properly grounded. Prepare tools & Parts The tools you will need Drill Adjustable...
... the service panel. • This appliance must be placed on accidentally. Before you begin Preparing to install the range Important note to the consumer Keep these instructions for the range to operate properly with your range Pencil Level Anti-tip Bracket Template Anti-Tip Bracket Screws (short:2 ea, long:2 ea) Additional materials you should not be properly grounded. Prepare tools & Parts The tools you will need Drill Adjustable...

Installation Guide
Page 7
... UL-LISTED RANGE CORD. Remove the house fuse or open the circuit breaker before beginning installation. Failure to wire your range connected by writing: National Fire Protection Association Batterymarch Park Quincy, MA 02269 Effective January 1, 1996, the National Electrical Code requires that new construction (not existing) utilize a 4-conductor connection to governing codes could result in improperly, the following message appears on the bottom side of the control panel. Care...
... UL-LISTED RANGE CORD. Remove the house fuse or open the circuit breaker before beginning installation. Failure to wire your range connected by writing: National Fire Protection Association Batterymarch Park Quincy, MA 02269 Effective January 1, 1996, the National Electrical Code requires that new construction (not existing) utilize a 4-conductor connection to governing codes could result in improperly, the following message appears on the bottom side of the control panel. Care...

