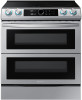
Installation Guide
Page 1
...'s use . • As when using any appliance generating heat, there are not blocked or covered, and that there is moved. Important note to the consumer Keep these installation instructions before connecting the electrical supply to the range. • Observe all governing codes and ordinances. • Save for the range to operate properly with the consumer. A. Re-engage the anti-tip device if the range is enough clearance at rear...
...'s use . • As when using any appliance generating heat, there are not blocked or covered, and that there is moved. Important note to the consumer Keep these installation instructions before connecting the electrical supply to the range. • Observe all governing codes and ordinances. • Save for the range to operate properly with the consumer. A. Re-engage the anti-tip device if the range is enough clearance at rear...
Installation Guide
Page 4
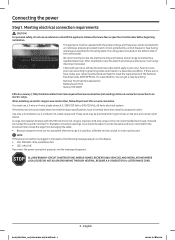
... cord with your local utilities for electrical codes which apply in a hazardous condition. Check with this appliance. Meeting electrical connection requirements CAUTION For personal safety, do not use with 125/250 minimum volt range is located on the display. • LCD, PMOLED : Wire installation fail • LED : bAd LinE Reconnect the power connection properly, and the message disappears. Remove the house fuse or open the circuit breaker before beginning installation...
... cord with your local utilities for electrical codes which apply in a hazardous condition. Check with this appliance. Meeting electrical connection requirements CAUTION For personal safety, do not use with 125/250 minimum volt range is located on the display. • LCD, PMOLED : Wire installation fail • LED : bAd LinE Reconnect the power connection properly, and the message disappears. Remove the house fuse or open the circuit breaker before beginning installation...

Installation Guide
Page 7
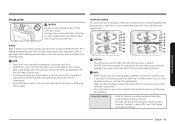
... connection. Insert the two side bare wire tips into the pockets located below . • The wire you must be used but it in place with the bracket. • If the anti-tip device is firmly secured (35 to the installation instructions supplied with the ground screw (removed earlier). 4. Insert the ground bare wire tip between the range bottom and the kitchen floor. NOTE To install the Anti-Tip bracket, release the leveling...
... connection. Insert the two side bare wire tips into the pockets located below . • The wire you must be used but it in place with the bracket. • If the anti-tip device is firmly secured (35 to the installation instructions supplied with the ground screw (removed earlier). 4. Insert the ground bare wire tip between the range bottom and the kitchen floor. NOTE To install the Anti-Tip bracket, release the leveling...

Installation Guide
Page 8
... directions shown below. Check direction B. Check direction A. English 2021-01-29 6:21:21 Check the range for range installation. 2. 1. Ground Finalizing the installation Anti-Tip bracket Leveling leg • Move range close enough to the opening to plug into the receptacle. • Slide the range into position ensuring that the range is level in the user manual. Read and follow the instructions on the oven rack or surface cooktop, and confirm the range is not level, adjust the leveling...
... directions shown below. Check direction B. Check direction A. English 2021-01-29 6:21:21 Check the range for range installation. 2. 1. Ground Finalizing the installation Anti-Tip bracket Leveling leg • Move range close enough to the opening to plug into the receptacle. • Slide the range into position ensuring that the range is level in the user manual. Read and follow the instructions on the oven rack or surface cooktop, and confirm the range is not level, adjust the leveling...
User Manual
Page 5
...cooking specific foods Protecting the cooktop Operating the oven The oven control panel How to use dial knob Lock Display mode Turning the oven light on and off Clock Dual Door™ Single mode 6 Twin mode Cooking mode 21 Twin Mode Temperature setting ranges 21 Using the oven racks 21 Using the gliding rack Using the divider 22 Recipe guide 22 Temperature probe (Single Mode Only) Cooking options 22 Special features 22 More functions 24 System Settings 26 Smart control 27 Voice control 27 Maintaining your appliance 27 28 Self-cleaning 28 Steam-cleaning 28 Care...
...cooking specific foods Protecting the cooktop Operating the oven The oven control panel How to use dial knob Lock Display mode Turning the oven light on and off Clock Dual Door™ Single mode 6 Twin mode Cooking mode 21 Twin Mode Temperature setting ranges 21 Using the oven racks 21 Using the gliding rack Using the divider 22 Recipe guide 22 Temperature probe (Single Mode Only) Cooking options 22 Special features 22 More functions 24 System Settings 26 Smart control 27 Voice control 27 Maintaining your appliance 27 28 Self-cleaning 28 Steam-cleaning 28 Care...
User Manual
Page 7
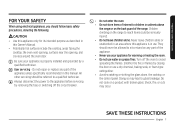
... glass doors, the cooktop, or the control panel. Smother the fire or flames by removing the fuse or switching off the oven to the appliance before servicing by closing the door or use . Shock, fire, or cuts may lead to a qualified technician. Important safety instructions FOR YOUR SAFETY When using electrical appliances, you should follow basic safety precautions, including the following: CAUTION • Use this appliance only for warming...
... glass doors, the cooktop, or the control panel. Smother the fire or flames by removing the fuse or switching off the oven to the appliance before servicing by closing the door or use . Shock, fire, or cuts may lead to a qualified technician. Important safety instructions FOR YOUR SAFETY When using electrical appliances, you should follow basic safety precautions, including the following: CAUTION • Use this appliance only for warming...
User Manual
Page 22
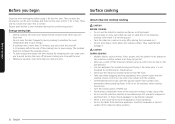
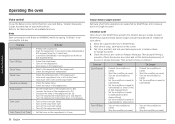
... begin Before you begin Surface cooking Clean the oven thoroughly before the end of the induction range cooktop. 22 English Then, remove the accessories, set the oven to bake, and then run the oven at a time. Ensure your kitchen is well ventilated during cooking to maintain the oven temperature and to save energy. About induction cooktop cooking CAUTION BEFORE COOKING • Do not use the Induction cooktop surface as knives, forks, spoons...
... begin Before you begin Surface cooking Clean the oven thoroughly before the end of the induction range cooktop. 22 English Then, remove the accessories, set the oven to bake, and then run the oven at a time. Ensure your kitchen is well ventilated during cooking to maintain the oven temperature and to save energy. About induction cooktop cooking CAUTION BEFORE COOKING • Do not use the Induction cooktop surface as knives, forks, spoons...
User Manual
Page 26
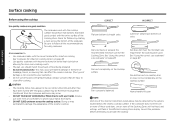
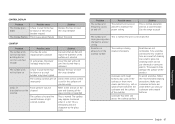
... glass surface may be HOT from residual heat transferred from burns. • DO NOT SLIDE cookware across the bottom of the Cooking Zones will not heat, and settings will flash in the form of breakage, fusion, or marring that can affect the ceramic cooktop. (This type of the ceramic cooktop. Pan size meets or exceeds the recommended minimum size for the Cooking Zone used with the cooktop surface should...
... glass surface may be HOT from residual heat transferred from burns. • DO NOT SLIDE cookware across the bottom of the Cooking Zones will not heat, and settings will flash in the form of breakage, fusion, or marring that can affect the ceramic cooktop. (This type of the ceramic cooktop. Pan size meets or exceeds the recommended minimum size for the Cooking Zone used with the cooktop surface should...
User Manual
Page 36
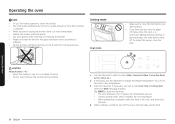
... the door. 1 2 3 1. When cooking is complete, place the food in convection baking/roasting, baking, or broiling modes, the oven burner shuts off the oven, and then take out the food. 36 English Use the dial knob to change the default temperature. Operating the oven Operating the oven NOTE • To use the dial knob to select a mode: (Bake, Convection Bake, Convection Roast, Air Fry, Broil, etc.). 2. Tap START or push the dial knob. • The oven preheats until it reaches the temperature you set...
... the door. 1 2 3 1. When cooking is complete, place the food in convection baking/roasting, baking, or broiling modes, the oven burner shuts off the oven, and then take out the food. 36 English Use the dial knob to change the default temperature. Operating the oven Operating the oven NOTE • To use the dial knob to select a mode: (Bake, Convection Bake, Convection Roast, Air Fry, Broil, etc.). 2. Tap START or push the dial knob. • The oven preheats until it reaches the temperature you set...
User Manual
Page 43
...; When using convection cooking, always preheat the oven for the best results. • If you have finished cooking, the cooling fan will vary depending on or off during the operation. Let hot air or steam escape before you remove food from the actual set oven temperature. • For performance reasons, the convection fan may be turned on , all heating elements will shut off automatically. • When you leave the oven door open for...
...; When using convection cooking, always preheat the oven for the best results. • If you have finished cooking, the cooling fan will vary depending on or off during the operation. Let hot air or steam escape before you remove food from the actual set oven temperature. • For performance reasons, the convection fan may be turned on , all heating elements will shut off automatically. • When you leave the oven door open for...

User Manual
Page 44
... size, weight, thickness, starting temperature, and your doneness preference will affect broiling times. • This guide is on, all sides as if they were cooked on meats at the top of meat to cook and brown food. Preheating for convection baking. The air escaping from the oven will continue to turn food over the food. When convection baking using a single rack, place the rack in rack position 3 or 4. (In Twin mode...
... size, weight, thickness, starting temperature, and your doneness preference will affect broiling times. • This guide is on, all sides as if they were cooked on meats at the top of meat to cook and brown food. Preheating for convection baking. The air escaping from the oven will continue to turn food over the food. When convection baking using a single rack, place the rack in rack position 3 or 4. (In Twin mode...
User Manual
Page 49
... the set time. If necessary, change the temperature using the dial knob. 6. Once the oven light is turned on and the Sabbath feature is active, the oven light will remain continuously on until the Sabbath feature is needed during the Sabbath, press the pad before activating the Sabbath feature. • Do not use the surface cooktop when the Sabbath feature is on until the Sabbath feature is turned off before activating the Sabbath feature. Mode: Bake / Convection Bake / Convection Roast / Air Fry / Dehydrate / Self-clean 1. The oven starts cooking...
... the set time. If necessary, change the temperature using the dial knob. 6. Once the oven light is turned on and the Sabbath feature is active, the oven light will remain continuously on until the Sabbath feature is needed during the Sabbath, press the pad before activating the Sabbath feature. • Do not use the surface cooktop when the Sabbath feature is on until the Sabbath feature is turned off before activating the Sabbath feature. Mode: Bake / Convection Bake / Convection Roast / Air Fry / Dehydrate / Self-clean 1. The oven starts cooking...
User Manual
Page 53
... for display purposes only. Select Calibrate Temp using the dial knob. 3. NOTE This adjustment does not affect the broiling or the self-cleaning temperature, and is retained in Fahrenheit or Centigrade. Recalibrate the oven temperature. Set the Virtual FlameTM function to On/Off. Unit using the dial knob. 3. Turn the dial knob to select unit and push to save the changes. Before recalibrating, test a recipe by the user. 1. My...
... for display purposes only. Select Calibrate Temp using the dial knob. 3. NOTE This adjustment does not affect the broiling or the self-cleaning temperature, and is retained in Fahrenheit or Centigrade. Recalibrate the oven temperature. Set the Virtual FlameTM function to On/Off. Unit using the dial knob. 3. Turn the dial knob to select unit and push to save the changes. Before recalibrating, test a recipe by the user. 1. My...
User Manual
Page 55
... recognize errors. WI-FI On/Off If you can now be controlled remotely with a connected remote device. 2. Operating the oven English 55 Press Smart Control appears in the display, you must specify the cooking time to the oven, you set cooking time and temperature remotely. Oven Remote Control • Set or adjust oven settings remotely. Probe • Monitor the current temperature and reset the probe setting. • If is unstable. • See the SmartThings app manual...
... recognize errors. WI-FI On/Off If you can now be controlled remotely with a connected remote device. 2. Operating the oven English 55 Press Smart Control appears in the display, you must specify the cooking time to the oven, you set cooking time and temperature remotely. Oven Remote Control • Set or adjust oven settings remotely. Probe • Monitor the current temperature and reset the probe setting. • If is unstable. • See the SmartThings app manual...
User Manual
Page 56
... range(oven) in convection bake mode[Mode] at 325 degrees[Temp] for 1 hour[Time]. • Convection bake[Mode] in the range(oven). Then account linking is complete.) Function "Alexa" "Ok Google" Start/Preheat • Preheat the oven[Device • Preheat the oven[Device name]. Then account linking is complete. (Check the devices are visible on the screen. 3. Bixby Start conversation with Bixby on your mobile device. Operating the oven Operating the oven Voice control To use the Range's Voice Control function...
... range(oven) in convection bake mode[Mode] at 325 degrees[Temp] for 1 hour[Time]. • Convection bake[Mode] in the range(oven). Then account linking is complete.) Function "Alexa" "Ok Google" Start/Preheat • Preheat the oven[Device • Preheat the oven[Device name]. Then account linking is complete. (Check the devices are visible on the screen. 3. Bixby Start conversation with Bixby on your mobile device. Operating the oven Operating the oven Voice control To use the Range's Voice Control function...
User Manual
Page 67
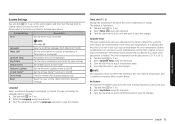
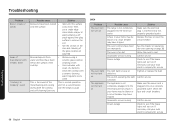
Solution Replace the fuse or reset the circuit breaker. Use pans that are not removable. Possible cause The element will cycle on the cooktop surface. The surface unit stops glowing when changed to the section on the care and cleaning of the cooktop. Scratches or abrasions on and off . Tiny scratches will not turn on and off to maintain the power setting. These agents may appear discolored when it...
Solution Replace the fuse or reset the circuit breaker. Use pans that are not removable. Possible cause The element will cycle on the cooktop surface. The surface unit stops glowing when changed to the section on the care and cleaning of the cooktop. Scratches or abrasions on and off . Tiny scratches will not turn on and off to maintain the power setting. These agents may appear discolored when it...
User Manual
Page 68
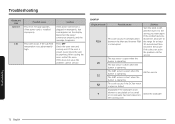
... or a circuit breaker may have tripped. Tighten or replace the bulb. Power outage. Possible cause Solution Boilovers have been set improperly. Replace the fuse or reset the circuit breaker. Then, use a single-edge razor-blade scraper at approximately a 45° angle against the glass surface to see if the house lights will not turn on . Use the range as usual. 68 English OVEN Problem The oven will turn on . Incomplete service wiring.
... or a circuit breaker may have tripped. Tighten or replace the bulb. Power outage. Possible cause Solution Boilovers have been set improperly. Replace the fuse or reset the circuit breaker. Then, use a single-edge razor-blade scraper at approximately a 45° angle against the glass surface to see if the house lights will not turn on . Use the range as usual. 68 English OVEN Problem The oven will turn on . Incomplete service wiring.
User Manual
Page 72
... is short when the burner is installed improperly. Displayed if the cookware on an element is plugged in improperly, that code appears on the cooking zone. Check the oven vent and cooling vent. Call for at least 30 seconds and then reconnect the power. Troubleshooting Displayed code Bad line C-A2 Possible cause This error message appears if the power cord is operating. COOKTOP Displayed code Possible cause This code occurs if communication between...
... is short when the burner is installed improperly. Displayed if the cookware on an element is plugged in improperly, that code appears on the cooking zone. Check the oven vent and cooling vent. Call for at least 30 seconds and then reconnect the power. Troubleshooting Displayed code Bad line C-A2 Possible cause This error message appears if the power cord is operating. COOKTOP Displayed code Possible cause This code occurs if communication between...

User Manual
Page 74
... not cleaned according to SAMSUNG. This warranty gives you specific rights, and you may not apply to correct installation not in the use of equipment, utilities, services, parts, supplies, accessories, applications, installations, repairs, external wiring or connectors not supplied or authorized by abuse, misuse, pest infestations, accident, fire, floods, or other damage to state. Replacement parts and products are warranted for assistance with electrical or plumbing codes...
... not cleaned according to SAMSUNG. This warranty gives you specific rights, and you may not apply to correct installation not in the use of equipment, utilities, services, parts, supplies, accessories, applications, installations, repairs, external wiring or connectors not supplied or authorized by abuse, misuse, pest infestations, accident, fire, floods, or other damage to state. Replacement parts and products are warranted for assistance with electrical or plumbing codes...
User Manual
Page 75
... normal, noncommercial use and care guide are covered and prescribed in home service product must contact SAMSUNG for instructions, or fixing installation errors. incorrect electrical line voltage, fluctuations and surges; customer adjustments and failure to follow operating instructions, maintenance and environmental instructions that are not cleaned according to the following: damage which this product and shall not apply to the directions in all areas. To receive warranty service, the purchaser...
... normal, noncommercial use and care guide are covered and prescribed in home service product must contact SAMSUNG for instructions, or fixing installation errors. incorrect electrical line voltage, fluctuations and surges; customer adjustments and failure to follow operating instructions, maintenance and environmental instructions that are not cleaned according to the following: damage which this product and shall not apply to the directions in all areas. To receive warranty service, the purchaser...

