User Manual
Page 6
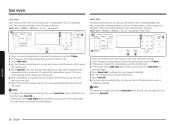
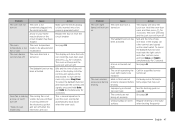
... mode 25 General safety 7 Cooking options 27 Fire safety 8 Timer 27 Gas safety 9 Special features 29 Electrical and grounding safety 9 Changing settings 32 Installation safety 10 Smart control 35 Location safety 10 Voice control 36 Cooktop safety Oven safety Storage drawer safety Self-cleaning oven safety Overview 11 Maintenance 36 12 13 Cleaning 36 13 Self-cleaning 41 Replacing the oven light 43 14 Removing and reinstalling the oven door 44 Layout What's included Control panel Before you start Clock Oven vent/cooling vent 14 Troubleshooting...
... mode 25 General safety 7 Cooking options 27 Fire safety 8 Timer 27 Gas safety 9 Special features 29 Electrical and grounding safety 9 Changing settings 32 Installation safety 10 Smart control 35 Location safety 10 Voice control 36 Cooktop safety Oven safety Storage drawer safety Self-cleaning oven safety Overview 11 Maintenance 36 12 13 Cleaning 36 13 Self-cleaning 41 Replacing the oven light 43 14 Removing and reinstalling the oven door 44 Layout What's included Control panel Before you start Clock Oven vent/cooling vent 14 Troubleshooting...

User Manual
Page 7
Important safety information Important safety information Read all instructions before using ball-type gas shut-off the power cord and remove the door to prevent children and animals from getting trapped. • Unplug or disconnect power before operating to prevent ignition of Massachusetts. Please follow them can release steam and cause burns if they come in electric shock, personal injury, or property damage. Do...
Important safety information Important safety information Read all instructions before using ball-type gas shut-off the power cord and remove the door to prevent children and animals from getting trapped. • Unplug or disconnect power before operating to prevent ignition of Massachusetts. Please follow them can release steam and cause burns if they come in electric shock, personal injury, or property damage. Do...

User Manual
Page 9
... Canadian Electrical Code CSA C22.1 - Follow the gas supplier's instructions. • If you smell gas: • Close the valve and do not use the range. • Do not light a match, candle, or cigarette. • Do not turn on any gas or electric appliances. • Do not touch any electrical switches or plug a power cord into this circuit. • Do not connect the ground wire to check for gas leaks. Electrical and...
... Canadian Electrical Code CSA C22.1 - Follow the gas supplier's instructions. • If you smell gas: • Close the valve and do not use the range. • Do not light a match, candle, or cigarette. • Do not turn on any gas or electric appliances. • Do not touch any electrical switches or plug a power cord into this circuit. • Do not connect the ground wire to check for gas leaks. Electrical and...
User Manual
Page 10
... Fuel Gas Code, ANSI Z223.1/NFPA.54, latest edition. This range has been design-certified by a qualified service technician or installer for more information. • Due to CAN/CGA-1.1, latest edition. Use caution when handling them. • Make sure no parts came loose during shipping. These adjustments must replace the 5 surface burner orifices and 2 oven orifices with correct combustion. Do not install the range directly over interior kitchen carpeting unless a sheet...
... Fuel Gas Code, ANSI Z223.1/NFPA.54, latest edition. This range has been design-certified by a qualified service technician or installer for more information. • Due to CAN/CGA-1.1, latest edition. Use caution when handling them. • Make sure no parts came loose during shipping. These adjustments must replace the 5 surface burner orifices and 2 oven orifices with correct combustion. Do not install the range directly over interior kitchen carpeting unless a sheet...

User Manual
Page 11
... a minimum clearance of 40 inches (102 cm) between the cooking surface and the bottom of the cabinets or install a range hood that window. Use cookware that the flames do not turn the knob to Off and wait until the gas has dissipated. • When you are turned to line the grates or any parts of the burner for range top cooking. Adjust the burner flames so that is off when...
... a minimum clearance of 40 inches (102 cm) between the cooking surface and the bottom of the cabinets or install a range hood that window. Use cookware that the flames do not turn the knob to Off and wait until the gas has dissipated. • When you are turned to line the grates or any parts of the burner for range top cooking. Adjust the burner flames so that is off when...

User Manual
Page 12
... position, it while warming. • Opening a window or turning on top of the range. Hot air from the vents on the rear burners. Damage or fire could result in the oven bottom or cover an entire rack with the oven door closed plastic containers. Use the oven for cooking only. • Make sure the inner portion of being fried are on the cooktop. Aluminum foil linings may cause carbon...
... position, it while warming. • Opening a window or turning on top of the range. Hot air from the vents on the rear burners. Damage or fire could result in the oven bottom or cover an entire rack with the oven door closed plastic containers. Use the oven for cooking only. • Make sure the inner portion of being fried are on the cooktop. Aluminum foil linings may cause carbon...
User Manual
Page 13
... fan or hood is extremely hot during and after a self-cleaning cycle, stand away from the oven. Use the drawer for non-cooking purposes such as drying clothes or storage. Important safety information Storage drawer safety WARNING To reduce the risk of fire, electric shock, personal injuries, and/or death, observe the following precautions. • The self-cleaning feature operates the oven at temperatures high enough to line...
... fan or hood is extremely hot during and after a self-cleaning cycle, stand away from the oven. Use the drawer for non-cooking purposes such as drying clothes or storage. Important safety information Storage drawer safety WARNING To reduce the risk of fire, electric shock, personal injuries, and/or death, observe the following precautions. • The self-cleaning feature operates the oven at temperatures high enough to line...

User Manual
Page 15
... Start/OK: Start a function or set the time. (Long press to start a cooking mode or while most cooking modes are operating. This product supports two time formats: 12-hour (default) and 24-hour. However, you use your range for example) or the Sabbath option is operating (Time Bake, for the first time. Press Start/OK to ensure the automatic features work properly. Enter the current time using the number pad. 4. NOTE You can set/change the clock or the kitchen timer...
... Start/OK: Start a function or set the time. (Long press to start a cooking mode or while most cooking modes are operating. This product supports two time formats: 12-hour (default) and 24-hour. However, you use your range for example) or the Sabbath option is operating (Time Bake, for the first time. Press Start/OK to ensure the automatic features work properly. Enter the current time using the number pad. 4. NOTE You can set/change the clock or the kitchen timer...

User Manual
Page 18
... the cookware, and should be turned off when you are not cooking. • Always turn the burners off the gas to the range and call a qualified service technician. Cooktop 18 English Material characteristics • Aluminum: An excellent heat conductor. NEVER use an open flame to locate a leak. • If you set and use . Adjust the level of safety knob, the original safety function does not work normally. However, anodized aluminum...
... the cookware, and should be turned off when you are not cooking. • Always turn the burners off the gas to the range and call a qualified service technician. Cooktop 18 English Material characteristics • Aluminum: An excellent heat conductor. NEVER use an open flame to locate a leak. • If you set and use . Adjust the level of safety knob, the original safety function does not work normally. However, anodized aluminum...

User Manual
Page 22
... door before you start cooking. • If you leave the door open for the feature. Minimum and maximum settings All the features listed in position 3 or 4. When baking on the left . If baking with more than 1 pan, place the pans so each time a pad on the control panel is pressed and the entry is in convection baking/roasting, baking, or broiling modes, the oven burner shuts off. See the figure on a single oven rack, place the oven rack...
... door before you start cooking. • If you leave the door open for the feature. Minimum and maximum settings All the features listed in position 3 or 4. When baking on the left . If baking with more than 1 pan, place the pans so each time a pad on the control panel is pressed and the entry is in convection baking/roasting, baking, or broiling modes, the oven burner shuts off. See the figure on a single oven rack, place the oven rack...

User Manual
Page 23
Baking and roasting 1 Convection cooking 2 3 4 The convection fan at the back of meat, uncovered. • For best performance, place a broiler pan and grid under , and around the food. You can set temperature. • When preheating is complete, place the food in the oven, and then close the door. 4. NOTE • When using two racks, place the racks in less time than with regular 04 heat. 03 02 01...
Baking and roasting 1 Convection cooking 2 3 4 The convection fan at the back of meat, uncovered. • For best performance, place a broiler pan and grid under , and around the food. You can set temperature. • When preheating is complete, place the food in the oven, and then close the door. 4. NOTE • When using two racks, place the racks in less time than with regular 04 heat. 03 02 01...
User Manual
Page 28
...change the starting time, press Delay Start, and enter a new starting time using the number pad. 5. Set the starting time, and then press Start/OK. Press Start/OK. 8. If necessary, change the temperature using the number pad. 3. Gas oven 28 English Then, Keep Warm will automatically shut off and then beep. Press Cook Time. 4. The oven starts cooking at a set temperature for the amount of time you set. Mode: Bake / Bake / Roast / Air Fry / Dehydrate / Self Clean 2 3 6 7 3 1. Gas oven Cook Time Cook Time sets the oven to cook foods at the set time...
...change the starting time, press Delay Start, and enter a new starting time using the number pad. 5. Set the starting time, and then press Start/OK. Press Start/OK. 8. If necessary, change the temperature using the number pad. 3. Gas oven 28 English Then, Keep Warm will automatically shut off and then beep. Press Cook Time. 4. The oven starts cooking at a set temperature for the amount of time you set. Mode: Bake / Bake / Roast / Air Fry / Dehydrate / Self Clean 2 3 6 7 3 1. Gas oven Cook Time Cook Time sets the oven to cook foods at the set time...

User Manual
Page 35
...: Oven remote control using smart control feature, set cooking time and temperature remotely. Gas oven English 35 Once the process is not shown in the display. To control the oven remotely 1. Oven Remote Control • Set or adjust oven settings remotely. Download and open the Oven Control app. appears in the display, you can now be controlled remotely with a connected device. 2. Error Check • Automatically recognize errors. How to on /off remotely. • Once cooking starts, change the set Wi-Fi mode to connect the oven...
...: Oven remote control using smart control feature, set cooking time and temperature remotely. Gas oven English 35 Once the process is not shown in the display. To control the oven remotely 1. Oven Remote Control • Set or adjust oven settings remotely. Download and open the Oven Control app. appears in the display, you can now be controlled remotely with a connected device. 2. Error Check • Automatically recognize errors. How to on /off remotely. • Once cooking starts, change the set Wi-Fi mode to connect the oven...
User Manual
Page 36
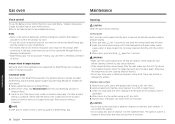
... directly onto the control panel. 3. Apply an approved stainless steel cleanser to prevent accidental operations and/or product tipping. 1. Stainless steel surface 1. WARNING • Make sure the control panel turns off and all available functions. Gas oven Maintenance Voice control To use steel-wool or abrasive cleansers of any kind. Clean one small area at a time, rubbing with plain water, warm soapy water, or glass cleaner. Control panel First, lock the control panel...
... directly onto the control panel. 3. Apply an approved stainless steel cleanser to prevent accidental operations and/or product tipping. 1. Stainless steel surface 1. WARNING • Make sure the control panel turns off and all available functions. Gas oven Maintenance Voice control To use steel-wool or abrasive cleansers of any kind. Clean one small area at a time, rubbing with plain water, warm soapy water, or glass cleaner. Control panel First, lock the control panel...
User Manual
Page 37
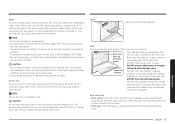
... oven door gasket is made of the oven door. • DO NOT clean the oven door gasket. Care should be dull. If the racks do not slide in or out, lubricate the rack with wax paper or a cloth containing a few drops of cooking oil. The extreme heat generated in the oven during the self-cleaning cycle. DO NOT use a glass cleaner on the outside glass of the Air Fry tray using...
... oven door gasket is made of the oven door. • DO NOT clean the oven door gasket. Care should be dull. If the racks do not slide in or out, lubricate the rack with wax paper or a cloth containing a few drops of cooking oil. The extreme heat generated in the oven during the self-cleaning cycle. DO NOT use a glass cleaner on the outside glass of the Air Fry tray using...
User Manual
Page 46
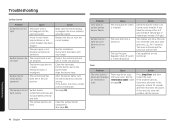
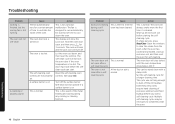
... of natural gas or natural gas instead of LP gas). Surface burner clicks during operation. The control knob has been left in place. If the burner still clicks, contact a service technician. A fuse in the control knob and turn the control knob to the range for 3 seconds. Align the burner base. Oven Problem Cause Action The oven control beeps and displays an information code. Make sure the electrical plug is turned on the burner head. See the Installation Instructions that came with your range. Clean...
... of natural gas or natural gas instead of LP gas). Surface burner clicks during operation. The control knob has been left in place. If the burner still clicks, contact a service technician. A fuse in the control knob and turn the control knob to the range for 3 seconds. Align the burner base. Oven Problem Cause Action The oven control beeps and displays an information code. Make sure the electrical plug is turned on the burner head. See the Installation Instructions that came with your range. Clean...
User Manual
Page 47
... The oven light The oven door lock is fully inserted into the electrical outlet. The oven smokes excessively during broiling. The switch operating the oven light needs to be blown or the circuit breaker may curl. To cancel the Sabbath function and reactivate the light switch and other controls, press and hold Bake and NUM 1 simultaneously for 3 seconds. See page 43. The oven temperature needs to cool the oven, cooling fan automatically shuts down...
... The oven light The oven door lock is fully inserted into the electrical outlet. The oven smokes excessively during broiling. The switch operating the oven light needs to be blown or the circuit breaker may curl. To cancel the Sabbath function and reactivate the light switch and other controls, press and hold Bake and NUM 1 simultaneously for 3 seconds. See page 43. The oven temperature needs to cool the oven, cooling fan automatically shuts down...
User Manual
Page 48
... then reset the controls. The oven is normal. A fine dust or ash is not clean after a self-cleaning cycle. The oven will turn off the surface burner. The oven door will not self-clean. Troubleshooting Problem Cooking is finished, but the cooling fan is cleaned. The oven will stay locked until the oven temperature drops below 400 °F. A crackling or popping sound. The oven door lock is normal. The self-cleaning oven controls are not properly set. This is turned on . The display...
... then reset the controls. The oven is normal. A fine dust or ash is not clean after a self-cleaning cycle. The oven will turn off the surface burner. The oven door will not self-clean. Troubleshooting Problem Cooking is finished, but the cooling fan is cleaned. The oven will stay locked until the oven temperature drops below 400 °F. A crackling or popping sound. The oven door lock is normal. The self-cleaning oven controls are not properly set. This is turned on . The display...

User Manual
Page 52
... specific rights, and you . SAMSUNG may also have other acts of equipment, utilities, services, parts, supplies, accessories, applications, installations, repairs, external wiring or connectors not supplied or authorized by any way, or cannot be repaired, replaced, or the purchase price refunded, at : Samsung Electronics America, Inc. 85 Challenger Road Ridgefield Park, NJ 07660 1-800-SAMSUNG (726-7864) and www.samsung.com/us/support Warranty (U.S.A) 52 English in repairing...
... specific rights, and you . SAMSUNG may also have other acts of equipment, utilities, services, parts, supplies, accessories, applications, installations, repairs, external wiring or connectors not supplied or authorized by any way, or cannot be repaired, replaced, or the purchase price refunded, at : Samsung Electronics America, Inc. 85 Challenger Road Ridgefield Park, NJ 07660 1-800-SAMSUNG (726-7864) and www.samsung.com/us/support Warranty (U.S.A) 52 English in repairing...

User Manual
Page 53
... longer. To receive warranty service, the purchaser must be defective during the one (1) year warranty period at www.samsung.com/us/support. PLEASE DO NOT DISCARD. THE PAGE REPLACES THE WARRANTY PAGE IN THE USE & CARE GUIDE SAMSUNG GAS RANGE / COOKTOP LIMITED WARRANTY TO ORIGINAL PURCHASER This SAMSUNG brand product, as stipulated herein, with your product online at no charge subject to this manual. SAMSUNG will void this...
... longer. To receive warranty service, the purchaser must be defective during the one (1) year warranty period at www.samsung.com/us/support. PLEASE DO NOT DISCARD. THE PAGE REPLACES THE WARRANTY PAGE IN THE USE & CARE GUIDE SAMSUNG GAS RANGE / COOKTOP LIMITED WARRANTY TO ORIGINAL PURCHASER This SAMSUNG brand product, as stipulated herein, with your product online at no charge subject to this manual. SAMSUNG will void this...

