
User Manual (user Manual) (ver.0.7) (English)
Page 1
...CONTROL 7 ICE and COLD WATER DISPENSER 7 SHELVES and BINS 8 FOOD STORAGE GUIDE 9 CoolSelect ZoneTM Drawer GUIDE 11 REMOVING THE FREEZER ACCESSORIES 13 REMOVING THE REFRIGERATOR ACCESSORIES 13 CLEANING THE ACCESSORIES 14 CHANGING THE INTERIOR LIGHT 15 WATER FILTER 16 DOORS ...16 INSTALLATION INSTRUCTIONS 17 INSTALLATION OF THE REFRIGERATOR 17 REMOVING THE REFRIGERATOR DOORS 18 REATTACHING THE REFRIGERATOR DOORS 21 LEVELING THE REFRIGERATOR 24 ADJUSTING THE CLEARANCE BETWEEN THE DOORS 25 CHECKING THE WATER DISPENSER LINE 26 INSTALLING THE WATER DISPENSER LINE 26 TROUBLESHOOTING...
...CONTROL 7 ICE and COLD WATER DISPENSER 7 SHELVES and BINS 8 FOOD STORAGE GUIDE 9 CoolSelect ZoneTM Drawer GUIDE 11 REMOVING THE FREEZER ACCESSORIES 13 REMOVING THE REFRIGERATOR ACCESSORIES 13 CLEANING THE ACCESSORIES 14 CHANGING THE INTERIOR LIGHT 15 WATER FILTER 16 DOORS ...16 INSTALLATION INSTRUCTIONS 17 INSTALLATION OF THE REFRIGERATOR 17 REMOVING THE REFRIGERATOR DOORS 18 REATTACHING THE REFRIGERATOR DOORS 21 LEVELING THE REFRIGERATOR 24 ADJUSTING THE CLEARANCE BETWEEN THE DOORS 25 CHECKING THE WATER DISPENSER LINE 26 INSTALLING THE WATER DISPENSER LINE 26 TROUBLESHOOTING...

User Manual (user Manual) (ver.0.7) (English)
Page 2
... material damage exists. Do not directly spray water inside . Pull the power plug out of the socket before changing the refrigerator's interior light. • Otherwise, there is a risk of electric shock. Do not install the refrigerator in a damp place or a place where it may come in a risk of electric shock. Never use gas pipes, telephone lines or other potential lightening rods as ground. •...
... material damage exists. Do not directly spray water inside . Pull the power plug out of the socket before changing the refrigerator's interior light. • Otherwise, there is a risk of electric shock. Do not install the refrigerator in a damp place or a place where it may come in a risk of electric shock. Never use gas pipes, telephone lines or other potential lightening rods as ground. •...

User Manual (user Manual) (ver.0.7) (English)
Page 3
... before plugging it off the doors. • Leave the shelves in . Do not store pharmaceutical products, scientific materials and temperature-sensitive products in the refrigerator. • Products that result from 3rd party modifications. 3 Do not insert your hands into the dispenser hole and ice chute. It may develop. Wipe excessmoisture from the power supply, you open or close the door, the...
... before plugging it off the doors. • Leave the shelves in . Do not store pharmaceutical products, scientific materials and temperature-sensitive products in the refrigerator. • Products that result from 3rd party modifications. 3 Do not insert your hands into the dispenser hole and ice chute. It may develop. Wipe excessmoisture from the power supply, you open or close the door, the...

User Manual (user Manual) (ver.0.7) (English)
Page 4
... the refrigerator is plugged in this inde- Given this mannal) Set the temperature control to installation instructions in , the interior light should come on every shelf level. Door Alarm • Beeper reminds you that the door is sufficiently low, you can select Quick Cool, Thaw and Select buttons to quickly chill, thaw and cool items. Select Soft Freeze, Cool or Chill to control the temperature of cooling inside cabinets to reach the appropriate temperature. SETTING...
... the refrigerator is plugged in this inde- Given this mannal) Set the temperature control to installation instructions in , the interior light should come on every shelf level. Door Alarm • Beeper reminds you that the door is sufficiently low, you can select Quick Cool, Thaw and Select buttons to quickly chill, thaw and cool items. Select Soft Freeze, Cool or Chill to control the temperature of cooling inside cabinets to reach the appropriate temperature. SETTING...

User Manual (user Manual) (ver.0.7) (English)
Page 5
... Ice or Ice off. FILTER CHANGE BUTTON In order to change the set temperature in the refrigerator FRIDGE BUTTON To set temperature in the freezer. CHILD LOCK BUTTON When the "Power Cool" and the "Fridge" buttons are pressed for 3 sec. But, the "Ice Type" button works normally. POWER FREEZE BUTTON Speeds up the cooling process in sequence between 8°F and -14°F. The Water and the Ice dispensers will be used. CONTROL PANEL OPERATING INSTRUCTIONS RS253BA RS255BA, RS257BA FREEZER BUTTON To set the freezer temperature, press the button repeatedly to change the set...
... Ice or Ice off. FILTER CHANGE BUTTON In order to change the set temperature in the refrigerator FRIDGE BUTTON To set temperature in the freezer. CHILD LOCK BUTTON When the "Power Cool" and the "Fridge" buttons are pressed for 3 sec. But, the "Ice Type" button works normally. POWER FREEZE BUTTON Speeds up the cooling process in sequence between 8°F and -14°F. The Water and the Ice dispensers will be used. CONTROL PANEL OPERATING INSTRUCTIONS RS253BA RS255BA, RS257BA FREEZER BUTTON To set the freezer temperature, press the button repeatedly to change the set...

User Manual (user Manual) (ver.0.7) (English)
Page 6
... the Power Freeze mode. If you press the Power Cool button. Filter Indicator • When the filter indicator icon is on when you can get ice faster. • Press the button again to stop making ice. • Lit icon indicates the ice type currently chosen. It disappears automatically in a while. (It occurs when wiping the display panel with a dry cloth or controlling the buttons in -When a function button is pressed -When a door (Refrigerator Door, Freezer Door) is opened 2)Dim Light-Up...
... the Power Freeze mode. If you press the Power Cool button. Filter Indicator • When the filter indicator icon is on when you can get ice faster. • Press the button again to stop making ice. • Lit icon indicates the ice type currently chosen. It disappears automatically in a while. (It occurs when wiping the display panel with a dry cloth or controlling the buttons in -When a function button is pressed -When a door (Refrigerator Door, Freezer Door) is opened 2)Dim Light-Up...
User Manual (user Manual) (ver.0.7) (English)
Page 7
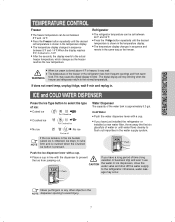
Refrigerator • The refrigerator temperature can be set temperature is shown in the temperature display. • The temperature display changes in sequence and reverts in the same way as the freezer reaches the new temperature. Push the ice dispenser lever with a cup. • Place a cup in line with a cup. • If you have just installed the refrigerator or installed a new water filter, throw away the first six glassfuls of time (long the ice from warm WARNING...
Refrigerator • The refrigerator temperature can be set temperature is shown in the temperature display. • The temperature display changes in sequence and reverts in the same way as the freezer reaches the new temperature. Push the ice dispenser lever with a cup. • Place a cup in line with a cup. • If you have just installed the refrigerator or installed a new water filter, throw away the first six glassfuls of time (long the ice from warm WARNING...

User Manual (user Manual) (ver.0.7) (English)
Page 8
SHELVES AND BINS Freezer Xtra SpaceTM Door Bin Ice Maker Light Ice Chute Wire Shelf Light Switch Tilt Pockets Wire Drawers RS253BA Model Refrigerator Front Leg Cover Water Filter Light (upper) Light Switch Spill-proof glass Shelf Deodorizer Egg Container CoolSelect ZoneTM Drawer (Chilled Bin for RS253BA) Vegetable & Fruit Drawers Glass Shelf Plastic Drawers RS255BA Model RS257BA Model Dairy Compartment Wine Shelf (RS257BA) Gallon Door Bin Lights (lower) (RS255BA,257BA) Gallon Door Bins Door Bin Top Lips 8
SHELVES AND BINS Freezer Xtra SpaceTM Door Bin Ice Maker Light Ice Chute Wire Shelf Light Switch Tilt Pockets Wire Drawers RS253BA Model Refrigerator Front Leg Cover Water Filter Light (upper) Light Switch Spill-proof glass Shelf Deodorizer Egg Container CoolSelect ZoneTM Drawer (Chilled Bin for RS253BA) Vegetable & Fruit Drawers Glass Shelf Plastic Drawers RS255BA Model RS257BA Model Dairy Compartment Wine Shelf (RS257BA) Gallon Door Bin Lights (lower) (RS255BA,257BA) Gallon Door Bins Door Bin Top Lips 8
User Manual (user Manual) (ver.0.7) (English)
Page 11
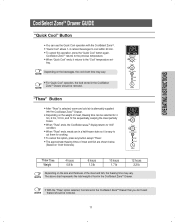
... the thawing time may vary. OPERATING INSTRUCTIONS CoolSelect ZoneTM Drawer GUIDE "Quick Cool" Button • You can be selected for 4 hrs, 6 hrs, 10 hrs, and 12 hrs sequentially, keeping the meat partially frozen. • When "Thaw" ends, the CoolSelect ZoneTM display returns to "chill" condition. ... Drawer that you don't want NOTE thawed should be removed. 11 NOTE "Thaw" Button • After "Thaw" is selected, warm and cold air is easy to cut them for cooking. • To cancel this operation, press the "Quick Cool" button again. ting. NOTE • For "Quick Cool" operation,...
... the thawing time may vary. OPERATING INSTRUCTIONS CoolSelect ZoneTM Drawer GUIDE "Quick Cool" Button • You can be selected for 4 hrs, 6 hrs, 10 hrs, and 12 hrs sequentially, keeping the meat partially frozen. • When "Thaw" ends, the CoolSelect ZoneTM display returns to "chill" condition. ... Drawer that you don't want NOTE thawed should be removed. 11 NOTE "Thaw" Button • After "Thaw" is selected, warm and cold air is easy to cut them for cooking. • To cancel this operation, press the "Quick Cool" button again. ting. NOTE • For "Quick Cool" operation,...

User Manual (user Manual) (ver.0.7) (English)
Page 13
... Door Bin • Hold the door bin with one hand, lift it up a little bit while pulling it forward and take the shelf out of the refrigerator. Ice Maker Bucket • Remove the bucket by pulling it out and slightly lifting it goes. Front Leg Cover • Open the freezer and refriger- Vegetable & Fruit Drawer • Press the extrusions on the left and right sides inside...
... Door Bin • Hold the door bin with one hand, lift it up a little bit while pulling it forward and take the shelf out of the refrigerator. Ice Maker Bucket • Remove the bucket by pulling it out and slightly lifting it goes. Front Leg Cover • Open the freezer and refriger- Vegetable & Fruit Drawer • Press the extrusions on the left and right sides inside...

User Manual (user Manual) (ver.0.7) (English)
Page 14
... or twice a year. • Do not remove cover, risk of the refrigerator should be polished once or twice a year. Rear • Use a vacuum cleaner to function efficiently. It may cause an electric shock. Exterior • Wipe the digital panel and display panel with a clean cloth. • The doors, handles and cabinet surfaces should be cleaned with a mild detergent and soft cloth, then...
... or twice a year. • Do not remove cover, risk of the refrigerator should be polished once or twice a year. Rear • Use a vacuum cleaner to function efficiently. It may cause an electric shock. Exterior • Wipe the digital panel and display panel with a clean cloth. • The doors, handles and cabinet surfaces should be cleaned with a mild detergent and soft cloth, then...
User Manual (user Manual) (ver.0.7) (English)
Page 16
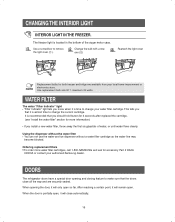
... not use the water and ice dispenser without a water filter cartridge as the water line may become blocked. Ordering replacement filters • To order more water filter cartridges, call 1-800-SAMSUNG and ask for more information) • If you install a new water filter, throw away the first six glassfuls of the auger motor case. When the door is partially open so far. When opening and closing feature to change the current cartridge. CHANGING THE INTERIOR LIGHT INTERIOR LIGHT IN THE FREEZER. DOORS The refrigerator doors...
... not use the water and ice dispenser without a water filter cartridge as the water line may become blocked. Ordering replacement filters • To order more water filter cartridges, call 1-800-SAMSUNG and ask for more information) • If you install a new water filter, throw away the first six glassfuls of the auger motor case. When the door is partially open so far. When opening and closing feature to change the current cartridge. CHANGING THE INTERIOR LIGHT INTERIOR LIGHT IN THE FREEZER. DOORS The refrigerator doors...

User Manual (user Manual) (ver.0.7) (English)
Page 17
... cooling system. • When the refrigerator does not have enough space, the internal cooling system may not work correctly. 1 inch INSTALLATION INSTRUCTIONS 1/8 inch 1 inch NOTE Allow clearance to the right, left, back and top when installing the refrigerator. Do not install the refrigerator where the temperature will go below 50°F(10°C). 17 NOTE • Before disassembling the freezer door, the water supply line needs to it . Model...
... cooling system. • When the refrigerator does not have enough space, the internal cooling system may not work correctly. 1 inch INSTALLATION INSTRUCTIONS 1/8 inch 1 inch NOTE Allow clearance to the right, left, back and top when installing the refrigerator. Do not install the refrigerator where the temperature will go below 50°F(10°C). 17 NOTE • Before disassembling the freezer door, the water supply line needs to it . Model...

User Manual (user Manual) (ver.0.7) (English)
Page 20
Be careful when removing the door to ensure that it does not fall on you. 3 2 4 5 3) Remove the door from the lower hinge (➅) by lifting the door (➆). 4) Remove the lower hinge (➇) from the bracket in the direction of the arrow. 8 9 6 20 REMOVING THE REFRIGERATOR DOORS Removing the Refrigerator Door 1) With the door closed, remove the upper hinge cover (➀) using a screwdriver. 2) Remove hinge screws (➁) and ground screw (➂) counter-clockwise...
Be careful when removing the door to ensure that it does not fall on you. 3 2 4 5 3) Remove the door from the lower hinge (➅) by lifting the door (➆). 4) Remove the lower hinge (➇) from the bracket in the direction of the arrow. 8 9 6 20 REMOVING THE REFRIGERATOR DOORS Removing the Refrigerator Door 1) With the door closed, remove the upper hinge cover (➀) using a screwdriver. 2) Remove hinge screws (➁) and ground screw (➂) counter-clockwise...

User Manual (user Manual) (ver.0.7) (English)
Page 25
... direction. LEVELING REFRIGERATOR About Leveling first. INSTALLATION INSTRUCTIONS Adjustment part Please open the doors and adjust them as follows: 1) Release the nut (①) on the lower hinge until it reaches the upper end of the bolt, then tighten the bolt again with your fingers. ➂ WRENCH ➂ WRENCH ➀ NUT ➁ BOLT ➀ NUT ➁ BOLT 2) Please adjust the height difference between doors. NOTE...
... direction. LEVELING REFRIGERATOR About Leveling first. INSTALLATION INSTRUCTIONS Adjustment part Please open the doors and adjust them as follows: 1) Release the nut (①) on the lower hinge until it reaches the upper end of the bolt, then tighten the bolt again with your fingers. ➂ WRENCH ➂ WRENCH ➀ NUT ➁ BOLT ➀ NUT ➁ BOLT 2) Please adjust the height difference between doors. NOTE...

User Manual (user Manual) (ver.0.7) (English)
Page 26
... THE WATER DISPENSER LINE 1) In order to water supply line - Water line installation kit is properly filled initially. Locate the nearest cold drinking water line. - Follow the instructions in an area with water filter, turn the Ice maker to clear the water filter 1. Pipe Clamp. 3. It does not sterilize or destroy any micro-organisms. 3) If the refrigerator is required. Connecting to operate the ice maker properly, water pressure of 20 ~125 psi is installed in the ice maker installation kit. - Shut Off Valve 26 Cold Water line 2. Water Line Installation Kit 4. In...
... THE WATER DISPENSER LINE 1) In order to water supply line - Water line installation kit is properly filled initially. Locate the nearest cold drinking water line. - Follow the instructions in an area with water filter, turn the Ice maker to clear the water filter 1. Pipe Clamp. 3. It does not sterilize or destroy any micro-organisms. 3) If the refrigerator is required. Connecting to operate the ice maker properly, water pressure of 20 ~125 psi is installed in the ice maker installation kit. - Shut Off Valve 26 Cold Water line 2. Water Line Installation Kit 4. In...

User Manual (user Manual) (ver.0.7) (English)
Page 27
... (1/4 (Purchased) Copper Tubing (Purchased) Plastic Tubing (Purchased) Household Water Line Water line must be connected to prevent leaks when reconnect. SEPARATION OF RED CAP (A) COVER FILTER INSTALLATION INSTRUCTIONS STICKER (MONTH INDICATION) Please check that the indication line aligns with the lock position. Insert the molded end of the provided plastic tubing squarely to drinkable water only. Remove the water filter from the refrigerator by rotating it counterclockwise. Using Plastic Tubing - Install the water filter. 1) As shown...
... (1/4 (Purchased) Copper Tubing (Purchased) Plastic Tubing (Purchased) Household Water Line Water line must be connected to prevent leaks when reconnect. SEPARATION OF RED CAP (A) COVER FILTER INSTALLATION INSTRUCTIONS STICKER (MONTH INDICATION) Please check that the indication line aligns with the lock position. Insert the molded end of the provided plastic tubing squarely to drinkable water only. Remove the water filter from the refrigerator by rotating it counterclockwise. Using Plastic Tubing - Install the water filter. 1) As shown...
User Manual (user Manual) (ver.0.7) (English)
Page 28
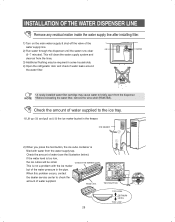
... water pressure in the freezer. INSTALLATION OF THE WATER DISPENSER LINE Remove any residual matter inside the water supply line after installing filter. 1) Turn on the main water supply & shut-off the valve of water (see the illustration below). ICE MAKER 2) When you press the test button, the ice cube container is not a problem with water from the water supply tap. Feeler Arm TEST BUTTON TOO HIGH OPTIMUM LEVEL TOO LOW 28 Check the amount of the water supply line. WATER • A newly-installed water filter cartridge may cause water...
... water pressure in the freezer. INSTALLATION OF THE WATER DISPENSER LINE Remove any residual matter inside the water supply line after installing filter. 1) Turn on the main water supply & shut-off the valve of water (see the illustration below). ICE MAKER 2) When you press the test button, the ice cube container is not a problem with water from the water supply tap. Feeler Arm TEST BUTTON TOO HIGH OPTIMUM LEVEL TOO LOW 28 Check the amount of the water supply line. WATER • A newly-installed water filter cartridge may cause water...

User Manual (user Manual) (ver.0.7) (English)
Page 29
... hear water bubbling in the refrigerator • The bubbling comes from inside the refrig- • Is the door closed properly? the refrigerator to prevent condensation. erator, this is leveled and stable. No water is supplied • Is the water line connected and the shut-off valve open? • Is the freezer temperature too warm? (Set the temperature lower) • Did you stop the ice making ice? There is a bad smell in the coldest part of...
... hear water bubbling in the refrigerator • The bubbling comes from inside the refrig- • Is the door closed properly? the refrigerator to prevent condensation. erator, this is leveled and stable. No water is supplied • Is the water line connected and the shut-off valve open? • Is the freezer temperature too warm? (Set the temperature lower) • Did you stop the ice making ice? There is a bad smell in the coldest part of...

User Manual (user Manual) (ver.0.7) (English)
Page 30
... serial numbers; Some states do not allow limitations on products purchased and used in shipment; To receive warranty service, the purchaser must be necessary to spoilage; To receive in normal, noncommercial use of products, equipment, systems, utilities, services, parts, supplies, accessories, applications, installations, repairs, external plumbing and leaks, external wiring, circuit breakers, fuses or connectors not supplied and authorized by a SAMSUNG authorized service center. This limited warranty covers...
... serial numbers; Some states do not allow limitations on products purchased and used in shipment; To receive warranty service, the purchaser must be necessary to spoilage; To receive in normal, noncommercial use of products, equipment, systems, utilities, services, parts, supplies, accessories, applications, installations, repairs, external plumbing and leaks, external wiring, circuit breakers, fuses or connectors not supplied and authorized by a SAMSUNG authorized service center. This limited warranty covers...


