Owners Manual
Page 2
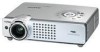
... digital zoom function expands (to approx. 16 times of screen size) or compress the image size, allowing you wish to use. ◆ Blackboard Function Blackboard✳ can be used as computer input or monitor output conveniently. (See page 44.) ◆ User's Logo A projected image can be selected in the Setting menu. (See page 45.) 2 Vertical auto keystone correction and Auto PC adjustment is performed with the Capture function. This projector...
... digital zoom function expands (to approx. 16 times of screen size) or compress the image size, allowing you wish to use. ◆ Blackboard Function Blackboard✳ can be used as computer input or monitor output conveniently. (See page 44.) ◆ User's Logo A projected image can be selected in the Setting menu. (See page 45.) 2 Vertical auto keystone correction and Auto PC adjustment is performed with the Capture function. This projector...
Owners Manual
Page 3
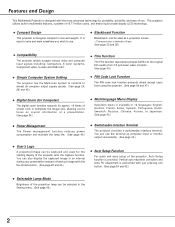
... 29 Manual PC Adjustment 30 Image Level Selection 32 Image Level Adjustment 33 Screen Size Adjustment 34 Video Input 35 Input Source Selection (Video, S-Video) 35 Input Source Selection (Component, RGB Scart 21-Pin) 36 Video System Selection 37 Image Level Selection 38 Image Level Adjustment 39 Screen Size Adjustment 41 Setting 42 Setting 42 Maintenance and Cleaning 49 Warning Indicator 49 Cleaning the Air Filters 50 Attaching the Lens Cover 50 Cleaning the Projection Lens 51 Cleaning the Projector Cabinet 51 Lamp Replacement 52 Lamp Replace Counter 53...
... 29 Manual PC Adjustment 30 Image Level Selection 32 Image Level Adjustment 33 Screen Size Adjustment 34 Video Input 35 Input Source Selection (Video, S-Video) 35 Input Source Selection (Component, RGB Scart 21-Pin) 36 Video System Selection 37 Image Level Selection 38 Image Level Adjustment 39 Screen Size Adjustment 41 Setting 42 Setting 42 Maintenance and Cleaning 49 Warning Indicator 49 Cleaning the Air Filters 50 Attaching the Lens Cover 50 Cleaning the Projection Lens 51 Cleaning the Projector Cabinet 51 Lamp Replacement 52 Lamp Replace Counter 53...
Owners Manual
Page 4
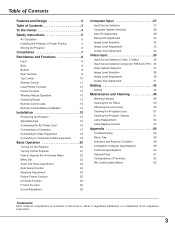
... Electronic Computer/Data Processing Equipment, ANSI/NFPA 75. If the projector is to operate improperly, read this booklet. CAUTION Not for an extended time, unplug the projector from the projection lens. READ AND KEEP THIS OWNER'S MANUAL FOR LATER USE. THIS SYMBOL INDICATES THAT THERE ARE IMPORTANT OPERATING AND MAINTENANCE INSTRUCTIONS IN THE OWNER'S MANUAL WITH THIS UNIT. Eye damage could result. If the problem still persists...
... Electronic Computer/Data Processing Equipment, ANSI/NFPA 75. If the projector is to operate improperly, read this booklet. CAUTION Not for an extended time, unplug the projector from the projection lens. READ AND KEEP THIS OWNER'S MANUAL FOR LATER USE. THIS SYMBOL INDICATES THAT THERE ARE IMPORTANT OPERATING AND MAINTENANCE INSTRUCTIONS IN THE OWNER'S MANUAL WITH THIS UNIT. Eye damage could result. If the problem still persists...
Owners Manual
Page 6
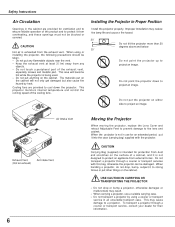
... from overheating, and these openings must not be blocked or covered. This projector monitors internal temperature and control the running speed of the exhaust vent, especially screws and metallic part. When carrying a projector, use for their information. Do not put any objects. - Air Intake Vent Exhaust Vent (Hot air exhaust) Air Intake Vent 6 Moving the Projector When moving the projector, replace the Lens Cover and retract Adjustable Feet to...
... from overheating, and these openings must not be blocked or covered. This projector monitors internal temperature and control the running speed of the exhaust vent, especially screws and metallic part. When carrying a projector, use for their information. Do not put any objects. - Air Intake Vent Exhaust Vent (Hot air exhaust) Air Intake Vent 6 Moving the Projector When moving the projector, replace the Lens Cover and retract Adjustable Feet to...
Owners Manual
Page 7
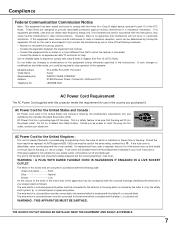
... it. Should the fuse need to be replaced, an ASTA approved BS 1362 fuse must be required to stop operation of the equipme Model Numbers Trade Name Responsible party Address Telephone No. : PLC-XU56, PLC-XU51, PLC-SU51 : Sanyo : SANYO FISHER COMPANY : 21605 Plummer Street, Chatsworth, California 91311 : (818)998-7322 AC Power Cord Requirement The AC Power Cord supplied with a moulded plug incorporating a fuse, the...
... it. Should the fuse need to be replaced, an ASTA approved BS 1362 fuse must be required to stop operation of the equipme Model Numbers Trade Name Responsible party Address Telephone No. : PLC-XU56, PLC-XU51, PLC-SU51 : Sanyo : SANYO FISHER COMPANY : 21605 Plummer Street, Chatsworth, California 91311 : (818)998-7322 AC Power Cord Requirement The AC Power Cord supplied with a moulded plug incorporating a fuse, the...
Owners Manual
Page 10
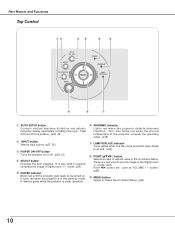
... + AUTO SET UP MENU SELECT LAMP REPLACE o i u q AUTO SETUP button Corrects vertical keystone distortion and adjusts computer display parameters including Fine sync., Total dots and Picture position. (p24, 42) w INPUT button Selects input source. (p27, 36 ) e POWER ON-OFF button Turns the projector on . OFF INPUT POWER WARNING VOLUME - This also blinks red when the internal temperature of the projector exceeds the operating range. (p49) u LAMP REPLACE indicator Turns yellow when the life of the projection lamp draws to be turned on or off. (p20, 21) r SELECT button Executes...
... + AUTO SET UP MENU SELECT LAMP REPLACE o i u q AUTO SETUP button Corrects vertical keystone distortion and adjusts computer display parameters including Fine sync., Total dots and Picture position. (p24, 42) w INPUT button Selects input source. (p27, 36 ) e POWER ON-OFF button Turns the projector on . OFF INPUT POWER WARNING VOLUME - This also blinks red when the internal temperature of the projector exceeds the operating range. (p49) u LAMP REPLACE indicator Turns yellow when the life of the projection lamp draws to be turned on or off. (p20, 21) r SELECT button Executes...
Owners Manual
Page 11
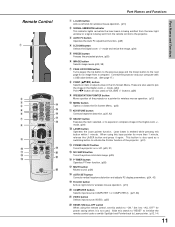
...) !4 POWER ON-OFF button Turns the projector on or off. (p20, 21) !5 NO SHOW button Turns the picture into black image. (p25) !6 P-TIMER button Operates P-Timer function. (p26) !7 MUTE button Mutes sound. (p26) !8 AUTO SET button Corrects vertical keystone distortion and adjusts PC display parameters. (p24, 42) !9 R-CLICK button Acts as VOLUME +/- Laser beam is not used as right click for wireless mouse operation. (p13) @0 COMPUTER button Selects input source (COMPUTER 1 or COMPUTER 2). (p27, 36) @1 VIDEO button Selects input source (VIDEO). (p35) @2 RESET...
...) !4 POWER ON-OFF button Turns the projector on or off. (p20, 21) !5 NO SHOW button Turns the picture into black image. (p25) !6 P-TIMER button Operates P-Timer function. (p26) !7 MUTE button Mutes sound. (p26) !8 AUTO SET button Corrects vertical keystone distortion and adjusts PC display parameters. (p24, 42) !9 R-CLICK button Acts as VOLUME +/- Laser beam is not used as right click for wireless mouse operation. (p13) @0 COMPUTER button Selects input source (COMPUTER 1 or COMPUTER 2). (p27, 36) @1 VIDEO button Selects input source (VIDEO). (p35) @2 RESET...
Owners Manual
Page 14
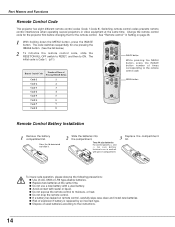
...; Replace two batteries at the same time. Switching remote control codes prevents remote control interference when operating several projectors or video equipment at the same time. ● Do not use a new battery with a used batteries according to moisture, or heat. ● Do not drop the remote control. ● If a battery has leaked on remote control, carefully wipe case clean and install new batteries. ● Risk of explosion if battery is Code 1. (p11) Remote Control Code Number of Times...
...; Replace two batteries at the same time. Switching remote control codes prevents remote control interference when operating several projectors or video equipment at the same time. ● Do not use a new battery with a used batteries according to moisture, or heat. ● Do not drop the remote control. ● If a battery has leaked on remote control, carefully wipe case clean and install new batteries. ● Risk of explosion if battery is Code 1. (p11) Remote Control Code Number of Times...
Owners Manual
Page 20
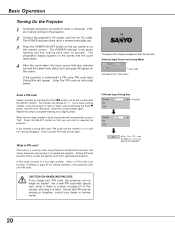
... remote control. When the four-digit number is a security code using Personal Identification Number that allows the person who knows it to "✳". Press the SELECT button so that was selected last and the Lamp mode status icon (see page 45) appear on the projector. 2 Connect the projector's AC power cord into an AC outlet. Setting PIN code prevents others except the specific users from operating the projector. The POWER indicator turns green lighting and the cooling fans start...
... remote control. When the four-digit number is a security code using Personal Identification Number that allows the person who knows it to "✳". Press the SELECT button so that was selected last and the Lamp mode status icon (see page 45) appear on the projector. 2 Connect the projector's AC power cord into an AC outlet. Setting PIN code prevents others except the specific users from operating the projector. The POWER indicator turns green lighting and the cooling fans start...
Owners Manual
Page 21
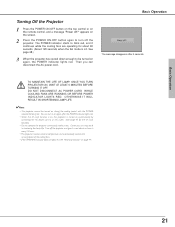
... the POWER indicator blinking red. Basic Operation Turning Off the Projector 1 Press the POWER ON-OFF button on the top control or on the remote control, and a message "Power off the projector and give it a rest about 90 seconds. (About 120 seconds when the fan mode is turned on automatically by connecting the AC power cord to an AC outlet. (See page 45 for about an hour in shortening the lamp life. Basic Operation The message...
... the POWER indicator blinking red. Basic Operation Turning Off the Projector 1 Press the POWER ON-OFF button on the top control or on the remote control, and a message "Power off the projector and give it a rest about 90 seconds. (About 120 seconds when the fan mode is turned on automatically by connecting the AC power cord to an AC outlet. (See page 45 for about an hour in shortening the lamp life. Basic Operation The message...

Owners Manual
Page 23
...(Green), and Image 1 ~ 4. (p32) Screen Menu Used to adjust size of image. [Normal / True / Wide / Digital zoom +/-] (p34) Setting Menu Used to change settings of the projector or reset lamp replace counter. (p42-48) Basic Operation Input Menu Used to select input source either Computer or Video. (p27) PC Adjust Menu Used to adjust parameters to match with input signal format. (p29-31) Image Adjust Menu Used to adjust computer image. [Contrast / Brightness / Color temp. / White balance (R/G/B) / Sharpness / Gamma] (p33) Sound Menu Used to adjust volume or mute sound. (p26) For video...
...(Green), and Image 1 ~ 4. (p32) Screen Menu Used to adjust size of image. [Normal / True / Wide / Digital zoom +/-] (p34) Setting Menu Used to change settings of the projector or reset lamp replace counter. (p42-48) Basic Operation Input Menu Used to select input source either Computer or Video. (p27) PC Adjust Menu Used to adjust parameters to match with input signal format. (p29-31) Image Adjust Menu Used to adjust computer image. [Contrast / Brightness / Color temp. / White balance (R/G/B) / Sharpness / Gamma] (p33) Sound Menu Used to adjust volume or mute sound. (p26) For video...
Owners Manual
Page 34
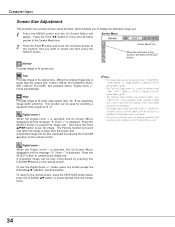
... by pressing the D.ZOOM ▼ button on the remote control. ✔Note: • This Screen Menu cannot be used . mode, press any resolution higher than the screen size (1024 x 768 for PLC-XU56/PLC-XU51, 800 x 600 for providing a squeezed video signal at 16 : 9. Screen Menu Screen Menu icon Move the red frame to pan the image. cannot be also expanded by expanding image width uniformly. Computer Input Screen Size Adjustment This projector has a picture screen resize function, which...
... by pressing the D.ZOOM ▼ button on the remote control. ✔Note: • This Screen Menu cannot be used . mode, press any resolution higher than the screen size (1024 x 768 for PLC-XU56/PLC-XU51, 800 x 600 for providing a squeezed video signal at 16 : 9. Screen Menu Screen Menu icon Move the red frame to pan the image. cannot be also expanded by expanding image width uniformly. Computer Input Screen Size Adjustment This projector has a picture screen resize function, which...
Owners Manual
Page 42
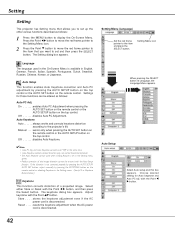
... AC power cord is On in the Setting menu. (p44) • Perfect correction of a projected image. with the Point ed button. Auto Setup This function enables Auto Keystone correction and Auto PC adjustment by pressing the KEYSTONE button on the remote control. On enables Auto PC Adjustment when pressing the AUTO SET button on the remote control or the AUTO SETUP button on the top control. Auto Keystone Auto always works and corrects keystone distortion according to the item and press the SELECT button. Manual . . . .works...
... AC power cord is On in the Setting menu. (p44) • Perfect correction of a projected image. with the Point ed button. Auto Setup This function enables Auto Keystone correction and Auto PC adjustment by pressing the KEYSTONE button on the remote control. On enables Auto PC Adjustment when pressing the AUTO SET button on the remote control or the AUTO SETUP button on the top control. Auto Keystone Auto always works and corrects keystone distortion according to the item and press the SELECT button. Manual . . . .works...
Owners Manual
Page 43
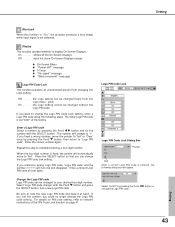
... whether to relevant instructions of the PIN Code Lock function on PIN code setting, refer to display On-Screen Displays. The initial Logo PIN code is entered, the following steps. Enter a Logo PIN code Select a number by pressing the Point 7 8 button and fix the number with the Point d button and press the SELECT button. Repeat this function is "On," the projector produces a blue image while input signal is fixed, the pointer will...
... whether to relevant instructions of the PIN Code Lock function on PIN code setting, refer to display On-Screen Displays. The initial Logo PIN code is entered, the following steps. Enter a Logo PIN code Select a number by pressing the Point 7 8 button and fix the number with the Point d button and press the SELECT button. Repeat this function is "On," the projector produces a blue image while input signal is fixed, the pointer will...
Owners Manual
Page 45
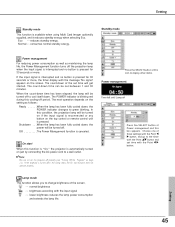
... the lamp life. The next operation depends on the top control or remote control unit is pressed for 30 seconds or more , the timer display with the message "No signal" appears on page 21). Press the SELECT button at this icon to turn the projector off properly (see "Turning Off the Projector" on the screen. Choose one of three settings with the Point 7 8 button, and go to green blinking. Lamp mode This...
... the lamp life. The next operation depends on the top control or remote control unit is pressed for 30 seconds or more , the timer display with the message "No signal" appears on page 21). Press the SELECT button at this icon to turn the projector off properly (see "Turning Off the Projector" on the screen. Choose one of three settings with the Point 7 8 button, and go to green blinking. Lamp mode This...
Owners Manual
Page 52
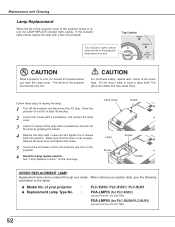
... an end. Make sure that the lamp is set properly. Top Control POWER This indicator lights yellow when the life of the projection lamp draws to the dealer. ● Model No. CAUTION For continued safety, replace with a lamp of the same type. Lamp Cover Screw Lamp Screw Screw Handle ORDER REPLACEMENT LAMP Replacement lamp can be ordered through your projector : ● Replacement Lamp Type No. : PLC-XU56/ PLC-XU51/ PLC-SU51 POA-LMP55 (for PLC-XU51) (Service Parts No. 610 309 2706) POA...
... an end. Make sure that the lamp is set properly. Top Control POWER This indicator lights yellow when the life of the projection lamp draws to the dealer. ● Model No. CAUTION For continued safety, replace with a lamp of the same type. Lamp Cover Screw Lamp Screw Screw Handle ORDER REPLACEMENT LAMP Replacement lamp can be ordered through your projector : ● Replacement Lamp Type No. : PLC-XU56/ PLC-XU51/ PLC-SU51 POA-LMP55 (for PLC-XU51) (Service Parts No. 610 309 2706) POA...

Owners Manual
Page 53
.... The message "Lamp replace counter Reset?" There is no broken shards or pieces of the lamp. Maintenance & Cleaning Maintenance and Cleaning Lamp Replace Counter Be sure to reset the lamp replace counter after the lamp is reset, the LAMP REPLACE indicator stops lighting. 1 Turn the projector on, press the MENU button and the OnScreen Menu will appear. Improper handling may result in the Lamp Replacement section of this manual. ) Continuous use as a result of hours of use of the lamp with a new one should...
.... The message "Lamp replace counter Reset?" There is no broken shards or pieces of the lamp. Maintenance & Cleaning Maintenance and Cleaning Lamp Replace Counter Be sure to reset the lamp replace counter after the lamp is reset, the LAMP REPLACE indicator stops lighting. 1 Turn the projector on, press the MENU button and the OnScreen Menu will appear. Improper handling may result in the Lamp Replacement section of this manual. ) Continuous use as a result of hours of use of the lamp with a new one should...
Owners Manual
Page 54
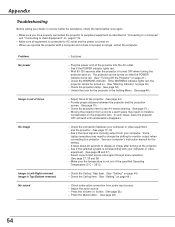
... the projection lens. Select correct input source once again through menu operation. (See page 27, 35 and 36) - Check the Ceiling item. (See "Setting" on page 44.) - Problem: No power Image is not out of focus. Adjust focus of the projector into the AC outlet. - See if the POWER indicator lights red. - Provide proper distance between your computer's instruction manual for assistance, check the items below once again. - Check the connection between the projector and the projection screen. (See...
... the projection lens. Select correct input source once again through menu operation. (See page 27, 35 and 36) - Check the Ceiling item. (See "Setting" on page 44.) - Problem: No power Image is not out of focus. Adjust focus of the projector into the AC outlet. - See if the POWER indicator lights red. - Provide proper distance between your computer's instruction manual for assistance, check the items below once again. - Check the connection between the projector and the projection screen. (See...

Owners Manual
Page 58
... the Power management mode. Check and clean the air filters. Do not leave the projector on the projector, the WARNING indicator stops blinking. When turning on . Unplug the AC power cord and plug it again to an end, the LAMP REPLACE indicator lights yellow. When this indicator lights yellow, replace the projection lamp with the POWER ON-OFF button. ✽ The projector is operating normally. ✽ The projector is abnormally high. The projector cannot be turned on the projector. Reset the Lamp replace counter after replacement of the projection lamp draws...
... the Power management mode. Check and clean the air filters. Do not leave the projector on the projector, the WARNING indicator stops blinking. When turning on . Unplug the AC power cord and plug it again to an end, the LAMP REPLACE indicator lights yellow. When this indicator lights yellow, replace the projection lamp with the POWER ON-OFF button. ✽ The projector is operating normally. ✽ The projector is abnormally high. The projector cannot be turned on the projector. Reset the Lamp replace counter after replacement of the projection lamp draws...
Owners Manual
Page 61
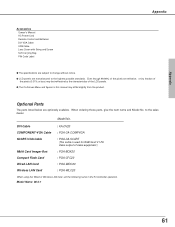
When ordering those parts, give the item name and Model No. Model Name: 08-4-1 61 Appendix Appendix Accessories Owner's Manual AC Power Cord Remote Control and Batteries DVI-VGA Cable USB Cable Lens Cover with String and Screw Soft Carrying Bag PIN Code Label ● The specifications are subject to change without notice. ● LCD panels are manufactured to the sales dealer. Model No. to the highest possible standards. Optional Parts The parts listed below...
When ordering those parts, give the item name and Model No. Model Name: 08-4-1 61 Appendix Appendix Accessories Owner's Manual AC Power Cord Remote Control and Batteries DVI-VGA Cable USB Cable Lens Cover with String and Screw Soft Carrying Bag PIN Code Label ● The specifications are subject to change without notice. ● LCD panels are manufactured to the sales dealer. Model No. to the highest possible standards. Optional Parts The parts listed below...


