Instruction Manual, PLC-SU40
Page 5
... AC POWER CORD 8 PICTURE IMAGE ADJUSTMENTS 28 POSITIONING PROJECTOR 9 IMAGE LEVEL SELECT 28 ADJUSTABLE FEET 9 IMAGE LEVEL ADJUSTMENT 29 INSTALLING PROJECTOR IN PROPER POSITION 10 PICTURE SCREEN ADJUSTMENT 30 MOVING PROJECTOR 10 CONNECTING PROJECTOR 11 VIDEO INPUT 31 SELECTING INPUT SOURCE 31 TERMINALS OF PROJECTOR 11 SELECTING VIDEO SYSTEM 32 CONNECTING TO COMPUTER 12 PICTURE IMAGE ADJUSTMENTS...
... AC POWER CORD 8 PICTURE IMAGE ADJUSTMENTS 28 POSITIONING PROJECTOR 9 IMAGE LEVEL SELECT 28 ADJUSTABLE FEET 9 IMAGE LEVEL ADJUSTMENT 29 INSTALLING PROJECTOR IN PROPER POSITION 10 PICTURE SCREEN ADJUSTMENT 30 MOVING PROJECTOR 10 CONNECTING PROJECTOR 11 VIDEO INPUT 31 SELECTING INPUT SOURCE 31 TERMINALS OF PROJECTOR 11 SELECTING VIDEO SYSTEM 32 CONNECTING TO COMPUTER 12 PICTURE IMAGE ADJUSTMENTS...
Instruction Manual, PLC-SU40
Page 6
...consumption while the projector is not pressed for connecting DVI output from a computer between SVGA (800 x 600) and SXGA (1280 x 1024) is shipped with this projector includes the Laser Pointer function. N Digital Visual Interface This projector is always ...video signal, such as computer input or monitor output conveniently. (Refer to focus on crucial information at a presentation. This projector cannot display the image of 16.77 million colors, and matrix liquid crystal display (LCD) technology. This function helps you to make a smart presentation on again when the projector...
...consumption while the projector is not pressed for connecting DVI output from a computer between SVGA (800 x 600) and SXGA (1280 x 1024) is shipped with this projector includes the Laser Pointer function. N Digital Visual Interface This projector is always ...video signal, such as computer input or monitor output conveniently. (Refer to focus on crucial information at a presentation. This projector cannot display the image of 16.77 million colors, and matrix liquid crystal display (LCD) technology. This function helps you to make a smart presentation on again when the projector...

Instruction Manual, PLC-SU40
Page 11
...Computer input or Monitor output properly before using this connector. (Refer to P13.) COMPUTER IN 1 VIDEO DVI - Set the terminal up as computer input or monitor output. CONNECTING PROJECTOR TERMINALS OF PROJECTOR This projector has input and output terminals on pages 11 to 13 and connect properly. L (MONO) ...personal computer to this connector. (Refer to P12, 36.) Note:This terminal outputs analog signal from video equipment to these jacks. (Refer to P12, 13.) RESET BUTTON This projector uses a micro processor to control this unit, and occasionally, this terminal. (Refer to P12.) ...
...Computer input or Monitor output properly before using this connector. (Refer to P13.) COMPUTER IN 1 VIDEO DVI - Set the terminal up as computer input or monitor output. CONNECTING PROJECTOR TERMINALS OF PROJECTOR This projector has input and output terminals on pages 11 to 13 and connect properly. L (MONO) ...personal computer to this connector. (Refer to P12, 36.) Note:This terminal outputs analog signal from video equipment to these jacks. (Refer to P12, 13.) RESET BUTTON This projector uses a micro processor to control this unit, and occasionally, this terminal. (Refer to P12.) ...

Instruction Manual, PLC-SU40
Page 12
AUDIO IN - VIDEO AUDIO IN R - AUDIO OUT Audio Cable (stereo) ✽ N MAC ADAPTER (Not supplied) Set switches as either Computer input or Monitor output before using this projector.) • VGA Cable (HDB 15 pin) • Control Cable for Serial Port ✽ or ADB Port &#...T.M.D.S.) ✽ • Audio Cables (RCA x 2 and Mini Plug (stereo) x 1) ✽ IBM-compatible computer or Macintosh computer (VGA / SVGA / XGA / SXGA) Desktop type Laptop type 12 Monitor Output Monitor Output Monitor Output Audio Output USB port Serial port or MAC Adapter ✽ Monitor Input...
AUDIO IN - VIDEO AUDIO IN R - AUDIO OUT Audio Cable (stereo) ✽ N MAC ADAPTER (Not supplied) Set switches as either Computer input or Monitor output before using this projector.) • VGA Cable (HDB 15 pin) • Control Cable for Serial Port ✽ or ADB Port &#...T.M.D.S.) ✽ • Audio Cables (RCA x 2 and Mini Plug (stereo) x 1) ✽ IBM-compatible computer or Macintosh computer (VGA / SVGA / XGA / SXGA) Desktop type Laptop type 12 Monitor Output Monitor Output Monitor Output Audio Output USB port Serial port or MAC Adapter ✽ Monitor Input...

Instruction Manual, PLC-SU40
Page 13
... not supplied with this projector.) • Video Cable (RCA x 1 or RCA x 3) ✽ • Scart-VGA Cable ✽ • S-VIDEO Cable ✽ • Audio Cable (RCA x 2) ✽ Video Source (example) Video Cassette Recorder Video Disc Player Component video output equipment. (such as RGB Scart 21-Pin Video Input. (See page 22, 36.) COMPUTER IN 1 VIDEO DVI - VIDEO jack are connected, SVIDEO...
... not supplied with this projector.) • Video Cable (RCA x 1 or RCA x 3) ✽ • Scart-VGA Cable ✽ • S-VIDEO Cable ✽ • Audio Cable (RCA x 2) ✽ Video Source (example) Video Cassette Recorder Video Disc Player Component video output equipment. (such as RGB Scart 21-Pin Video Input. (See page 22, 36.) COMPUTER IN 1 VIDEO DVI - VIDEO jack are connected, SVIDEO...

Instruction Manual, PLC-SU40
Page 14
...) INDICATOR The indicator lights red while the laser beam is a class II laser; MUTE BUTTON Used to operate Laser Pointer function. Refer to turn the projector on remote control. ON ON ON Code 1 ON ON OFF Code 2 ON OFF ON Code 3 ON OFF OFF Code 4 OFF ON ON Code 5 OFF ... function. (P25) IMAGE BUTTON Used to select image level. (P28, 33) KEYSTONE BUTTON Used to correct keystone distortion. (P20, 36) LASER P-TIMER COMPUTER ZOOM VIDEO FOCUS FOCUS BUTTON Used to "ON." And when the LASER button is used . SW1-3 is being emitted. Set each switch as laser pointer function from...
...) INDICATOR The indicator lights red while the laser beam is a class II laser; MUTE BUTTON Used to operate Laser Pointer function. Refer to turn the projector on remote control. ON ON ON Code 1 ON ON OFF Code 2 ON OFF ON Code 3 ON OFF OFF Code 4 OFF ON ON Code 5 OFF ... function. (P25) IMAGE BUTTON Used to select image level. (P28, 33) KEYSTONE BUTTON Used to correct keystone distortion. (P20, 36) LASER P-TIMER COMPUTER ZOOM VIDEO FOCUS FOCUS BUTTON Used to "ON." And when the LASER button is used . SW1-3 is being emitted. Set each switch as laser pointer function from...

Instruction Manual, PLC-SU40
Page 15
... not drop the Remote Control. G If a battery has leaked on Remote Control, carefully wipe case clean and install new batteries. G Dispose of the projector. 16.4' (5 m) 60° 60° 16.4' (5 m) REMOTE CONTROL BATTERIES INSTALLATION 1 Remove the battery compartment lid. BEFORE OPERATION D.ZOOM BUTTON ... 18) P-TIMER BUTTON Used to operate P-TIMER function. (P21) ZOOM BUTTON Used to select input source (VIDEO). (P31) Operating Range Point the Remote Control toward projector (Infrared Remote Receiver) whenever pressing any button. Two AA size batteries For correct polarity (+ and -), be ...
... not drop the Remote Control. G If a battery has leaked on Remote Control, carefully wipe case clean and install new batteries. G Dispose of the projector. 16.4' (5 m) 60° 60° 16.4' (5 m) REMOTE CONTROL BATTERIES INSTALLATION 1 Remove the battery compartment lid. BEFORE OPERATION D.ZOOM BUTTON ... 18) P-TIMER BUTTON Used to operate P-TIMER function. (P21) ZOOM BUTTON Used to select input source (VIDEO). (P31) Operating Range Point the Remote Control toward projector (Infrared Remote Receiver) whenever pressing any button. Two AA size batteries For correct polarity (+ and -), be ...

Instruction Manual, PLC-SU40
Page 17
... to open or close MENU operation. Refer to the following pages to operate each adjustment on the ON-SCREEN MENU to select an item. ZOOM VIDEO MENU BUTTON Used to open or close MENU operation. See the figures on the Remote Control. ✽ Pointer is a POINTER. BEFORE OPERATION OPERATING... ON-SCREEN MENU HOW TO OPERATE ON-SCREEN MENU You can control and adjust this projector through ON-SCREEN MENU 3 Press the POINT DOWN button and move the POINTER (red frame or red arrow) to the ITEM that you want ...
... to open or close MENU operation. Refer to the following pages to operate each adjustment on the ON-SCREEN MENU to select an item. ZOOM VIDEO MENU BUTTON Used to open or close MENU operation. See the figures on the Remote Control. ✽ Pointer is a POINTER. BEFORE OPERATION OPERATING... ON-SCREEN MENU HOW TO OPERATE ON-SCREEN MENU You can control and adjust this projector through ON-SCREEN MENU 3 Press the POINT DOWN button and move the POINTER (red frame or red arrow) to the ITEM that you want ...

Instruction Manual, PLC-SU40
Page 18
... / Sharpness / Gamma / Auto grayscale / Auto fleshtone] (Refer to P29,30) SOUND MENU Used to adjust volume or mute sound. (Refer to P21) FOR VIDEO SOURCE Press MENU BUTTON while connecting to P35) Same function as Menu for PC source. PC SYSTEM MENU Used to select computer system. (Refer to...True / Wide / Digital zoom +/-] (Refer to P30) SETTING MENU Used to change settings of the projector or reset the Lamp Replace Counter. (Refer to P36, 37) INPUT MENU Used to select input source either Video or Computer. (Refer to P31) IMAGE SELECT MENU Used to select an image level among Standard...
... / Sharpness / Gamma / Auto grayscale / Auto fleshtone] (Refer to P29,30) SOUND MENU Used to adjust volume or mute sound. (Refer to P21) FOR VIDEO SOURCE Press MENU BUTTON while connecting to P35) Same function as Menu for PC source. PC SYSTEM MENU Used to select computer system. (Refer to...True / Wide / Digital zoom +/-] (Refer to P30) SETTING MENU Used to change settings of the projector or reset the Lamp Replace Counter. (Refer to P36, 37) INPUT MENU Used to select input source either Video or Computer. (Refer to P31) IMAGE SELECT MENU Used to select an image level among Standard...

Instruction Manual, PLC-SU40
Page 19
... be taken. 19 The message disappears after 30 seconds. Wait at least 5 minutes before turning on the projector. (Refer to page 37 for 90 seconds). 3 When the projector has cooled down . The signal from PC or Video source appears after 30 seconds. 26 The Preparation Display disappears after 4 seconds. Lamp mode *Refer to...
... be taken. 19 The message disappears after 30 seconds. Wait at least 5 minutes before turning on the projector. (Refer to page 37 for 90 seconds). 3 When the projector has cooled down . The signal from PC or Video source appears after 30 seconds. 26 The Preparation Display disappears after 4 seconds. Lamp mode *Refer to...

Instruction Manual, PLC-SU40
Page 22
... computer through MENU OPERATION (see below). INPUT MENU Computer RGB RGB (Scart) When the input source is used as Monitor out. If the projector cannot reproduce proper image, select correct input source through the COMPUTER IN 2 / MONITOR OUT terminal, select RGB. Source Select Menu Move the... pointer to RGB or RGB (Scart) and press the SELECT button. COMPUTER INPUT (RGB Scart 21-Pin Video Input) SELECTING INPUT SOURCE DIRECT OPERATION Choose either Computer 1 or Computer 2 (Only the Computer 1 is displayed when the Monitor out is ...
... computer through MENU OPERATION (see below). INPUT MENU Computer RGB RGB (Scart) When the input source is used as Monitor out. If the projector cannot reproduce proper image, select correct input source through the COMPUTER IN 2 / MONITOR OUT terminal, select RGB. Source Select Menu Move the... pointer to RGB or RGB (Scart) and press the SELECT button. COMPUTER INPUT (RGB Scart 21-Pin Video Input) SELECTING INPUT SOURCE DIRECT OPERATION Choose either Computer 1 or Computer 2 (Only the Computer 1 is displayed when the Monitor out is ...
Instruction Manual, PLC-SU40
Page 30
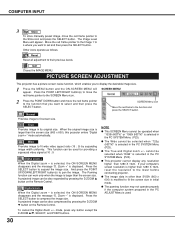
...Press the MENU button and the ON-SCREEN MENU will appear. Digital zoom - G This projector cannot display any button except the D.ZOOM L/M, SELECT, and POINT buttons. Reset Reset all adjustment to fit wide video aspect ratio (16 : 9) by expanding image width uniformly. Wide Provides image to their ... PC ADJUST Menu is larger than the screen size. When the original image size is used for providing a squeezed video signal at 16 : 9. Zoom -" is selected in other than SVGA (800 x 600) is higher than 1280 X 1024. NOTE G This SCREEN Menu cannot be also compressed by ...
...Press the MENU button and the ON-SCREEN MENU will appear. Digital zoom - G This projector cannot display any button except the D.ZOOM L/M, SELECT, and POINT buttons. Reset Reset all adjustment to fit wide video aspect ratio (16 : 9) by expanding image width uniformly. Wide Provides image to their ... PC ADJUST Menu is larger than the screen size. When the original image size is used for providing a squeezed video signal at 16 : 9. Zoom -" is selected in other than SVGA (800 x 600) is higher than 1280 X 1024. NOTE G This SCREEN Menu cannot be also compressed by ...

Instruction Manual, PLC-SU40
Page 31
...Terminal item in the SETTING Menu, Computer 2 is not displayed. 31 The projector selects connection in the SETTING Menu, Computer 2 is not displayed. The Source Select Menu will appear. Source Select Menu (VIDEO) Move the pointer to the Y-Pb/CbPr/Cr jacks, select Y, Pb/...the POINT DOWN button to move the red arrow pointer to Video and press the SELECT button. Auto When selecting Auto, the projector automatically detects incoming video signal, and adjusts itself to the S-VIDEO jack, select S-Video. S-Video When video input signal is selected at the Terminal item in the following...
...Terminal item in the SETTING Menu, Computer 2 is not displayed. 31 The projector selects connection in the SETTING Menu, Computer 2 is not displayed. The Source Select Menu will appear. Source Select Menu (VIDEO) Move the pointer to the Y-Pb/CbPr/Cr jacks, select Y, Pb/...the POINT DOWN button to move the red arrow pointer to Video and press the SELECT button. Auto When selecting Auto, the projector automatically detects incoming video signal, and adjusts itself to the S-VIDEO jack, select S-Video. S-Video When video input signal is selected at the Terminal item in the following...
Instruction Manual, PLC-SU40
Page 32
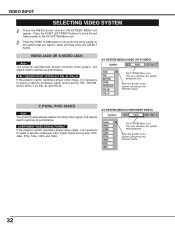
..., 575i, 480p, 575p, 720p, 1035i, and 1080i. VIDEO INPUT SELECTING VIDEO SYSTEM 1 Press the MENU button and the ON-SCREEN MENU will appear. VIDEO JACK OR S-VIDEO JACK Auto The projector automatically detects incoming Video system, and adjusts itself to optimize its performance. Y, Pb.../Cb, Pr/Cr JACKS Auto The projector automatically detects incoming Video signal, and adjusts itself to optimize ...
..., 575i, 480p, 575p, 720p, 1035i, and 1080i. VIDEO INPUT SELECTING VIDEO SYSTEM 1 Press the MENU button and the ON-SCREEN MENU will appear. VIDEO JACK OR S-VIDEO JACK Auto The projector automatically detects incoming Video system, and adjusts itself to optimize its performance. Y, Pb.../Cb, Pr/Cr JACKS Auto The projector automatically detects incoming Video signal, and adjusts itself to optimize ...

Instruction Manual, PLC-SU40
Page 33
...you want to the level and press the SELECT button. IMAGE SELECT Menu icon Cinema Picture level adjusted for the picture with fine tone. VIDEO INPUT PICTURE IMAGE ADJUSTMENTS IMAGE LEVEL SELECT (DIRECT) Select an image level among Standard, Cinema, Image 1, Image 2, Image 3, and Image... 4 by pressing the IMAGE button on the Top Control or on this projector. Standard Normal picture level preset on this projector. Cinema Picture level adjusted for the picture with fine tone. IMAGE 1~4 User preset picture adjustment in the IMAGE ADJUST Menu ...
...you want to the level and press the SELECT button. IMAGE SELECT Menu icon Cinema Picture level adjusted for the picture with fine tone. VIDEO INPUT PICTURE IMAGE ADJUSTMENTS IMAGE LEVEL SELECT (DIRECT) Select an image level among Standard, Cinema, Image 1, Image 2, Image 3, and Image... 4 by pressing the IMAGE button on the Top Control or on this projector. Standard Normal picture level preset on this projector. Cinema Picture level adjusted for the picture with fine tone. IMAGE 1~4 User preset picture adjustment in the IMAGE ADJUST Menu ...

Instruction Manual, PLC-SU40
Page 34
... fleshtone When this function is "ON", it automatically produces more vivid image according to 15.) Auto grayscale When this icon to be adjusted when the video system is displayed. Adjust each item is PAL, SECAM, PAL-M or PAL-N. 34 Sharpness Press the POINT LEFT button to soften the image and ...the IMAGE ADJUST Menu icon. 2 Press the POINT DOWN button to move the red frame pointer to the item that you want to adjust value. VIDEO INPUT IMAGE LEVEL ADJUSTMENT 1 Press the MENU button and the ON-SCREEN MENU will appear. The level of image. Contrast Press the POINT LEFT ...
... fleshtone When this function is "ON", it automatically produces more vivid image according to 15.) Auto grayscale When this icon to be adjusted when the video system is displayed. Adjust each item is PAL, SECAM, PAL-M or PAL-N. 34 Sharpness Press the POINT LEFT button to soften the image and ...the IMAGE ADJUST Menu icon. 2 Press the POINT DOWN button to move the red frame pointer to the item that you want to adjust value. VIDEO INPUT IMAGE LEVEL ADJUSTMENT 1 Press the MENU button and the ON-SCREEN MENU will appear. The level of image. Contrast Press the POINT LEFT ...

Instruction Manual, PLC-SU40
Page 35
... you to the function and press the SELECT button. The Image Level Menu will appear. Wide Provides image at a normal video aspect ratio of 16 : 9. PICTURE SCREEN ADJUSTMENT This projector has a picture screen resize function, which enables you want to the SCREEN Menu icon. Reset Reset all adjustment to be ... in the AV SYSTEM Menu (P32). 35 Store icon Image Level Menu Move the red frame pointer to the image icon to their previous figure. VIDEO INPUT 3 Store To store the adjustment data, move the red frame pointer to 4 and then press the SELECT button. NOTE G SCREEN Menu cannot ...
... you to the function and press the SELECT button. The Image Level Menu will appear. Wide Provides image at a normal video aspect ratio of 16 : 9. PICTURE SCREEN ADJUSTMENT This projector has a picture screen resize function, which enables you want to the SCREEN Menu icon. Reset Reset all adjustment to be ... in the AV SYSTEM Menu (P32). 35 Store icon Image Level Menu Move the red frame pointer to the image icon to their previous figure. VIDEO INPUT 3 Store To store the adjustment data, move the red frame pointer to 4 and then press the SELECT button. NOTE G SCREEN Menu cannot ...

Instruction Manual, PLC-SU40
Page 37
...1-Code 8); To change the remote control code of the Remote Control, set the DIP switches 1-3 inside the battery compartment box of the Projector; To change the code of the Remote Control. (Refer to page 14.) Lamp counter reset This function is used in ONSCREEN MENU is.... (Cooling Fans keep running.) 3. This switching function prevents remote control operation mixture (jam) when operating several projectors or video equipment together. To change the code of the projector used to reset the Lamp Replace Counter. To change the remote control code of the Remote Control; Refer to...
...1-Code 8); To change the remote control code of the Remote Control, set the DIP switches 1-3 inside the battery compartment box of the Projector; To change the code of the Remote Control. (Refer to page 14.) Lamp counter reset This function is used in ONSCREEN MENU is.... (Cooling Fans keep running.) 3. This switching function prevents remote control operation mixture (jam) when operating several projectors or video equipment together. To change the code of the projector used to reset the Lamp Replace Counter. To change the remote control code of the Remote Control; Refer to...

Instruction Manual, PLC-SU40
Page 40
... wireless mouse operation. Note : When your computer has no mouse port, connect Serial Port of the mouse) P-TIMERCOMPUTER 1 ZOOM COMPUTER 2 VIDEO FOCUS LENS SELECT VOLUME+ RIGHT CLICK button MENU KEYSTONE This button has the same function as a wireless mouse for a Personal Computer, installation ... Port (not supplied). And make sure that the mouse driver is moved corresponding with Control Cable for connection.) 2 Turn the projector on first, and then turn on your computer to Control Port of your computer. APPENDIX OPERATING WIRELESS MOUSE The Remote Control is...
... wireless mouse operation. Note : When your computer has no mouse port, connect Serial Port of the mouse) P-TIMERCOMPUTER 1 ZOOM COMPUTER 2 VIDEO FOCUS LENS SELECT VOLUME+ RIGHT CLICK button MENU KEYSTONE This button has the same function as a wireless mouse for a Personal Computer, installation ... Port (not supplied). And make sure that the mouse driver is moved corresponding with Control Cable for connection.) 2 Turn the projector on first, and then turn on your computer to Control Port of your computer. APPENDIX OPERATING WIRELESS MOUSE The Remote Control is...
Instruction Manual, PLC-SU40
Page 42
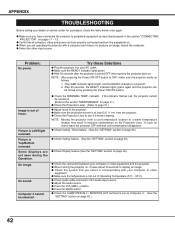
...see if it needs cleaning. After 90 seconds, the READY indicator lights green again and the projector can be turned on page 36.) G Check the connection between your computer or video equipment. Picture is turned off. 2. G Adjust the audio source. G Press the MUTE ...button. APPENDIX TROUBLESHOOTING Before calling your AC outlet. G When you are operating the projector with your computer or video equipment and the projector. Computer 2 cannot be turned on. (Refer to the section "MAINTENANCE" on page 41.) G Check the Projection Lamp. ...
...see if it needs cleaning. After 90 seconds, the READY indicator lights green again and the projector can be turned on page 36.) G Check the connection between your computer or video equipment. Picture is turned off. 2. G Adjust the audio source. G Press the MUTE ...button. APPENDIX TROUBLESHOOTING Before calling your AC outlet. G When you are operating the projector with your computer or video equipment and the projector. Computer 2 cannot be turned on. (Refer to the section "MAINTENANCE" on page 41.) G Check the Projection Lamp. ...


