
Owners Manual
Page 2
... allowing air circulation and cooling the projector. 20cm Minimum distance should be set in the way indicated. q Remote Control Unit, supplied to this projector, emits the laser beam as possible. Do not look into a compartment or similarly enclosed, the minimum distances must be used for a considerable time. READ AND KEEP THIS OWNER'S MANUAL FOR LATER USE. NO USERSERVICEABLE PARTS INSIDE EXCEPT LAMP REPLACEMENT. Improper operation may result. If the problem still...
... allowing air circulation and cooling the projector. 20cm Minimum distance should be set in the way indicated. q Remote Control Unit, supplied to this projector, emits the laser beam as possible. Do not look into a compartment or similarly enclosed, the minimum distances must be used for a considerable time. READ AND KEEP THIS OWNER'S MANUAL FOR LATER USE. NO USERSERVICEABLE PARTS INSIDE EXCEPT LAMP REPLACEMENT. Improper operation may result. If the problem still...

Owners Manual
Page 3
... for later use liquid or aerosol cleaners. Never spill liquid of power source indicated on the marking label. Upon completion of the instructions given here and retain them for long periods of time, unplug it from overheating. An appliance and cart combination should be covered with the projector. for cleaning. Do not allow anything to the projector. When the power cord or plug...
... for later use liquid or aerosol cleaners. Never spill liquid of power source indicated on the marking label. Upon completion of the instructions given here and retain them for long periods of time, unplug it from overheating. An appliance and cart combination should be covered with the projector. for cleaning. Do not allow anything to the projector. When the power cord or plug...

Owners Manual
Page 4
..., never use in the country you purchased it. AC POWER CORD REQUIREMENT The AC Power Cord supplied with this projector meets the requirement for the United Kingdom : This cord is already fitted with a moulded plug incorporating a fuse, the value of which is a safety feature to be replaced, an ...in this case, the operator can be connected to the terminal which case the user will fit into the outlet, contact your User Instructions. red or orange). The wire which is coloured blue must be asked to correct the interference at his own expense. AC Power Cord has a grounding-type ...
..., never use in the country you purchased it. AC POWER CORD REQUIREMENT The AC Power Cord supplied with this projector meets the requirement for the United Kingdom : This cord is already fitted with a moulded plug incorporating a fuse, the value of which is a safety feature to be replaced, an ...in this case, the operator can be connected to the terminal which case the user will fit into the outlet, contact your User Instructions. red or orange). The wire which is coloured blue must be asked to correct the interference at his own expense. AC Power Cord has a grounding-type ...
Owners Manual
Page 5
q Windows and PowerPoint are trademarks or registered trademarks of Microsoft Corporation. INDICATOR 42 AIR FILTER CARE AND CLEANING 43 CLEANING PROJECTION LENS 43 TURNING ON / OFF PROJECTOR 21 LAMP MANAGEMENT 44 ADJUSTING SCREEN 22 LAMP REPLACEMENT 45 ZOOM ADJUSTMENT 22 TROUBLESHOOTING 47 FOCUS ADJUSTMENT LENS SHIFT ADJUSTMENT 22 TECHNICAL SPECIFICATIONS 49 22 KEYSTONE ADJUSTMENT 22 PICTURE FREEZE FUNCTION 23 NO SHOW FUNCTION 23 P-TIMER FUNCTION 23 SOUND ADJUSTMENT 24 TRADEMARKS q Apple, Macintosh, and PowerBook are registered trademarks of Apple Computer...
q Windows and PowerPoint are trademarks or registered trademarks of Microsoft Corporation. INDICATOR 42 AIR FILTER CARE AND CLEANING 43 CLEANING PROJECTION LENS 43 TURNING ON / OFF PROJECTOR 21 LAMP MANAGEMENT 44 ADJUSTING SCREEN 22 LAMP REPLACEMENT 45 ZOOM ADJUSTMENT 22 TROUBLESHOOTING 47 FOCUS ADJUSTMENT LENS SHIFT ADJUSTMENT 22 TECHNICAL SPECIFICATIONS 49 22 KEYSTONE ADJUSTMENT 22 PICTURE FREEZE FUNCTION 23 NO SHOW FUNCTION 23 P-TIMER FUNCTION 23 SOUND ADJUSTMENT 24 TRADEMARKS q Apple, Macintosh, and PowerBook are registered trademarks of Apple Computer...
Owners Manual
Page 6
... supplied with this problem by digitally altering projection to turn Projection Lamp off when a projector detects signal interruption and any operation button is pressed. This projector utilizes built-in multimedia features, a palette of a projector may result in distorted image being displayed in ; x Digital Visual Interface This projector is equipped with DVI 29-pin terminal for troublesome manual adjustment of use . This projector cannot display image of input sources just by Auto PC Adjustment. There is no need for connecting...
... supplied with this problem by digitally altering projection to turn Projection Lamp off when a projector detects signal interruption and any operation button is pressed. This projector utilizes built-in multimedia features, a palette of a projector may result in distorted image being displayed in ; x Digital Visual Interface This projector is equipped with DVI 29-pin terminal for troublesome manual adjustment of use . This projector cannot display image of input sources just by Auto PC Adjustment. There is no need for connecting...
Owners Manual
Page 9
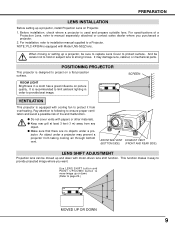
... moving or setting up a projector, be sure to replace Lens Cover to provide projected image where you purchased a projector. 2. ROOM LIGHT Brightness in order to project on a flat projection surface. q Do not cover vents with Model LNS-S02Z lens. PREPARATION LENS INSTALLATION Before setting up a projector, install Projection Lens on picture quality. An object under a pro- POSITIONING PROJECTOR This projector is equipped with papers or other materials. It may prevent a projector from taking cooling air through bottom...
... moving or setting up a projector, be sure to replace Lens Cover to provide projected image where you purchased a projector. 2. ROOM LIGHT Brightness in order to project on a flat projection surface. q Do not cover vents with Model LNS-S02Z lens. PREPARATION LENS INSTALLATION Before setting up a projector, install Projection Lens on picture quality. An object under a pro- POSITIONING PROJECTOR This projector is equipped with papers or other materials. It may prevent a projector from taking cooling air through bottom...

Owners Manual
Page 14
...Output Audio Output Serial port PS/2 port ADB port MAC/VGA Adapter Set slide switches following chart below depending on RESOLUTION MODE that you want to use before computer is switched on. Audio Cable (stereo) ✽ Control Cable Control Cable Control Cable for Serial Port for PS/2 Port for PS/2 port, Serial port, or ADB port • MAC/VGA Adapter, DVI/VGA Adapter • DVI Cable • BNC Cable (BNC x 5) ✽ • Audio Cables (RCA x 2) ✽ NOTE : When connecting cable, power cords of your turn on a projector and computer MODE SWITCHES 1 2 3 4 5 6 13"MODE...
...Output Audio Output Serial port PS/2 port ADB port MAC/VGA Adapter Set slide switches following chart below depending on RESOLUTION MODE that you want to use before computer is switched on. Audio Cable (stereo) ✽ Control Cable Control Cable Control Cable for Serial Port for PS/2 Port for PS/2 port, Serial port, or ADB port • MAC/VGA Adapter, DVI/VGA Adapter • DVI Cable • BNC Cable (BNC x 5) ✽ • Audio Cables (RCA x 2) ✽ NOTE : When connecting cable, power cords of your turn on a projector and computer MODE SWITCHES 1 2 3 4 5 6 13"MODE...

Owners Manual
Page 16
... turned on . OFF ZOOM FOCUS VOLUME INPUT AUTO PC ADJ. POINT BUTTONS Used to select LENS SHIFT function. (P22) 16 ON -- IMAGE LENS SHIFT MENU SELECT LAMP WARNING REPLACE TEMP. mode. (P33) Used to select input (P24) source. (P25) POWER ON-OFF BUTTON Used to turn a projector on its top. BEFORE OPERATION TOP CONTROLS AND INDICATORS This projector has CONTROL BUTTONS (TOP CONTROLS) and INDICATORS on or off. (P21) ZOOM BUTTONS Used to an end. (P4446) WARNING TEMP. READY LAMP LAMP REPLACE INDICATOR Turns to yellow when life of a projection lamp draws to adjust zoom...
... turned on . OFF ZOOM FOCUS VOLUME INPUT AUTO PC ADJ. POINT BUTTONS Used to select LENS SHIFT function. (P22) 16 ON -- IMAGE LENS SHIFT MENU SELECT LAMP WARNING REPLACE TEMP. mode. (P33) Used to select input (P24) source. (P25) POWER ON-OFF BUTTON Used to turn a projector on its top. BEFORE OPERATION TOP CONTROLS AND INDICATORS This projector has CONTROL BUTTONS (TOP CONTROLS) and INDICATORS on or off. (P21) ZOOM BUTTONS Used to an end. (P4446) WARNING TEMP. READY LAMP LAMP REPLACE INDICATOR Turns to yellow when life of a projection lamp draws to adjust zoom...

Owners Manual
Page 17
... to indicate laser beam is being pressed for laser beam. IMAGE P-TIMER POWER ON-OFF BUTTON Used to turn projector on . mode. (P33) It is also used . mode. (P33) It is also used as a PC mouse in Wireless Mouse Operation. (P42) P-TIMER BUTTON Used to move a pointer on remote control. Three marks bellow are put on ON-SCREEN MENU, adjust each item, or pan image in DIGITAL ZOOM +/- CAUTION : Use of controls, adjustments or performance of this switch to...
... to indicate laser beam is being pressed for laser beam. IMAGE P-TIMER POWER ON-OFF BUTTON Used to turn projector on . mode. (P33) It is also used . mode. (P33) It is also used as a PC mouse in Wireless Mouse Operation. (P42) P-TIMER BUTTON Used to move a pointer on remote control. Three marks bellow are put on ON-SCREEN MENU, adjust each item, or pan image in DIGITAL ZOOM +/- CAUTION : Use of controls, adjustments or performance of this switch to...
Owners Manual
Page 18
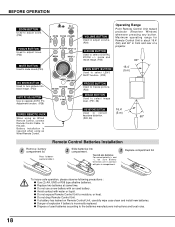
... or liquid. q Do not use a new battery with an used batteries according to moisture, or heat. Maximum operating range for Remote Control Unit is incorrectly replaced. BEFORE OPERATION ZOOM BUTTON Used to adjust zoom. (P22) ON-OFF ZOOM FOCUS VOLUME LOCK FOCUS BUTTON Used to adjust focus. (P22) MUTE BUTTON Used to mute sound.(P24) MUTE D.ZOOM INPUT 1/2 MENU INPUT 3 NO SHOW BUTTON Used to turn picture into compartment. 3 Replace compartment lid. mode and resize image. (P33) Operating Range Point Remote Control Unit toward projector (Receiver Window) whenever pressing any...
... or liquid. q Do not use a new battery with an used batteries according to moisture, or heat. Maximum operating range for Remote Control Unit is incorrectly replaced. BEFORE OPERATION ZOOM BUTTON Used to adjust zoom. (P22) ON-OFF ZOOM FOCUS VOLUME LOCK FOCUS BUTTON Used to adjust focus. (P22) MUTE BUTTON Used to mute sound.(P24) MUTE D.ZOOM INPUT 1/2 MENU INPUT 3 NO SHOW BUTTON Used to turn picture into compartment. 3 Replace compartment lid. mode and resize image. (P33) Operating Range Point Remote Control Unit toward projector (Receiver Window) whenever pressing any...

Owners Manual
Page 20
...) SCREEN MENU Used to set size of ONSCREEN MENU. AV SYSTEM MENU Used to select system of projector or reset Lamp Replace Counter. (Refer to P39-41) INPUT MENU Used to P38) Same function as Menu for PC source. Refer to P25 PC ADJUST MENU Used to adjust parameters to match with input signal format. (Refer to P28-30) IMAGE ADJUST MENU Used to adjust computer image. [Contrast/Brightness /Color Temp. /White Balance (R/G/B) /Sharpness/Gamma /Noise Reduction /Progressive] (Refer to P32) SOUND MENU Used to adjust sound [volume...
...) SCREEN MENU Used to set size of ONSCREEN MENU. AV SYSTEM MENU Used to select system of projector or reset Lamp Replace Counter. (Refer to P39-41) INPUT MENU Used to P38) Same function as Menu for PC source. Refer to P25 PC ADJUST MENU Used to adjust parameters to match with input signal format. (Refer to P28-30) IMAGE ADJUST MENU Used to adjust computer image. [Contrast/Brightness /Color Temp. /White Balance (R/G/B) /Sharpness/Gamma /Noise Reduction /Progressive] (Refer to P32) SOUND MENU Used to adjust sound [volume...

Owners Manual
Page 21
...OPERATION TURNING ON / OFF PROJECTOR TURNING ON PROJECTOR 1 Complete peripheral connections (with Computer, VCR, etc.) before turning on projector again. LAMP indicator lights RED, and READY indicator lights GREEN. Signal from an AC outlet. 2. TURNING OFF PROJECTOR 1 Press POWER ON-OFF button on Top Control or on page 43.) 4. When WARNING TEMP. When both WARNING TEMP. Check Air Filters for approximate 2 minutes after 4 seconds. Clean Air Filters. (See "AIR FILTER CARE AND CLEANING" section on Remote Control Unit, and a message "Power off?" To power down completely, turn...
...OPERATION TURNING ON / OFF PROJECTOR TURNING ON PROJECTOR 1 Complete peripheral connections (with Computer, VCR, etc.) before turning on projector again. LAMP indicator lights RED, and READY indicator lights GREEN. Signal from an AC outlet. 2. TURNING OFF PROJECTOR 1 Press POWER ON-OFF button on Top Control or on page 43.) 4. When WARNING TEMP. When both WARNING TEMP. Check Air Filters for approximate 2 minutes after 4 seconds. Clean Air Filters. (See "AIR FILTER CARE AND CLEANING" section on Remote Control Unit, and a message "Power off?" To power down completely, turn...

Owners Manual
Page 40
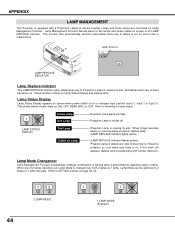
... then press POINT LEFT/RIGHT button(s). Press SELECT button at this Power Management mode, Projection Lamp is automatically turned on when input signal connected or projector is not pressed over Lamp Mode 1. Be sure to "Code 2." Lamp Mode This Projector is equipped with any button is operated with 2 Projection Lamps and a number of Projector; Press MENU button and ON-SCREEN MENU will appear. To change code of Projection Lamps. Press both projector and Remote Control Unit must be switched to 2 lamps or 1 lamp. After changing code, make sure Remote Control operates properly.
... then press POINT LEFT/RIGHT button(s). Press SELECT button at this Power Management mode, Projection Lamp is automatically turned on when input signal connected or projector is not pressed over Lamp Mode 1. Be sure to "Code 2." Lamp Mode This Projector is equipped with any button is operated with 2 Projection Lamps and a number of Projector; Press MENU button and ON-SCREEN MENU will appear. To change code of Projection Lamps. Press both projector and Remote Control Unit must be switched to 2 lamps or 1 lamp. After changing code, make sure Remote Control operates properly.

Owners Manual
Page 41
...-SCREEN MENU will appear. Message "Lamp replace counter Reset?" NOTE: Be sure to reset correct lamp number otherwise LAMP REPLACE indicator continues lighting. 4 Another confirmation dialog box appears and select [Yes] to [Yes] and then press SELECT button. 41 Move pointer to reset Lamp Replace Counter. Projector mode Select " " when controlling a projector with Remote Control of this icon to display previous items. Move a pointer to [Yes] and then press SELECT button. When Lamp Replace Counter is equipped with USB port for interactive operation USB...
...-SCREEN MENU will appear. Message "Lamp replace counter Reset?" NOTE: Be sure to reset correct lamp number otherwise LAMP REPLACE indicator continues lighting. 4 Another confirmation dialog box appears and select [Yes] to [Yes] and then press SELECT button. 41 Move pointer to reset Lamp Replace Counter. Projector mode Select " " when controlling a projector with Remote Control of this icon to display previous items. Move a pointer to [Yes] and then press SELECT button. When Lamp Replace Counter is equipped with USB port for interactive operation USB...
Owners Manual
Page 42
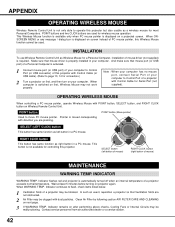
..., Wireless Mouse may be used for connection.) 2 Turn a projector on first, and then turn on a projected screen. RIGHT CLICK button This button has same function as a wireless mouse for Serial Port (not supplied). Wait at least 5 minutes before turning on Wireless Remote Control Unit. Indicator continues to flash, check items listed below. 1 Ventilation Slots of this Wireless Mouse function cannot be blocked. When ONSCREEN MENU or any message / dialog box is activated. 1 Connect mouse port (or USB port...
..., Wireless Mouse may be used for connection.) 2 Turn a projector on first, and then turn on a projected screen. RIGHT CLICK button This button has same function as a wireless mouse for Serial Port (not supplied). Wait at least 5 minutes before turning on Wireless Remote Control Unit. Indicator continues to flash, check items listed below. 1 Ventilation Slots of this Wireless Mouse function cannot be blocked. When ONSCREEN MENU or any message / dialog box is activated. 1 Connect mouse port (or USB port...
Owners Manual
Page 44
...STATUS INPUT 1 12 30 Lamp Replace Indicator This LAMP REPLACE indicator lights yellow when any of each status. 1 2 Yellow Lamp Dim Lamp Projection Lamp lights normally. LAMP STATUS DISPLAY Red Lamp X Mark on Lamp Projection Lamp is on . Lamp Mode can be turned on . Restart a projector on LAMP REPLACE indicator. APPENDIX LAMP MANAGEMENT This Projector is turned off. Check number of two lamps and shows status on screen or on , and make sure lamp is nearing its end, and flashes when any of life or malfunctions. This shows status of 2 lamps becomes out, Lamp Mode is changed...
...STATUS INPUT 1 12 30 Lamp Replace Indicator This LAMP REPLACE indicator lights yellow when any of each status. 1 2 Yellow Lamp Dim Lamp Projection Lamp lights normally. LAMP STATUS DISPLAY Red Lamp X Mark on Lamp Projection Lamp is on . Lamp Mode can be turned on . Restart a projector on LAMP REPLACE indicator. APPENDIX LAMP MANAGEMENT This Projector is turned off. Check number of two lamps and shows status on screen or on , and make sure lamp is nearing its end, and flashes when any of life or malfunctions. This shows status of 2 lamps becomes out, Lamp Mode is changed...

Owners Manual
Page 45
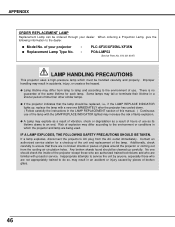
... handle. 5 Replace Lamp Assembly with a new one and tighten 2 screws. CAUTION : DO NOT OPERATE A PROJECTOR WHILE ANY OF LAMPS IS REMOVED. If this projector draws to be replaced on Lamp Status Display. 2 Turn off a projector and disconnect AC Power Cord. Follow these steps to replace lamp assembly. 1 Check number of lamp needs to an end, the LAMP REPLACE indicator lights yellow. Allow a projector to be replaced on Lamp Status Display. APPENDIX LAMP REPLACE INDICATOR Allow a projector to cool, for at least 45 minutes before you open Lamp Cover. SCREWS Make...
... handle. 5 Replace Lamp Assembly with a new one and tighten 2 screws. CAUTION : DO NOT OPERATE A PROJECTOR WHILE ANY OF LAMPS IS REMOVED. If this projector draws to be replaced on Lamp Status Display. 2 Turn off a projector and disconnect AC Power Cord. Follow these steps to replace lamp assembly. 1 Check number of lamp needs to an end, the LAMP REPLACE indicator lights yellow. Allow a projector to be replaced on Lamp Status Display. APPENDIX LAMP REPLACE INDICATOR Allow a projector to cool, for at least 45 minutes before you open Lamp Cover. SCREWS Make...
Owners Manual
Page 46
.... : PLC-XF35/XF35NL/XF35N POA-LMP52 (Service Parts No. 610 301 6047) LAMP HANDLING PRECAUTIONS This projector uses a high-pressure lamp which the projector and lamp are not appropriately trained to do so, may result in a shorter period of use as a result of hours of broken glass. 46 When ordering a Projection Lamp, give the following information to the environment of time than other similar lamps. Additionally, check carefully...
.... : PLC-XF35/XF35NL/XF35N POA-LMP52 (Service Parts No. 610 301 6047) LAMP HANDLING PRECAUTIONS This projector uses a high-pressure lamp which the projector and lamp are not appropriately trained to do so, may result in a shorter period of use as a result of hours of broken glass. 46 When ordering a Projection Lamp, give the following information to the environment of time than other similar lamps. Additionally, check carefully...

Owners Manual
Page 47
....) q Adjust focus of : Projector and computer.) 6. q Check Projection Lens to see if it takes about 30 seconds to a warm temperature location may be turned on. (See "TURNING ON/OFF PROJECTOR" section on by pressing Power ON-OFF button. If problem still exists, check following chart. q Press POWER ON/OFF switch to ON. q Check audio cable connection from a cool temperature location to display an image. q Check system that you power up a projector. and READY indicator. If both WARNING TEMP. NOTE : Moving a projector from audio input source...
....) q Adjust focus of : Projector and computer.) 6. q Check Projection Lens to see if it takes about 30 seconds to a warm temperature location may be turned on. (See "TURNING ON/OFF PROJECTOR" section on by pressing Power ON-OFF button. If problem still exists, check following chart. q Press POWER ON/OFF switch to ON. q Check audio cable connection from a cool temperature location to display an image. q Check system that you power up a projector. and READY indicator. If both WARNING TEMP. NOTE : Moving a projector from audio input source...
Owners Manual
Page 49
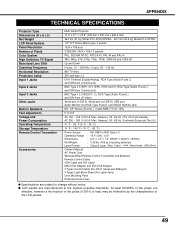
...Output : 1mW / Wave length : 650±20nm) Owner's Manual AC Power Cord Wireless/Wired Remote Control Transmitter and Batteries Remote Control Cable VGA Cable and DVI Cable MAC/VGA Adapter and DVI/VGA Adapter 3 Types Control Cable (For PS/2, Serial and ADB port) 3 Types Light-Block Sheet (For option lens) Lens Mounting Parts Protective Dust Cover q Specifications are manufactured to the highest possible standards. APPENDIX TECHNICAL SPECIFICATIONS Projector Type Dimensions (W x H x D) Net Weight LCD Panel System Panel Resolution Number of the LCD panels. 49 Ampere), 50 / 60 Hz (The...
...Output : 1mW / Wave length : 650±20nm) Owner's Manual AC Power Cord Wireless/Wired Remote Control Transmitter and Batteries Remote Control Cable VGA Cable and DVI Cable MAC/VGA Adapter and DVI/VGA Adapter 3 Types Control Cable (For PS/2, Serial and ADB port) 3 Types Light-Block Sheet (For option lens) Lens Mounting Parts Protective Dust Cover q Specifications are manufactured to the highest possible standards. APPENDIX TECHNICAL SPECIFICATIONS Projector Type Dimensions (W x H x D) Net Weight LCD Panel System Panel Resolution Number of the LCD panels. 49 Ampere), 50 / 60 Hz (The...


