
Owners Manual
Page 2
...cover the ventilation slot on the top, sides and rear of the projector cabinet for 1 minute / LASER POINTER INDICATOR lights red to operate improperly, read this manual thoroughly and operate the projector properly. Eye damage could result. SIDE and TOP 50cm 50cm REAR...BACK). THIS SYMBOL INDICATES THAT THERE ARE IMPORTANT OPERATING AND MAINTENANCE INSTRUCTIONS IN THE OWNER'S MANUAL WITH THIS UNIT. 2 q This projector produces intense light from the power outlet. q This projector should be taken. q Remote Control Unit, supplied to be used for a considerable time....
...cover the ventilation slot on the top, sides and rear of the projector cabinet for 1 minute / LASER POINTER INDICATOR lights red to operate improperly, read this manual thoroughly and operate the projector properly. Eye damage could result. SIDE and TOP 50cm 50cm REAR...BACK). THIS SYMBOL INDICATES THAT THERE ARE IMPORTANT OPERATING AND MAINTENANCE INSTRUCTIONS IN THE OWNER'S MANUAL WITH THIS UNIT. 2 q This projector produces intense light from the power outlet. q This projector should be taken. q Remote Control Unit, supplied to be used for a considerable time....

Owners Manual
Page 4
... you could be asked to radio communications. The wire which is not suitable for a Class A digital device, pursuant to stop operation of this projector meets the requirement for the United States and Canada : AC Power Cord used in the United States and Canada is detachable, never use in ...covers are coloured in your electrician. The Wires in this mains lead are available from the Parts Department indicated in accordance with the instruction manual, may not correspond with the letter N or coloured black. Do not try to defeat this case, the operator can be required to ...
... you could be asked to radio communications. The wire which is not suitable for a Class A digital device, pursuant to stop operation of this projector meets the requirement for the United States and Canada : AC Power Cord used in the United States and Canada is detachable, never use in ...covers are coloured in your electrician. The Wires in this mains lead are available from the Parts Department indicated in accordance with the instruction manual, may not correspond with the letter N or coloured black. Do not try to defeat this case, the operator can be required to ...
Owners Manual
Page 5
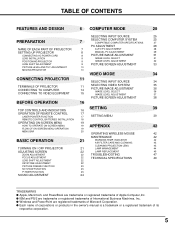
... DESIGN 6 COMPUTER MODE 25 SELECTING INPUT SOURCE 25 PREPARATION 7 SELECTING COMPUTER SYSTEM COMPATIBLE COMPUTER SPECIFICATIONS 25 27 PC ADJUSTMENT 28 NAME OF EACH PART OF PROJECTOR 7 AUTO PC ADJUSTMENT 28 SETTING-UP PROJECTOR 8 MANUAL PC ADJUSTMENT 29 CONNECTING AC POWER CORD 8 PICTURE IMAGE ADJUSTMENT 31 LENS INSTALLATION 9 IMAGE LEVEL SELECT 31 POSITIONING...
... DESIGN 6 COMPUTER MODE 25 SELECTING INPUT SOURCE 25 PREPARATION 7 SELECTING COMPUTER SYSTEM COMPATIBLE COMPUTER SPECIFICATIONS 25 27 PC ADJUSTMENT 28 NAME OF EACH PART OF PROJECTOR 7 AUTO PC ADJUSTMENT 28 SETTING-UP PROJECTOR 8 MANUAL PC ADJUSTMENT 29 CONNECTING AC POWER CORD 8 PICTURE IMAGE ADJUSTMENT 31 LENS INSTALLATION 9 IMAGE LEVEL SELECT 31 POSITIONING...
Owners Manual
Page 6
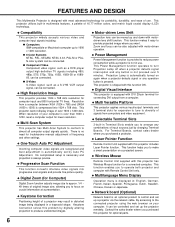
.... No complicated setup is necessary and projection is no need for troublesome manual adjustment of frequency and other settings. q Computers IBM-compatible or Macintosh computer up a projector via the network cable. x Progressive Scan Function This function converts interlace video...projector is shipped with this projector includes Laser Pointer function. x Selectable Terminal Slots 3-built-in multimedia features, a palette of 16.77 million colors, and matrix liquid crystal display (LCD) technology. x Laser Pointer Function Remote Control Unit supplied with this projector...
.... No complicated setup is necessary and projection is no need for troublesome manual adjustment of frequency and other settings. q Computers IBM-compatible or Macintosh computer up a projector via the network cable. x Progressive Scan Function This function converts interlace video...projector is shipped with this projector includes Laser Pointer function. x Selectable Terminal Slots 3-built-in multimedia features, a palette of 16.77 million colors, and matrix liquid crystal display (LCD) technology. x Laser Pointer Function Remote Control Unit supplied with this projector...
Owners Manual
Page 9
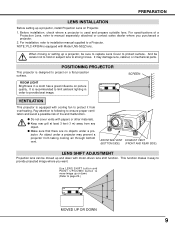
.... NOTE; PLC-XF35N is used and prepare suitable lens. This function makes it from overheating. For installation, refer to installation manual supplied to provide best image. PREPARATION LENS INSTALLATION Before setting up a projector, install Projection Lens on picture quality. jector. AIR INTAKE VENT EXHAUST VENT (BOTTOM SIDE) (FRONT AND REAR SIDE) LENS...
.... NOTE; PLC-XF35N is used and prepare suitable lens. This function makes it from overheating. For installation, refer to installation manual supplied to provide best image. PREPARATION LENS INSTALLATION Before setting up a projector, install Projection Lens on picture quality. jector. AIR INTAKE VENT EXHAUST VENT (BOTTOM SIDE) (FRONT AND REAR SIDE) LENS...

Owners Manual
Page 26
... selects PC system among those provided in this projector and PC system can be also selected manually. 1 Press MENU button and ON-SCREEN MENU will appear. COMPUTER INPUT AUTOMATIC MULTI-SCAN SYSTEM This projector automatically tunes to most different types of computers based on VGA, SVGA, XGA, SXGA or UXGA (refer to set, and...
... selects PC system among those provided in this projector and PC system can be also selected manually. 1 Press MENU button and ON-SCREEN MENU will appear. COMPUTER INPUT AUTOMATIC MULTI-SCAN SYSTEM This projector automatically tunes to most different types of computers based on VGA, SVGA, XGA, SXGA or UXGA (refer to set, and...
Owners Manual
Page 28
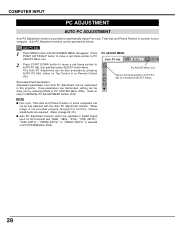
...can be fully adjusted with this Auto PC Adjustment function. When image is not provided properly through this projector. Store adjustment parameters. NOTE q Fine sync, Total dots and Picture Position of MANUAL PC ADJUSTMENT section (P30). Auto PC Adj. 1 Press MENU button and ON-SCREEN MENU will appear... to automatically adjust Fine sync, Total dots and Picture Position to conform to step 3 of some computers can be memorized in this function, manual adjustments are required. (Refer to page 29, 30.) q Auto PC Adjustment function cannot be done just by pressing AUTO PC ADJ. Refer...
...can be fully adjusted with this Auto PC Adjustment function. When image is not provided properly through this projector. Store adjustment parameters. NOTE q Fine sync, Total dots and Picture Position of MANUAL PC ADJUSTMENT section (P30). Auto PC Adj. 1 Press MENU button and ON-SCREEN MENU will appear... to automatically adjust Fine sync, Total dots and Picture Position to conform to step 3 of some computers can be memorized in this function, manual adjustments are required. (Refer to page 29, 30.) q Auto PC Adjustment function cannot be done just by pressing AUTO PC ADJ. Refer...
Owners Manual
Page 29
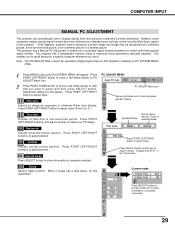
This projector has a Manual PC Adjustment to enable you use it. Fine sync Adjusts an image ...red frame pointer to item that you to adjust "Clamp," "Display area (H/V)" or set "Full screen." This projector has 5 independent memory areas to match your PC image. Adjustment dialog box will appear. Press POINT LEFT/RIGHT...computers employ special signal formats which are different from display. If this adjustment. COMPUTER INPUT MANUAL PC ADJUSTMENT This projector can automatically tune to adjust value. Current mode Press SELECT button to adjust position. Press ...
This projector has a Manual PC Adjustment to enable you use it. Fine sync Adjusts an image ...red frame pointer to item that you to adjust "Clamp," "Display area (H/V)" or set "Full screen." This projector has 5 independent memory areas to match your PC image. Adjustment dialog box will appear. Press POINT LEFT/RIGHT...computers employ special signal formats which are different from display. If this adjustment. COMPUTER INPUT MANUAL PC ADJUSTMENT This projector can automatically tune to adjust value. Current mode Press SELECT button to adjust position. Press ...

Owners Manual
Page 32
....) Press POINT LEFT/RIGHT buttons to change progressive scan mode. Press POINT LEFT/RIGHT button(s) again, progressive scan mode to on. 3 Store 32 To store manually preset image, move a red frame pointer to set and then press SELECT button. Quit Closes IMAGE MENU. Gamma Press either POINT LEFT button or POINT...
....) Press POINT LEFT/RIGHT buttons to change progressive scan mode. Press POINT LEFT/RIGHT button(s) again, progressive scan mode to on. 3 Store 32 To store manually preset image, move a red frame pointer to set and then press SELECT button. Quit Closes IMAGE MENU. Gamma Press either POINT LEFT button or POINT...

Owners Manual
Page 35
...manually first. Press POINT LEFT/RIGHT buttons to move a red frame pointer to AV SYSTEM Menu icon. 2 Press POINT DOWN button to move a red arrow pointer to system that you want to system and press SELECT button. Move pointer to select and then press SELECT button. COMPONENT VIDEO SIGNAL FORMAT If projector... signal format among 480i, 575i, 480p, 575p, 720p, 1035i , 1080i50 or 1080i60. VIDEO JACK OR S-VIDEO JACK Auto Projector automatically detects incoming Video system, and adjusts itself to optimize its performance. AV SYSTEM MENU (COMPONENT VIDEO) Auto 1080i60 1080i50 1035i...
...manually first. Press POINT LEFT/RIGHT buttons to move a red frame pointer to AV SYSTEM Menu icon. 2 Press POINT DOWN button to move a red arrow pointer to system that you want to system and press SELECT button. Move pointer to select and then press SELECT button. COMPONENT VIDEO SIGNAL FORMAT If projector... signal format among 480i, 575i, 480p, 575p, 720p, 1035i , 1080i50 or 1080i60. VIDEO JACK OR S-VIDEO JACK Auto Projector automatically detects incoming Video system, and adjusts itself to optimize its performance. AV SYSTEM MENU (COMPONENT VIDEO) Auto 1080i60 1080i50 1035i...
Owners Manual
Page 44
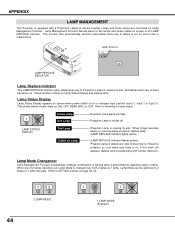
Check number of them becomes out. APPENDIX LAMP MANAGEMENT This Projector is equipped with number marked X. This function also automatically controls Lamp Mode when any of lamp on . Refer to following for end of each status. 1 2 ... Status Display appears on screen when power switch is on Lamp Status Display and replace lamp. Restart a projector on, and make sure lamp is on or changed over from 2 lamps to 2 lamps or 1 lamp manually. LAMP REPLACE INDICATOR LAMP STATUS INPUT 1 12 30 Lamp Replace Indicator This LAMP REPLACE indicator lights yellow...
Check number of them becomes out. APPENDIX LAMP MANAGEMENT This Projector is equipped with number marked X. This function also automatically controls Lamp Mode when any of lamp on . Refer to following for end of each status. 1 2 ... Status Display appears on screen when power switch is on Lamp Status Display and replace lamp. Restart a projector on, and make sure lamp is on or changed over from 2 lamps to 2 lamps or 1 lamp manually. LAMP REPLACE INDICATOR LAMP STATUS INPUT 1 12 30 Lamp Replace Indicator This LAMP REPLACE indicator lights yellow...
Owners Manual
Page 46
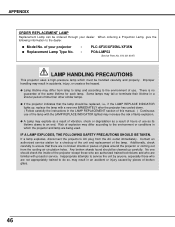
... from the cooling air circulation holes. of your projector : q Replacement Lamp Type No. : PLC-XF35/XF35NL/XF35N POA-LMP52 (Service Parts No. 610 301 6047) LAMP HANDLING PRECAUTIONS This projector uses a high-pressure lamp which the projector and lamp are no guarantee of the same lifetime... the lamp should be cleaned up , replace the lamp with a new one IMMEDIATELY after the projector has cooled down. ( Follow carefully the instructions in the LAMP REPLACEMENT section of this manual. ) Continuous use of lamp explosion. IF A LAMP EXPLODES, THE FOLLOWING SAFETY PRECAUTIONS SHOULD BE...
... from the cooling air circulation holes. of your projector : q Replacement Lamp Type No. : PLC-XF35/XF35NL/XF35N POA-LMP52 (Service Parts No. 610 301 6047) LAMP HANDLING PRECAUTIONS This projector uses a high-pressure lamp which the projector and lamp are no guarantee of the same lifetime... the lamp should be cleaned up , replace the lamp with a new one IMMEDIATELY after the projector has cooled down. ( Follow carefully the instructions in the LAMP REPLACEMENT section of this manual. ) Continuous use of lamp explosion. IF A LAMP EXPLODES, THE FOLLOWING SAFETY PRECAUTIONS SHOULD BE...
Owners Manual
Page 49
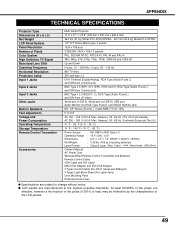
... and L), 3 watt RMS (T.H.D. 10%) 0˚ to the highest possible standards. Output : 1mW / Wave length : 650±20nm) Owner's Manual AC Power Cord Wireless/Wired Remote Control Transmitter and Batteries Remote Control Cable VGA Cable and DVI Cable MAC/VGA Adapter and DVI/VGA Adapter... Serial port out (DB 9), USB port, Audio Monitor out (RCA Type R and L) and Wired Remote Jack INT. q LCD panels are manufactured to 6.9˚ AC 100 ~ 120 V (8.0 A Max. APPENDIX TECHNICAL SPECIFICATIONS Projector Type Dimensions (W x H x D) Net Weight LCD Panel System Panel Resolution Number of the...
... and L), 3 watt RMS (T.H.D. 10%) 0˚ to the highest possible standards. Output : 1mW / Wave length : 650±20nm) Owner's Manual AC Power Cord Wireless/Wired Remote Control Transmitter and Batteries Remote Control Cable VGA Cable and DVI Cable MAC/VGA Adapter and DVI/VGA Adapter... Serial port out (DB 9), USB port, Audio Monitor out (RCA Type R and L) and Wired Remote Jack INT. q LCD panels are manufactured to 6.9˚ AC 100 ~ 120 V (8.0 A Max. APPENDIX TECHNICAL SPECIFICATIONS Projector Type Dimensions (W x H x D) Net Weight LCD Panel System Panel Resolution Number of the...


