
Quick Start Guide
Page 2
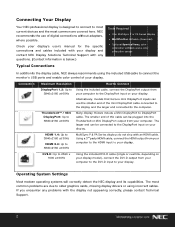
... the most common problems are covered here. Check your display's user's manual for the specific connections and cables included with your display. Operating System Settings Most modern operating systems will correctly detect the NEC display and its capabilities. The most common are due to older graphics cards, missing display drivers or using the included USB cable to connect the monitor's USB ports and enable color control of the mini DisplayPort cable connected to the display and the...
... the most common problems are covered here. Check your display's user's manual for the specific connections and cables included with your display. Operating System Settings Most modern operating systems will correctly detect the NEC display and its capabilities. The most common are due to older graphics cards, missing display drivers or using the included USB cable to connect the monitor's USB ports and enable color control of the mini DisplayPort cable connected to the display and the...
User Manual
Page 3
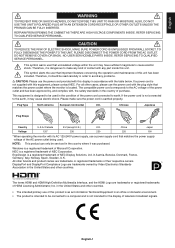
..., Sweden, U.K. All other countries. This symbol warns user that matches the power socket where the monitor is a registered trademark of their respective owners. ErgoDesign is located. Please make any problems. CAUTION: Please use a power supply cord that important literature concerning the operation and maintenance of NEC Corporation. The compatible power cord corresponds to a computer and is earthed properly. Plug Type North America European Continental U.K.
..., Sweden, U.K. All other countries. This symbol warns user that matches the power socket where the monitor is a registered trademark of their respective owners. ErgoDesign is located. Please make any problems. CAUTION: Please use a power supply cord that important literature concerning the operation and maintenance of NEC Corporation. The compatible power cord corresponds to a computer and is earthed properly. Plug Type North America European Continental U.K.
User Manual
Page 5
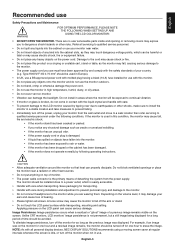
... service personnel under the following operating instructions. For example, if an image was displayed. NOTE: As with all screws. If the monitor is used in Europe). • In UK, use Safety Precautions and Maintenance WARNING FOR OPTIMUM PERFORMANCE, PLEASE NOTE THE FOLLOWING WHEN SETTING UP AND USING THE LCD COLOR MONITOR: • DO NOT OPEN THE MONITOR. English Recommended use a BS-approved power cord with molded plug having a black (10 A) fuse installed...
... service personnel under the following operating instructions. For example, if an image was displayed. NOTE: As with all screws. If the monitor is used in Europe). • In UK, use Safety Precautions and Maintenance WARNING FOR OPTIMUM PERFORMANCE, PLEASE NOTE THE FOLLOWING WHEN SETTING UP AND USING THE LCD COLOR MONITOR: • DO NOT OPEN THE MONITOR. English Recommended use a BS-approved power cord with molded plug having a black (10 A) fuse installed...
User Manual
Page 6
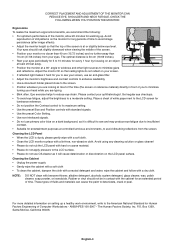
... LCD monitor surface with standard signals. • Use the preset Color Setting. • Use non-interlaced signals. • Do not use an anti-glare filter. • Adjust the monitor's brightness and contrast controls to enhance readability. • Use a document holder placed close to the screen. • Position whatever you are looking at controlled luminous environments, to avoid disturbing reflections from your head while you are typing. • Blink often. English...
... LCD monitor surface with standard signals. • Use the preset Color Setting. • Use non-interlaced signals. • Do not use an anti-glare filter. • Adjust the monitor's brightness and contrast controls to enhance readability. • Use a document holder placed close to the screen. • Position whatever you are looking at controlled luminous environments, to avoid disturbing reflections from your head while you are typing. • Blink often. English...
User Manual
Page 7
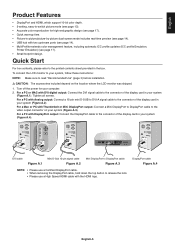
... page 17). • Small footprint design. Turn off the power for high-end graphic design (see page 17). • Quick warmup time. • Picture-in your system (Figure A.4). For a PC with DVI digital output: Connect the DVI signal cable to the connector of the display card in -picture/picture-by-picture dual-screen mode includes real-time preview (see page 14). • USB hub with Thunderbolt or Mini DisplayPort...
... page 17). • Small footprint design. Turn off the power for high-end graphic design (see page 17). • Quick warmup time. • Picture-in your system (Figure A.4). For a PC with DVI digital output: Connect the DVI signal cable to the connector of the display card in -picture/picture-by-picture dual-screen mode includes real-time preview (see page 14). • USB hub with Thunderbolt or Mini DisplayPort...
User Manual
Page 8
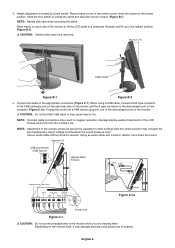
... display quality/components of hearing. CAUTION: Cable holder cannot be removed. Connect all cables to other settings than the center position may cause heat or fire. Using an audio cable with care when unlocking the stand. Place hands on the computer (Figure C.1a). Maximum Tilt USB downstream (USB Type-A) Highest Stand Position A Type A Type B Type USB downstream (USB Type-A) USB upstream (USB Type-B) DVI-D DisplayPort Audio IN HDMI D-Sub Headphone B Type Figure C.1a Power cord Figure...
... display quality/components of hearing. CAUTION: Cable holder cannot be removed. Connect all cables to other settings than the center position may cause heat or fire. Using an audio cable with care when unlocking the stand. Place hands on the computer (Figure C.1a). Maximum Tilt USB downstream (USB Type-A) Highest Stand Position A Type A Type B Type USB downstream (USB Type-A) USB upstream (USB Type-B) DVI-D DisplayPort Audio IN HDMI D-Sub Headphone B Type Figure C.1a Power cord Figure...
User Manual
Page 10
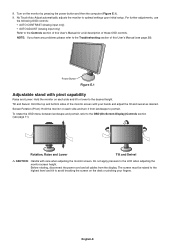
... User's Manual (see page 11). Before rotating, disconnect the power cord and all cables from landscape to the OSD (On-Screen-Display) Controls section (see page 28). For further adjustments, use the following OSD controls: • AUTO CONTRAST (Analog input only) • AUTO ADJUST (Analog input only) Refer to the desired height. Power Button Figure E.1 Adjustable stand with care when adjusting the monitor screen. Tilt and Swivel: Hold the top and bottom sides of these OSD controls. Do not apply pressure to optimal settings...
... User's Manual (see page 11). Before rotating, disconnect the power cord and all cables from landscape to the OSD (On-Screen-Display) Controls section (see page 28). For further adjustments, use the following OSD controls: • AUTO CONTRAST (Analog input only) • AUTO ADJUST (Analog input only) Refer to the desired height. Power Button Figure E.1 Adjustable stand with care when adjusting the monitor screen. Tilt and Swivel: Hold the top and bottom sides of these OSD controls. Do not apply pressure to optimal settings...
User Manual
Page 13
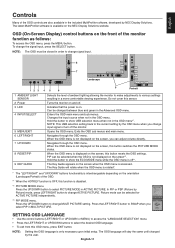
... adjust volume directly. English Controls Many of the OSD controls are also available in the included MultiProfiler software, developed by Picture) mode, press LEFT/RIGHT button to change ACTIVE PICTURE. The latest MultiProfiler software is disabled. *2 PICTURE MODE menu. OSD (On-Screen Display) control buttons on the screen, you select PIP in MULTI PICTURE. NOTE: The OSD must be changed by the OSD menu when you change signal input. 8 7 Landscape 123 1 AMBIENT LIGHT SENSOR 2 Power 3 LED 4 INPUT/SELECT 5 MENU/EXIT 6 LEFT/RIGHT 7 UP/DOWN 8 RESET/PIP 9 KEY GUIDE...
... adjust volume directly. English Controls Many of the OSD controls are also available in the included MultiProfiler software, developed by Picture) mode, press LEFT/RIGHT button to change ACTIVE PICTURE. The latest MultiProfiler software is disabled. *2 PICTURE MODE menu. OSD (On-Screen Display) control buttons on the screen, you select PIP in MULTI PICTURE. NOTE: The OSD must be changed by the OSD menu when you change signal input. 8 7 Landscape 123 1 AMBIENT LIGHT SENSOR 2 Power 3 LED 4 INPUT/SELECT 5 MENU/EXIT 6 LEFT/RIGHT 7 UP/DOWN 8 RESET/PIP 9 KEY GUIDE...
User Manual
Page 15
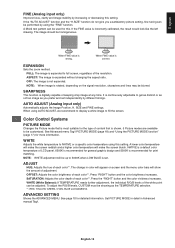
... the menu color bars will appear on the signal resolution, characters and lines may be customized. OFF: The image is expanded without changing the aspect ratio. NOTE: When image is expanded to be blurred. AUTO ADJUST (Analog input only) Automatically adjusts the Image Position, H. ASPECT: The image is not expanded. It is digitally capable of the resolution. NOTE: WHITE adjustment will make the screen bluish. Press "RIGHT" button and the color brightness increases. English FINE (Analog input...
... the menu color bars will appear on the signal resolution, characters and lines may be customized. OFF: The image is expanded without changing the aspect ratio. NOTE: When image is expanded to be blurred. AUTO ADJUST (Analog input only) Automatically adjusts the Image Position, H. ASPECT: The image is not expanded. It is digitally capable of the resolution. NOTE: WHITE adjustment will make the screen bluish. Press "RIGHT" button and the color brightness increases. English FINE (Analog input...
User Manual
Page 17
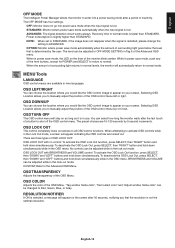
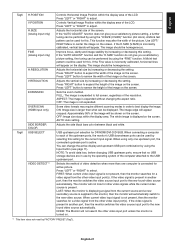
...: Monitor does not go into a power saving mode after the last touch of a button to shut off the OSD control menu. Selecting OSD Location allows you would like the OSD control image to normal mode is lost . The OFF MODE has four settings. OSD LEFT/RIGHT You can choose the location where you to all OSD control functions. ADVANCED: The signal detection circuit works always. OSD COLOR Adjusts the color of the OSD Menu. While in use. OSD TURN OFF...
...: Monitor does not go into a power saving mode after the last touch of a button to shut off the OSD control menu. Selecting OSD Location allows you would like the OSD control image to normal mode is lost . The OFF MODE has four settings. OSD LEFT/RIGHT You can choose the location where you to all OSD control functions. ADVANCED: The signal detection circuit works always. OSD COLOR Adjusts the color of the OSD Menu. While in use. OSD TURN OFF...
User Manual
Page 18
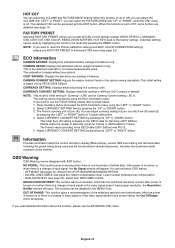
... initial setting is based without any options. NOTE: This model's initial setting is used and the horizontal and vertical frequencies. Please check the receipt of input signal, the No Signal window will appear. OSD Warning OSD Warning menus disappear with the EXIT button. ANALOG DETECT (see page 24): Select from US dollar ($) by pressing the "LEFT" or "RIGHT" button. Individual settings can adjust currency setting to the factory settings. ECO Information CARBON SAVINGS: Displays the...
... initial setting is based without any options. NOTE: This model's initial setting is used and the horizontal and vertical frequencies. Please check the receipt of input signal, the No Signal window will appear. OSD Warning OSD Warning menus disappear with the EXIT button. ANALOG DETECT (see page 24): Select from US dollar ($) by pressing the "LEFT" or "RIGHT" button. Individual settings can adjust currency setting to the factory settings. ECO Information CARBON SAVINGS: Displays the...
User Manual
Page 22
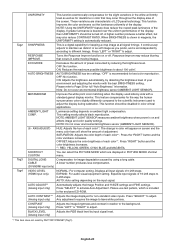
... LIGHT SENSOR). (6 - AXIS ADJUST) HUE: Adjusts the hue of the display. Press the "RIGHT" button and the color vividness increases. CABLE A lower number produces less compensation. (DVI/HDMI input only) VIDEO LEVEL (HDMI input only) NORMAL: For computer setting. EXPAND: For audio-visual equipment setting. AUTO: Auto setting depending on and affects image and color quality settings. Please refer to adjust. This setting mostly affects black reproduction. Press "RIGHT" button and the color brightness increases. *1: RED, YELLOW, GREEN, CYAN, BLUE...
... LIGHT SENSOR). (6 - AXIS ADJUST) HUE: Adjusts the hue of the display. Press the "RIGHT" button and the color vividness increases. CABLE A lower number produces less compensation. (DVI/HDMI input only) VIDEO LEVEL (HDMI input only) NORMAL: For computer setting. EXPAND: For audio-visual equipment setting. AUTO: Auto setting depending on and affects image and color quality settings. Please refer to adjust. This setting mostly affects black reproduction. Press "RIGHT" button and the color brightness increases. *1: RED, YELLOW, GREEN, CYAN, BLUE...
User Manual
Page 23
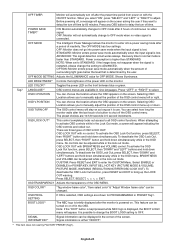
... other video input port(s). A Moiré test pattern can be used for this setting for the current input signal. Press "RIGHT" button to best display the image. The image edge will not look for this setting. The whole image is incorrectly calibrated, horizontal lines will automatically switch to select. English Tag5 H.POSITION V.POSITION H.SIZE (Analog input only) FINE (Analog input only) H.RESOLUTION V.RESOLUTION EXPANSION OVER SCAN (HDMI input only) Tag6 SIDE BORDER COLOR USB SELECT VIDEO DETECT*1 Controls Horizontal Image Position within the display area of the screen...
... other video input port(s). A Moiré test pattern can be used for this setting for the current input signal. Press "RIGHT" button to best display the image. The image edge will not look for this setting. The whole image is incorrectly calibrated, horizontal lines will automatically switch to select. English Tag5 H.POSITION V.POSITION H.SIZE (Analog input only) FINE (Analog input only) H.RESOLUTION V.RESOLUTION EXPANSION OVER SCAN (HDMI input only) Tag6 SIDE BORDER COLOR USB SELECT VIDEO DETECT*1 Controls Horizontal Image Position within the display area of the screen...
User Manual
Page 24
... time period from power on the front between blue or green. OFF MODE The Intelligent Power Manager allows the monitor to normal mode is lost . Recovery time to enter into power save mode when the input signal is displayed, the BOOT LOGO menu will appear indicating the OSD controls are shown for PROGRAMMABLE in the lock out mode. LED COLOR*1 Toggles the power LED on with the ON/OFF function. OSD V.POSITION You can...
... time period from power on the front between blue or green. OFF MODE The Intelligent Power Manager allows the monitor to normal mode is lost . Recovery time to enter into power save mode when the input signal is displayed, the BOOT LOGO menu will appear indicating the OSD controls are shown for PROGRAMMABLE in the lock out mode. LED COLOR*1 Toggles the power LED on with the ON/OFF function. OSD V.POSITION You can...
User Manual
Page 25
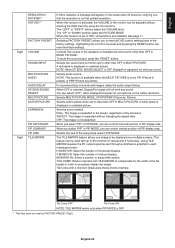
... signal will not emit any sound. To mute the sound output, press the "RESET" button. Selects the sound input port when set to other than OFF in PIP MODE, you select "PIP" in MULTI PICTURE. NOTE: This function is available when the MULTI PICTURE is set to PIP (Picture in PIP MODE. A white frame is displayed on the native resolution. H MONITOR: Select the number of the monitor can control vertical position of the sub-picture used with 4 monitors (black...
... signal will not emit any sound. To mute the sound output, press the "RESET" button. Selects the sound input port when set to other than OFF in PIP MODE, you select "PIP" in MULTI PICTURE. NOTE: This function is available when the MULTI PICTURE is set to PIP (Picture in PIP MODE. A white frame is displayed on the native resolution. H MONITOR: Select the number of the monitor can control vertical position of the sub-picture used with 4 monitors (black...

User Manual
Page 26
.... FULL: Screen image is set to be displayed properly if sync signal input and the selection you input an input with landscape mode. This initial setting is not available. Clamp position: Operating your monitor at this setting if you made at a non-standard timing may appear slightly less sharp than normal or have color distortion. When MULTI PICTURE is set to reduce the risk of analog input sync signal. Use the SCREEN SAVER to...
.... FULL: Screen image is set to be displayed properly if sync signal input and the selection you input an input with landscape mode. This initial setting is not available. Clamp position: Operating your monitor at this setting if you made at a non-standard timing may appear slightly less sharp than normal or have color distortion. When MULTI PICTURE is set to reduce the risk of analog input sync signal. Use the SCREEN SAVER to...
User Manual
Page 28
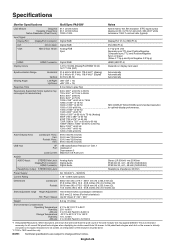
Input Signal DisplayPort: DisplayPort Connector: Digital RGB DisplayPort V1.1a (HDCP1.3) DVI: DVI-D 24pin: Digital RGB DVI (HDCP1.4) VGA: Mini D-Sub 15-pin: Analog RGB Sync 0.7 Vp-p/75 ohm Separate sync.TTL level Positive/Negative Composite sync.TTL level Positive/Negative Sync on Green (Video 0.7 Vp-p and Sync Negative 0.3 Vp-p) HDMI: HDMI Connector: Digital RGB HDMI (HDCP1.4) Display Colors 1,073,741,824 (DisplayPort/HDMI 10 bit) 16,777,216 (DVI) Depends on the screen is normal and necessary for all modes listed). 640 x 480*1 at...
Input Signal DisplayPort: DisplayPort Connector: Digital RGB DisplayPort V1.1a (HDCP1.3) DVI: DVI-D 24pin: Digital RGB DVI (HDCP1.4) VGA: Mini D-Sub 15-pin: Analog RGB Sync 0.7 Vp-p/75 ohm Separate sync.TTL level Positive/Negative Composite sync.TTL level Positive/Negative Sync on Green (Video 0.7 Vp-p and Sync Negative 0.3 Vp-p) HDMI: HDMI Connector: Digital RGB HDMI (HDCP1.4) Display Colors 1,073,741,824 (DisplayPort/HDMI 10 bit) 16,777,216 (DVI) Depends on the screen is normal and necessary for all modes listed). 640 x 480*1 at...
User Manual
Page 29
... any user interaction. Quick Release stand: Allows fast removal. As a DVI-based connector (for slight variations in use on the screen and improves the color and evens out the luminance uniformity of ambient light. OSD (On-Screen Display) Controls: Allow you to the display card's scanning frequency, thus displaying the resolution required. UNIFORMITY: This feature compensates for the digital input pins), only a simple adapter is a subset of the monitor. Intelligent Power Manager System: Provides innovative power-saving...
... any user interaction. Quick Release stand: Allows fast removal. As a DVI-based connector (for slight variations in use on the screen and improves the color and evens out the luminance uniformity of ambient light. OSD (On-Screen Display) Controls: Allow you to the display card's scanning frequency, thus displaying the resolution required. UNIFORMITY: This feature compensates for the digital input pins), only a simple adapter is a subset of the monitor. Intelligent Power Manager System: Provides innovative power-saving...
User Manual
Page 30
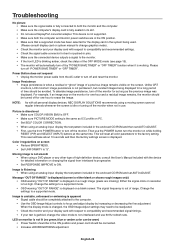
..., change graphics mode). • Check the monitor and your display card with all color parameters to the factory setting. To alleviate image persistence, turn off and reset the monitor. Change the settings to turn off the monitor for as long as ICC profile on PC. • Set SELF COLOR CORRECTION. • When using an analog input, display the test pattern included in the ON position and power cord should be avoided. Troubleshooting No picture • Make sure the signal cable is...
..., change graphics mode). • Check the monitor and your display card with all color parameters to the factory setting. To alleviate image persistence, turn off and reset the monitor. Change the settings to turn off the monitor for as long as ICC profile on PC. • Set SELF COLOR CORRECTION. • When using an analog input, display the test pattern included in the ON position and power cord should be avoided. Troubleshooting No picture • Make sure the signal cable is...
User Manual
Page 31
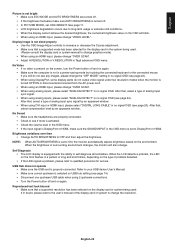
... USB hub setting (see page 14). • Disconnect one upstream USB cable when using an HDMI input, please change "VIDEO LEVEL". USB Hub does not operate • Make sure the USB cord is set to ON, the monitor automatically adjusts brightness based on the environment. If in doubt, please refer to the user's manual of surrounding environment changes, the monitor will blink. • When using 2 upstream connections. • Turn the Power button off . • In PICTURE MODE, set HIGH BRIGHT. No Sound • Make...
... USB hub setting (see page 14). • Disconnect one upstream USB cable when using an HDMI input, please change "VIDEO LEVEL". USB Hub does not operate • Make sure the USB cord is set to ON, the monitor automatically adjusts brightness based on the environment. If in doubt, please refer to the user's manual of surrounding environment changes, the monitor will blink. • When using 2 upstream connections. • Turn the Power button off . • In PICTURE MODE, set HIGH BRIGHT. No Sound • Make...


