

PN-455 Operation Manual
Page 1
... RAIN OR MOISTURE. The lightning flash with arrowhead symbol, within the product's enclosure that may be of sufficient magnitude to persons. Model No.: Serial No.: U.S.A. REFER SERVICING TO QUALIFIED SERVICE PERSONNEL. CAUTION RISK OF ELECTRIC SHOCK DO NOT OPEN CAUTION: TO REDUCE THE RISK OF ELECTRIC SHOCK, DO NOT REMOVE COVER. NO USER-SERVICEABLE PARTS INSIDE. ENGLISH PN-455 LCD MONITOR ENGLISH IMPORTANT: To aid reporting...
... RAIN OR MOISTURE. The lightning flash with arrowhead symbol, within the product's enclosure that may be of sufficient magnitude to persons. Model No.: Serial No.: U.S.A. REFER SERVICING TO QUALIFIED SERVICE PERSONNEL. CAUTION RISK OF ELECTRIC SHOCK DO NOT OPEN CAUTION: TO REDUCE THE RISK OF ELECTRIC SHOCK, DO NOT REMOVE COVER. NO USER-SERVICEABLE PARTS INSIDE. ENGLISH PN-455 LCD MONITOR ENGLISH IMPORTANT: To aid reporting...

PN-455 Operation Manual
Page 3
... vents and openings since they can block ventilation openings. Power cord protection - Never insert an object into the product. Removing covers can break when the product is operated. 2. Improper adjustment of the product. Cleaning - Therefore, it can cause damage, which often requires extensive adjustment work by a qualified technician. 3E To ensure your safety and prolong the service life of a SHARP LCD product. Do...
... vents and openings since they can block ventilation openings. Power cord protection - Never insert an object into the product. Removing covers can break when the product is operated. 2. Improper adjustment of the product. Cleaning - Therefore, it can cause damage, which often requires extensive adjustment work by a qualified technician. 3E To ensure your safety and prolong the service life of a SHARP LCD product. Do...
PN-455 Operation Manual
Page 4
.... Use of power supply used in fire, electric shock and/or other heat-generating products (including amplifiers). 20. WARNING: This is in which case the user may be sure to install the product according to the operating instructions. When the product displays an abnormal condition. In case the product needs replacement parts, make sure that the service person uses replacement parts specified by the manufacturer. 19. Power source...
.... Use of power supply used in fire, electric shock and/or other heat-generating products (including amplifiers). 20. WARNING: This is in which case the user may be sure to install the product according to the operating instructions. When the product displays an abnormal condition. In case the product needs replacement parts, make sure that the service person uses replacement parts specified by the manufacturer. 19. Power source...

PN-455 Operation Manual
Page 5
... for errors made with the application of Microsoft Corporation. - ENGLISH TIPS AND SAFETY PRECAUTIONS - The TFT color LCD panel used in electric shock. However, there may not exactly represent the actual product or display. Do not allow the monitor to receive strong shocks or to fall or topple over bend it . - Also, do not add extension cords. Insert the power plug directly...
... for errors made with the application of Microsoft Corporation. - ENGLISH TIPS AND SAFETY PRECAUTIONS - The TFT color LCD panel used in electric shock. However, there may not exactly represent the actual product or display. Do not allow the monitor to receive strong shocks or to fall or topple over bend it . - Also, do not add extension cords. Insert the power plug directly...
PN-455 Operation Manual
Page 6
... 11 Removing the battery cover 12 Remote control operation range 12 Connection and Installation Connecting Peripheral Equipment 13 Connecting External Speakers 18 Connecting the AC Cord 19 Connecting Multiple Monitors 20 Mounting Precautions 21 Mounting the Temporary Stands 22 Bundling Cables ...22 Attaching the Carrying Handles 23 Basic Operation Turning on Power 24 Main power switch 24 Turning power on/off using remote control 24 Remote Control Unit 25 Menu Items ...26 Menu option selection 26 Menu screen explanation 28 Initialization (Reset)/Functional Restriction Setting...
... 11 Removing the battery cover 12 Remote control operation range 12 Connection and Installation Connecting Peripheral Equipment 13 Connecting External Speakers 18 Connecting the AC Cord 19 Connecting Multiple Monitors 20 Mounting Precautions 21 Mounting the Temporary Stands 22 Bundling Cables ...22 Attaching the Carrying Handles 23 Basic Operation Turning on Power 24 Main power switch 24 Turning power on/off using remote control 24 Remote Control Unit 25 Menu Items ...26 Menu option selection 26 Menu screen explanation 28 Initialization (Reset)/Functional Restriction Setting...
PN-455 Operation Manual
Page 7
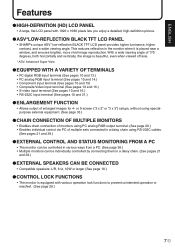
....) ●CONTROL LOCK FUNCTIONS • The monitor is equipped with 1920 x 1080 pixels lets you enjoy a detailed, high-definition picture. ● ASV*LOW-REFLECTION BLACK TFT LCD PANEL • SHARP's unique ASV* low-reflection BLACK TFT LCD panel provides higher luminance, higher contrast, and a wider viewing angle. or 9-screen ("2 x 2" or "3 x 3") setups, without using specialpurpose external equipment. (See page 33.) ●CHAIN CONNECTION OF MULTIPLE MONITORS • Enables chain connection of monitors using PC analog RGB output...
....) ●CONTROL LOCK FUNCTIONS • The monitor is equipped with 1920 x 1080 pixels lets you enjoy a detailed, high-definition picture. ● ASV*LOW-REFLECTION BLACK TFT LCD PANEL • SHARP's unique ASV* low-reflection BLACK TFT LCD panel provides higher luminance, higher contrast, and a wider viewing angle. or 9-screen ("2 x 2" or "3 x 3") setups, without using specialpurpose external equipment. (See page 33.) ●CHAIN CONNECTION OF MULTIPLE MONITORS • Enables chain connection of monitors using PC analog RGB output...
PN-455 Operation Manual
Page 8
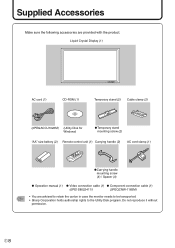
... Windows) ●Temporary stand mounting screw (2) "AA" size battery (2) Remote control unit (1) Carrying handle (2) AC cord clamp (1) BRIGHT - DISLAY MODE SIZE RRMCGRE1L0MC0O-44TM5EP0FPCZONTROL POWER MUTE BRIGHT + MENU INPUT ●Carrying handle mounting screw (4) / Spacer (4) ● Operation manual (1) ● Video connection cable (1) ● Component connection cable (1) (0PE1S8022411/) (0PEQCNW-1165M) • You are provided with the product. E8 Supplied Accessories Make sure the following accessories are advised to retain the carton in case the monitor needs...
... Windows) ●Temporary stand mounting screw (2) "AA" size battery (2) Remote control unit (1) Carrying handle (2) AC cord clamp (1) BRIGHT - DISLAY MODE SIZE RRMCGRE1L0MC0O-44TM5EP0FPCZONTROL POWER MUTE BRIGHT + MENU INPUT ●Carrying handle mounting screw (4) / Spacer (4) ● Operation manual (1) ● Video connection cable (1) ● Component connection cable (1) (0PE1S8022411/) (0PEQCNW-1165M) • You are provided with the product. E8 Supplied Accessories Make sure the following accessories are advised to retain the carton in case the monitor needs...
PN-455 Operation Manual
Page 12
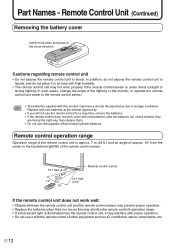
... not use rechargeable (Nickel-metal-hydride) batteries. Part Names - E 12 MUTE VOL+ BRIGHT+ SIZE MENU INPUT 10° Remote control sensor 13.1 feet (4 m) If the remote control unit does not work properly if the remote control sensor is approx. 7 m (23 ft.) and an angle of the remote control sensor. 13.1 feet (4 m) 10° 1(56.m4 )feet POWER DISPLAY MODE REMOTE CONTROL BRIGHTVOL- Cautions regarding remote control unit • Do not expose the remote control...
... not use rechargeable (Nickel-metal-hydride) batteries. Part Names - E 12 MUTE VOL+ BRIGHT+ SIZE MENU INPUT 10° Remote control sensor 13.1 feet (4 m) If the remote control unit does not work properly if the remote control sensor is approx. 7 m (23 ft.) and an angle of the remote control sensor. 13.1 feet (4 m) 10° 1(56.m4 )feet POWER DISPLAY MODE REMOTE CONTROL BRIGHTVOL- Cautions regarding remote control unit • Do not expose the remote control...
PN-455 Operation Manual
Page 17
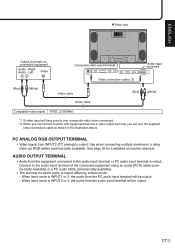
... analog) is output differs by screen mode. - Right Audio - PC ANALOG RGB OUTPUT TERMINAL • Video signal from the audio input terminal will have priority over composite video when connected. *2 When you connect the monitor with equipment that has a video output terminal, you can use the supplied video connection cable as shown in a daisy chain via RGB cables (commercially available). Left Video Composite video input terminal INPUT4 (VIDEO) Video connection cable (*2) Audio input terminals AUDIO IN R L (Red) (White) Video cable Audio cable (Red) (White) Compatible video signal...
... analog) is output differs by screen mode. - Right Audio - PC ANALOG RGB OUTPUT TERMINAL • Video signal from the audio input terminal will have priority over composite video when connected. *2 When you connect the monitor with equipment that has a video output terminal, you can use the supplied video connection cable as shown in a daisy chain via RGB cables (commercially available). Left Video Composite video input terminal INPUT4 (VIDEO) Video connection cable (*2) Audio input terminals AUDIO IN R L (Red) (White) Video cable Audio cable (Red) (White) Compatible video signal...
PN-455 Operation Manual
Page 21
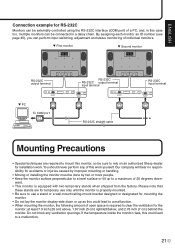
... inch (5 cm) right/left/below, and 2.76 inch (7 cm) behind the monitor. Do not block any of this could lead to rely on an authorized Sharp dealer for RS-232C Monitors can be sure to a malfunction. • When mounting the monitor, the following amount of open space is equipped with two temporary stands when shipped from the factory. ENGLISH Connection example for installation work...
... inch (5 cm) right/left/below, and 2.76 inch (7 cm) behind the monitor. Do not block any of this could lead to rely on an authorized Sharp dealer for RS-232C Monitors can be sure to a malfunction. • When mounting the monitor, the following amount of open space is equipped with two temporary stands when shipped from the factory. ENGLISH Connection example for installation work...
PN-455 Operation Manual
Page 24
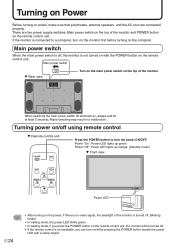
... the remote control is connected to turn on the computer. Rapid switching may result in a malfunction. Turning power on the remote control unit. Power "Off": Power LED lights up green. There are connected properly. Main power switch ▼ Rear view Turn on the main power switch on power, make sure that peripherals, external speakers, and the AC cord are two power supply switches: Main power switch on the top of the monitor and POWER button on /off using remote control ▼ Remote control unit Press the POWER button to a computer, turn...
... the remote control is connected to turn on the computer. Rapid switching may result in a malfunction. Turning power on the remote control unit. Power "Off": Power LED lights up green. There are connected properly. Main power switch ▼ Rear view Turn on the main power switch on power, make sure that peripherals, external speakers, and the AC cord are two power supply switches: Main power switch on the top of the monitor and POWER button on /off using remote control ▼ Remote control unit Press the POWER button to a computer, turn...

PN-455 Operation Manual
Page 25
... MUTE button again to turn the sound back to "0". Sound is muted when volume is set to the previous level. BRIGHT (Backlight adjustment) Displays the BRIGHT menu when the menu screen is not available, you can change the mode by Dot ➞ WIDE... MODE (Screen mode selection) Each time you press this button, the mode changes in the following order: • INPUT1 (DIGITAL) ➞ INPUT2 (ANALOG) ➞ INPUT3 (COMPONENT) ➞ INPUT4 (VIDEO) ➞ INPUT1 (DIGITAL)... * If the remote control...
... MUTE button again to turn the sound back to "0". Sound is muted when volume is set to the previous level. BRIGHT (Backlight adjustment) Displays the BRIGHT menu when the menu screen is not available, you can change the mode by Dot ➞ WIDE... MODE (Screen mode selection) Each time you press this button, the mode changes in the following order: • INPUT1 (DIGITAL) ➞ INPUT2 (ANALOG) ➞ INPUT3 (COMPONENT) ➞ INPUT4 (VIDEO) ➞ INPUT1 (DIGITAL)... * If the remote control...

PN-455 Operation Manual
Page 26
... selection MENU button • Displays and turns off the menu screen. • Switches menu screens. Pressing increases a value. Example of various functions using the remote control unit. ADJUSTMENT MANUAL CLOCK PHASE H-POS V-POS 1024x768 ANALOG AUTO 127 77 134 113 V: 60 Hz H: 48 KHz E 26 Pressing decreases a value. Cursor control (UP/DOWN/LEFT/RIGHT) • / : Selects a desired item on the screen to enable video and audio adjustment and the setting of menu operation: Adjusting CONTRAST (video...
... selection MENU button • Displays and turns off the menu screen. • Switches menu screens. Pressing increases a value. Example of various functions using the remote control unit. ADJUSTMENT MANUAL CLOCK PHASE H-POS V-POS 1024x768 ANALOG AUTO 127 77 134 113 V: 60 Hz H: 48 KHz E 26 Pressing decreases a value. Cursor control (UP/DOWN/LEFT/RIGHT) • / : Selects a desired item on the screen to enable video and audio adjustment and the setting of menu operation: Adjusting CONTRAST (video...

PN-455 Operation Manual
Page 31
... / USER Default STD THRU Displays the input signal level as it is only selectable for COOL / • / STD / • / WARM to USER] (INPUT1 / INPUT2) Adjustable range OFF / SET SET Copies the values set for INPUT1. direction Darkens red component. [USER (G-CONTRAST)] (INPUT1 / INPUT2) Adjustable range 0 - 255 + direction Brightens green component. - AUTO The BLACK LEVEL and CONTRAST are manually adjusted. direction Darkens green component. [USER (B-CONTRAST)] (INPUT1 / INPUT2) Adjustable range 0 - 255 + direction Brightens blue component. - COOL Color tone...
... / USER Default STD THRU Displays the input signal level as it is only selectable for COOL / • / STD / • / WARM to USER] (INPUT1 / INPUT2) Adjustable range OFF / SET SET Copies the values set for INPUT1. direction Darkens red component. [USER (G-CONTRAST)] (INPUT1 / INPUT2) Adjustable range 0 - 255 + direction Brightens green component. - AUTO The BLACK LEVEL and CONTRAST are manually adjusted. direction Darkens green component. [USER (B-CONTRAST)] (INPUT1 / INPUT2) Adjustable range 0 - 255 + direction Brightens blue component. - COOL Color tone...
PN-455 Operation Manual
Page 33
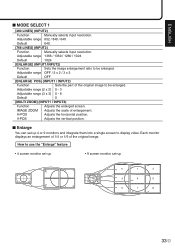
... • 4 screen monitor set-up • 9 screen monitor set up 0 0 1 2 3 2 1 0 12 3 45 6 78 3 0 1 2 3 4 5 6 7 8 33 E V-POS Adjusts the vertical position. ■ Enlarge You can set -up 4 or 9 monitors and integrate them into a single screen to display video. Each monitor displays an enlargement of 1/4 or 1/9 of enlargement. Adjustable range (2 x 2) 0 - 3 Adjustable range (3 x 3) 0 - 8 Default 0 [MULTI ZOOM] (INPUT1 / INPUT2) Function Adjusts the enlarged screen. IMAGE ZOOM Adjusts the scale of the original image. ENGLISH ■ MODE SELECT 1 [480...
... • 4 screen monitor set-up • 9 screen monitor set up 0 0 1 2 3 2 1 0 12 3 45 6 78 3 0 1 2 3 4 5 6 7 8 33 E V-POS Adjusts the vertical position. ■ Enlarge You can set -up 4 or 9 monitors and integrate them into a single screen to display video. Each monitor displays an enlargement of 1/4 or 1/9 of enlargement. Adjustable range (2 x 2) 0 - 3 Adjustable range (3 x 3) 0 - 8 Default 0 [MULTI ZOOM] (INPUT1 / INPUT2) Function Adjusts the enlarged screen. IMAGE ZOOM Adjusts the scale of the original image. ENGLISH ■ MODE SELECT 1 [480...
PN-455 Operation Manual
Page 34
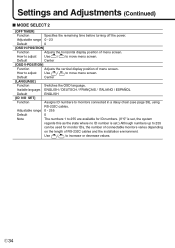
...Although numbers up to monitors connected in a daisy chain (see page 39), using RS-232C cables. Adjustable range 0 - 23 Default 0 [OSD H-POSITION] Function Adjusts the horizontal display position of menu screen. Default Center [OSD V-POSITION] Function Adjusts the vertical display position of menu screen. Use / to move menu screen. Settings and Adjustments (Continued) ■ MODE SELECT 2 [OFF TIMER] Function Specifies the remaining time before turning off the power. Default Center [LANGUAGE] Function Switches the OSD language. E 34 How to adjust Use / to...
...Although numbers up to monitors connected in a daisy chain (see page 39), using RS-232C cables. Adjustable range 0 - 23 Default 0 [OSD H-POSITION] Function Adjusts the horizontal display position of menu screen. Default Center [OSD V-POSITION] Function Adjusts the vertical display position of menu screen. Use / to move menu screen. Settings and Adjustments (Continued) ■ MODE SELECT 2 [OFF TIMER] Function Specifies the remaining time before turning off the power. Default Center [LANGUAGE] Function Switches the OSD language. E 34 How to adjust Use / to...
PN-455 Operation Manual
Page 36
...-wide image (4:3) is not a malfunction. • Depending on the supplied CD-ROM. Open the CD-ROM in "WIDE" mode. • When using "Wide Mode" and adjust the vertical position (see page 30), display an image to the specifications of the creators, as protected by Copyright Law, so please be cropped. This is due to "NORMAL". • When playing commercial software, parts of the screen. If you are using the screen size switching...
...-wide image (4:3) is not a malfunction. • Depending on the supplied CD-ROM. Open the CD-ROM in "WIDE" mode. • When using "Wide Mode" and adjust the vertical position (see page 30), display an image to the specifications of the creators, as protected by Copyright Law, so please be cropped. This is due to "NORMAL". • When playing commercial software, parts of the screen. If you are using the screen size switching...
PN-455 Operation Manual
Page 37
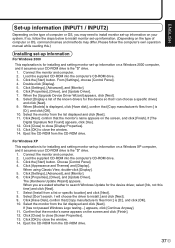
... [Next]. 11. Click [Close] to close [Screen Properties]. 13. Select the monitor from the list displayed and click [Next]. Choose [Control Panel]. 4. Eject the CD-ROM from a list or specific location] and click [Next]. 8. Connect the monitor and computer. 2. Click [Properties], [Driver], and [Update Driver]. 7. For Windows XP This explanation is for installing and setting monitor set-up information on a Windows XP computer, and it assumes your...
... [Next]. 11. Click [Close] to close [Screen Properties]. 13. Select the monitor from the list displayed and click [Next]. Choose [Control Panel]. 4. Eject the CD-ROM from a list or specific location] and click [Next]. 8. Connect the monitor and computer. 2. Click [Properties], [Driver], and [Update Driver]. 7. For Windows XP This explanation is for installing and setting monitor set-up information on a Windows XP computer, and it assumes your...
PN-455 Operation Manual
Page 52
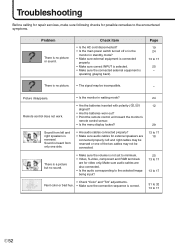
... main power switch turned off or is the monitor in waiting mode? 24 Remote control does not work. • Are the batteries inserted with polarity ( , ) 12 aligned? • Are the batteries worn out? • Point the remote control unit toward the monitor's remote control sensor. • Is the menu display locked? 29 Sound from only one side. • Are audio cables connected properly? • Make sure audio cables for video only. Troubleshooting Before calling for repair services, make...
... main power switch turned off or is the monitor in waiting mode? 24 Remote control does not work. • Are the batteries inserted with polarity ( , ) 12 aligned? • Are the batteries worn out? • Point the remote control unit toward the monitor's remote control sensor. • Is the menu display locked? 29 Sound from only one side. • Are audio cables connected properly? • Make sure audio cables for video only. Troubleshooting Before calling for repair services, make...
PN-455 Operation Manual
Page 54
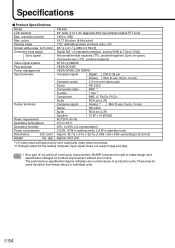
... Power consumption Dimensions inch (mm) Weight lbs. (kg) PN-455 45" wide (113.1 cm diagonal) ASV low-reflection black TFT LCD 1920 x 1080 16.77 M colors (8 bits/color) 170° right/left/up/down (contrast ratio ≥10) 38-7/8 x 21-7/8 (985.9 X 554.6) Digital DVI 1.0 standard-compliant, analog RGB (0.7Vp-p) [75Ω] Horizontal/vertical separate (TTL: positive/negative), Sync-on-green, Composite sync (TTL: positive/negative) NTSC (3.58MHz) VESA DDC2B VESA DPMS, DVI DMPM Computer signal Digital DVI...
... Power consumption Dimensions inch (mm) Weight lbs. (kg) PN-455 45" wide (113.1 cm diagonal) ASV low-reflection black TFT LCD 1920 x 1080 16.77 M colors (8 bits/color) 170° right/left/up/down (contrast ratio ≥10) 38-7/8 x 21-7/8 (985.9 X 554.6) Digital DVI 1.0 standard-compliant, analog RGB (0.7Vp-p) [75Ω] Horizontal/vertical separate (TTL: positive/negative), Sync-on-green, Composite sync (TTL: positive/negative) NTSC (3.58MHz) VESA DDC2B VESA DPMS, DVI DMPM Computer signal Digital DVI...

