

XV-Z3000 Operation Manual
Page 2
...to this equipment not expressly approved by the manufacturer could void the user's authority to operate this operation manual carefully. Model No.: XV-Z3000U Serial No.: WARNING: High brightness light source. See bottom of light, or view directly. REFER SERVICING TO QUALIFIED SERVICE PERSONNEL. ... 1 DO NOT REMOVE SCREWS EXCEPT SPECIFIED USER SERVICE SCREW. Introduction IMPORTANT • For your Projector, please record the Serial Number located on the bottom of the projector and retain this product to persons. Be especially careful that children do not stare directly into ...
...to this equipment not expressly approved by the manufacturer could void the user's authority to operate this operation manual carefully. Model No.: XV-Z3000U Serial No.: WARNING: High brightness light source. See bottom of light, or view directly. REFER SERVICING TO QUALIFIED SERVICE PERSONNEL. ... 1 DO NOT REMOVE SCREWS EXCEPT SPECIFIED USER SERVICE SCREW. Introduction IMPORTANT • For your Projector, please record the Serial Number located on the bottom of the projector and retain this product to persons. Be especially careful that children do not stare directly into ...

XV-Z3000 Operation Manual
Page 3
...remote control. This equipment generates, uses, and can be regulated due to radio communications. ONLY Declaration of conformity SHARP PROJECTOR, MODEL XV-Z3000U This device complies with any interference received, including interference that the equipment must accept any high technology electronic equipment...or television reception, which can radiate radio frequency energy and, if not installed and used in a particular installation. This SHARP projector uses a DMD panel. Ensure the cooling fan has stopped before disconnecting the power cord. This will not occur in...
...remote control. This equipment generates, uses, and can be regulated due to radio communications. ONLY Declaration of conformity SHARP PROJECTOR, MODEL XV-Z3000U This device complies with any interference received, including interference that the equipment must accept any high technology electronic equipment...or television reception, which can radiate radio frequency energy and, if not installed and used in a particular installation. This SHARP projector uses a DMD panel. Ensure the cooling fan has stopped before disconnecting the power cord. This will not occur in...

XV-Z3000 Operation Manual
Page 4
... and the screen display are slightly different, depending on the projector. 1 Press dMENU. • The "Picture" menu screen for setting up and operating the projector. However, you can also be performed by using the projector. Note .........Indicates additional information for the selected input mode is... Fine Sync Options1 Options2 Example: "Picture" screen menu for INPUT 1 mode Selected input mode Menu icons Picture Picture Mode Contrast Bright Color Tint Sharp Red Blue INPUT 1 Standard 0 0 0 0 0 0 0 Note • The "Fine Sync" menu is displayed. RETURN ENTER END...
... and the screen display are slightly different, depending on the projector. 1 Press dMENU. • The "Picture" menu screen for setting up and operating the projector. However, you can also be performed by using the projector. Note .........Indicates additional information for the selected input mode is... Fine Sync Options1 Options2 Example: "Picture" screen menu for INPUT 1 mode Selected input mode Menu icons Picture Picture Mode Contrast Bright Color Tint Sharp Red Blue INPUT 1 Standard 0 0 0 0 0 0 0 Note • The "Fine Sync" menu is displayed. RETURN ENTER END...

XV-Z3000 Operation Manual
Page 5
...10 Part Names and Functions 11 Inserting the Batteries 14 Usable Range 15 Quick Start Quick Start 16 Setup Setting up the Projector 18 Setting up the Projector 18 Standard Setup (Front Projection) ....... 18 Ceiling-mount Setup 18 Projection (PRJ) Mode 19 Picture (Screen) Size ...Equipment ......... 23 Connecting to a Computer 26 Controlling the Projector by a Computer 27 Using Basic Operation Turning the Projector On/Off 28 Connecting the Power Cord 28 Turning the Projector on 28 Turning the Power off (Putting the Projector into Standby Mode 29 Image Projection 29 Switching the ...
...10 Part Names and Functions 11 Inserting the Batteries 14 Usable Range 15 Quick Start Quick Start 16 Setup Setting up the Projector 18 Setting up the Projector 18 Standard Setup (Front Projection) ....... 18 Ceiling-mount Setup 18 Projection (PRJ) Mode 19 Picture (Screen) Size ...Equipment ......... 23 Connecting to a Computer 26 Controlling the Projector by a Computer 27 Using Basic Operation Turning the Projector On/Off 28 Connecting the Power Cord 28 Turning the Projector on 28 Turning the Power off (Putting the Projector into Standby Mode 29 Image Projection 29 Switching the ...

XV-Z3000 Operation Manual
Page 9
...high image quality, SHARP recommends that it is first turned on. Rest your projector. Do not set "Fan Mode" to "High". I When placing the projector in a high position, ensure that this can affect the longevity of the adjustment foot. I Place the projector on the projector. See "Replacing the...plug the power cord back in and turn on a level site within the adjustment range (8 degrees) of the optical system. Place the projector where the intake and exhaust vents are not obstructed. I Protect the lens so as mountains (at least 10 minutes. I Continuously watching the...
...high image quality, SHARP recommends that it is first turned on. Rest your projector. Do not set "Fan Mode" to "High". I When placing the projector in a high position, ensure that this can affect the longevity of the adjustment foot. I Place the projector on the projector. See "Replacing the...plug the power cord back in and turn on a level site within the adjustment range (8 degrees) of the optical system. Place the projector where the intake and exhaust vents are not obstructed. I Protect the lens so as mountains (at least 10 minutes. I Continuously watching the...

XV-Z3000 Operation Manual
Page 10
... temperature, as this can cause damage due to hard impact and/or vibration, as the cooling fan also stops. 9 When using the projector overseas, be sure to use an appropriate power cord for instructions on how to setup problems or blockage of the picture. Refer to heat... and its performance is automatically controlled. Unplug the power cord after a 90-second cooling-off , the temperature warn- I Do not carry the projector by holding the lens. ing indicator on the circumstances and the internal temperature. The sound of the plug may change during projection or cooling fan...
... temperature, as this can cause damage due to hard impact and/or vibration, as the cooling fan also stops. 9 When using the projector overseas, be sure to use an appropriate power cord for instructions on how to setup problems or blockage of the picture. Refer to heat... and its performance is automatically controlled. Unplug the power cord after a 90-second cooling-off , the temperature warn- I Do not carry the projector by holding the lens. ing indicator on the circumstances and the internal temperature. The sound of the plug may change during projection or cooling fan...

XV-Z3000 Operation Manual
Page 12
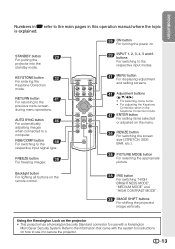
ENTER button 41 For setting items selected or adjusted on and putting the projector into standby mode. HEIGHT 30 ADJUST lever 52 Temperature warning indicator 29 INPUT buttons (P/R) For switching input mode 1, 2, 3, 4, 5 or 6. 41 MENU button For displaying adjustment .... 15 Remote control sensor (front) Push both sides of the lens cap to the main pages in this operation manual where the topic is explained. Projector Top View Power indicator 28, 52 28, 52 Lamp indicator STANDBY/ON button 28 For turning the power on the menu. Front View Focus ring...
ENTER button 41 For setting items selected or adjusted on and putting the projector into standby mode. HEIGHT 30 ADJUST lever 52 Temperature warning indicator 29 INPUT buttons (P/R) For switching input mode 1, 2, 3, 4, 5 or 6. 41 MENU button For displaying adjustment .... 15 Remote control sensor (front) Push both sides of the lens cap to the main pages in this operation manual where the topic is explained. Projector Top View Power indicator 28, 52 28, 52 Lamp indicator STANDBY/ON button 28 For turning the power on the menu. Front View Focus ring...

XV-Z3000 Operation Manual
Page 13
... S-video output terminal (VCR, DVD player, etc.). 3 INPUT 4 terminal Connecting video equipment without S-video output terminal. TRIGGER terminal 7 When the projector is explained. INPUT 3 terminal 2 Connecting video equipment with hard disc, etc.). I Connecting video equipment with component output terminal 4 (DVD player, ...terminal Connecting the computer to the main pages in Z refer to control the projector. If an electric screen or other compatible device is connected, it can be turned on when the projector is turned on , a control signal (DC 12V) outputs from this operation...
... S-video output terminal (VCR, DVD player, etc.). 3 INPUT 4 terminal Connecting video equipment without S-video output terminal. TRIGGER terminal 7 When the projector is explained. INPUT 3 terminal 2 Connecting video equipment with hard disc, etc.). I Connecting video equipment with component output terminal 4 (DVD player, ...terminal Connecting the computer to the main pages in Z refer to control the projector. If an electric screen or other compatible device is connected, it can be turned on when the projector is turned on , a control signal (DC 12V) outputs from this operation...
XV-Z3000 Operation Manual
Page 14
... SHIFT buttons For shifting the projected image vertically. button 48 For switching to a computer. Using the Kensington Lock on the projector • This projector has a Kensington Security Standard connector for use with the system for instructions on how to use it to secure the...to the previous menu screen during menu operations. KEYSTONE button 32 For entering the Keystone Correction mode. STANDBY button 29 For putting the projector into the standby mode. Introduction Numbers in Z refer to the main pages in the Keystone Correction mode. 41 ENTER button For setting...
... SHIFT buttons For shifting the projected image vertically. button 48 For switching to a computer. Using the Kensington Lock on the projector • This projector has a Kensington Security Standard connector for use with the system for instructions on how to use it to secure the...to the previous menu screen during menu operations. KEYSTONE button 32 For entering the Keystone Correction mode. STANDBY button 29 For putting the projector into the standby mode. Introduction Numbers in Z refer to the main pages in the Keystone Correction mode. 41 ENTER button For setting...
XV-Z3000 Operation Manual
Page 15
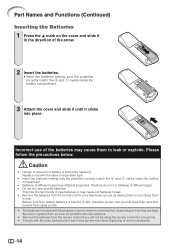
... batteries from the remote control if you first wipe them and then remove them using the remote control for a long time. • Comply with this projector may cause them as soon as leaving them in the direction of the arrow. 2 Insert the batteries. • Insert the batteries making sure the polarities...
... batteries from the remote control if you first wipe them and then remove them using the remote control for a long time. • Comply with this projector may cause them as soon as leaving them in the direction of the arrow. 2 Insert the batteries. • Insert the batteries making sure the polarities...

XV-Z3000 Operation Manual
Page 16
... the screen material. When using the remote control • Ensure that you do not drop, expose to control the projector within the ranges shown in the illustration. In this case, move the projector away from the remote control can be reflected off a screen for easy operation. Remote control sensor (front) 30°...
... the screen material. When using the remote control • Ensure that you do not drop, expose to control the projector within the ranges shown in the illustration. In this case, move the projector away from the remote control can be reflected off a screen for easy operation. Remote control sensor (front) 30°...

XV-Z3000 Operation Manual
Page 17
... buttons 7 ENTER button 1. Quick Start This section shows the basic operation (projector connecting with the video equipment). Connect the projector to the video equipment and plug the power cord into the AC socket of the projector _PP. 22-28 To INPUT 4 terminal AC socket Connect the audio output of... the video equipment is explained using one ex- Remove the lens cap and turn the projector on _P. 28 On the On the remote projector control 16 Place the projector facing a wall or a screen _P. 18 2. For details, see the page described below for each step. Setup and...
... buttons 7 ENTER button 1. Quick Start This section shows the basic operation (projector connecting with the video equipment). Connect the projector to the video equipment and plug the power cord into the AC socket of the projector _PP. 22-28 To INPUT 4 terminal AC socket Connect the audio output of... the video equipment is explained using one ex- Remove the lens cap and turn the projector on _P. 28 On the On the remote projector control 16 Place the projector facing a wall or a screen _P. 18 2. For details, see the page described below for each step. Setup and...

XV-Z3000 Operation Manual
Page 18
... On-screen Display • Unplug the power cord from the AC outlet after the cooling fan stops. 17 Adjust the projector angle using the INPUT buttons on the projector or the INPUT 4 button on the remote control to set the upper-left positions of the projected image. 3. Press P/R/O/Q on the ... again while the confirmation message is displayed, to switch the input mode. 6. Turn the Power off _P. 29 Press the STANDBY/ON button on the projector or the STANDBY button on the remote control to set the position. 4. Follow steps 2 and 3 to also set and setup will be set the...
... On-screen Display • Unplug the power cord from the AC outlet after the cooling fan stops. 17 Adjust the projector angle using the INPUT buttons on the projector or the INPUT 4 button on the remote control to set the upper-left positions of the projected image. 3. Press P/R/O/Q on the ... again while the confirmation message is displayed, to switch the input mode. 6. Turn the Power off _P. 29 Press the STANDBY/ON button on the projector or the STANDBY button on the remote control to set the position. 4. Follow steps 2 and 3 to also set and setup will be set the...

XV-Z3000 Operation Manual
Page 19
... other than the U.S.A.). See page 49 for use the optional Sharp ceiling-mount bracket for this function. 18 Doing so will eliminate the need for additional information concerning "Picture (Screen) Size and Projection Dis- Standard Setup (Front Projection) I Place the projector at the required distance from the screen according to the desired...
... other than the U.S.A.). See page 49 for use the optional Sharp ceiling-mount bracket for this function. 18 Doing so will eliminate the need for additional information concerning "Picture (Screen) Size and Projection Dis- Standard Setup (Front Projection) I Place the projector at the required distance from the screen according to the desired...
XV-Z3000 Operation Manual
Page 20
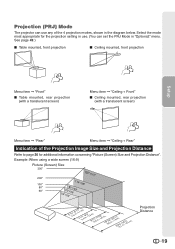
... to page 20 for the projection setting in use. (You can use any of the 4 projection modes, shown in "Options2" menu. Projection (PRJ) Mode The projector can set the PRJ Mode in the diagram below.
... to page 20 for the projection setting in use. (You can use any of the 4 projection modes, shown in "Options2" menu. Projection (PRJ) Mode The projector can set the PRJ Mode in the diagram below.

XV-Z3000 Operation Manual
Page 21
.../m) L2: Maximum projection distance (ft/m) H: Distance from the lens center to the bottom of the image (in/cm) S: Adjustable range of the projector to the screen. The formula for picture size and projection distance [Feet/inches] [m/cm] L1 (ft) = 0.03019χ / 0.3048 L1 ...54 H (cm) = 0.21794χ S (in the table as a reference when installing the projector. Use the values in ) = ±0.0508χ / 2.54 S (cm) = ±0.0508χ 20 Setting up the Projector (Continued) Picture (Screen) Size and Projection Distance The projection screen size varies according to the distance from...
.../m) L2: Maximum projection distance (ft/m) H: Distance from the lens center to the bottom of the image (in/cm) S: Adjustable range of the projector to the screen. The formula for picture size and projection distance [Feet/inches] [m/cm] L1 (ft) = 0.03019χ / 0.3048 L1 ...54 H (cm) = 0.21794χ S (in the table as a reference when installing the projector. Use the values in ) = ±0.0508χ / 2.54 S (cm) = ±0.0508χ 20 Setting up the Projector (Continued) Picture (Screen) Size and Projection Distance The projection screen size varies according to the distance from...

XV-Z3000 Operation Manual
Page 23
... game Compo- Samples of the connecting equipment. • You may need other cables or connectors not listed below. Equipment Input Signal Cable Terminal on the projector Audio-visual equipment HDMI video HDMI cable (commercially available) INPUT6 Component video Component cable (commercially available) Component video 3 RCA to the operation manual of Cables...
... game Compo- Samples of the connecting equipment. • You may need other cables or connectors not listed below. Equipment Input Signal Cable Terminal on the projector Audio-visual equipment HDMI video HDMI cable (commercially available) INPUT6 Component video Component cable (commercially available) Component video 3 RCA to the operation manual of Cables...

XV-Z3000 Operation Manual
Page 24
To INPUT1 terminal Component cable (commercially available) Connections 23 When connecting the component video equipment to the component input terminal on the projector first and then the other devices. After making all connections, turn off the devices to be connected. Connecting to Video Equipment Before connecting, ensure that the power cord of the projector is unplugged from the AC outlet and turn on the projector (INPUT1 or INPUT2) To component output (Y, CB/PB, CR/PR) terminal DVD, etc.
To INPUT1 terminal Component cable (commercially available) Connections 23 When connecting the component video equipment to the component input terminal on the projector first and then the other devices. After making all connections, turn off the devices to be connected. Connecting to Video Equipment Before connecting, ensure that the power cord of the projector is unplugged from the AC outlet and turn on the projector (INPUT1 or INPUT2) To component output (Y, CB/PB, CR/PR) terminal DVD, etc.

XV-Z3000 Operation Manual
Page 26
...transmitted, and a high-quality image with a simple connection can deliver a high-defini- Using cables that can be displayable. 25 Since this projector does not support an audio signal by itself, use a cable that conforms to HDMI standards may not be enjoyed. • When a ... (type A) (commercially available) Note • HDMI (High Definition Multimedia Interface) is connected to the computer-RGB/ component input terminal on the projector (INPUT5) To component output (Y, CB/PB, CR/PR) terminal DVD, etc. When connecting the component video equipment to the HDMI terminal, a...
...transmitted, and a high-quality image with a simple connection can deliver a high-defini- Using cables that can be displayable. 25 Since this projector does not support an audio signal by itself, use a cable that conforms to HDMI standards may not be enjoyed. • When a ... (type A) (commercially available) Note • HDMI (High Definition Multimedia Interface) is connected to the computer-RGB/ component input terminal on the projector (INPUT5) To component output (Y, CB/PB, CR/PR) terminal DVD, etc. When connecting the component video equipment to the HDMI terminal, a...

XV-Z3000 Operation Manual
Page 28
...on the computer. This may damage your computer or projector. • Do not connect or disconnect an RS-232C serial control cable to or from the computer while it is on the projector is not correctly set up. Refer to control the projector and check the status of an RS-232C serial ...control cable. Connections 27 Controlling the Projector by a Computer When the RS-232C terminal on . D-sub RS-232C adaptor ...
...on the computer. This may damage your computer or projector. • Do not connect or disconnect an RS-232C serial control cable to or from the computer while it is on the projector is not correctly set up. Refer to control the projector and check the status of an RS-232C serial ...control cable. Connections 27 Controlling the Projector by a Computer When the RS-232C terminal on . D-sub RS-232C adaptor ...


