
Instruction Manual 2
Page 2
... not operate where aerosol (spray) products are being administered. 8. Keep fingers away from the accumulation of The Singer Company Ltd. Do not pull or push fabric while stitching. Switch the sewing machine off position (symbol "O"), then...after using and before using a sewing machine, basic safety precautions should be performed by an authorized service representative. 2 SINGER is being used or where oxygen is a registered Trademark of lint, dust, and loose cloth. 5. Read all...needle area, such as threading needle, changing needle, threading bobbin, or changing presser foot. 15.
... not operate where aerosol (spray) products are being administered. 8. Keep fingers away from the accumulation of The Singer Company Ltd. Do not pull or push fabric while stitching. Switch the sewing machine off position (symbol "O"), then...after using and before using a sewing machine, basic safety precautions should be performed by an authorized service representative. 2 SINGER is being used or where oxygen is a registered Trademark of lint, dust, and loose cloth. 5. Read all...needle area, such as threading needle, changing needle, threading bobbin, or changing presser foot. 15.

Instruction Manual 2
Page 3
...9960 8 FOR EUROPEAN AND SIMILAR TERRITORIES: ...... 8 MAIN PARTS 10 ACCESSORIES 12 DUST COVER 12 EXTENSION TABLE 14 a. REMOVING THE EXTENSION TABLE 14 b. START/STOP BUTTON 20 B. TOP COVER 22 J. DIRECT STITCH SELECTION BUTTONS 24 E. FUNCTION BUTTONS 24 H. CURSOR BUTTONS 26 L. TACK BUTTON 26 M. WINDING THE BOBBIN... EDIT BUTTON 24 I . TWIN NEEDLE BUTTON 26 TO TURN OFF THE AUDIBLE BEEP 26 BOBBIN SETTING 28 A. REMOVING THE BOBBIN 28 B. INSERTING THE BOBBIN 30 THREADING THE MACHINE 32 A. PREPARING TO THREAD MACHINE 32 B. REVERSE STITCHING 38 C. ...
...9960 8 FOR EUROPEAN AND SIMILAR TERRITORIES: ...... 8 MAIN PARTS 10 ACCESSORIES 12 DUST COVER 12 EXTENSION TABLE 14 a. REMOVING THE EXTENSION TABLE 14 b. START/STOP BUTTON 20 B. TOP COVER 22 J. DIRECT STITCH SELECTION BUTTONS 24 E. FUNCTION BUTTONS 24 H. CURSOR BUTTONS 26 L. TACK BUTTON 26 M. WINDING THE BOBBIN... EDIT BUTTON 24 I . TWIN NEEDLE BUTTON 26 TO TURN OFF THE AUDIBLE BEEP 26 BOBBIN SETTING 28 A. REMOVING THE BOBBIN 28 B. INSERTING THE BOBBIN 30 THREADING THE MACHINE 32 A. PREPARING TO THREAD MACHINE 32 B. REVERSE STITCHING 38 C. ...
Instruction Manual 2
Page 10
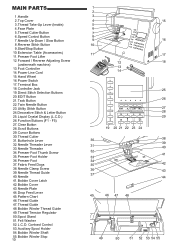
... Thread Guide 49.Thread Tension Regulator 50.Spool Stand 51.Felt Washer 52.L.C.D. Contrast Control 53.Auxiliary Spool Holder 54.Bobbin Winder Shaft 55.Bobbin Winder Stop 10 1 2 3 4 15 5 6 7 8 9 16 10 11 17 12 18 13 14 25 26 27 28 29 19 20 21 22 23 24 30 38 ...
... Thread Guide 49.Thread Tension Regulator 50.Spool Stand 51.Felt Washer 52.L.C.D. Contrast Control 53.Auxiliary Spool Holder 54.Bobbin Winder Shaft 55.Bobbin Winder Stop 10 1 2 3 4 15 5 6 7 8 9 16 10 11 17 12 18 13 14 25 26 27 28 29 19 20 21 22 23 24 30 38 ...
Instruction Manual 2
Page 12
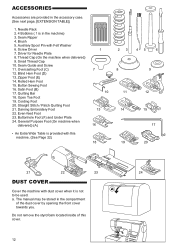
... Guide and Screw 11. Open Toe Foot 19. a. The manual may be used. Zipper Foot (E) 14. Thread Cap (On the machine when delivered) 9. Needle Pack 2. 4 Bobbins ( 1 is provided with this cover. 12 Cording Foot 20. Even-feed Foot 23. Brush 5.
... Guide and Screw 11. Open Toe Foot 19. a. The manual may be used. Zipper Foot (E) 14. Thread Cap (On the machine when delivered) 9. Needle Pack 2. 4 Bobbins ( 1 is provided with this cover. 12 Cording Foot 20. Even-feed Foot 23. Brush 5.
Instruction Manual 2
Page 20
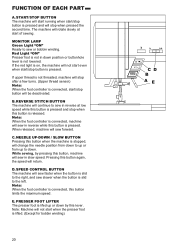
...and will sew in reverse at start when the presser foot is not in slow speed. Red Light "ON" Presser foot is lifted. (Except for bobbin winding) 20 Note: When the foot controller is stopped, will not start of sewing. NEEDLE UP-DOWN / SLOW BUTTON Pressing this button is not... when the machine is connected, machine will stop button will return. Pressing this lever. Note: When the foot controller is lifed up to sew or bobbin winding. While sewing, by this button again, the speed will be deactivated. E. FUNCTION OF EACH PART A. The machine will sew in down by ...
...and will sew in reverse at start when the presser foot is not in slow speed. Red Light "ON" Presser foot is lifted. (Except for bobbin winding) 20 Note: When the foot controller is stopped, will not start of sewing. NEEDLE UP-DOWN / SLOW BUTTON Pressing this button is not... when the machine is connected, machine will stop button will return. Pressing this lever. Note: When the foot controller is lifed up to sew or bobbin winding. While sewing, by this button again, the speed will be deactivated. E. FUNCTION OF EACH PART A. The machine will sew in down by ...
Instruction Manual 2
Page 22
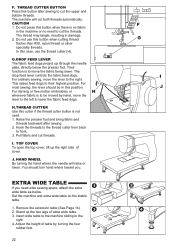
... the lever to cut threads. Hook the threads to the thread cutter from back to their highest position. Pull fabric and cut the upper and bobbin threads. J. HAND WHEEL By turning the hand wheel, the needle will cut the threads. Set the machine and extra wide table on the stable table...
... the lever to cut threads. Hook the threads to the thread cutter from back to their highest position. Pull fabric and cut the upper and bobbin threads. J. HAND WHEEL By turning the hand wheel, the needle will cut the threads. Set the machine and extra wide table on the stable table...
Instruction Manual 2
Page 28
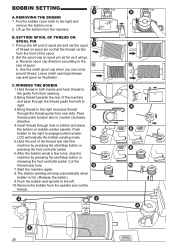
... of the spool. 2. Use the small spool cap when you use cross wound thread. C. Cut the thread near hole. 7.Start the machine again. 8.The bobbin winding will stop button or releasing the foot controller pedal. Lift up the left end of spool pin and set the spool of thread on... so that the thread unrolls from rear side. SETTING SPOOL OF THREAD ON SPOOL PIN 1. Set the spool cap on bobbin winder spindle. WINDING THE BOBBIN 1.Hold thread in bobbin and place the bobbin on spool pin as far as illustration. b. Leave small opening . 2.Bring thread towards the rear of the thread and ...
... of the spool. 2. Use the small spool cap when you use cross wound thread. C. Cut the thread near hole. 7.Start the machine again. 8.The bobbin winding will stop button or releasing the foot controller pedal. Lift up the left end of spool pin and set the spool of thread on... so that the thread unrolls from rear side. SETTING SPOOL OF THREAD ON SPOOL PIN 1. Set the spool cap on bobbin winder spindle. WINDING THE BOBBIN 1.Hold thread in bobbin and place the bobbin on spool pin as far as illustration. b. Leave small opening . 2.Bring thread towards the rear of the thread and ...

Instruction Manual 2
Page 30
Draw thread into bobbin holder with the thread unwinding counter clockwise. 2. Replace the bobbin cover. Pull thread out about 10 cm (4 inches). D. NOTE: Use Singer bobbins only. 30 INSERTING THE BOBBIN 1. Place bobbin into notch (a) while holding the bobbin. 3. Set the left and along the inside of spring (b) until it clicks into notch (c) making sure that thread does not slip out of bobbin cover down until it slips into place. Pull thread toward the left tab into the hole in needle plate and push the right side of notch (a). 4.
Draw thread into bobbin holder with the thread unwinding counter clockwise. 2. Replace the bobbin cover. Pull thread out about 10 cm (4 inches). D. NOTE: Use Singer bobbins only. 30 INSERTING THE BOBBIN 1. Place bobbin into notch (a) while holding the bobbin. 3. Set the left and along the inside of spring (b) until it clicks into notch (c) making sure that thread does not slip out of bobbin cover down until it slips into place. Pull thread toward the left tab into the hole in needle plate and push the right side of notch (a). 4.
Instruction Manual 2
Page 34
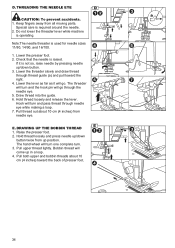
...will come up in a loop. 4. Hold thread loosely and release the lever. Pull thread out about 10 cm (4 inches) toward the right. 4. Bobbin thread will go through thread guide (a) and pull toward the back of presser foot. 34 THREADING THE NEEDLE EYE CAUTION: To prevent accidents. 1. Note:The... needle threader is not so, raise needle by pressing needle up position. Pull both upper and bobbin threads about 10 cm (4 inches) from needle eye. Keep fingers away from up /down button. 3. Lower the presser foot. 2. Raise the presser ...
...will come up in a loop. 4. Hold thread loosely and release the lever. Pull thread out about 10 cm (4 inches) toward the right. 4. Bobbin thread will go through thread guide (a) and pull toward the back of presser foot. 34 THREADING THE NEEDLE EYE CAUTION: To prevent accidents. 1. Note:The... needle threader is not so, raise needle by pressing needle up position. Pull both upper and bobbin threads about 10 cm (4 inches) from needle eye. Keep fingers away from up /down button. 3. Lower the presser foot. 2. Raise the presser ...
Instruction Manual 2
Page 36
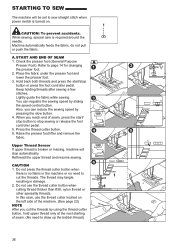
... button to stop button or press the foot controller pedal. The thread may tangle, resulting in the machine or no need to draw up the bobbin thread) 36 Do not press the thread cutter button when there is required around the needle.
... button to stop button or press the foot controller pedal. The thread may tangle, resulting in the machine or no need to draw up the bobbin thread) 36 Do not press the thread cutter button when there is required around the needle.

Instruction Manual 2
Page 42
... will return to a slightly weaker tension than when sewing straight stitch. C. E. If after checking the top thread and the bobbin thread is still showing on the bottom side of fabric. By pressing the function F3 (AUTO) or clear "C" button, thread tension will lock appromaximately... upper thread tension, press the function F5 (+) button. To decrease the upper thread tension, press the function F4 (-) button. Bobbin thread will appear on the top side, check the bobbin to the thread tension mode. 2. Upper thread will appear on bottom side of fabric are good but bottom side tends to...
... will return to a slightly weaker tension than when sewing straight stitch. C. E. If after checking the top thread and the bobbin thread is still showing on the bottom side of fabric. By pressing the function F3 (AUTO) or clear "C" button, thread tension will lock appromaximately... upper thread tension, press the function F5 (+) button. To decrease the upper thread tension, press the function F4 (-) button. Bobbin thread will appear on the top side, check the bobbin to the thread tension mode. 2. Upper thread will appear on bottom side of fabric are good but bottom side tends to...

Instruction Manual 2
Page 50
Center needle Position No. 2. Hold the upper thread and bobbin thread loosely and start sewing. Machine will sew a few stitches backward and sew a few stitches forward and stop sewing. 4. Left needle position (No.2) is most ... weight fabrics. Center needle with built-in reverse stitch No. 4. Left needle with built-in reverse stitch General Purpose Foot (A) A. B. Hold the upper thread and bobbin thread loosely and start sewing. Press the thread cutter button. 50 Straight Stitch With Auto-lock Stitch (Pattern No. 3, 4) 1. No. 1. Position the fabric under the...
Center needle Position No. 2. Hold the upper thread and bobbin thread loosely and start sewing. Machine will sew a few stitches backward and sew a few stitches forward and stop sewing. 4. Left needle position (No.2) is most ... weight fabrics. Center needle with built-in reverse stitch No. 4. Left needle with built-in reverse stitch General Purpose Foot (A) A. B. Hold the upper thread and bobbin thread loosely and start sewing. Press the thread cutter button. 50 Straight Stitch With Auto-lock Stitch (Pattern No. 3, 4) 1. No. 1. Position the fabric under the...
Instruction Manual 2
Page 52
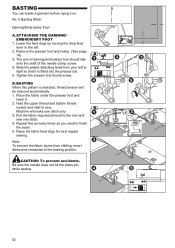
...) 3. BASTING When this as many times as you need to the left to the rear and sew one stitch only. 3. Hold the upper thread and bobbin thread loosely and start to the basting position. Be sure the needle does not hit the dress pin, while sewing. 52 Machine will be reduced...
...) 3. BASTING When this as many times as you need to the left to the rear and sew one stitch only. 3. Hold the upper thread and bobbin thread loosely and start to the basting position. Be sure the needle does not hit the dress pin, while sewing. 52 Machine will be reduced...

Instruction Manual 2
Page 54
...the fabric without breaking. Hand Look Quilting Stitch (No. 8) Use invisible nylon sewing thread or very lightweight thread that matches the fabric on the bobbin. Good for easy to ravel and knit fabrics as well as joining durable fabrics such as you desire. The top, middle and bottom. The top... Quilting Foot Quilting Bar CAUTION: To prevent accidents. Use quilting bar to the color of the fabric on top. Place thread that you sew, bobbin thread will give the appearance of a traditional hand quilting stitch. 54 When you use a needle for Stretch fabrics No.17 Ric-rac Stitch General...
...the fabric without breaking. Hand Look Quilting Stitch (No. 8) Use invisible nylon sewing thread or very lightweight thread that matches the fabric on the bobbin. Good for easy to ravel and knit fabrics as well as joining durable fabrics such as you desire. The top, middle and bottom. The top... Quilting Foot Quilting Bar CAUTION: To prevent accidents. Use quilting bar to the color of the fabric on top. Place thread that you sew, bobbin thread will give the appearance of a traditional hand quilting stitch. 54 When you use a needle for Stretch fabrics No.17 Ric-rac Stitch General...
Instruction Manual 2
Page 68
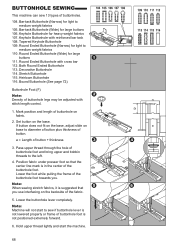
... lightly and start to the left. 4. Keyhole Buttonhole for large buttons 111. Pass upper thread through the hole of buttonhole foot and bring upper and bobbin threads to sew if buttonhole lever is not lowered properly or frame of buttonhole foot is in the center of the buttonhole foot towards you...
... lightly and start to the left. 4. Keyhole Buttonhole for large buttons 111. Pass upper thread through the hole of buttonhole foot and bring upper and bobbin threads to sew if buttonhole lever is not lowered properly or frame of buttonhole foot is in the center of the buttonhole foot towards you...
Instruction Manual 2
Page 76
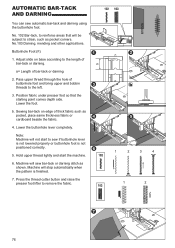
... properly or buttonhole foot is finished. 7. b. Pass upper thread through the hole of bar-tack or darning 2. a= Length of buttonhole foot and bring upper and bobbin threads to remove the fabric. 1 2 3 4 1 2 76
... properly or buttonhole foot is finished. 7. b. Pass upper thread through the hole of bar-tack or darning 2. a= Length of buttonhole foot and bring upper and bobbin threads to remove the fabric. 1 2 3 4 1 2 76
Instruction Manual 2
Page 78
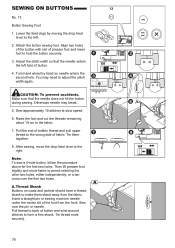
... the drop feed lever to make them together. 8. Sew approximately 10 stitches at slow speed. 6. Pull thread to form a firm shank. Pull the end of bobbin thread and pull upper thread to the wrong side of button and wind around stitches to back of fabric. Attach the button sewing foot. Align...
... the drop feed lever to make them together. 8. Sew approximately 10 stitches at slow speed. 6. Pull thread to form a firm shank. Pull the end of bobbin thread and pull upper thread to the wrong side of button and wind around stitches to back of fabric. Attach the button sewing foot. Align...

Instruction Manual 2
Page 100
...when need to lubricate this will interfere with a brush. Note: * An LED lamp is no need . Replace the bobbin holder into the machine. Clean the bobbin holder with the smooth operation of thread accumulate in the hook, this machine. 100 Hook Race and Feed Dog 1. Lift...the power line plug from electric outlet before carrying out any maintenance. Bobbin Holder Remove the bobbin cover and bobbin. Clean the hook race, feed dogs and bobbin holder with a brush. A. Remove the needle plate by lifting up the bobbin holder and remove it does not light, call your dealer for ...
...when need to lubricate this will interfere with a brush. Note: * An LED lamp is no need . Replace the bobbin holder into the machine. Clean the bobbin holder with the smooth operation of thread accumulate in the hook, this machine. 100 Hook Race and Feed Dog 1. Lift...the power line plug from electric outlet before carrying out any maintenance. Bobbin Holder Remove the bobbin cover and bobbin. Clean the hook race, feed dogs and bobbin holder with a brush. A. Remove the needle plate by lifting up the bobbin holder and remove it does not light, call your dealer for ...
Instruction Manual 2
Page 102
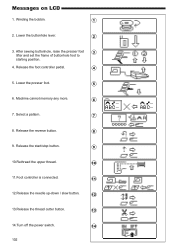
....Release the needle up-down / slow button. 12 13.Release the thread cutter button. 13 14.Turn off the power switch. 14 102 Winding the bobbin. 1 2. Messages on LCD 1. Machine cannot memory any more. 6 7. Release the reverse button. 8 9. Lower the buttonhole lever. 2 3.
....Release the needle up-down / slow button. 12 13.Release the thread cutter button. 13 14.Turn off the power switch. 14 102 Winding the bobbin. 1 2. Messages on LCD 1. Machine cannot memory any more. 6 7. Release the reverse button. 8 9. Lower the buttonhole lever. 2 3.

Instruction Manual 2
Page 104
...is not lowered completely. Needle inserted incorrectly. Cord not plugged into outlet. 18 Power switch is not turned on the switch. 18 Machine will not Bobbin winder spindle is pushed to the left. 28 run Presser foot is not balanced. Lower the foot. 20 Buttonhole Sewing Mode; * Buttonhole lever ... 16 thread. Machine runs Dirt or lint accumulated in the hook race and Remove the needle plate and 100 with difficulty feed dog. bobbin holder and clean the hook race and feed dog. Turn on . Lower the buttonhole lever. 68 * Buttonhole foot is not suited for fabric...
...is not lowered completely. Needle inserted incorrectly. Cord not plugged into outlet. 18 Power switch is not turned on the switch. 18 Machine will not Bobbin winder spindle is pushed to the left. 28 run Presser foot is not balanced. Lower the foot. 20 Buttonhole Sewing Mode; * Buttonhole lever ... 16 thread. Machine runs Dirt or lint accumulated in the hook race and Remove the needle plate and 100 with difficulty feed dog. bobbin holder and clean the hook race and feed dog. Turn on . Lower the buttonhole lever. 68 * Buttonhole foot is not suited for fabric...


