Instruction Manual and Troubleshooting Guide
Page 13
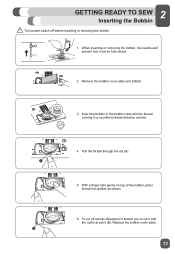
... through the slit (A). 5. To cut it with the thread running in a counterclockwise direction (arrow). Remove the bobbin cover plate and bobbin. 3. Insert the bobbin in the bobbin case with the cutter at point (B). 2 GETTING READY TO SEW Inserting the Bobbin ⚠ Turn power switch off excess thread pull it toward you to cut off before inserting...
... through the slit (A). 5. To cut it with the thread running in a counterclockwise direction (arrow). Remove the bobbin cover plate and bobbin. 3. Insert the bobbin in the bobbin case with the cutter at point (B). 2 GETTING READY TO SEW Inserting the Bobbin ⚠ Turn power switch off excess thread pull it toward you to cut off before inserting...
Instruction Manual and Troubleshooting Guide
Page 27
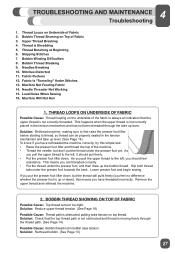
... UNDERSIDE OF FABRIC Possible Cause: Thread looping on top thread. Slip both thread tails under the presser foot, and then draw up or down), this simple test: • Raise the presser foot lifter and thread the top of the fabric is always an indication that the top thread path is not... presser foot and begin sewing. Loud Noise When Sewing 16. As you pull the upper thread to thread, so thread can be properly seated in bobbin case tension. BOBBIN THREAD SHOWING ON TOP OF FABRIC Possible Cause: Top thread tension too tight. Solution: Check that the upper thread is up the...
... UNDERSIDE OF FABRIC Possible Cause: Thread looping on top thread. Slip both thread tails under the presser foot, and then draw up or down), this simple test: • Raise the presser foot lifter and thread the top of the fabric is always an indication that the top thread path is not... presser foot and begin sewing. Loud Noise When Sewing 16. As you pull the upper thread to thread, so thread can be properly seated in bobbin case tension. BOBBIN THREAD SHOWING ON TOP OF FABRIC Possible Cause: Top thread tension too tight. Solution: Check that the upper thread is up the...

Instruction Manual and Troubleshooting Guide
Page 29
... sure that the thread is placed snuggly in the bobbin case. (See Page 13) Possible Cause: Bobbin wound too full or unevenly. Solution: Clean bobbin case. (See Page 32) Possible Cause: Wrong bobbins being used. Solution: Insert appropriate needle for fabric. NEEDLES BREAKING Possible ...Solution: Don't manually push/pull fabric in bobbin case. Solution: Check that come with SINGER® Class 15 transparent bobbins. 9. Solution: Use SINGER® bobbins that bobbin is winding sloppily because thread end not held at beginning of the bobbin) securely, allow the machine's feed teeth...
... sure that the thread is placed snuggly in the bobbin case. (See Page 13) Possible Cause: Bobbin wound too full or unevenly. Solution: Clean bobbin case. (See Page 32) Possible Cause: Wrong bobbins being used. Solution: Insert appropriate needle for fabric. NEEDLES BREAKING Possible ...Solution: Don't manually push/pull fabric in bobbin case. Solution: Check that come with SINGER® Class 15 transparent bobbins. 9. Solution: Use SINGER® bobbins that bobbin is winding sloppily because thread end not held at beginning of the bobbin) securely, allow the machine's feed teeth...
Instruction Manual and Troubleshooting Guide
Page 32
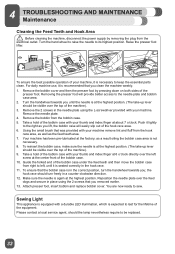
...foot lifter. Turn the handwheel towards you; Using the small brush that you lift, the bobbin case will provide better access to the needle plate and bobbin case area. 2. Take a hold of the bobbin case with your thumb and index finger at 6 o'clock directly over the feed dogs and secure ...in place using the L-screwdriver provided with your machine remove lint and fluff from the bobbin case. 5. Reposition the needle plate over the left , until the needle is recommended that was provided with your machine, it is at about...
...foot lifter. Turn the handwheel towards you; Using the small brush that you lift, the bobbin case will provide better access to the needle plate and bobbin case area. 2. Take a hold of the bobbin case with your thumb and index finger at 6 o'clock directly over the feed dogs and secure ...in place using the L-screwdriver provided with your machine remove lint and fluff from the bobbin case. 5. Reposition the needle plate over the left , until the needle is recommended that was provided with your machine, it is at about...


