Operater's Manual
Page 3
... Starting the Engine 16 PTO Clutch Adjustment 26 Stopping the Rider and Engine 16 Check Mower Blade Stoppping Time 26 Mowing 16 Mower Deck Leveling 27 Pushing the Rider by Hand 16 Servicing the Mower Blades 28 Zero Turn Driving Practice 17 Lubrication 29 Attaching a Trailer 19 Cleaning the Battery and Cables...
... Starting the Engine 16 PTO Clutch Adjustment 26 Stopping the Rider and Engine 16 Check Mower Blade Stoppping Time 26 Mowing 16 Mower Deck Leveling 27 Pushing the Rider by Hand 16 Servicing the Mower Blades 28 Zero Turn Driving Practice 17 Lubrication 29 Attaching a Trailer 19 Cleaning the Battery and Cables...
Operater's Manual
Page 5
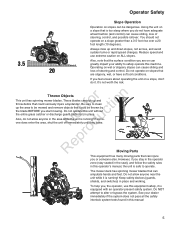
... mow up and fo tio throw debris that can pick up and down slopes, not across, and avoid sudden turns or rapid speed changes. These blades can injure you , the operator, use extreme caution on a slope greater than a 3.5 foot rise over a 20 foot length (10 degrees). Be ...system tests found in place and working. Do not operate on slopes that the surface condition you start mowing. The mower deck has spinning mower blades that could seriously injure a bystander. Reduce speed and use this machine. Operator Safety 3.5 20 Slope Operation Operation on slopes can amputate hands and...
... mow up and fo tio throw debris that can pick up and down slopes, not across, and avoid sudden turns or rapid speed changes. These blades can injure you , the operator, use extreme caution on a slope greater than a 3.5 foot rise over a 20 foot length (10 degrees). Be ...system tests found in place and working. Do not operate on slopes that the surface condition you start mowing. The mower deck has spinning mower blades that could seriously injure a bystander. Reduce speed and use this machine. Operator Safety 3.5 20 Slope Operation Operation on slopes can amputate hands and...
Operater's Manual
Page 7
...your satisfaction, contact the Customer Service Department. DO NOT allow children in yard when machine is doubtful. 13. DO NOT operate blades in accordance remain where you have any questions pertaining to your machine which your dealer cannot answer to your foot on slopes exceeding ... require extra CAUTION. DO NOT operate machine under the NOT operate machine on the ground to try to stabilize operated (even with the blade OFF). Preparation 1. Data indicates that operators age 60 and above, are flammable and 2. These operators should evaluate their ability to neutral ...
...your satisfaction, contact the Customer Service Department. DO NOT allow children in yard when machine is doubtful. 13. DO NOT operate blades in accordance remain where you have any questions pertaining to your machine which your dealer cannot answer to your foot on slopes exceeding ... require extra CAUTION. DO NOT operate machine under the NOT operate machine on the ground to try to stabilize operated (even with the blade OFF). Preparation 1. Data indicates that operators age 60 and above, are flammable and 2. These operators should evaluate their ability to neutral ...

Operater's Manual
Page 8
... catcher components frequently for traffic when near or crossing roadways. 13. STOP engine immediately after striking an obstruc- Gasoline is set. 8 www.Snapper.com Allow the engine to cool before resuming operation. 12. DO NOT store the machine or fuel container inside a vehicle or on clothing,...all times until fueling is an open device 1. tion and location. 7. Make sure all objects before removing grass catcher or iately STOP blades, STOP engine, and STOP unclogging mower to hitch plate as on the ground. Know how to prevent injury from the vehicle or tion....
... catcher components frequently for traffic when near or crossing roadways. 13. STOP engine immediately after striking an obstruc- Gasoline is set. 8 www.Snapper.com Allow the engine to cool before resuming operation. 12. DO NOT store the machine or fuel container inside a vehicle or on clothing,...all times until fueling is an open device 1. tion and location. 7. Make sure all objects before removing grass catcher or iately STOP blades, STOP engine, and STOP unclogging mower to hitch plate as on the ground. Know how to prevent injury from the vehicle or tion....
Operater's Manual
Page 9
...poison. could ignite gas exiting engine. 14. DO NOT change engine governor speed settings or fumes may 8. Store fuel container 12. blades or wear heavy leather gloves and use . When draining fuel tank, drain fuel into an approved container outdoors and away from open flame...stop. Service engine and make adjustments only when 5. Remove spark plug wire(s) from spark plug(s) and secure wire(s) away from binding. Mower blades are subject to spark plug hole; CAUTION when handling them. 2. WARNING Engine exhaust, some models. engine. DO NOT store machine or ...
...poison. could ignite gas exiting engine. 14. DO NOT change engine governor speed settings or fumes may 8. Store fuel container 12. blades or wear heavy leather gloves and use . When draining fuel tank, drain fuel into an approved container outdoors and away from open flame...stop. Service engine and make adjustments only when 5. Remove spark plug wire(s) from spark plug(s) and secure wire(s) away from binding. Mower blades are subject to spark plug hole; CAUTION when handling them. 2. WARNING Engine exhaust, some models. engine. DO NOT store machine or ...

Operater's Manual
Page 12
...drive belt does not stop within five seconds, see your dealer. See an authorized dealer. Decal, Weight Limit Part No. 7101940 12 www.Snapper.com Do not attempt to a complete stop within five seconds after the electric PTO switch is turned off (or operator rises off seat). ...is equipped with ground speed levers not locked in their START/PARK positions in order to start the engine. TEST 2 - CHECK MOWER BLADE STOPPING TIME The mower blades and mower drive belt should come to bypass or tamper with the switches/ devices. 7104226 7104227 TEST 1 - TEST 4 - ENGINE SHOULD...
...drive belt does not stop within five seconds, see your dealer. See an authorized dealer. Decal, Weight Limit Part No. 7101940 12 www.Snapper.com Do not attempt to a complete stop within five seconds after the electric PTO switch is turned off (or operator rises off seat). ...is equipped with ground speed levers not locked in their START/PARK positions in order to start the engine. TEST 2 - CHECK MOWER BLADE STOPPING TIME The mower blades and mower drive belt should come to bypass or tamper with the switches/ devices. 7104226 7104227 TEST 1 - TEST 4 - ENGINE SHOULD...
Operater's Manual
Page 14
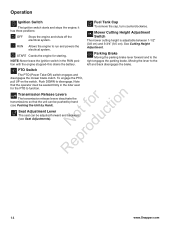
...Cap To remove the cap, turn counterclockwise. Note that the unit can be pushed by hand fo tio (see Seat Adjustments). 14 www.Snapper.com To engage the PTO, pull UP on the switch. Operation Ignition Switch The ignition switch starts and stops the engine; Transmission Release Levers.... Moving the lever to run and powers the electrical system. PTO Switch The PTO (Power Take-Off) switch engages and disengages the mower blade clutch. START Cranks the engine for the PTO to function. Mower Cutting Height Adjustment Switch The mower cutting height is adjustable between 1-1/2" (3,8 cm...
...Cap To remove the cap, turn counterclockwise. Note that the unit can be pushed by hand fo tio (see Seat Adjustments). 14 www.Snapper.com To engage the PTO, pull UP on the switch. Operation Ignition Switch The ignition switch starts and stops the engine; Transmission Release Levers.... Moving the lever to run and powers the electrical system. PTO Switch The PTO (Power Take-Off) switch engages and disengages the mower blade clutch. START Cranks the engine for the PTO to function. Mower Cutting Height Adjustment Switch The mower cutting height is adjustable between 1-1/2" (3,8 cm...
Operater's Manual
Page 20
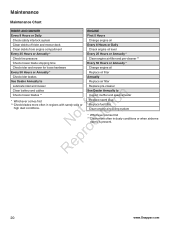
...Every 25 Hours or Annually * Every 25 Hours or Annually * Check tire pressure Clean engine air filter and pre-cleaner ** Check mower blade stopping time Every 50 Hours or Annually * Check rider and mower for loose hardware Change engine oil Every 50 Hours or Annually * Replace...conditions or when airborne debris is present. 20 www.Snapper.com See Dealer Annually to Replace air filter Lubricate rider and mower Replace pre-cleaner Clean battery and cables Check mower blades ** r n * Whichever comes first fo tio ** Check blades more often in regions with sandy soils or RNeoptroduc...
...Every 25 Hours or Annually * Every 25 Hours or Annually * Check tire pressure Clean engine air filter and pre-cleaner ** Check mower blade stopping time Every 50 Hours or Annually * Check rider and mower for loose hardware Change engine oil Every 50 Hours or Annually * Replace...conditions or when airborne debris is present. 20 www.Snapper.com See Dealer Annually to Replace air filter Lubricate rider and mower Replace pre-cleaner Clean battery and cables Check mower blades ** r n * Whichever comes first fo tio ** Check blades more often in regions with sandy soils or RNeoptroduc...
Operater's Manual
Page 22
... bystanders. Maintenance Washing the Mower Deck The washout port allows you store your unit for several minutes before use. WARNING Before running and the blades are engaged, the person cleaning the mower must be in the engine owner's manual. • Allow the engine to an ignition source (..., poorly ventilated structure. When the mower is also toxic to the washout port (C) on the mower deck. Mower Deck Washout Port 22 www.Snapper.com Disengage the PTO, lock the ground speed levers into cotact with fuel) in a cool, dry place and fully charged about once a month...
... bystanders. Maintenance Washing the Mower Deck The washout port allows you store your unit for several minutes before use. WARNING Before running and the blades are engaged, the person cleaning the mower must be in the engine owner's manual. • Allow the engine to an ignition source (..., poorly ventilated structure. When the mower is also toxic to the washout port (C) on the mower deck. Mower Deck Washout Port 22 www.Snapper.com Disengage the PTO, lock the ground speed levers into cotact with fuel) in a cool, dry place and fully charged about once a month...
Operater's Manual
Page 26
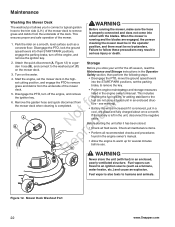
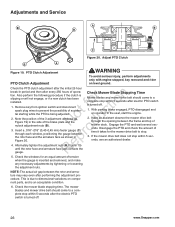
... PTO clutch adjustment after the initial 25 hour break-in the side of operation. Check the mower blade stopping time. Also perform the following procedure if the clutch is turned off . 26 www.Snapper.com Insert a .016"-.018" (0,40-0,45 mm) feeler gauge (C) r through the opening between... the rotor face and the armature face as shown in the seat, start the engine. 2. Adjust PTO Clutch B A Figure 19. Check Mower Blade Stopping Time Mower blades and mower drive belt...
... PTO clutch adjustment after the initial 25 hour break-in the side of operation. Check the mower blade stopping time. Also perform the following procedure if the clutch is turned off . 26 www.Snapper.com Insert a .016"-.018" (0,40-0,45 mm) feeler gauge (C) r through the opening between... the rotor face and the armature face as shown in the seat, start the engine. 2. Adjust PTO Clutch B A Figure 19. Check Mower Blade Stopping Time Mower blades and mower drive belt...
Operater's Manual
Page 27
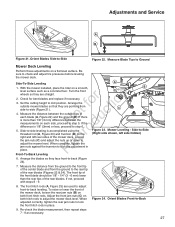
... p the jam nuts (C) and adjust the nuts up or down to lock the adjustment in place. To raise or lower the front of the rear blades. Adjust the front jam nuts (C) on both hitch rods to -side leveling is more than the rear tips of the mower deck, loosen the rear... to check and adjust tire pressures before leveling the mower deck. t c 4. Measure the distance from the ground to the front tip of the center blade and from side-to step 5. Orient Blades Side-to -back (Figure 24). 7. With the mower installed, place the rider on a flat level surface. fo tio 3. Arrange the...
... p the jam nuts (C) and adjust the nuts up or down to lock the adjustment in place. To raise or lower the front of the rear blades. Adjust the front jam nuts (C) on both hitch rods to -side leveling is more than the rear tips of the mower deck, loosen the rear... to check and adjust tire pressures before leveling the mower deck. t c 4. Measure the distance from the ground to the front tip of the center blade and from side-to step 5. Orient Blades Side-to -back (Figure 24). 7. With the mower installed, place the rider on a flat level surface. fo tio 3. Arrange the...

Operater's Manual
Page 28
... up toward the mower deck as shown in serious injury. 28 www.Snapper.com Mower Leveling - Front-to 50-60 ft-lbs (68-81 Nm). A N d balanced blade will remain level. 6. Remove the bolt (C), blade washer (B), and blade. 4. Blade Installation WARNING For your personal safety, blade mounting hardware must be installed with bare hands. Adjustments and Service...
... up toward the mower deck as shown in serious injury. 28 www.Snapper.com Mower Leveling - Front-to 50-60 ft-lbs (68-81 Nm). A N d balanced blade will remain level. 6. Remove the bolt (C), blade washer (B), and blade. 4. Blade Installation WARNING For your personal safety, blade mounting hardware must be installed with bare hands. Adjustments and Service...
Operater's Manual
Page 29
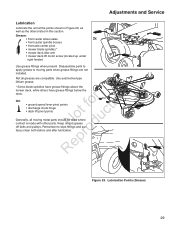
Grease: • front caster wheel axles 2x • front caster spindle bosses • front axle center pivot • mower blade spindles * • mower deck idler arm • mower deck lift motor screw (located up under 2x right fender) Use grease fittings when ...present. Not all moving parts when grease fittings are compatible. Use automotive-type lithium grease. * Some blade spindles have grease fittings below the deck. Figure 29. Keep oil and grease N d off belts and pulleys. Disassemble parts to apply grease to ...
Grease: • front caster wheel axles 2x • front caster spindle bosses • front axle center pivot • mower blade spindles * • mower deck idler arm • mower deck lift motor screw (located up under 2x right fender) Use grease fittings when ...present. Not all moving parts when grease fittings are compatible. Use automotive-type lithium grease. * Some blade spindles have grease fittings below the deck. Figure 29. Keep oil and grease N d off belts and pulleys. Disassemble parts to apply grease to ...
Operater's Manual
Page 32
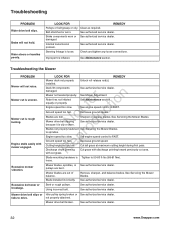
...o to FAST. Mower blades are dull. See authorized...blades. See authorized service dealer. r Engine speed too slow. Set engine speed control to spindles. Blade mounting hardware is uneven. Blade...Blades are out of balance. Cutting height set too low. Mower blades, spindles, or pulleys are bent. Remove, sharpen, and balance blades...See Maintenance section. Blades not properly fastened See Servicing the Mower Blades. r n ...See Servicing the Mower Blades. Cut grass with discharge... fast. See Servicing the Mower Blades. Rider steers or handles poorly....
...o to FAST. Mower blades are dull. See authorized...blades. See authorized service dealer. r Engine speed too slow. Set engine speed control to spindles. Blade mounting hardware is uneven. Blade...Blades are out of balance. Cutting height set too low. Mower blades, spindles, or pulleys are bent. Remove, sharpen, and balance blades...See Maintenance section. Blades not properly fastened See Servicing the Mower Blades. r n ...See Servicing the Mower Blades. Cut grass with discharge... fast. See Servicing the Mower Blades. Rider steers or handles poorly....


