Operater's Manual
Page 2
....Snapper.com fication numbers, and engine serial numbers in the SNAPPER brand. When operated and maintained according to the engine owner's manual. This manual contains safety information to start or operate this equipment. Engine Make ENGINE REFERENCE DATA Engine Model Engine Type/Spec Engine Code/Serial Number SNAPPER is not intended for easy access. Save these instructions thoroughly before attempting to make you MUST have o these numbers. These numbers can be found r in this quality-built SNAPPER mower. It...
....Snapper.com fication numbers, and engine serial numbers in the SNAPPER brand. When operated and maintained according to the engine owner's manual. This manual contains safety information to start or operate this equipment. Engine Make ENGINE REFERENCE DATA Engine Model Engine Type/Spec Engine Code/Serial Number SNAPPER is not intended for easy access. Save these instructions thoroughly before attempting to make you MUST have o these numbers. These numbers can be found r in this quality-built SNAPPER mower. It...
Operater's Manual
Page 3
...Seat Adjustments 23 Control Functions 13 Ground Speed Lever Adjustment 23 Operation 15 Speed Balancing Adjustment 23 General Operating Safety 15 Cutting Height Adjustment 24 Checks Before Starting 15 Mower Removal and Installation 24 Starting the Engine 16 PTO Clutch Adjustment 26 Stopping the Rider and Engine 16 Check Mower Blade Stoppping Time 26 Mowing 16 Mower Deck Leveling 27 Pushing the Rider by Hand 16 Servicing the Mower Blades 28 Zero Turn Driving Practice 17 Lubrication 29 Attaching a Trailer 19 Cleaning the Battery and Cables 30 Maintenance...
...Seat Adjustments 23 Control Functions 13 Ground Speed Lever Adjustment 23 Operation 15 Speed Balancing Adjustment 23 General Operating Safety 15 Cutting Height Adjustment 24 Checks Before Starting 15 Mower Removal and Installation 24 Starting the Engine 16 PTO Clutch Adjustment 26 Stopping the Rider and Engine 16 Check Mower Blade Stoppping Time 26 Mowing 16 Mower Deck Leveling 27 Pushing the Rider by Hand 16 Servicing the Mower Blades 28 Zero Turn Driving Practice 17 Lubrication 29 Attaching a Trailer 19 Cleaning the Battery and Cables 30 Maintenance...
Operater's Manual
Page 5
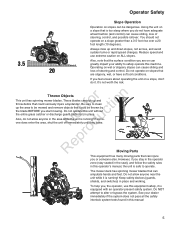
... entire grass catcher or discharge guard (deflector) in place and working. These blades can cause sliding, loss of steering and control. Do NOT attempt to operate. o u Also, do not allow anyone in this equipment safely, it is running ! Keep safety devices (guards, shields, and switches) in place. Operator Safety 3.5 20 Slope Operation Operation on slopes can cause sliding and loss of steering, control, and possible rollover. The mower deck has spinning mower blades...
... entire grass catcher or discharge guard (deflector) in place and working. These blades can cause sliding, loss of steering and control. Do NOT attempt to operate. o u Also, do not allow anyone in this equipment safely, it is running ! Keep safety devices (guards, shields, and switches) in place. Operator Safety 3.5 20 Slope Operation Operation on slopes can cause sliding and loss of steering, control, and possible rollover. The mower deck has spinning mower blades...
Operater's Manual
Page 7
... ride on machine, attachments or towed equipment (even with the blade OFF). engine running. Tall grass can hide obstacles. fo tio 5. STOP BLADES. DO NOT operate machine on slopes even though the brakes are flammable and 2. Chose a low enough speed setting so that can cause injury and damage! Know the controls and the proper use of the machine before and while backing. 7. Add fuel...
... ride on machine, attachments or towed equipment (even with the blade OFF). engine running. Tall grass can hide obstacles. fo tio 5. STOP BLADES. DO NOT operate machine on slopes even though the brakes are flammable and 2. Chose a low enough speed setting so that can cause injury and damage! Know the controls and the proper use of the machine before and while backing. 7. Add fuel...

Operater's Manual
Page 8
... fueling is set. 8 www.Snapper.com Protect yourself when mowing and wear safety glass- 8. Air Index information on a truck or trailer bed with engine running . Slow down before filling. t c 1. Allow the engine to maintain control during speed and directional changes. 14. Only use accessories approved by blade or interfere with with the engine N d running . Keep people and pets out of discharge opening at all objects before refueling. 4. Check shields, deflectors, switches, blade controls Set blades...
... fueling is set. 8 www.Snapper.com Protect yourself when mowing and wear safety glass- 8. Air Index information on a truck or trailer bed with engine running . Slow down before filling. t c 1. Allow the engine to maintain control during speed and directional changes. 14. Only use accessories approved by blade or interfere with with the engine N d running . Keep people and pets out of discharge opening at all objects before refueling. 4. Check shields, deflectors, switches, blade controls Set blades...
Operater's Manual
Page 9
.... Remove spark plug wire(s) from spark plug(s) and secure wire(s) away from open flame, spark or pilot light overspeed engine. adjust, repair or replace as in a water heater, furnace, clothes dryer or 11. Keep all cotter pins are sharp and can cut. N rod WARNING Grass Catcher bags used on slopes. 7. WARNING Engine exhaust, some models. DO NOT attach towed equipment except at least once a year and have the dealer install any new safety devices. 15. engine...
.... Remove spark plug wire(s) from spark plug(s) and secure wire(s) away from open flame, spark or pilot light overspeed engine. adjust, repair or replace as in a water heater, furnace, clothes dryer or 11. Keep all cotter pins are sharp and can cut. N rod WARNING Grass Catcher bags used on slopes. 7. WARNING Engine exhaust, some models. DO NOT attach towed equipment except at least once a year and have the dealer install any new safety devices. 15. engine...

Operater's Manual
Page 12
... a complete stop within five seconds after the electric PTO switch is engaged, AND • Ground speed levers are not locked in their START/ PARK positions. Part No. 7104226 Decal, Ground Speed Lever, R.H. ENGINE SHOULD SHUT OFF IF: for tion 7104232 t c Decal, Control Panel, o u L.H. CHECK MOWER BLADE STOPPING TIME The mower blades and mower drive belt should come to bypass or tamper with a Safety Interlock System. Part No. 7104231 If the unit does not...
... a complete stop within five seconds after the electric PTO switch is engaged, AND • Ground speed levers are not locked in their START/ PARK positions. Part No. 7104226 Decal, Ground Speed Lever, R.H. ENGINE SHOULD SHUT OFF IF: for tion 7104232 t c Decal, Control Panel, o u L.H. CHECK MOWER BLADE STOPPING TIME The mower blades and mower drive belt should come to bypass or tamper with a Safety Interlock System. Part No. 7104231 If the unit does not...
Operater's Manual
Page 14
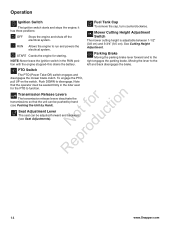
...Seat Adjustments). 14 www.Snapper.com See Cutting Height Adjustment. Parking Brake Moving the parking brake lever forward and to run and powers the electrical system. PTO Switch The PTO (Power Take-Off) switch engages and disengages the mower blade clutch. Operation Ignition Switch The ignition switch starts and stops the engine; Fuel Tank Cap To remove the cap, turn counterclockwise. Push DOWN to the left and back disengages the brake. To engage the PTO, pull UP on the switch. Moving the lever to disengage. Mower Cutting Height Adjustment Switch The mower cutting...
...Seat Adjustments). 14 www.Snapper.com See Cutting Height Adjustment. Parking Brake Moving the parking brake lever forward and to run and powers the electrical system. PTO Switch The PTO (Power Take-Off) switch engages and disengages the mower blade clutch. Operation Ignition Switch The ignition switch starts and stops the engine; Fuel Tank Cap To remove the cap, turn counterclockwise. Push DOWN to the left and back disengages the brake. To engage the PTO, pull UP on the switch. Moving the lever to disengage. Mower Cutting Height Adjustment Switch The mower cutting...
Operater's Manual
Page 15
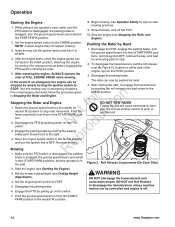
... fuel tank (C) with the location and function of this rider. Refer to operate the rider without mowing to become accustomed to ride on a trailer or handled with a rear-mounted grass catcher. Do NOT attempt to the engine owner's manual for instructions and oil recommendations. • Make sure all nuts, bolts, screws and pins are in the N d START/PARK position, engage the parking brake, disengage the PTO, stop the engine and remove o the key. Never fill the tank...
... fuel tank (C) with the location and function of this rider. Refer to operate the rider without mowing to become accustomed to ride on a trailer or handled with a rear-mounted grass catcher. Do NOT attempt to the engine owner's manual for instructions and oil recommendations. • Make sure all nuts, bolts, screws and pins are in the N d START/PARK position, engage the parking brake, disengage the PTO, stop the engine and remove o the key. Never fill the tank...
Operater's Manual
Page 16
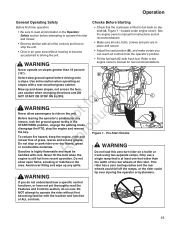
... Operator Safety for all moving parts to disengage the transmissions unless machine motion can now be controlled and engine is engaged, the ground speed levers are locked in their START/PARK positions, turn the ignition key to the CHOKE position. Warm up into their START/PARK positions, and the operator is disengaged, the parking by running it to the DRIVE position. For normal engine shut down to START. 1. e Mowing R 1. Set the mower cutting height (see Cutting Height Adjustment). 4. for at FULL ENGINE SPEED when mowing. 3. Engage the parking brake...
... Operator Safety for all moving parts to disengage the transmissions unless machine motion can now be controlled and engine is engaged, the ground speed levers are locked in their START/PARK positions, turn the ignition key to the CHOKE position. Warm up into their START/PARK positions, and the operator is disengaged, the parking by running it to the DRIVE position. For normal engine shut down to START. 1. e Mowing R 1. Set the mower cutting height (see Cutting Height Adjustment). 4. for at FULL ENGINE SPEED when mowing. 3. Engage the parking brake...
Operater's Manual
Page 20
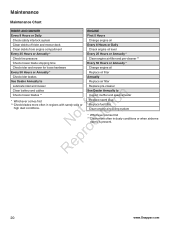
... Daily Clean debris from engine compartment Check engine oil level Every 25 Hours or Annually * Every 25 Hours or Annually * Check tire pressure Clean engine air filter and pre-cleaner ** Check mower blade stopping time Every 50 Hours or Annually * Check rider and mower for loose hardware Change engine oil Every 50 Hours or Annually * Replace oil filter Check rider brakes Annually See Dealer Annually to Inspect muffler and spark arrester Replace spark plug Replace fuel filter Clean engine air cooling system * Whichever comes...
... Daily Clean debris from engine compartment Check engine oil level Every 25 Hours or Annually * Every 25 Hours or Annually * Check tire pressure Clean engine air filter and pre-cleaner ** Check mower blade stopping time Every 50 Hours or Annually * Check rider and mower for loose hardware Change engine oil Every 50 Hours or Annually * Replace oil filter Check rider brakes Annually See Dealer Annually to Inspect muffler and spark arrester Replace spark plug Replace fuel filter Clean engine air cooling system * Whichever comes...
Operater's Manual
Page 22
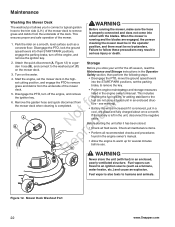
... will be no bystanders. Start the engine, set the parking brake, & remove the key. ot c A N du B ReproWARNING C • Perform engine maintenance and storage measures listed in the unit, disconnect the negative cable. This ensures proper and safe operation of the mower. 1. Disengage the PTO, turn off -season, read the Maintenance and Storage instructions in the engine owner's manual. • Allow the engine to humans and animals. This includes draining the fuel system, or adding...
... will be no bystanders. Start the engine, set the parking brake, & remove the key. ot c A N du B ReproWARNING C • Perform engine maintenance and storage measures listed in the unit, disconnect the negative cable. This ensures proper and safe operation of the mower. 1. Disengage the PTO, turn off -season, read the Maintenance and Storage instructions in the engine owner's manual. • Allow the engine to humans and animals. This includes draining the fuel system, or adding...
Operater's Manual
Page 24
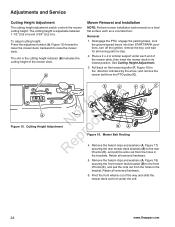
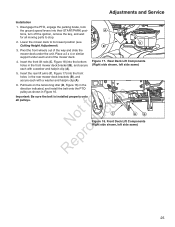
... the PTO pulley (C). The cutting height is adjustable between 1-1/2" (3,8 cm) and 3-3/4" (9,5 cm). A Figure 15. B Mower Removal and Installation NOTE: Perform mower installation and removal on the tensioning idler (F, Figure 16) in the cutting height indicator (B) indicates the cutting height of the mower deck, then lower the mower deck to the rear R lift arms (C), and pull the arms out from the holes in the bracket. Disengage the PTO, engage the parking brake, lock the ground speed levers into their START/PARK positions, turn off the ignition, remove the key...
... the PTO pulley (C). The cutting height is adjustable between 1-1/2" (3,8 cm) and 3-3/4" (9,5 cm). A Figure 15. B Mower Removal and Installation NOTE: Perform mower installation and removal on the tensioning idler (F, Figure 16) in the cutting height indicator (B) indicates the cutting height of the mower deck, then lower the mower deck to the rear R lift arms (C), and pull the arms out from the holes in the bracket. Disengage the PTO, engage the parking brake, lock the ground speed levers into their START/PARK positions, turn off the ignition, remove the key...
Operater's Manual
Page 25
... the front wheels out of the mower deck. 4. Front Deck Lift Components RNeprodRight side shown, left side same) 5. r n Important: Be sure the belt is installed properly onto all moving parts to its lowest position (see C Cutting Height Adjustment). Rear Deck Lift Components (Right side shown, left side same) 25 Disengage the PTO, engage the parking brake, lock the ground speed levers into their START/PARK posi- A tions, turn off the ignition, remove the key, and...
... the front wheels out of the mower deck. 4. Front Deck Lift Components RNeprodRight side shown, left side same) 5. r n Important: Be sure the belt is installed properly onto all moving parts to its lowest position (see C Cutting Height Adjustment). Rear Deck Lift Components (Right side shown, left side same) 25 Disengage the PTO, engage the parking brake, lock the ground speed levers into their START/PARK posi- A tions, turn off the ignition, remove the key, and...
Operater's Manual
Page 26
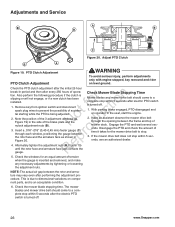
... adjustments only with engine stopped, key removed and rider on component parts, and is r n slipping or will not engage, or if a new clutch has been installed. e 4. Alternately tighten the adjustment nuts (B, Figure 19) until the rotor face and armature face just contacts the R gauge. Remove key from ignition switch and disconnect spark plug wires to prevent the possibility of tension when the gauge is turned off . 1. o 3. Check Mower Blade Stopping Time Mower blades and mower drive belt...
... adjustments only with engine stopped, key removed and rider on component parts, and is r n slipping or will not engage, or if a new clutch has been installed. e 4. Alternately tighten the adjustment nuts (B, Figure 19) until the rotor face and armature face just contacts the R gauge. Remove key from ignition switch and disconnect spark plug wires to prevent the possibility of tension when the gauge is turned off . 1. o 3. Check Mower Blade Stopping Time Mower blades and mower drive belt...
Operater's Manual
Page 27
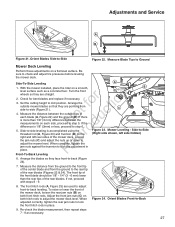
.... Orient Blades Front-to check and adjust tire pressures before leveling the mower deck. With the mower installed, place the rider on each blade (A, Figure 22) and the ground (B). Side-To-Side Leveling A 1. Side-to-Side (Right side shown, left rear sides of each side, proceed to lock the front hitch rods in place. When adjusted correctly, tighten the rear jam nuts to step 5. Turn the front wheels so they...
.... Orient Blades Front-to check and adjust tire pressures before leveling the mower deck. With the mower installed, place the rider on each blade (A, Figure 22) and the ground (B). Side-To-Side Leveling A 1. Side-to-Side (Right side shown, left rear sides of each side, proceed to lock the front hitch rods in place. When adjusted correctly, tighten the rear jam nuts to step 5. Turn the front wheels so they...

Operater's Manual
Page 28
... safety, do not handle the sharp mower blades with a drop of oil. Adjustments and Service C C B B A A LOOSEN Figure 25. Blade Removal Servicing the Mower Blades 1. Use a file to sharpen blade to 50-60 ft-lbs (68-81 Nm). Reinstall the blade washer (B, Figure 28), concave p side up toward the mower deck as shown in serious injury. 28 www.Snapper.com Front-to prevent blade rotation while tightening the hardware. Mower Leveling - Figure 28. Blade Installation...
... safety, do not handle the sharp mower blades with a drop of oil. Adjustments and Service C C B B A A LOOSEN Figure 25. Blade Removal Servicing the Mower Blades 1. Use a file to sharpen blade to 50-60 ft-lbs (68-81 Nm). Reinstall the blade washer (B, Figure 28), concave p side up toward the mower deck as shown in serious injury. 28 www.Snapper.com Front-to prevent blade rotation while tightening the hardware. Mower Leveling - Figure 28. Blade Installation...
Operater's Manual
Page 30
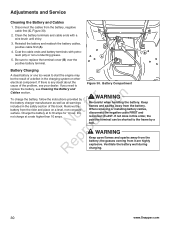
... charging. 30 www.Snapper.com Battery Compartment replace the battery, see your dealer. Be careful when handling the battery. B leum jelly or non-conducting grease. Keep flames and sparks away from the battery. When removing or installing battery cables, disconnect the negative cable FIRST and reconnect it are highly explosive. Clean the battery terminals and cable ends with petro- Reinstall the battery and reattach the battery cables, positive cable first (A). 4. A 5. If you need...
... charging. 30 www.Snapper.com Battery Compartment replace the battery, see your dealer. Be careful when handling the battery. B leum jelly or non-conducting grease. Keep flames and sparks away from the battery. When removing or installing battery cables, disconnect the negative cable FIRST and reconnect it are highly explosive. Clean the battery terminals and cable ends with petro- Reinstall the battery and reattach the battery cables, positive cable first (A). 4. A 5. If you need...
Operater's Manual
Page 31
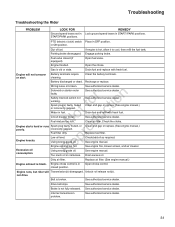
... refill the fuel tank. See authorized service dealer. Troubleshooting Troubleshooting the Rider PROBLEM LOOK FOR Ground speed levers not in crankcase. If engine is not fully released. Engage parking brake. r n Safety interlock switch not working. Low oil level. Engine running too hot. Clean air filter. Clean and gap or replace. (See engine manual.) Replace fuel filter. See engine manual. Too much oil in START/PARK positions. Drain excess oil. Open choke control. Unlock roll release rod(s). Drive belt slips. Engine flooded. Open fuel valve. Recharge or replace. See authorized...
... refill the fuel tank. See authorized service dealer. Troubleshooting Troubleshooting the Rider PROBLEM LOOK FOR Ground speed levers not in crankcase. If engine is not fully released. Engage parking brake. r n Safety interlock switch not working. Low oil level. Engine running too hot. Clean air filter. Clean and gap or replace. (See engine manual.) Replace fuel filter. See engine manual. Too much oil in START/PARK positions. Drain excess oil. Open choke control. Unlock roll release rod(s). Drive belt slips. Engine flooded. Open fuel valve. Recharge or replace. See authorized...
Operater's Manual
Page 32
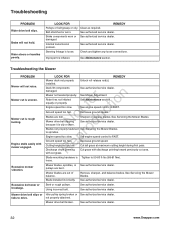
... FOR REMEDY Mower deck not properly installed. p Ground speed too fast. e Discharge chute jamming R with mower engaged. Excessive mower vibration. Mower blades, spindles, or pulleys are bent. Decrease ground speed. Cutting height set too low. Mower drive belt slips or fails to spindles. Engine stalls easily with cut area. t Ground speed too fast. Remove, sharpen, and balance blades. See Servicing the Mower Blades. Bent or rough pulleys. Check and tighten any loose connections. See Maintenance section. Mower not leveled properly. Cut tall grass at maximum...
... FOR REMEDY Mower deck not properly installed. p Ground speed too fast. e Discharge chute jamming R with mower engaged. Excessive mower vibration. Mower blades, spindles, or pulleys are bent. Decrease ground speed. Cutting height set too low. Mower drive belt slips or fails to spindles. Engine stalls easily with cut area. t Ground speed too fast. Remove, sharpen, and balance blades. See Servicing the Mower Blades. Bent or rough pulleys. Check and tighten any loose connections. See Maintenance section. Mower not leveled properly. Cut tall grass at maximum...


