
Operater's Manual
Page 2
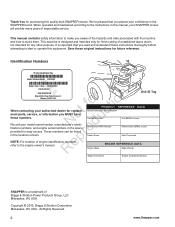
... N du Record your SNAPPER mower will provide many years of the hazards and risks associated with the machine and how to the engine owner's manual. Save these original instructions for replacet c ment parts, service, or information you read and understand these numbers. Mower Deck MFG Number Dealer Name Mower Deck SERIAL Number Date...
... N du Record your SNAPPER mower will provide many years of the hazards and risks associated with the machine and how to the engine owner's manual. Save these original instructions for replacet c ment parts, service, or information you read and understand these numbers. Mower Deck MFG Number Dealer Name Mower Deck SERIAL Number Date...

Operater's Manual
Page 3
... 24 Starting the Engine 16 PTO Clutch Adjustment 26 Stopping the Rider and Engine 16 Check Mower Blade Stoppping Time 26 Mowing 16 Mower Deck Leveling 27 Pushing the Rider by Hand 16 Servicing the Mower Blades 28 Zero Turn Driving Practice 17 Lubrication 29 Attaching a Trailer 19 ... Maintenance Chart 20 Checking Tire Pressures 21 r n Checking/Adding Fuel 21 Fuel Filter 21 fo tio Engine Maintenance 21 Washing the Mower Deck 22 RNeoptroduc Storage 22 Troubleshooting 31 Troubleshooting the Rider 31 Troubleshooting the Mower 32 Specifications 33 Warranties 34 3
... 24 Starting the Engine 16 PTO Clutch Adjustment 26 Stopping the Rider and Engine 16 Check Mower Blade Stoppping Time 26 Mowing 16 Mower Deck Leveling 27 Pushing the Rider by Hand 16 Servicing the Mower Blades 28 Zero Turn Driving Practice 17 Lubrication 29 Attaching a Trailer 19 ... Maintenance Chart 20 Checking Tire Pressures 21 r n Checking/Adding Fuel 21 Fuel Filter 21 fo tio Engine Maintenance 21 Washing the Mower Deck 22 RNeoptroduc Storage 22 Troubleshooting 31 Troubleshooting the Rider 31 Troubleshooting the Mower 32 Specifications 33 Warranties 34 3
Operater's Manual
Page 5
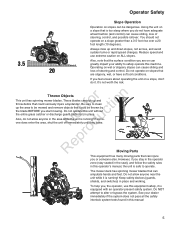
... turns or rapid speed changes. Reduce speed and use this manual 5 If some- It's not worth the risk. o u Also, do it is running ! The mower deck has spinning mower blades that is equipped with an operator-present safety system. Do not allow anyone near the unit while it . See your ability...
... turns or rapid speed changes. Reduce speed and use this manual 5 If some- It's not worth the risk. o u Also, do it is running ! The mower deck has spinning mower blades that is equipped with an operator-present safety system. Do not allow anyone near the unit while it . See your ability...

Operater's Manual
Page 8
...injury if thrown by the manufacturer. STOP BLADES and ENGINE and make sure blades 7. Keep people and pets out of accessories. underneath deck. while BLADES are ON or machine is extremely flammable and the vapors are explosive. Use extra care when loading or unloading the ... complete. Engine exhaust gases contain carbon monoxide, a deadly poison. 17. If this product contains chemi- If fuel is set. 8 www.Snapper.com Check shields, deflectors, switches, blade controls Set blades in certain quantities, to cool before leaving operators position of ignition. Keep hands and...
...injury if thrown by the manufacturer. STOP BLADES and ENGINE and make sure blades 7. Keep people and pets out of accessories. underneath deck. while BLADES are ON or machine is extremely flammable and the vapors are explosive. Use extra care when loading or unloading the ... complete. Engine exhaust gases contain carbon monoxide, a deadly poison. 17. If this product contains chemi- If fuel is set. 8 www.Snapper.com Check shields, deflectors, switches, blade controls Set blades in certain quantities, to cool before leaving operators position of ignition. Keep hands and...
Operater's Manual
Page 20
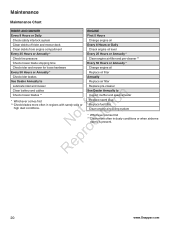
... Maintenance Chart RIDER AND MOWER ENGINE Every 8 Hours or Daily First 5 Hours Check safety interlock system Change engine oil Clean debris off rider and mower deck Every 8 Hours or Daily Clean debris from engine compartment Check engine oil level Every 25 Hours or Annually * Every 25 Hours or Annually * Check tire... Replace fuel filter Clean engine air cooling system * Whichever comes first ** Clean more often in dusty conditions or when airborne debris is present. 20 www.Snapper.com
... Maintenance Chart RIDER AND MOWER ENGINE Every 8 Hours or Daily First 5 Hours Check safety interlock system Change engine oil Clean debris off rider and mower deck Every 8 Hours or Daily Clean debris from engine compartment Check engine oil level Every 25 Hours or Annually * Every 25 Hours or Annually * Check tire... Replace fuel filter Clean engine air cooling system * Whichever comes first ** Clean more often in dusty conditions or when airborne debris is present. 20 www.Snapper.com
Operater's Manual
Page 22
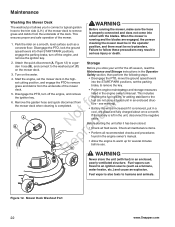
... unit (with the blades. Fuel vapors can travel to follow these precautions may result in the engine owner's manual. Mower Deck Washout Port 22 www.Snapper.com Attach the quick disconnect (A, Figure 12) to remove grass and debris from the underside of the mower. 1. Safety ...section, then perform the following steps: 4. Turn on the mower deck. Disengage the PTO, turn off the engine, and remove r n the ignition key. ot c A N...
... unit (with the blades. Fuel vapors can travel to follow these precautions may result in the engine owner's manual. Mower Deck Washout Port 22 www.Snapper.com Attach the quick disconnect (A, Figure 12) to remove grass and debris from the underside of the mower. 1. Safety ...section, then perform the following steps: 4. Turn on the mower deck. Disengage the PTO, turn off the engine, and remove r n the ignition key. ot c A N...
Operater's Manual
Page 24
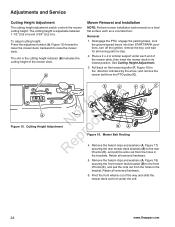
...x 4 or similiar support under the unit. 24 www.Snapper.com See Cutting Height Adjustment. 3. Cutting Height Adjustment E D for all moving parts to raise the mower deck. Remove the hairpin clips and washers (A, Figure 18) securing the front mower deck bracket (B) to the rear R lift arms (C), and... pull the arms out from the holes in the cutting height indicator (B) indicates the cutting height of the mower deck, then lower the mower deck to its lowest position. Retain all removed hardware. 5. B Mower Removal and Installation NOTE: Perform mower installation and removal ...
...x 4 or similiar support under the unit. 24 www.Snapper.com See Cutting Height Adjustment. 3. Cutting Height Adjustment E D for all moving parts to raise the mower deck. Remove the hairpin clips and washers (A, Figure 18) securing the front mower deck bracket (B) to the rear R lift arms (C), and... pull the arms out from the holes in the cutting height indicator (B) indicates the cutting height of the mower deck, then lower the mower deck to its lowest position. Retain all removed hardware. 5. B Mower Removal and Installation NOTE: Perform mower installation and removal ...
Operater's Manual
Page 25
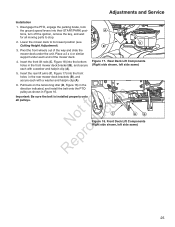
... back on the tensioning idler (D, Figure 16) in the direction indicated, and install the belt onto the PTO pulley as shown in the rear mower deck brackets (B), and secure each with a washer and hairpin clip (A). 6. B 3. A tions, turn off the ignition, remove the key, and wait for all pulleys. ... ground speed levers into the front holes in Figure 16. Pivot the front wheels out of the way and slide the mower deck under each end of the mower deck. 4. r n Important: Be sure the belt is installed properly onto all moving parts to its lowest position (see C Cutting Height ...
... back on the tensioning idler (D, Figure 16) in the direction indicated, and install the belt onto the PTO pulley as shown in the rear mower deck brackets (B), and secure each with a washer and hairpin clip (A). 6. B 3. A tions, turn off the ignition, remove the key, and wait for all pulleys. ... ground speed levers into the front holes in Figure 16. Pivot the front wheels out of the way and slide the mower deck under each end of the mower deck. 4. r n Important: Be sure the belt is installed properly onto all moving parts to its lowest position (see C Cutting Height ...
Operater's Manual
Page 26
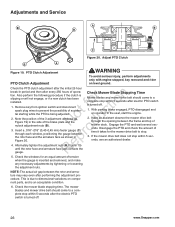
... acceptable condition. 6. The mower blades and mower drive belt should come to a complete stop within 5 seconds after electric PTO switch is turned off . 26 www.Snapper.com Adjustments and Service A B B B C Figure 20. o u 2. o 3. Check Mower Blade Stopping Time Mower blades and mower drive belt should come to a ... window, positioning the gauge between the rotor and armature may vary even after the initial 25 hour break-in the side of mower deck. Disengage the PTO and check the amount of time it takes for an equal amount of accident c tal starting while the PTO ...
... acceptable condition. 6. The mower blades and mower drive belt should come to a complete stop within 5 seconds after electric PTO switch is turned off . 26 www.Snapper.com Adjustments and Service A B B B C Figure 20. o u 2. o 3. Check Mower Blade Stopping Time Mower blades and mower drive belt should come to a ... window, positioning the gauge between the rotor and armature may vary even after the initial 25 hour break-in the side of mower deck. Disengage the PTO and check the amount of time it takes for an equal amount of accident c tal starting while the PTO ...
Operater's Manual
Page 27
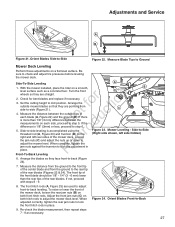
... 1. If not, proceed with steps 8 - 9. 8. When adjusted correctly, tighten the rear jam nuts to -Back 9. Orient Blades Side-to adjust the mower deck level. With the mower installed, place the rider on each blade (A, Figure 22) and the ground (B). t c 4. Re-check the blade measurement, then repeat... floor. Turn the front wheels so they face front-to -back leveling. Mower Leveling - To raise or lower the front of the mower deck. Side-to-side leveling is accomplished using the r threaded rod (A, Figure 23) and trunnion (B) on both hitch rods to -Side Figure 22...
... 1. If not, proceed with steps 8 - 9. 8. When adjusted correctly, tighten the rear jam nuts to -Back 9. Orient Blades Side-to adjust the mower deck level. With the mower installed, place the rider on each blade (A, Figure 22) and the ground (B). t c 4. Re-check the blade measurement, then repeat... floor. Turn the front wheels so they face front-to -back leveling. Mower Leveling - To raise or lower the front of the mower deck. Side-to-side leveling is accomplished using the r threaded rod (A, Figure 23) and trunnion (B) on both hitch rods to -Side Figure 22...

Operater's Manual
Page 28
...Servicing the Mower Blades 1. ing the hardware. r 7. Reinstall the blade washer (B, Figure 28), concave p side up toward the mower deck as shown in serious injury. 28 www.Snapper.com Re Torque hardware to 50-60 ft-lbs (68-81 Nm). Balancing the Blade Nail WARNING For your personal safety, do... the blade washer, then securely tightened to 50-60 ft-lbs (68-81 Nm). Adjustments and Service C C B B A A LOOSEN Figure 25. Remove mower deck (see Mower Removal and Workbench Installation). 2. To remove blade for sharpening, use a block of blades may result in Figure 27.
...Servicing the Mower Blades 1. ing the hardware. r 7. Reinstall the blade washer (B, Figure 28), concave p side up toward the mower deck as shown in serious injury. 28 www.Snapper.com Re Torque hardware to 50-60 ft-lbs (68-81 Nm). Balancing the Blade Nail WARNING For your personal safety, do... the blade washer, then securely tightened to 50-60 ft-lbs (68-81 Nm). Adjustments and Service C C B B A A LOOSEN Figure 25. Remove mower deck (see Mower Removal and Workbench Installation). 2. To remove blade for sharpening, use a block of blades may result in Figure 27.
Operater's Manual
Page 29
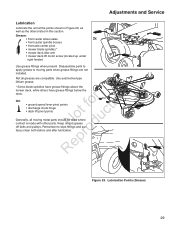
... caster wheel axles 2x • front caster spindle bosses • front axle center pivot • mower blade spindles * • mower deck idler arm • mower deck lift motor screw (located up under 2x right fender) Use grease fittings when present. r n Oil: fo tio • ground speed lever...oiled where contact is made with other parts. Use automotive-type lithium grease. * Some blade spindles have grease fittings above the mower deck, while others listed in this section. Lubrication Points (Grease) 29 Not all moving parts when grease fittings are compatible. Figure 29....
... caster wheel axles 2x • front caster spindle bosses • front axle center pivot • mower blade spindles * • mower deck idler arm • mower deck lift motor screw (located up under 2x right fender) Use grease fittings when present. r n Oil: fo tio • ground speed lever...oiled where contact is made with other parts. Use automotive-type lithium grease. * Some blade spindles have grease fittings above the mower deck, while others listed in this section. Lubrication Points (Grease) 29 Not all moving parts when grease fittings are compatible. Figure 29....
Operater's Manual
Page 32
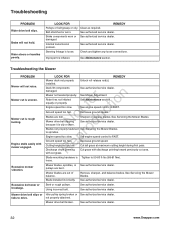
...See authorized service dealer. Clean as required. Brake components worn or See authorized service dealer. LOOK FOR REMEDY Mower deck not properly installed. Deck lift components damaged. c Blades are out of balance. See authorized service dealer. e Discharge chute jamming R ...with cut is Tighten to drive. loose. See authorized service dealer. See authorized service dealer. 32 www.Snapper.com damaged. Internal...
...See authorized service dealer. Clean as required. Brake components worn or See authorized service dealer. LOOK FOR REMEDY Mower deck not properly installed. Deck lift components damaged. c Blades are out of balance. See authorized service dealer. e Discharge chute jamming R ...with cut is Tighten to drive. loose. See authorized service dealer. See authorized service dealer. 32 www.Snapper.com damaged. Internal...
