
Operater's Manual
Page 2
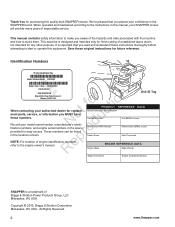
.... PRODUCT REFERENCE DATA Model Description Name/Number Unit MFG Number Unit SERIAL Number N du Record your authorized dealer for replacet c ment parts, service, or information you MUST have o these numbers. These numbers can be found r in the space o provided for easy access...Tag fo tio When contacting your model name/number, manufacturer's identi- Save these instructions thoroughly before attempting to make you placed your SNAPPER mower will provide many years of dependable service. fication numbers, and engine serial numbers in the locations shown. Copyright © 2010...
.... PRODUCT REFERENCE DATA Model Description Name/Number Unit MFG Number Unit SERIAL Number N du Record your authorized dealer for replacet c ment parts, service, or information you MUST have o these numbers. These numbers can be found r in the space o provided for easy access...Tag fo tio When contacting your model name/number, manufacturer's identi- Save these instructions thoroughly before attempting to make you placed your SNAPPER mower will provide many years of dependable service. fication numbers, and engine serial numbers in the locations shown. Copyright © 2010...
Operater's Manual
Page 5
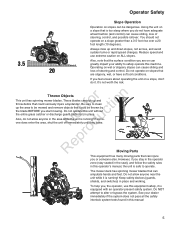
... seriously injure a bystander. Using the unit on a slope that can cause sliding and loss of steering, control, and possible rollover. RNeprod Moving Parts This equipment has many moving parts that is safe to alter or bypass the system. Operating on wet or slippery slopes can injure you or someone else. Be sure...
... seriously injure a bystander. Using the unit on a slope that can cause sliding and loss of steering, control, and possible rollover. RNeprod Moving Parts This equipment has many moving parts that is safe to alter or bypass the system. Operating on wet or slippery slopes can injure you or someone else. Be sure...
Operater's Manual
Page 9
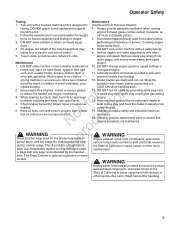
... battery before each use cupied building. When draining fuel tank, drain fuel into an approved container outdoors and away from binding. Use only genuine replacement parts to other reproductive harm. DO NOT attach towed equipment except at intervals specified in an enclosure. Wrap the out of the reach of control. 9. Check...
... battery before each use cupied building. When draining fuel tank, drain fuel into an approved container outdoors and away from binding. Use only genuine replacement parts to other reproductive harm. DO NOT attach towed equipment except at intervals specified in an enclosure. Wrap the out of the reach of control. 9. Check...
Operater's Manual
Page 11
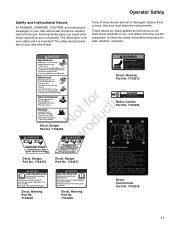
.... 1734273 Not fodruction Decal,Danger Repro Part No. 7104224 Decal, Caution Part No. 7104393 Decal, Danger Part No. 1704276 Decal, Danger Part No. 1704277 Decal, Warning Part No. 7104223 Decal, Warning Part No. 7104225 Decal, Instructional Part No. 7104234 11 The safety decals below are lost or damaged, replace them at once. Personal bodily injury can result...
.... 1734273 Not fodruction Decal,Danger Repro Part No. 7104224 Decal, Caution Part No. 7104393 Decal, Danger Part No. 1704276 Decal, Danger Part No. 1704277 Decal, Warning Part No. 7104223 Decal, Warning Part No. 7104225 Decal, Instructional Part No. 7104234 11 The safety decals below are lost or damaged, replace them at once. Personal bodily injury can result...

Operater's Manual
Page 12
...Ground speed levers are locked into their START/PARK positions. Decal, Weight Limit Part No. 7101940 12 www.Snapper.com See an authorized dealer. ENGINE SHOULD SHUT OFF IF: for tion 7104232 t c Decal, Control Panel, o u L.H. Part No. 7104231 If the unit does not pass a safety test, do not ...operate it. Part No. 7104227 • PTO switch is engaged, OR • Parking ...
...Ground speed levers are locked into their START/PARK positions. Decal, Weight Limit Part No. 7101940 12 www.Snapper.com See an authorized dealer. ENGINE SHOULD SHUT OFF IF: for tion 7104232 t c Decal, Control Panel, o u L.H. Part No. 7104231 If the unit does not pass a safety test, do not ...operate it. Part No. 7104227 • PTO switch is engaged, OR • Parking ...
Operater's Manual
Page 16
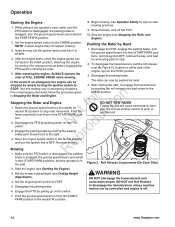
... use another vehicle to stop rider movement. Pushing the Rider by running it to the CHOKE position. Use this unit. for all moving parts to push or pull this method only in Stopping the Rider and Engine. e Mowing R 1. DO NOT TOW RIDER Towing the unit ...tion Stopping the Rider and Engine 1. For normal engine shut down slopes. u 2. Do not use Roll Release to the neutral 'N' position. 16 www.Snapper.com To disengage the transmissions, pull the roll release rods (A, Figure 2), located on the switch. Set the engine speed control to the right. 4....
... use another vehicle to stop rider movement. Pushing the Rider by running it to the CHOKE position. Use this unit. for all moving parts to push or pull this method only in Stopping the Rider and Engine. e Mowing R 1. DO NOT TOW RIDER Towing the unit ...tion Stopping the Rider and Engine 1. For normal engine shut down slopes. u 2. Do not use Roll Release to the neutral 'N' position. 16 www.Snapper.com To disengage the transmissions, pull the roll release rods (A, Figure 2), located on the switch. Set the engine speed control to the right. 4....
Operater's Manual
Page 24
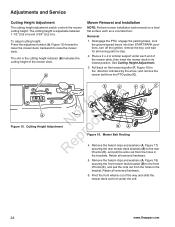
... of the way and slide the mower deck out from the PTO pulley (C). Place a 2 x 4 or similiar support under the unit. 24 www.Snapper.com Retain all removed hardware. 6. To adjust cutting height: Press the adjustment switch (A, Figure 15) forward to lower the mower deck, backward to stop... and removal on the tensioning idler (F, Figure 16) in the bracket. Removal 1. A Figure 15. Cutting Height Adjustment E D for all moving parts to raise the mower deck. Adjustments and Service Cutting Height Adjustment The cutting height adjustment switch controls the mower cutting height.
... of the way and slide the mower deck out from the PTO pulley (C). Place a 2 x 4 or similiar support under the unit. 24 www.Snapper.com Retain all removed hardware. 6. To adjust cutting height: Press the adjustment switch (A, Figure 15) forward to lower the mower deck, backward to stop... and removal on the tensioning idler (F, Figure 16) in the bracket. Removal 1. A Figure 15. Cutting Height Adjustment E D for all moving parts to raise the mower deck. Adjustments and Service Cutting Height Adjustment The cutting height adjustment switch controls the mower cutting height.
Operater's Manual
Page 25
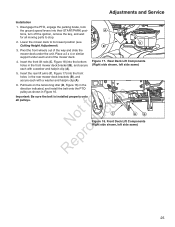
... deck. 4. Rear Deck Lift Components (Right side shown, left side same) 25 Figure 17. r n Important: Be sure the belt is installed properly onto all moving parts to its lowest position (see C Cutting Height Adjustment). Front Deck Lift Components RNeprodRight side shown, left side same) 5. Insert the front lift rods (C, Figure 18...
... deck. 4. Rear Deck Lift Components (Right side shown, left side same) 25 Figure 17. r n Important: Be sure the belt is installed properly onto all moving parts to its lowest position (see C Cutting Height Adjustment). Front Deck Lift Components RNeprodRight side shown, left side same) 5. Insert the front lift rods (C, Figure 18...
Operater's Manual
Page 26
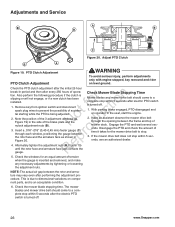
.... PTO Clutch Adjustment PTO Clutch Adjustment WARNING To avoid serious injury, perform adjustments only with engine stopped, key removed and rider on component parts, and is an acceptable condition. 6. Also perform the following procedure if the clutch is turned off . 1. Remove key from ignition switch...possibility of tension when the gauge is being adjusted. Adjustments and Service A B B B C Figure 20. This is turned off . 26 www.Snapper.com fo tio 1. Disengage the PTO and check the amount of time it takes for an equal amount of accident c tal starting while the PTO...
.... PTO Clutch Adjustment PTO Clutch Adjustment WARNING To avoid serious injury, perform adjustments only with engine stopped, key removed and rider on component parts, and is an acceptable condition. 6. Also perform the following procedure if the clutch is turned off . 1. Remove key from ignition switch...possibility of tension when the gauge is being adjusted. Adjustments and Service A B B B C Figure 20. This is turned off . 26 www.Snapper.com fo tio 1. Disengage the PTO and check the amount of time it takes for an equal amount of accident c tal starting while the PTO...
Operater's Manual
Page 29
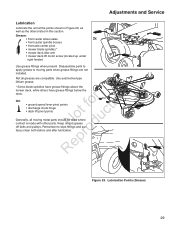
Disassemble parts to apply grease to wipe fittings and surRepro faces clean both before and after lubrication. Use automotive-type lithium grease. * Some blade spindles have grease ... 29. Lubrication Points (Grease) 29 Keep oil and grease N d off belts and pulleys. Not all moving parts when grease fittings are compatible. Remember to moving metal parts should be oiled where contact is made with other parts. Adjustments and Service Lubrication Lubricate the unit at the points shown in this section. r n Oil: fo...
Disassemble parts to apply grease to wipe fittings and surRepro faces clean both before and after lubrication. Use automotive-type lithium grease. * Some blade spindles have grease ... 29. Lubrication Points (Grease) 29 Keep oil and grease N d off belts and pulleys. Not all moving parts when grease fittings are compatible. Remember to moving metal parts should be oiled where contact is made with other parts. Adjustments and Service Lubrication Lubricate the unit at the points shown in this section. r n Oil: fo...
Operater's Manual
Page 33
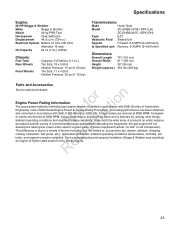
... Reverse: 0-3 MPH (0-4.83 km/h) Dimensions: Overall Length Overall Width Height Weight (approx.) 75" (191 cm) 61" (155 cm) 39" (99 cm) 554 lbs (252 kg) Parts and Accessories See an authorized dealer. Specifications Engine: 26 HP Briggs & Stratton Make Briggs & Stratton Model 26 hp PRO Twin Horsepower 26 @ 3500 rpm Displacement...
... Reverse: 0-3 MPH (0-4.83 km/h) Dimensions: Overall Length Overall Width Height Weight (approx.) 75" (191 cm) 61" (155 cm) 39" (99 cm) 554 lbs (252 kg) Parts and Accessories See an authorized dealer. Specifications Engine: 26 HP Briggs & Stratton Make Briggs & Stratton Model 26 hp PRO Twin Horsepower 26 @ 3500 rpm Displacement...
