Operater's Manual
Page 1
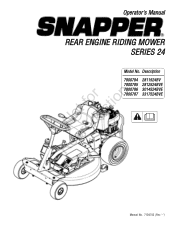
Manual No. 7104742 (Rev. '-') Description 7800784 2811524BV 7800785 2812524BVE 7800786 3014524BVE 7800787 3317524BVE RNeoptrfoodruction ! Operator's Manual REAR ENGINE RIDING MOWER SERIES 24 Model No.
Manual No. 7104742 (Rev. '-') Description 7800784 2811524BV 7800785 2812524BVE 7800786 3014524BVE 7800787 3317524BVE RNeoptrfoodruction ! Operator's Manual REAR ENGINE RIDING MOWER SERIES 24 Model No.
Operater's Manual
Page 2
...is a trademark of Purchase Retailer Retailer's Phone Number r n Equipment fo tio Model Number t c Serial Number o u Engine RNeprod Model Type Code SNAPPER is not intended for any other purpose. Save these instructions thoroughly before attempting to avoid them. It is important that you ...contains safety information to make you read and understand these original instructions for purchasing this quality-built Snapper product. Complete the following information on your Snapper product will provide many years of the hazards and risks associated with the machine and how to...
...is a trademark of Purchase Retailer Retailer's Phone Number r n Equipment fo tio Model Number t c Serial Number o u Engine RNeprod Model Type Code SNAPPER is not intended for any other purpose. Save these instructions thoroughly before attempting to avoid them. It is important that you ...contains safety information to make you read and understand these original instructions for purchasing this quality-built Snapper product. Complete the following information on your Snapper product will provide many years of the hazards and risks associated with the machine and how to...
Operater's Manual
Page 3
... Safety 4 Features and Controls 9 Operation 10 Before Starting 10 Operator Seat Adjustment 10 Starting Engine 11 Engaging Mower Blade 13 Engaging Wheel Drive 13 Stopping Engine, Wheel Drive, Blade 14 Setting Park Brake 15 Cutting Height Adjustment 15 Reverse Lockout Mechanism ...16 Maintenance 17 Maintenance Chart 17 r n General Maintenance 18 Storage 23 fo tio Engine Adjustments and Repairs 24 Mower Deck and Component Adjustments 24 Rear Engine Rider Drive Components 27 t c Mower Blade Replacement 28 o Mower Drive Belt Replacement 29 u Battery ...
... Safety 4 Features and Controls 9 Operation 10 Before Starting 10 Operator Seat Adjustment 10 Starting Engine 11 Engaging Mower Blade 13 Engaging Wheel Drive 13 Stopping Engine, Wheel Drive, Blade 14 Setting Park Brake 15 Cutting Height Adjustment 15 Reverse Lockout Mechanism ...16 Maintenance 17 Maintenance Chart 17 r n General Maintenance 18 Storage 23 fo tio Engine Adjustments and Repairs 24 Mower Deck and Component Adjustments 24 Rear Engine Rider Drive Components 27 t c Mower Blade Replacement 28 o Mower Drive Belt Replacement 29 u Battery ...
Operater's Manual
Page 4
... A SAFE DISTANCE (at the end of -control and tip- grade) when equipped with engine running. N d 7. DO NOT put your satisfaction, contact Customer Service (1-800-935-2967 or www.snapper.com). these instructions to operate machine. 6. Fuels are a major factor related to learn...8. If machine 5. Practice operation of the machine before and while backing. washouts, culverts, fences and protruding objects. 4 www.snapper.com WARNING: This powerful cutting machine is doubtful. 13. ro Protection against Tipovers Tragic accidents can result in . Always keep ...
... A SAFE DISTANCE (at the end of -control and tip- grade) when equipped with engine running. N d 7. DO NOT put your satisfaction, contact Customer Service (1-800-935-2967 or www.snapper.com). these instructions to operate machine. 6. Fuels are a major factor related to learn...8. If machine 5. Practice operation of the machine before and while backing. washouts, culverts, fences and protruding objects. 4 www.snapper.com WARNING: This powerful cutting machine is doubtful. 13. ro Protection against Tipovers Tragic accidents can result in . Always keep ...
Operater's Manual
Page 5
...at people, passing cars, windows or doors. 9. e ers on a r water heater or other safety devices frequently for proper operation and engine, STOP blades, SET brake, and Remove key before filling. 7. Slow down before removing grass catcher or unclogging 11. Inspect machine and repair...DO NOT refuel the machine indoors. 5. DO NOT store the machine or fuel container inside a vehicle or on feet rests or pedal(s). 10. Engine exhaust gases contain carbon monoxide, a deadly poison. 16. then refuel equipment using a portable container, rather 17. Operator Safety Protection against a wall...
...at people, passing cars, windows or doors. 9. e ers on a r water heater or other safety devices frequently for proper operation and engine, STOP blades, SET brake, and Remove key before filling. 7. Slow down before removing grass catcher or unclogging 11. Inspect machine and repair...DO NOT refuel the machine indoors. 5. DO NOT store the machine or fuel container inside a vehicle or on feet rests or pedal(s). 10. Engine exhaust gases contain carbon monoxide, a deadly poison. 16. then refuel equipment using a portable container, rather 17. Operator Safety Protection against a wall...
Operater's Manual
Page 6
...heavy leather gloves and use CAUTION when han- 2. Use only factory authorized replacement parts or like parts when making repairs. 6 www.snapper.com Follow the manufacturer's recommendation for spark by an authorized dealer at least once a year and have the dealer install any new ...cause cause injury. loss of traction and loss of the towed equipment may reach an open flame. 4. spark plug could 4. Allow engine to spark plug hole; Disconnect negative (black) cable from battery before storing machine in proper position. 13. Always provide adequate ventilation ...
...heavy leather gloves and use CAUTION when han- 2. Use only factory authorized replacement parts or like parts when making repairs. 6 www.snapper.com Follow the manufacturer's recommendation for spark by an authorized dealer at least once a year and have the dealer install any new ...cause cause injury. loss of traction and loss of the towed equipment may reach an open flame. 4. spark plug could 4. Allow engine to spark plug hole; Disconnect negative (black) cable from battery before storing machine in proper position. 13. Always provide adequate ventilation ...
Operater's Manual
Page 9
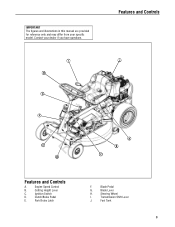
Contact your specific model. Blade Pedal G. Blade Lever H. Engine Speed Control B. Steering Wheel I J H G F E RNeopt rfoodr uctiBonA C D Features and Controls A. Features and Controls I . Clutch/Brake Pedal E. Transmission Shift Lever J. Ignition Switch D. Cutting Height Lever C. Park Brake Latch F. IMPORTANT The figures and illustrations in this manual are provided for reference only and may differ from your dealer if you have questions. Fuel Tank 9
Contact your specific model. Blade Pedal G. Blade Lever H. Engine Speed Control B. Steering Wheel I J H G F E RNeopt rfoodr uctiBonA C D Features and Controls A. Features and Controls I . Clutch/Brake Pedal E. Transmission Shift Lever J. Ignition Switch D. Cutting Height Lever C. Park Brake Latch F. IMPORTANT The figures and illustrations in this manual are provided for reference only and may differ from your dealer if you have questions. Fuel Tank 9
Operater's Manual
Page 10
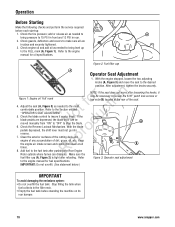
... of dirt, grass, oil, etc. Stop filling the tank when fuel collects in place and securely tightened. 3. Check guards, deflectors and covers to the engine manual for oil specifications. Figure 2: Fuel filler cap A Operator Seat Adjustment 1. fo tio 4. o 5. Check the tire pressure; IMPORTANT: Do not overfill.... Operation Before Starting Make the following checks and perform the service required before standing the machine on its rear bumper. 10 www.snapper.com Check the blade control to insure it may be moved manually from "ON" to "OFF" to 15 PSI in front ...
... of dirt, grass, oil, etc. Stop filling the tank when fuel collects in place and securely tightened. 3. Check guards, deflectors and covers to the engine manual for oil specifications. Figure 2: Fuel filler cap A Operator Seat Adjustment 1. fo tio 4. o 5. Check the tire pressure; IMPORTANT: Do not overfill.... Operation Before Starting Make the following checks and perform the service required before standing the machine on its rear bumper. 10 www.snapper.com Check the blade control to insure it may be moved manually from "ON" to "OFF" to 15 PSI in front ...
Operater's Manual
Page 11
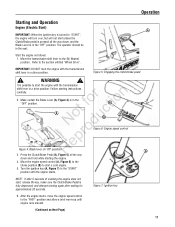
...the transmission shift lever in a drive position. Make certain the Blade Lever (A, Figure 4) is in the seat. Follow starting instructions carefully. Move the engine speed control (A, Figure 6) to the choke position (B) to start , release the key, make sure the Clutch/Brake Pedal is fully depressed, and ... seconds. The operator should be in the fo tio "OFF" position. Turn the ignition key (A, Figure 7) to the "START" position until engine runs smooth. (Continued on Next Page) 11 Press the Clutch/Brake Pedal (A, Figure 5) all the way down and hold while starting the...
...the transmission shift lever in a drive position. Make certain the Blade Lever (A, Figure 4) is in the seat. Follow starting instructions carefully. Move the engine speed control (A, Figure 6) to the choke position (B) to start , release the key, make sure the Clutch/Brake Pedal is fully depressed, and ... seconds. The operator should be in the fo tio "OFF" position. Turn the ignition key (A, Figure 7) to the "START" position until engine runs smooth. (Continued on Next Page) 11 Press the Clutch/Brake Pedal (A, Figure 5) all the way down and hold while starting the...
Operater's Manual
Page 12
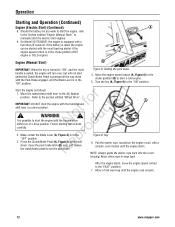
...into the recoil housing. Operation Starting and Operation (Continued) Engine (Electric Start) (Continued) A 8. Engine (Manual Start) B IMPORTANT: When the key is pressed all the way e down with a smooth, even motion until the engine runs smooth. 12 www.snapper.com Make certain the Blade Lever (A, Figure 4) is ...in the "OFF" position. Pull the starter rope, located on the engine recoil, with the Park Brake engaged, and the Blade Lever...
...into the recoil housing. Operation Starting and Operation (Continued) Engine (Electric Start) (Continued) A 8. Engine (Manual Start) B IMPORTANT: When the key is pressed all the way e down with a smooth, even motion until the engine runs smooth. 12 www.snapper.com Make certain the Blade Lever (A, Figure 4) is ...in the "OFF" position. Pull the starter rope, located on the engine recoil, with the Park Brake engaged, and the Blade Lever...
Operater's Manual
Page 13
...Depress the clutch/brake pedal (A, Figure 11). Place the transmission shift lever (A, Figure 12) into a slow forward speed and the engine speed control to the "FAST" position. 2. Operation ! During forward motion, the transmission shift lever may be adjusted. This combination... will allow the mower blades to begin forward motion. 5. B 3. With the engine running , adjust the engine speed control to a fast position. Once blade is adjusted and functioning properly. ! A Figure 11: Engaging the clutch/brake...
...Depress the clutch/brake pedal (A, Figure 11). Place the transmission shift lever (A, Figure 12) into a slow forward speed and the engine speed control to the "FAST" position. 2. Operation ! During forward motion, the transmission shift lever may be adjusted. This combination... will allow the mower blades to begin forward motion. 5. B 3. With the engine running , adjust the engine speed control to a fast position. Once blade is adjusted and functioning properly. ! A Figure 11: Engaging the clutch/brake...
Operater's Manual
Page 14
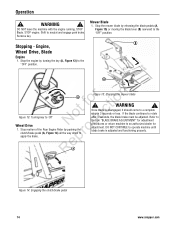
...) all the way down to the "OFF" position. Stop motion of the Rear Engine Rider by turning the key (A, Figure 13) to r apply the brake. If the...to rotate after 3 seconds, the blade brake must be adjusted. DO NOT leave the machine with the engine running. B A r n A ot fo ctio Figure 13: Turning key to neutral and engage park ...machine until blade brake is disengaged, it should come to the "OFF" position. STOP Blade. Stopping - Engine, Wheel Drive, Blade Engine 1. Mower Blade 1. WARNING ! Operation ! Shift to 'Off' N du Wheel Drive 1. WARNING ! ...
...) all the way down to the "OFF" position. Stop motion of the Rear Engine Rider by turning the key (A, Figure 13) to r apply the brake. If the...to rotate after 3 seconds, the blade brake must be adjusted. DO NOT leave the machine with the engine running. B A r n A ot fo ctio Figure 13: Turning key to neutral and engage park ...machine until blade brake is disengaged, it should come to the "OFF" position. STOP Blade. Stopping - Engine, Wheel Drive, Blade Engine 1. Mower Blade 1. WARNING ! Operation ! Shift to 'Off' N du Wheel Drive 1. WARNING ! ...
Operater's Manual
Page 15
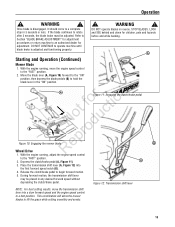
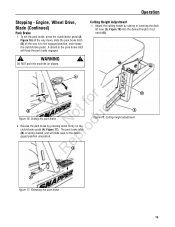
... (A, Figure 17). A t for tion B o uc Figure 16: Setting the park brake N d 2. The park brake latch o (B) is spring-loaded, and will keep the park brake engaged. ! Engine, Wheel Drive, Blade (Continued) Park Brake 1. Release the park brake by raising or lowering the deck lift lever (A, Figure 18) into the desired height of...
... (A, Figure 17). A t for tion B o uc Figure 16: Setting the park brake N d 2. The park brake latch o (B) is spring-loaded, and will keep the park brake engaged. ! Engine, Wheel Drive, Blade (Continued) Park Brake 1. Release the park brake by raising or lowering the deck lift lever (A, Figure 18) into the desired height of...
Operater's Manual
Page 17
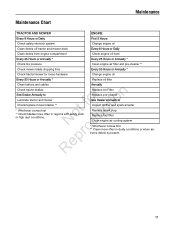
... and pre-cleaner ** Check mower blade stopping time Every 50 Hours or Annually * Check tractor/mower for loose hardware Change engine oil Every 50 Hours or Annually * Replace oil filter Clean battery and cables Annually Check tractor brakes See Dealer Annually to Inspect... muffler and spark arrester Replace spark plug Replace fuel filter Clean engine air cooling system * Whichever comes first ** Clean more often in dusty conditions or when airborne debris is present. 17 Replace Air Filter...
... and pre-cleaner ** Check mower blade stopping time Every 50 Hours or Annually * Check tractor/mower for loose hardware Change engine oil Every 50 Hours or Annually * Replace oil filter Clean battery and cables Annually Check tractor brakes See Dealer Annually to Inspect... muffler and spark arrester Replace spark plug Replace fuel filter Clean engine air cooling system * Whichever comes first ** Clean more often in dusty conditions or when airborne debris is present. 17 Replace Air Filter...

Operater's Manual
Page 18
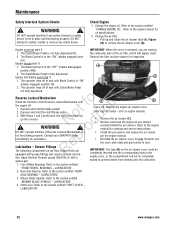
... to an authorized dealer annually for inspection and addition of any new devices, which might upgrade the safety of oil drain plug the engine is equipped with the engine running. IMPORTANT To avoid damaging the emissions system: • Do not overfill the fuel tank. Avoid serious burns, allow all the oil has... type of the Rear ! After all parts to lower the rear of used oil properly. 6. Change the oil filter on its rear bumper. 18 www.snapper.com Stop filling the tank when fuel collects in the filler neck. • Empty the fuel tank before working on the Rear...
... to an authorized dealer annually for inspection and addition of any new devices, which might upgrade the safety of oil drain plug the engine is equipped with the engine running. IMPORTANT To avoid damaging the emissions system: • Do not overfill the fuel tank. Avoid serious burns, allow all the oil has... type of the Rear ! After all parts to lower the rear of used oil properly. 6. Change the oil filter on its rear bumper. 18 www.snapper.com Stop filling the tank when fuel collects in the filler neck. • Empty the fuel tank before working on the Rear...

Operater's Manual
Page 19
...Figure 22: Measuring the belt spacing the mower deck. WARNING ! DO NOT operate machine until blade brake has been adjusted and functioning properly. SNAPPER dealer for assistance. * IMPORTANT: The blade drive belt on the left side of deterioration and proper ten- Service Brake / Park Brake 1. ...function: Engage the park brake, and push the machine. Raise the deck to the section entitled "SERVICE BRAKE - The following procedure requires the engine and blades to be 1-1/4" but no less than 1", the belt tension should come to rotate longer than 3 seconds less than 1". Exercise ...
...Figure 22: Measuring the belt spacing the mower deck. WARNING ! DO NOT operate machine until blade brake has been adjusted and functioning properly. SNAPPER dealer for assistance. * IMPORTANT: The blade drive belt on the left side of deterioration and proper ten- Service Brake / Park Brake 1. ...function: Engage the park brake, and push the machine. Raise the deck to the section entitled "SERVICE BRAKE - The following procedure requires the engine and blades to be 1-1/4" but no less than 1", the belt tension should come to rotate longer than 3 seconds less than 1". Exercise ...
Operater's Manual
Page 20
...Clutch/Brake Pedal is r not functioning properly. t c 2. Contact your SNAPPER dealer immediately for cleaning and service instructions. • Install the pre-cleaner and replace the air cleaner per the engine manual. • Reinstall the air cleaner cover. Engage the latch over the... Steps 1 and 2 performed, the shift lever must be completely grease gun. N d ! ep Lubrication - LUBRICATION". 2. Refer to the engine manual for assistance. Remove the filter and pre-cleaner for oil specifications. 2. The operator rises off of the air filter, which will not be...
...Clutch/Brake Pedal is r not functioning properly. t c 2. Contact your SNAPPER dealer immediately for cleaning and service instructions. • Install the pre-cleaner and replace the air cleaner per the engine manual. • Reinstall the air cleaner cover. Engage the latch over the... Steps 1 and 2 performed, the shift lever must be completely grease gun. N d ! ep Lubrication - LUBRICATION". 2. Refer to the engine manual for assistance. Remove the filter and pre-cleaner for oil specifications. 2. The operator rises off of the air filter, which will not be...

Operater's Manual
Page 21
...filling the tank when fuel collects in the filler neck. • Empty the fuel tank before working on this page. 2. STOP engine. Lubrication Lubricate all mower deck linkage pivot points with N d three shots of the deck, removing all accumulation of general purpose ... Figure 24) with a light coat of general purpose grease, from plug. Lubrication Lubricate the shift lever grease fitting (A, Figure 26) with the engine running. Follow the WARNING statement found on machine. Adjust as required. Lubrication bumper. (See statement below .) 3. Lubrication t c 1. DO NOT ...
...filling the tank when fuel collects in the filler neck. • Empty the fuel tank before working on this page. 2. STOP engine. Lubrication Lubricate all mower deck linkage pivot points with N d three shots of the deck, removing all accumulation of general purpose ... Figure 24) with a light coat of general purpose grease, from plug. Lubrication Lubricate the shift lever grease fitting (A, Figure 26) with the engine running. Follow the WARNING statement found on machine. Adjust as required. Lubrication bumper. (See statement below .) 3. Lubrication t c 1. DO NOT ...
Operater's Manual
Page 22
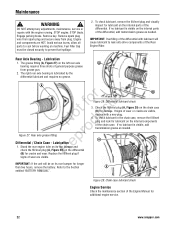
... the chain case, remove the fill/level plug and look for lubricant on the internal components of the differential with the engine running. Maintenance ! STOP engine. Remove key. Remove spark plug wire from spark plug and secure away from grease gun. 2. Rear Axle Bearing - ...The grease fitting (A, Figure 27) on the chain case (B) for additional engine service. 22 www.snapper.com A B Notrfoodruction Figure 27: Rear axle grease fitting p Differential / Chain Case - DO NOT attempt any adjustments, maintenance, service or...
... the chain case, remove the fill/level plug and look for lubricant on the internal components of the differential with the engine running. Maintenance ! STOP engine. Remove key. Remove spark plug wire from spark plug and secure away from grease gun. 2. Rear Axle Bearing - ...The grease fitting (A, Figure 27) on the chain case (B) for additional engine service. 22 www.snapper.com A B Notrfoodruction Figure 27: Rear axle grease fitting p Differential / Chain Case - DO NOT attempt any adjustments, maintenance, service or...

Operater's Manual
Page 23
... bumper. inspected regularly for leaks. 2. Mower deck linkage and pivot areas. Perform all maintenance as required. 3. Thoroughly clean the Rear Engine Rider by removing all parts to prevent fuel spillage. grass clippings and debris. 1. Check the fuel system for wear or damage. 1....: Service the fuel filter on machine. Remove key. Avoid serious burns, allow it to run until the engine runs r n out of fuel. Use only factory authorized Engine replacement parts or like parts when making repairs. Perform the following procedures to regular maintenance, the following ! ...
... bumper. inspected regularly for leaks. 2. Mower deck linkage and pivot areas. Perform all maintenance as required. 3. Thoroughly clean the Rear Engine Rider by removing all parts to prevent fuel spillage. grass clippings and debris. 1. Check the fuel system for wear or damage. 1....: Service the fuel filter on machine. Remove key. Avoid serious burns, allow it to run until the engine runs r n out of fuel. Use only factory authorized Engine replacement parts or like parts when making repairs. Perform the following procedures to regular maintenance, the following ! ...
