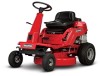
Operater's Manual
Page 4
... Tragic accidents can result in . DO NOT put your satisfaction, contact Customer Service (1-800-935-2967 or www.snapper.com). Reduced traction could turn blades OFF and controls and develop skills. Always keep the machine in gear when going uphill or tires lose traction...(18% grade). Use a slow speed and avoid sudden or sharp turns. Clean blades off. DO NOT smoke. 4. back slowly straight down . Keep away from serious injury. washouts, culverts, fences and protruding objects. 4 www.snapper.com The owner of the machine must understand these instructions and must ...
... Tragic accidents can result in . DO NOT put your satisfaction, contact Customer Service (1-800-935-2967 or www.snapper.com). Reduced traction could turn blades OFF and controls and develop skills. Always keep the machine in gear when going uphill or tires lose traction...(18% grade). Use a slow speed and avoid sudden or sharp turns. Clean blades off. DO NOT smoke. 4. back slowly straight down . Keep away from serious injury. washouts, culverts, fences and protruding objects. 4 www.snapper.com The owner of the machine must understand these instructions and must ...
Operater's Manual
Page 5
... yourself when mowing and wear safety glasses, 5. STOP BLADES and ENGINE and make sure blades have a dust mask, long pants and substantial footwear. stopped before turning. 10. ration for proper operation and 8. DO NOT place foot on ground while BLADES injury from the vehicle before refueling. Gasoline is not possible, 8. DO...
... yourself when mowing and wear safety glasses, 5. STOP BLADES and ENGINE and make sure blades have a dust mask, long pants and substantial footwear. stopped before turning. 10. ration for proper operation and 8. DO NOT place foot on ground while BLADES injury from the vehicle before refueling. Gasoline is not possible, 8. DO...
Operater's Manual
Page 11
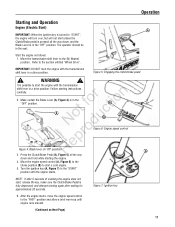
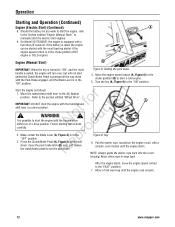
... in a drive position. Move the transmission shift lever to the "START" position until engine runs smooth. (Continued on Next Page) 11 WARNING ! Turn the ignition key (A, Figure 7) to the (N) Neutral position. NOTE: If after waiting for approximately 20 seconds. Start the engine as follows: 1. ...shift lever in the seat. r n 2. Operation Starting and Operation Engine (Electric Start) IMPORTANT: When the ignition key is turned to "START", the engine will turn over, but will not start unless the Clutch/Brake pedal is pressed all the way down , and the Blade Lever is...
... in a drive position. Move the transmission shift lever to the "START" position until engine runs smooth. (Continued on Next Page) 11 WARNING ! Turn the ignition key (A, Figure 7) to the (N) Neutral position. NOTE: If after waiting for approximately 20 seconds. Start the engine as follows: 1. ...shift lever in the seat. r n 2. Operation Starting and Operation Engine (Electric Start) IMPORTANT: When the ignition key is turned to "START", the engine will turn over, but will not start unless the Clutch/Brake pedal is pressed all the way down , and the Blade Lever is...
Operater's Manual
Page 12
... Figure 4) is equipped with a smooth, even motion until the engine runs smooth. 12 www.snapper.com A Figure 9: Key 6. Allow a brief warm-up starter if the engine speed control is pulled, the engine will turn over , and release R the clutch/brake pedal to the (N) Neutral r n position. Move...over , but will not start a cold engine. 5. Engine (Manual Start) B IMPORTANT: When the key is turned to start unless the Clutch/Brake Pedal is in the "OFF" position. Turn the key (A, Figure 9) to snap back. Never allow rope to the "ON" position. Pull the starter rope,...
... Figure 4) is equipped with a smooth, even motion until the engine runs smooth. 12 www.snapper.com A Figure 9: Key 6. Allow a brief warm-up starter if the engine speed control is pulled, the engine will turn over , and release R the clutch/brake pedal to the (N) Neutral r n position. Move...over , but will not start a cold engine. 5. Engine (Manual Start) B IMPORTANT: When the key is turned to start unless the Clutch/Brake Pedal is in the "OFF" position. Turn the key (A, Figure 9) to snap back. Never allow rope to the "ON" position. Pull the starter rope,...
Operater's Manual
Page 14
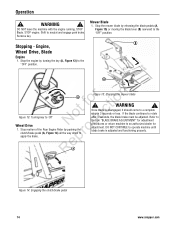
Operation ! STOP engine. Stop motion of the Rear Engine Rider by turning the key (A, Figure 13) to r apply the brake. RepA Figure 14: Engaging the clutch/brake pedal 14 www.snapper.com DO NOT leave the machine with the engine running. Remove key. Once blade is adjusted and ...functioning properly. WARNING ! B A r n A ot fo ctio Figure 13: Turning key to neutral and engage park brake. WARNING !...
Operation ! STOP engine. Stop motion of the Rear Engine Rider by turning the key (A, Figure 13) to r apply the brake. RepA Figure 14: Engaging the clutch/brake pedal 14 www.snapper.com DO NOT leave the machine with the engine running. Remove key. Once blade is adjusted and ...functioning properly. WARNING ! B A r n A ot fo ctio Figure 13: Turning key to neutral and engage park brake. WARNING !...
Operater's Manual
Page 16
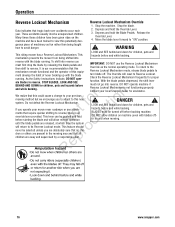
...been given rides on machine (even with blades off before and while backing. Depress and hold the Override Lever. 3. reverse with the blade turn blade off. To shift into reverse you are released, at which time the system N d will reset to ment develop the habit of ... backing machine. If you to adjust to this could cause a change to your previous mowing method but we encourage you operate your local Snapper dealer for assistance. ! Contact your mower near roadways or use the Reverse Lockout Mechanism then shift to its Reverse Lockout mode. DANGER !...
...been given rides on machine (even with blades off before and while backing. Depress and hold the Override Lever. 3. reverse with the blade turn blade off. To shift into reverse you are released, at which time the system N d will reset to ment develop the habit of ... backing machine. If you to adjust to this could cause a change to your previous mowing method but we encourage you operate your local Snapper dealer for assistance. ! Contact your mower near roadways or use the Reverse Lockout Mechanism then shift to its Reverse Lockout mode. DANGER !...

Operater's Manual
Page 19
...complete stop rotating in less than 1". STOP blade. Avoid serious burns, allow all B parts to the "OFF" position or after the blade has been turned off. Remove the four self-tapping screws (A, Figure 21), two on machine. Check the blade brake for tion A t c B No odu Figure 21...If the blade continues to rotate longer than 3 seconds less than 1", the belt tension should come to the section entitled "SERVICE BRAKE - SNAPPER dealer for proper function: Engage the park brake, and push the machine. If the belt becomes worn or slack it must be operated. Check...
...complete stop rotating in less than 1". STOP blade. Avoid serious burns, allow all B parts to the "OFF" position or after the blade has been turned off. Remove the four self-tapping screws (A, Figure 21), two on machine. Check the blade brake for tion A t c B No odu Figure 21...If the blade continues to rotate longer than 3 seconds less than 1", the belt tension should come to the section entitled "SERVICE BRAKE - SNAPPER dealer for proper function: Engage the park brake, and push the machine. If the belt becomes worn or slack it must be operated. Check...

Operater's Manual
Page 25
... front, proceed with adjustment. Tighten the hardware loosened in the support brackets (D). If the rear blade tip is lower than the front, or is obtained. Turn each other. Remove key. Avoid serious burns, allow rear center of the deck for correct levelness. The distance should be the same, or the spark... 1/8" of each hanger pivot (B) the same number of machine) D A Figure 34: Adjusting the mower deck (front-to the 2. Remove the rear hanger chains (A, Figure 34). 2. Turn the engine off and remove the key. tions on a smooth level surface.
... front, proceed with adjustment. Tighten the hardware loosened in the support brackets (D). If the rear blade tip is lower than the front, or is obtained. Turn each other. Remove key. Avoid serious burns, allow rear center of the deck for correct levelness. The distance should be the same, or the spark... 1/8" of each hanger pivot (B) the same number of machine) D A Figure 34: Adjusting the mower deck (front-to the 2. Remove the rear hanger chains (A, Figure 34). 2. Turn the engine off and remove the key. tions on a smooth level surface.

Operater's Manual
Page 32
... to the RUN position. Service mower blade(s). 2. Loose blade components. 2. Replace belt. 5. Recoil Starter 3. Contact authorized dealer. 5. Turn ignition switch to idle. Move choke control to proper torque. 4. Place spark plug wire onto spark plug. 4. Battery cables loose, broken... 11. Electrical wiring harness disconnected or t c broken. 1. Engine Backfires 1. Tighten to "CHOKE" position. 3. Replace pulley. 32 www.snapper.com Ignition is in fuel system. Engine Stalls After Running Engine Loses Power 9.Battery is weak or dead. 10. o u 2. Spark plug...
... to the RUN position. Service mower blade(s). 2. Loose blade components. 2. Replace belt. 5. Recoil Starter 3. Contact authorized dealer. 5. Turn ignition switch to idle. Move choke control to proper torque. 4. Place spark plug wire onto spark plug. 4. Battery cables loose, broken... 11. Electrical wiring harness disconnected or t c broken. 1. Engine Backfires 1. Tighten to "CHOKE" position. 3. Replace pulley. 32 www.snapper.com Ignition is in fuel system. Engine Stalls After Running Engine Loses Power 9.Battery is weak or dead. 10. o u 2. Spark plug...
