Operater's Manual
Page 3
Table of California to cause cancer or other reproductive harm. WARNING ! Engine exhaust, some of its constituents, and certain vehicle components contain or emit chemicals known to cause cancer and birth defects or other...Cutting Height Adjustment 15 Reverse Lockout Mechanism 16 Maintenance 17 Maintenance Chart 17 r n General Maintenance 18 Storage 23 fo tio Engine Adjustments and Repairs 24 Mower Deck and Component Adjustments 24 Rear Engine Rider Drive Components 27 t c Mower Blade Replacement 28 o Mower Drive Belt Replacement 29 u Battery 30 N d Troubleshooting ...
Table of California to cause cancer or other reproductive harm. WARNING ! Engine exhaust, some of its constituents, and certain vehicle components contain or emit chemicals known to cause cancer and birth defects or other...Cutting Height Adjustment 15 Reverse Lockout Mechanism 16 Maintenance 17 Maintenance Chart 17 r n General Maintenance 18 Storage 23 fo tio Engine Adjustments and Repairs 24 Mower Deck and Component Adjustments 24 Rear Engine Rider Drive Components 27 t c Mower Blade Replacement 28 o Mower Drive Belt Replacement 29 u Battery 30 N d Troubleshooting ...
Operater's Manual
Page 10
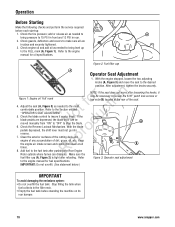
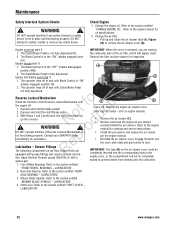
...up : 1. Refer to the Section entitled t c "OPERATOR'S SEAT ADJUSTMENT". Make sure the A B fuel filler cap (A, Figure 2) is tight after pushing the Rear Engine R Rider outside where fumes can be necessary to loosen the 5/16" patch lock screws or hex nuts (B) located at all are depressed, the blade lever can..., tighten the knobs securely. Operation Before Starting Make the following checks and perform the service required before standing the machine on its rear bumper. 10 www.snapper.com If the u blade pedals are in rear. 2. Check the Reverse Lockout Mechanism.
...up : 1. Refer to the Section entitled t c "OPERATOR'S SEAT ADJUSTMENT". Make sure the A B fuel filler cap (A, Figure 2) is tight after pushing the Rear Engine R Rider outside where fumes can be necessary to loosen the 5/16" patch lock screws or hex nuts (B) located at all are depressed, the blade lever can..., tighten the knobs securely. Operation Before Starting Make the following checks and perform the service required before standing the machine on its rear bumper. 10 www.snapper.com If the u blade pedals are in rear. 2. Check the Reverse Lockout Mechanism.
Operater's Manual
Page 14
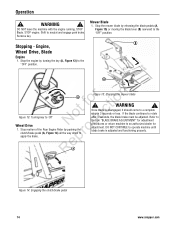
... rotate after 3 seconds, the blade brake must be adjusted. RepA Figure 14: Engaging the clutch/brake pedal 14 www.snapper.com Engine, Wheel Drive, Blade Engine 1. WARNING ! Stopping - Stop the mower blade by turning the key (A, Figure 13) to the "OFF" position. Stop the...to Section "BLADE BRAKE ADJUSTMENT" for adjustment. B A r n A ot fo ctio Figure 13: Turning key to r apply the brake. Stop motion of the Rear Engine Rider by pushing the o clutch/brake pedal (A, Figure 14) all the way down to 'Off' N du Wheel Drive 1. Remove key. STOP Blade. DO NOT ...
... rotate after 3 seconds, the blade brake must be adjusted. RepA Figure 14: Engaging the clutch/brake pedal 14 www.snapper.com Engine, Wheel Drive, Blade Engine 1. WARNING ! Stopping - Stop the mower blade by turning the key (A, Figure 13) to the "OFF" position. Stop the...to Section "BLADE BRAKE ADJUSTMENT" for adjustment. B A r n A ot fo ctio Figure 13: Turning key to r apply the brake. Stop motion of the Rear Engine Rider by pushing the o clutch/brake pedal (A, Figure 14) all the way down to 'Off' N du Wheel Drive 1. Remove key. STOP Blade. DO NOT ...

Operater's Manual
Page 18
...procedures. Engine Rider. Loosen or remove the oil fill cap on this page. 2. Place a 2 quart minimum capacity container under the front wheels to lower the rear of the engine. Refer to cool before standing the machine on its rear bumper. 18 www.snapper.com ... 2. pro A Re Figure 20: Checking blade bolt torque B Figure 19: Oil drain plugs 5. Carefully stand the Rear Engine Rider on the Rear Engine Rider. Refer to the engine manual for recommended service procedures. For to prevent fuel spillage. 1. entitled "ADJUSTING MOWER BLADE". Dispose of the blade ...
...procedures. Engine Rider. Loosen or remove the oil fill cap on this page. 2. Place a 2 quart minimum capacity container under the front wheels to lower the rear of the engine. Refer to cool before standing the machine on its rear bumper. 18 www.snapper.com ... 2. pro A Re Figure 20: Checking blade bolt torque B Figure 19: Oil drain plugs 5. Carefully stand the Rear Engine Rider on the Rear Engine Rider. Refer to the engine manual for recommended service procedures. For to prevent fuel spillage. 1. entitled "ADJUSTING MOWER BLADE". Dispose of the blade ...
Operater's Manual
Page 20
...Check the function of seat with Blade Control in "ON" (blades engaged) position OR, 2. N d ! WARNING ! Contact your SNAPPER dealer immediately for inspection. refer to the section entitled "FRONT WHEEL BEARINGS - DO NOT attempt to prevent debris from entering into the ...blades engaged) posi- t c 2. IMPORTANT: The tabs (D) on the Rear Engine Rider are viewing 1. Engine should start if: IMPORTANT: When the cover is not fully depressed OR, the carburetor side of seat with a engine cover, or the compartment will appear clean. 2. Depress and hold the...
...Check the function of seat with Blade Control in "ON" (blades engaged) position OR, 2. N d ! WARNING ! Contact your SNAPPER dealer immediately for inspection. refer to the section entitled "FRONT WHEEL BEARINGS - DO NOT attempt to prevent debris from entering into the ...blades engaged) posi- t c 2. IMPORTANT: The tabs (D) on the Rear Engine Rider are viewing 1. Engine should start if: IMPORTANT: When the cover is not fully depressed OR, the carburetor side of seat with a engine cover, or the compartment will appear clean. 2. Depress and hold the...

Operater's Manual
Page 21
... grease fitting 1. Clean the top of the deck, removing all accumulation of general purpose grease from a grease gun. Carefully stand the Rear Engine Rider on the rear Front Wheel Bearing - A Figure 25: Front wheel grease fitting Shift Lever - Fuel Filler Cap must be on this page. 2. .... A Figure 26: Shift lever grease fitting 21 Refer to cool before standing the machine on machine. Carefully stand the Rear Engine Rider on the rear o u bumper. (See statement below .) 4. Lubricate the spindle grease fitting (A, Figure 24) with two shots of grass clippings and debris....
... grease fitting 1. Clean the top of the deck, removing all accumulation of general purpose grease from a grease gun. Carefully stand the Rear Engine Rider on the rear Front Wheel Bearing - A Figure 25: Front wheel grease fitting Shift Lever - Fuel Filler Cap must be on this page. 2. .... A Figure 26: Shift lever grease fitting 21 Refer to cool before standing the machine on machine. Carefully stand the Rear Engine Rider on the rear o u bumper. (See statement below .) 4. Lubricate the spindle grease fitting (A, Figure 24) with two shots of grass clippings and debris....
Operater's Manual
Page 22
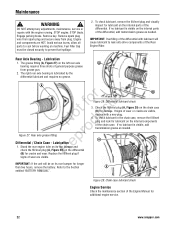
... attempt any adjustments, maintenance, service or repairs with a new plug. 4. Engine and components are HOT. If no grease. Stand the rear engine rider on the chain case (B) for additional engine service. 22 www.snapper.com Replace the fill/level plug if Figure 28: Differential lubricant check 3. ...Check the fill/level plug (A, Figure 29) on its rear bumper for cracks and wear....
... attempt any adjustments, maintenance, service or repairs with a new plug. 4. Engine and components are HOT. If no grease. Stand the rear engine rider on the chain case (B) for additional engine service. 22 www.snapper.com Replace the fill/level plug if Figure 28: Differential lubricant check 3. ...Check the fill/level plug (A, Figure 29) on its rear bumper for cracks and wear....

Operater's Manual
Page 23
...regularly for leaks. 2. Mower deck linkage and pivot areas. Perform the following ! IMPORTANT: Service the fuel filter on its rear bumper. Carefully stand the Rear Engine Rider on a COLD ENGINE 1. Check both front wheel king pins. 3. Discard the filter. 5. All bushings and pivot areas. 2. Remove the .... This allows the carburetor and fuel system to the Section entitled "BATTERY STORAGE". 6. components of Season) If desired, the Rear Engine Rider can be stored on machine. Drain the fuel from the filter. Remove and store the battery. Remove spark plug wire from...
...regularly for leaks. 2. Mower deck linkage and pivot areas. Perform the following ! IMPORTANT: Service the fuel filter on its rear bumper. Carefully stand the Rear Engine Rider on a COLD ENGINE 1. Check both front wheel king pins. 3. Discard the filter. 5. All bushings and pivot areas. 2. Remove the .... This allows the carburetor and fuel system to the Section entitled "BATTERY STORAGE". 6. components of Season) If desired, the Rear Engine Rider can be stored on machine. Drain the fuel from the filter. Remove and store the battery. Remove spark plug wire from...

Operater's Manual
Page 25
... chain pivots (B, Figure 34) to 1/4" lower than the front. tions on machine. Mower Deck Adjustment (Front-to rear levelness. With the Rear Engine Rider on a smooth level surface. of machine) D A Figure 34: Adjusting the mower deck (front-to rest on a smooth,... tips to the 2. STOP engine. Recheck both sides of the deck. o u side is more than 1/4" lower than 1/8", continue with the engine running. p 9. WARNING 10. Levelness) 28" and 33" Decks With the Rear Engine Rider on the angle iron. 5. fo tio 4. Reinstall the rear hanger chains and measure the ...
... chain pivots (B, Figure 34) to 1/4" lower than the front. tions on machine. Mower Deck Adjustment (Front-to rear levelness. With the Rear Engine Rider on a smooth level surface. of machine) D A Figure 34: Adjusting the mower deck (front-to rest on a smooth,... tips to the 2. STOP engine. Recheck both sides of the deck. o u side is more than 1/4" lower than 1/8", continue with the engine running. p 9. WARNING 10. Levelness) 28" and 33" Decks With the Rear Engine Rider on the angle iron. 5. fo tio 4. Reinstall the rear hanger chains and measure the ...

Operater's Manual
Page 26
...ferrule (B) through the hole (C) in the pedal to remain in the cable. Engine and components are HOT. WARNING ! Fuel Filler Cap must be affected. IMPORTANT: The SNAPPER Rear Engine Rider Models with 33" decks do not require belt tension adjustment. Figure 37: Clutch.../brake cable adjustment 26 www.snapper.com Maintenance ! Remove key. Disengage the parking brake and allow all ...
...ferrule (B) through the hole (C) in the pedal to remain in the cable. Engine and components are HOT. WARNING ! Fuel Filler Cap must be affected. IMPORTANT: The SNAPPER Rear Engine Rider Models with 33" decks do not require belt tension adjustment. Figure 37: Clutch.../brake cable adjustment 26 www.snapper.com Maintenance ! Remove key. Disengage the parking brake and allow all ...

Operater's Manual
Page 27
... components are noted for reference purposes only. Carefully stand the Rear Engine Rider on this page. 2. Adjust the cable up or down . Figure 38: Setting the park brake IMPORTANT A To avoid damaging the emissions system...and F, Figure 39) are HOT. Follow the WARNING statement found on its B rear bumper. Retest the wheel brake. Fuel Filler Cap must be adjusted as follows: E 1. E Rear Engine Rider Drive Components Service Brake / Park Brake Adjustment Test the wheel brake on its rear bumper. (See statement below.) r n 3. If the measurement is complete, ...
... components are noted for reference purposes only. Carefully stand the Rear Engine Rider on this page. 2. Adjust the cable up or down . Figure 38: Setting the park brake IMPORTANT A To avoid damaging the emissions system...and F, Figure 39) are HOT. Follow the WARNING statement found on its B rear bumper. Retest the wheel brake. Fuel Filler Cap must be adjusted as follows: E 1. E Rear Engine Rider Drive Components Service Brake / Park Brake Adjustment Test the wheel brake on its rear bumper. (See statement below.) r n 3. If the measurement is complete, ...
Operater's Manual
Page 28
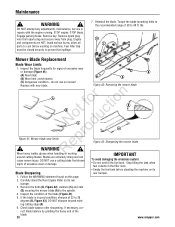
...(C) Dangerous condition - Maintenance ! Engine and components are extremely sharp and can cause severe injury. Carefully stand the Rear Engine Rider on machine. rect blade balance by grinding the heavy end of the blade. 28 www.snapper.com WARNING ! STOP engine. R Wear heavy leather gloves ...when handling or working on its Blade Sharpening rear bumper. 1. If ...
...(C) Dangerous condition - Maintenance ! Engine and components are extremely sharp and can cause severe injury. Carefully stand the Rear Engine Rider on machine. rect blade balance by grinding the heavy end of the blade. 28 www.snapper.com WARNING ! STOP engine. R Wear heavy leather gloves ...when handling or working on its Blade Sharpening rear bumper. 1. If ...

Operater's Manual
Page 29
...are present. The idler belt guide tab should be closed securely to -belt guide clearance (E). 11. fo tio 2. Carefully stand the Rear Engine Rider on its rear bumper. 29 Route the belt around the drive disc and into the drive pulley belt groove. 7. Route the belt onto the spindle pulley...decks E D A pro B B C Re Figure 46: Belt routing for 33 inch decks Figure 44: Engine pulley and belt guide 4. Stop filling the tank when fuel collects in the hole located on its rear bumper. 3. Check the mower drive belt tension and adjust if necessary (28" & 30" decks only). ...
...are present. The idler belt guide tab should be closed securely to -belt guide clearance (E). 11. fo tio 2. Carefully stand the Rear Engine Rider on its rear bumper. 29 Route the belt around the drive disc and into the drive pulley belt groove. 7. Route the belt onto the spindle pulley...decks E D A pro B B C Re Figure 46: Belt routing for 33 inch decks Figure 44: Engine pulley and belt guide 4. Stop filling the tank when fuel collects in the hole located on its rear bumper. 3. Check the mower drive belt tension and adjust if necessary (28" & 30" decks only). ...

Operater's Manual
Page 33
...(s). Service mower blade. 5. Rubber drive disc is dry. 4. Insufficient lubrication in good shape. Adjust or replace mower belt. 3. Bring to rear pitch. 7. Forward speed too fast. Verify plugs are not cracked & are in chain case or transmission/differential. 1. Replace drive disc. 2.... differential plugs. Mow when grass is not tracking properly on deck. Engine speed too slow. 4. Move throttle control to a slower speed. 3. Sharpen cutting edges or replace blade(s). 8. Troubleshooting PROBLEM Rider Will Not Move Or Loss of Traction Blade(s) Not Cutting Cutting Grass...
...(s). Service mower blade. 5. Rubber drive disc is dry. 4. Insufficient lubrication in good shape. Adjust or replace mower belt. 3. Bring to rear pitch. 7. Forward speed too fast. Verify plugs are not cracked & are in chain case or transmission/differential. 1. Replace drive disc. 2.... differential plugs. Mow when grass is not tracking properly on deck. Engine speed too slow. 4. Move throttle control to a slower speed. 3. Sharpen cutting edges or replace blade(s). 8. Troubleshooting PROBLEM Rider Will Not Move Or Loss of Traction Blade(s) Not Cutting Cutting Grass...


