
Operation Manual
Page 3
... Operator Safety 4 Features and Controls 10 Operation...11 Before Starting 11 Oil Recommendations 11 Fuel Recommendations 12 Starting the Mower 12 Propelling the Mower 12 Stopping the Mower 13 Handle Height Adjustment 13 Cutting Height Adjustment 13 Mulching Operation 14 Installing the Discharge Deflector 14 Installing the Grass Bag 15 Maintenance...17 Maintenance Chart 17 Change Engine Oil 18 n Change Oil Filter (if equipped 18 Service Air Filter 18 tio Check Safety Interlock System 19 Clean Debris Off Mower 19 Storage Procedure 19 r c Service...20 fo u Troubleshooting...
... Operator Safety 4 Features and Controls 10 Operation...11 Before Starting 11 Oil Recommendations 11 Fuel Recommendations 12 Starting the Mower 12 Propelling the Mower 12 Stopping the Mower 13 Handle Height Adjustment 13 Cutting Height Adjustment 13 Mulching Operation 14 Installing the Discharge Deflector 14 Installing the Grass Bag 15 Maintenance...17 Maintenance Chart 17 Change Engine Oil 18 n Change Oil Filter (if equipped 18 Service Air Filter 18 tio Check Safety Interlock System 19 Clean Debris Off Mower 19 Storage Procedure 19 r c Service...20 fo u Troubleshooting...

Operation Manual
Page 6
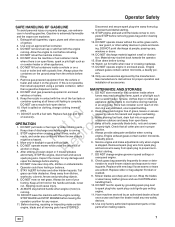
... NOT mow it. 2. Each person operating the machine must be of a responsible adult other safety devices frequently for chil- Read, understand, and follow instructions and warnings POISONOUS GAS HAZARD. Know the controls and the proper use of carbon monoxide gas from serious injury. Only mature, responsible persons shall operate the machine and only after this manual and on the mower, engine and attach...
... NOT mow it. 2. Each person operating the machine must be of a responsible adult other safety devices frequently for chil- Read, understand, and follow instructions and warnings POISONOUS GAS HAZARD. Know the controls and the proper use of carbon monoxide gas from serious injury. Only mature, responsible persons shall operate the machine and only after this manual and on the mower, engine and attach...
Operation Manual
Page 7
... all times until the blade comes to prevent accidental starting . Always provide adequate ventilation when running . repair the damage before turning. ing parts. Keep away from the vehicle before storing machine in place and work- 3. DO NOT mow on the handle and walk, never handling them. run. spark plug could ignite gas exiting running engine. devices. 11. Gasoline is spilled on clothing, change engine governor speed settings or spark plug wire. Extinguish all cotter...
... all times until the blade comes to prevent accidental starting . Always provide adequate ventilation when running . repair the damage before turning. ing parts. Keep away from the vehicle before storing machine in place and work- 3. DO NOT mow on the handle and walk, never handling them. run. spark plug could ignite gas exiting running engine. devices. 11. Gasoline is spilled on clothing, change engine governor speed settings or spark plug wire. Extinguish all cotter...

Operation Manual
Page 11
... of the cutting deck and engine of spilled fuel, dirt, grass, oil, etc. Refer to the section entitled 'Fuel Recommendations'. Refer to the section entitled 'Oil Recommendations'. It N p should be at all are acceptable if classified for service Figure 1: Mower controls 3. After adding oil, wait one minute and SF, SG, SH, SJ or higher. Check oil level more recheck the oil level. Operation Before Starting 1. Check the guards, deflectors, grass bag, and covers to select...
... of the cutting deck and engine of spilled fuel, dirt, grass, oil, etc. Refer to the section entitled 'Fuel Recommendations'. Refer to the section entitled 'Oil Recommendations'. It N p should be at all are acceptable if classified for service Figure 1: Mower controls 3. After adding oil, wait one minute and SF, SG, SH, SJ or higher. Check oil level more recheck the oil level. Operation Before Starting 1. Check the guards, deflectors, grass bag, and covers to select...

Operation Manual
Page 12
... gas that could still be adjusted POISONOUS GAS HAZARD. You CANNOT see below 2,500 feet (762 meters) with battery back-up until the engine runs smooth before beginning mower operation. Operation Fuel Recommendations Fuel must meet these spaces and can linger for high altitude adjustment u information. Do not mix oil in minutes. Use of the ground speed control. N pr Starting the Mower Re WARNING A C Figure 3: Starting the mower Propelling the Mower 1. If you start handle...
... gas that could still be adjusted POISONOUS GAS HAZARD. You CANNOT see below 2,500 feet (762 meters) with battery back-up until the engine runs smooth before beginning mower operation. Operation Fuel Recommendations Fuel must meet these spaces and can linger for high altitude adjustment u information. Do not mix oil in minutes. Use of the ground speed control. N pr Starting the Mower Re WARNING A C Figure 3: Starting the mower Propelling the Mower 1. If you start handle...

Operation Manual
Page 13
... the wheel drive control. 2. DO NOT attempt any maintenance, adjustments or service with engine and blade running . Disconnect spark plug wire and secure away from spark plug. Disconnect spark plug wire and secure away from spark plug. Engine and components are HOT. Avoid serious burns, allow sufficient time for all components to the desired cutting height. Tighten the lower nuts on each lower handle to cool. 1. The lowest cutting position is Notch 7 (Figure 7). Operation Stopping the Mower...
... the wheel drive control. 2. DO NOT attempt any maintenance, adjustments or service with engine and blade running . Disconnect spark plug wire and secure away from spark plug. Disconnect spark plug wire and secure away from spark plug. Engine and components are HOT. Avoid serious burns, allow sufficient time for all components to the desired cutting height. Tighten the lower nuts on each lower handle to cool. 1. The lowest cutting position is Notch 7 (Figure 7). Operation Stopping the Mower...
Operation Manual
Page 14
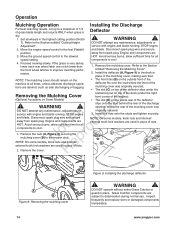
.... Grass Catcher components are t d HOT. Refer to the Section entitled "Cutting Height DO NOT attempt any maintenance, adjustments or r c service with engine and blade running . Move the ground speed control to deterioration during normal use. Disconnect spark plug wire and secure fo u away from spark plug. o ro 1. N p NOTE: On some models, knob nuts and internal/ external tooth lock washers are used in place of nuts. Operation Mulching Operation Installing the Discharge For best mulching results, cut up...
.... Grass Catcher components are t d HOT. Refer to the Section entitled "Cutting Height DO NOT attempt any maintenance, adjustments or r c service with engine and blade running . Move the ground speed control to deterioration during normal use. Disconnect spark plug wire and secure fo u away from spark plug. o ro 1. N p NOTE: On some models, knob nuts and internal/ external tooth lock washers are used in place of nuts. Operation Mulching Operation Installing the Discharge For best mulching results, cut up...

Operation Manual
Page 15
... restraining nut on Some Models) ! Disconnect spark plug wire and secure away from spark plug. Install the mulching plug (A, Figure 11) if mulching 1. Refer to the section entitled "Starting the Mower". N p Refer to the Section entitled "Removing the Mulching Cover". 2. STOP engine and blade. components to cool. Install the adapter (A, Figure 10) to the deck in place of the adapt- DO NOT attempt any maintenance, adjustments or service with engine and blade running . Engine and components are HOT...
... restraining nut on Some Models) ! Disconnect spark plug wire and secure away from spark plug. Install the mulching plug (A, Figure 11) if mulching 1. Refer to the section entitled "Starting the Mower". N p Refer to the Section entitled "Removing the Mulching Cover". 2. STOP engine and blade. components to cool. Install the adapter (A, Figure 10) to the deck in place of the adapt- DO NOT attempt any maintenance, adjustments or service with engine and blade running . Engine and components are HOT...
Operation Manual
Page 16
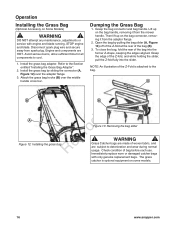
...) over the middle handle cross bar. The grass catcher is attached to cool. 1. Operation Installing the Grass Bag (Optional Accessory on some models. 16 www.snapper.com Disconnect spark plug wire and secure away from the mower handle. Dumping the Grass Bag 1. Then lift up on the bag connector, removing it from spark plug. To close the bag, fold the rear of the bag (B). 3. Grasp the edge of bag before each use. WARNING ! WARNING ! STOP engine and blade. Refer to...
...) over the middle handle cross bar. The grass catcher is attached to cool. 1. Operation Installing the Grass Bag (Optional Accessory on some models. 16 www.snapper.com Disconnect spark plug wire and secure away from the mower handle. Dumping the Grass Bag 1. Then lift up on the bag connector, removing it from spark plug. To close the bag, fold the rear of the bag (B). 3. Grasp the edge of bag before each use. WARNING ! WARNING ! STOP engine and blade. Refer to...

Operation Manual
Page 17
... maintenance, adjustments or service with sandy soils N Rep or high dust conditions. Disconnect spark plug wire and secure away from spark plug. Wear heavy leather gloves when handling or working around cutting blades. MOWER ENGINE Every 8 Hours or Daily First 5 Hours Check safety interlock system Change engine oil Clean debris off mower Every 25 Hours or Annually * n Check mower for all components to Lubricate mower Check mower blade ** r c Check mower blade stopping time fo u Check drive belt t d Clean battery and cables o o * Whichever comes first r **Check blade...
... maintenance, adjustments or service with sandy soils N Rep or high dust conditions. Disconnect spark plug wire and secure away from spark plug. Wear heavy leather gloves when handling or working around cutting blades. MOWER ENGINE Every 8 Hours or Daily First 5 Hours Check safety interlock system Change engine oil Clean debris off mower Every 25 Hours or Annually * n Check mower for all components to Lubricate mower Check mower blade ** r c Check mower blade stopping time fo u Check drive belt t d Clean battery and cables o o * Whichever comes first r **Check blade...
Operation Manual
Page 18
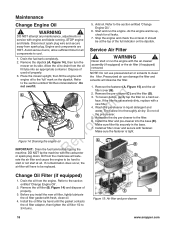
... any maintenance, adjustments or service with the carburetor filter cover (B). 2. As the engine warms up, check for all . Drain the fuel tank completely. 2. Do not overfill. 1. DO NOT tip the machine with engine and blade running. If the filter is tight. Assemble the dry pre-cleaner to 3/4 turns. 18 www.snapper.com Oil from the engine. Remove the oil filter (B, Figure 14) and dispose of ! WARNING ! Pressurized air can damage the filter and engine oil to thoroughly air dry. Remove...
... any maintenance, adjustments or service with the carburetor filter cover (B). 2. As the engine warms up, check for all . Drain the fuel tank completely. 2. Do not overfill. 1. DO NOT tip the machine with engine and blade running. If the filter is tight. Assemble the dry pre-cleaner to 3/4 turns. 18 www.snapper.com Oil from the engine. Remove the oil filter (B, Figure 14) and dispose of ! WARNING ! Pressurized air can damage the filter and engine oil to thoroughly air dry. Remove...
Operation Manual
Page 19
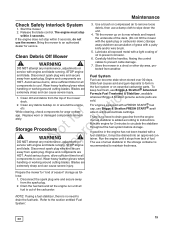
... Debris Off Mower oil to instructions. Carefully fold the handles, flexing the control ! service with a FRESH START® fuel cap, use the mower. HOT. n 1. tio 2. Clean any debris buildup on or around cutting blades. Replace worn or damaged components immedifo u ately. STOP engine e and blade. For engines equipped with engine and blade running . There is no need to drain gasoline from the engine if a fuel stabilizer is added according to prevent corrosion. 6. HOT. Maintenance Check Safety Interlock...
... Debris Off Mower oil to instructions. Carefully fold the handles, flexing the control ! service with a FRESH START® fuel cap, use the mower. HOT. n 1. tio 2. Clean any debris buildup on or around cutting blades. Replace worn or damaged components immedifo u ately. STOP engine e and blade. For engines equipped with engine and blade running . There is no need to drain gasoline from the engine if a fuel stabilizer is added according to prevent corrosion. 6. HOT. Maintenance Check Safety Interlock...
Operation Manual
Page 20
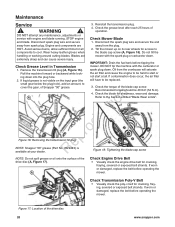
... input gear (the mower. IMPORTANT: Drain the fuel tank before operating the mower. Oil from the plug. Check the torque of Snapper "00" grease. A Check Engine Drive Belt • Visually check the engine drive belt for access to components to the Section entitled "Blade Wear Limits". Disconnect the spark plug wire and secure the end away from spark plug. If worn or damaged, replace the belt before tipping the Check Grease Level in Transmission 1. WARNING 3. Reinstall the transmission plug. 4. Check the grease level after each 25 hours...
... input gear (the mower. IMPORTANT: Drain the fuel tank before operating the mower. Oil from the plug. Check the torque of Snapper "00" grease. A Check Engine Drive Belt • Visually check the engine drive belt for access to components to the Section entitled "Blade Wear Limits". Disconnect the spark plug wire and secure the end away from spark plug. If worn or damaged, replace the belt before tipping the Check Grease Level in Transmission 1. WARNING 3. Reinstall the transmission plug. 4. Check the grease level after each 25 hours...

Operation Manual
Page 21
... . mower! IMPORTANT: Drain the fuel tank before tipping the mower. If contamination does occur, the air filter will saturate the air filter and cause the engine to cool. Refer to appear on its rear wheels. D E Figure 21: Removing the mower blade en 21 A B C Standard Blade Wear Limit 1. Disconnect the spark plug wire and secure the end (C) Dangerous condition! n A tio B for signs 2. Do not tilt the mower with the carburetor or spark plug down...
... . mower! IMPORTANT: Drain the fuel tank before tipping the mower. If contamination does occur, the air filter will saturate the air filter and cause the engine to cool. Refer to appear on its rear wheels. D E Figure 21: Removing the mower blade en 21 A B C Standard Blade Wear Limit 1. Disconnect the spark plug wire and secure the end (C) Dangerous condition! n A tio B for signs 2. Do not tilt the mower with the carburetor or spark plug down...

Operation Manual
Page 23
... disc (C) is worn - STOP engine and blade. IMPORTANT: If the drive system continues slipping, refer to cool. Maintenance Driven and Drive Disc Service ! A 5. Disconnect spark plug wire and secure away from spark plug. Wipe away any of needle nose pliers to clean drive disc or driven disc. 3. Drive Spring Repair/Replacement If the drive spring (A, Figure 25) is broken, replace with a new spring. Worn Poly-V belt (D) or engine drive belt (E). Avoid serious burns, allow sufficient...
... disc (C) is worn - STOP engine and blade. IMPORTANT: If the drive system continues slipping, refer to cool. Maintenance Driven and Drive Disc Service ! A 5. Disconnect spark plug wire and secure away from spark plug. Wipe away any of needle nose pliers to clean drive disc or driven disc. 3. Drive Spring Repair/Replacement If the drive spring (A, Figure 25) is broken, replace with a new spring. Worn Poly-V belt (D) or engine drive belt (E). Avoid serious burns, allow sufficient...
Operation Manual
Page 26
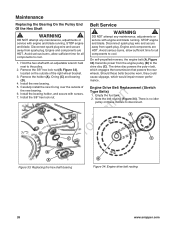
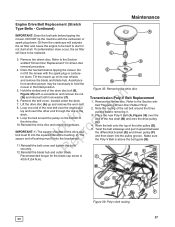
... impair mower perfor- (D). wheels. Disconnect spark plug wire and secure and blade. Should these models to cool. n 7. On self-propelled mowers, the engine belt (A, Figure 1. Carefully install the new O-ring over the outside of the new bearing. 6. Engine Drive Belt Replacement (Stretch Type Belts) 1. Maintenance Replacing the Bearing On the Pulley End Belt Service Of the Hex Shaft ! r ctio A ot fo odu D r C C N Rep B A B Figure 33: Replacing the hex shaft bearing Figure 34: Engine drive belt routing 26 www.snapper.com STOP engine and blade. Remove...
... impair mower perfor- (D). wheels. Disconnect spark plug wire and secure and blade. Should these models to cool. n 7. On self-propelled mowers, the engine belt (A, Figure 1. Carefully install the new O-ring over the outside of the new bearing. 6. Engine Drive Belt Replacement (Stretch Type Belts) 1. Maintenance Replacing the Bearing On the Pulley End Belt Service Of the Hex Shaft ! r ctio A ot fo odu D r C C N Rep B A B Figure 33: Replacing the hex shaft bearing Figure 34: Engine drive belt routing 26 www.snapper.com STOP engine and blade. Remove...
Operation Manual
Page 27
... the routing of fo u the drive disc. Drain the fuel tank before tipping the mower. R Recommended torque for driven disc D removal procedure. 4. B D G F Figure 36: Poly-v belt routing en 27 Lift the drive disc (A) up on the bottom of the old belt around the pulley on its rear wheels F and remove the blade and blade hub. Work the belt onto the top of bushing must fit into the bracket slot. Maintenance Engine Drive Belt Replacement (Stretch Type Belts - Oil from...
... the routing of fo u the drive disc. Drain the fuel tank before tipping the mower. R Recommended torque for driven disc D removal procedure. 4. B D G F Figure 36: Poly-v belt routing en 27 Lift the drive disc (A) up on the bottom of the old belt around the pulley on its rear wheels F and remove the blade and blade hub. Work the belt onto the top of bushing must fit into the bracket slot. Maintenance Engine Drive Belt Replacement (Stretch Type Belts - Oil from...
Operation Manual
Page 28
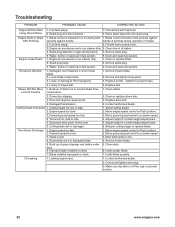
Using Recoil Starter 2. Spark plug wire disconnected. 1. Fuel tank empty. 2. Engine air pre-cleaner or air cleaner dirty. 5. Drain and clean fuel system. Service mower blade. 2. Service and tighten loose parts. 3. Tighten to a slower speed. 3. Damaged transmission. Engine speed too slow. r 3. Build up of debris on deck. 1. Contact authorized dealer. 1. Adjust cutting height. 2. Adjust height of grass clippings and debris under e deck. Move ground speed control to proper torque. 4. Mow when grass is not being held securely against After Running securely against ...
Using Recoil Starter 2. Spark plug wire disconnected. 1. Fuel tank empty. 2. Engine air pre-cleaner or air cleaner dirty. 5. Drain and clean fuel system. Service mower blade. 2. Service and tighten loose parts. 3. Tighten to a slower speed. 3. Damaged transmission. Engine speed too slow. r 3. Build up of debris on deck. 1. Contact authorized dealer. 1. Adjust cutting height. 2. Adjust height of grass clippings and debris under e deck. Move ground speed control to proper torque. 4. Mow when grass is not being held securely against After Running securely against ...

Operation Manual
Page 29
... damaged will be considered as filters, belts, cutting blades, and brake pads (except engine brake pads) are excluded to you . Other Exclusions - o ro ABOUTYOUR WARRANTY N p We welcome warranty repair and apologize to the extent exclusion is necessary to a major failure. This warranty only covers defects in the Operator's Manual, and serviced or repaired using the product after it shall thereafter be used for warranty service may not be of incidental...
... damaged will be considered as filters, belts, cutting blades, and brake pads (except engine brake pads) are excluded to you . Other Exclusions - o ro ABOUTYOUR WARRANTY N p We welcome warranty repair and apologize to the extent exclusion is necessary to a major failure. This warranty only covers defects in the Operator's Manual, and serviced or repaired using the product after it shall thereafter be used for warranty service may not be of incidental...
Operation Manual
Page 30
... Air Index. Owner's Warranty Responsibilities: As the engine/equipment owner, you are pleased to a B&S distribution center, servicing dealer, or other emissions-related assemblies. Fuel Metering System Cold start enrichment system (soft choke) Carburetor and internal parts Fuel pump n Fuel line, fuel line fittings, clamps Fuel tank, cap and tether tio Carbon canister b. period stated above . Any such part repaired or replaced under the warranty will be repaired...
... Air Index. Owner's Warranty Responsibilities: As the engine/equipment owner, you are pleased to a B&S distribution center, servicing dealer, or other emissions-related assemblies. Fuel Metering System Cold start enrichment system (soft choke) Carburetor and internal parts Fuel pump n Fuel line, fuel line fittings, clamps Fuel tank, cap and tether tio Carbon canister b. period stated above . Any such part repaired or replaced under the warranty will be repaired...


