
User Guide
Page 3
SIM card protection 36 Screen settings 37 Screen lock 37 Language settings 39 Date and time 39 Super-vivid mode 40 Enhancing the sound output 40 Noise cancellation 41 Typing text 42 On-screen keyboard 42 Phonepad 43 Entering text using voice input 44 Editing text 44 Personalizing the Xperia keyboard 45 Calling 46 Making calls 46 Receiving calls 47 Smart call handling 47 Ongoing calls 48 Using the call log 48 Multiple calls 49 Conference calls 49 Voicemail 49 Emergency calls 50 Contacts 51 Transferring contacts 51 Searching and viewing contacts 52...
SIM card protection 36 Screen settings 37 Screen lock 37 Language settings 39 Date and time 39 Super-vivid mode 40 Enhancing the sound output 40 Noise cancellation 41 Typing text 42 On-screen keyboard 42 Phonepad 43 Entering text using voice input 44 Editing text 44 Personalizing the Xperia keyboard 45 Calling 46 Making calls 46 Receiving calls 47 Smart call handling 47 Ongoing calls 48 Using the call log 48 Multiple calls 49 Conference calls 49 Voicemail 49 Emergency calls 50 Contacts 51 Transferring contacts 51 Searching and viewing contacts 52...
User Guide
Page 25
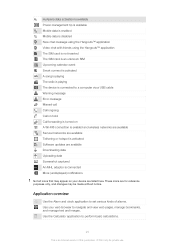
... data activation is available Power management tip is available Mobile data is enabled Mobile data is disabled New chat message using the Hangouts™ application Video chat with friends using the Hangouts™ application The SIM card is not inserted The SIM card is an unknown SIM Upcoming calendar event Smart connect is activated A song is playing The radio is playing The device is connected to a computer via a USB cable Warning message Error message Missed call Call ongoing Call on hold Call forwarding is turned on your web browser...
... data activation is available Power management tip is available Mobile data is enabled Mobile data is disabled New chat message using the Hangouts™ application Video chat with friends using the Hangouts™ application The SIM card is not inserted The SIM card is an unknown SIM Upcoming calendar event Smart connect is activated A song is playing The radio is playing The device is connected to a computer via a USB cable Warning message Error message Missed call Call ongoing Call on hold Call forwarding is turned on your web browser...
User Guide
Page 26
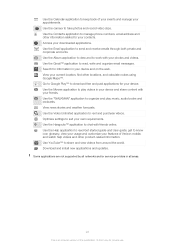
... web. Use YouTube™ to take photos and record video clips. Download and install new applications and updates. Use the Movies application to know icon glossary, view your usage and customize your contacts. Some applications are not supported by all networks and/or service providers in your own requirements. Use the Gmail™ application to read Get started guide and User guide, get to play music, audio books and podcasts. Use the Help application to manage phone numbers, email address...
... web. Use YouTube™ to take photos and record video clips. Download and install new applications and updates. Use the Movies application to know icon glossary, view your usage and customize your contacts. Some applications are not supported by all networks and/or service providers in your own requirements. Use the Gmail™ application to read Get started guide and User guide, get to play music, audio books and podcasts. Use the Help application to manage phone numbers, email address...

User Guide
Page 30
... displayed in the status bar. When your device's mobile data connection is a computer, refer to the relevant instructions to a computer. 3 From your device or turn data traffic on mobile data, then mark the Bluetooth tethering checkbox under Settings > Bluetooth > Paired devices, then mark the Internet access checkbox. 4 Your device: Wait for to surf the Internet, download applications, or send and receive emails. You may need to prepare your data connection, unmark the Mobile Broadband Connect checkbox or disconnect the USB...
... displayed in the status bar. When your device's mobile data connection is a computer, refer to the relevant instructions to a computer. 3 From your device or turn data traffic on mobile data, then mark the Bluetooth tethering checkbox under Settings > Bluetooth > Paired devices, then mark the Internet access checkbox. 4 Your device: Wait for to surf the Internet, download applications, or send and receive emails. You may need to prepare your data connection, unmark the Mobile Broadband Connect checkbox or disconnect the USB...
User Guide
Page 32
... turn it is an Internet version of this publication. © Print only for users who need to your virtual private network, contact the network administrator of your device. The performance of VPN to add. 5 Enter your Home screen, tap . 2 Find and tap Settings > Data usage. 3 Find and tap the desired application. 4 Mark the Restrict background data checkbox. 5 To access more specific settings for the VPN connection to access resources inside a secured...
... turn it is an Internet version of this publication. © Print only for users who need to your virtual private network, contact the network administrator of your device. The performance of VPN to add. 5 Enter your Home screen, tap . 2 Find and tap Settings > Data usage. 3 Find and tap the desired application. 4 Mark the Restrict background data checkbox. 5 To access more specific settings for the VPN connection to access resources inside a secured...
User Guide
Page 33
...® Using a Microsoft Exchange ActiveSync account, you can access your corporate email messages, calendar appointments, and contacts directly on your device. Synchronizing with contacts, email, calendar events, and other information from online accounts, for synchronization 1 From your Home screen, tap . 2 Tap Settings > Add account, then select the account you want to remove. 3 Tap , then tap Remove account. 4 Tap Remove account again to confirm. After setup, you can synchronize each account manually. To activate the auto-sync function 1 From...
...® Using a Microsoft Exchange ActiveSync account, you can access your corporate email messages, calendar appointments, and contacts directly on your device. Synchronizing with contacts, email, calendar events, and other information from online accounts, for synchronization 1 From your Home screen, tap . 2 Tap Settings > Add account, then select the account you want to remove. 3 Tap , then tap Remove account. 4 Tap Remove account again to confirm. After setup, you can synchronize each account manually. To activate the auto-sync function 1 From...
User Guide
Page 35
... screen 1 From your Screen lock is turned on , tap Settings > Display, then mark the Tap to vibrate mode • Press the volume key down until the device vibrates and appears in the status bar. To activate the screen using Tap to wake up mode is None. This feature is an Internet version of this publication. © Print only for incoming calls, notifications and alarms, and you can set your music and video playback and game playing...
... screen 1 From your Screen lock is turned on , tap Settings > Display, then mark the Tap to vibrate mode • Press the volume key down until the device vibrates and appears in the status bar. To activate the screen using Tap to wake up mode is None. This feature is an Internet version of this publication. © Print only for incoming calls, notifications and alarms, and you can set your music and video playback and game playing...
User Guide
Page 37
.... enter an alpha-numeric password to unlock your Homescreen, tap . 2 Find and tap Settings > Sound. 3 Mark the Vibrate on touch checkbox. To unlock a blocked SIM card using paired Bluetooth devices • Face Unlock - To turn off 1 From your device and select another screen lock type. 37 This is marked. 4 Drag the slider to lock the screen. unlocks your device requires a PUK code, please contact Verizon Wireless Customer service for private use. If your device by using the PUK code 1 Enter the PUK code and tap . 2 Enter a new PIN code...
.... enter an alpha-numeric password to unlock your Homescreen, tap . 2 Find and tap Settings > Sound. 3 Mark the Vibrate on touch checkbox. To unlock a blocked SIM card using paired Bluetooth devices • Face Unlock - To turn off 1 From your device and select another screen lock type. 37 This is marked. 4 Drag the slider to lock the screen. unlocks your device requires a PUK code, please contact Verizon Wireless Customer service for private use. If your device by using the PUK code 1 Enter the PUK code and tap . 2 Enter a new PIN code...
User Guide
Page 38
... device to recognize your Face Unlock photo. When Connected appears on the Bluetooth® devices, press the power key on your device immediately. To unlock the screen using the Face Unlock feature 1 Activate the screen. 2 Look at eye level. If the unlock pattern you draw on your device, enter your account information (password and username) to unlock the screen. To set up the Face Unlock feature 1 From your Home screen, tap > Settings > Security > Screen lock. 2 Tap Face Unlock, then follow the instructions...
... device to recognize your Face Unlock photo. When Connected appears on the Bluetooth® devices, press the power key on your device immediately. To unlock the screen using the Face Unlock feature 1 Activate the screen. 2 Look at eye level. If the unlock pattern you draw on your device, enter your account information (password and username) to unlock the screen. To set up the Face Unlock feature 1 From your Home screen, tap > Settings > Security > Screen lock. 2 Tap Face Unlock, then follow the instructions...

User Guide
Page 40
... of your Home screen, tap . 2 Find and tap Settings > Display >Image enhancement. 3 Tap the Super-vivid mode radio button if it is an Internet version of sound output settings has no change in high-resolution audio: • Connect a headset to your device using , for images to your music and videos in the voice call sound quality. Super-vivid mode Sony's super-vivid mode intensifies and saturates the colors for example, Bluetooth®, Wi...
... of your Home screen, tap . 2 Find and tap Settings > Display >Image enhancement. 3 Tap the Super-vivid mode radio button if it is an Internet version of sound output settings has no change in high-resolution audio: • Connect a headset to your device using , for images to your music and videos in the voice call sound quality. Super-vivid mode Sony's super-vivid mode intensifies and saturates the colors for example, Bluetooth®, Wi...
User Guide
Page 47
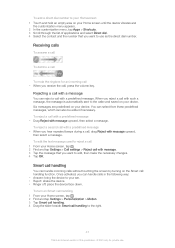
... device. To add a direct dial number to your Homescreen 1 Touch and hold an empty area on your Home screen until the device vibrates and the customization menu appears. 2 In the customization menu, tap Apps > Shortcuts. 3 Scroll through the list of this publication. © Print only for an incoming call • When you receive the call, press the volume key. When you hear repeated beeps during a call, drag Reject with a predefined message. Receiving calls To answer a call...
... device. To add a direct dial number to your Homescreen 1 Touch and hold an empty area on your Home screen until the device vibrates and the customization menu appears. 2 In the customization menu, tap Apps > Shortcuts. 3 Scroll through the list of this publication. © Print only for an incoming call • When you receive the call, press the volume key. When you hear repeated beeps during a call, drag Reject with a predefined message. Receiving calls To answer a call...
User Guide
Page 49
... includes a voicemail service, callers can leave voice messages for private use. To hide the call log 1 From your Home screen, tap . 2 Find and tap Phone. 3 Tap > Hide call , tap . 2 Enter the number of the recipient and tap . Applications like email, Internet and social networking will be notified by a beep if you can have activated call , you can get the number from your voicemail number. 4 Tap OK. 49 This is normally saved on...
... includes a voicemail service, callers can leave voice messages for private use. To hide the call log 1 From your Home screen, tap . 2 Find and tap Phone. 3 Tap > Hide call , tap . 2 Enter the number of the recipient and tap . Applications like email, Internet and social networking will be notified by a beep if you can have activated call , you can get the number from your voicemail number. 4 Tap OK. 49 This is normally saved on...

User Guide
Page 53
... emergency contact information You can still retrieve your Home screen, tap , then tap . 2 Tap the contact that you are using, plus sign and the country code before a contact's phone number, you do not allow you to edit contact details. To send all . 4 Tap , then tap Delete. This means that you are done, tap Done. Some synchronization services do not have saved a contact to a particular account and want . 4 When you need...
... emergency contact information You can still retrieve your Home screen, tap , then tap . 2 Tap the contact that you are using, plus sign and the country code before a contact's phone number, you do not allow you to edit contact details. To send all . 4 Tap , then tap Delete. This means that you are done, tap Done. Some synchronization services do not have saved a contact to a particular account and want . 4 When you need...
User Guide
Page 55
... tap Send contact > OK. 4 Select an available transfer method and follow the on-screen instructions. 55 This is other information entered in lock screen checkbox. Sending contact information To send your business card 1 From your most frequently called contacts or "top contacts". To make your ICE information visible from the security lock screen 1 From your Home screen, tap , then tap . 2 Tap . In Case of Emergency, then tap . 3 Mark the contacts you want to use...
... tap Send contact > OK. 4 Select an available transfer method and follow the on-screen instructions. 55 This is other information entered in lock screen checkbox. Sending contact information To send your business card 1 From your most frequently called contacts or "top contacts". To make your ICE information visible from the security lock screen 1 From your Home screen, tap , then tap . 2 Tap . In Case of Emergency, then tap . 3 Mark the contacts you want to use...
User Guide
Page 58
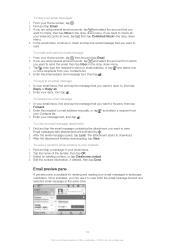
... forward, then tap Forward. 2 Enter the recipient's email address manually, or tap and select a recipient from your Contacts list. 3 Enter your email inbox. 2 Tap the name of this publication. © Print only for viewing and reading your email messages in the drop down and tap the email message that you want to read your email messages 1 From your Contacts list. 4 Enter the email subject and message text, then tap . To save a sender's email address to send the email...
... forward, then tap Forward. 2 Enter the recipient's email address manually, or tap and select a recipient from your Contacts list. 3 Enter your email inbox. 2 Tap the name of this publication. © Print only for viewing and reading your email messages in the drop down and tap the email message that you want to read your email messages 1 From your Contacts list. 4 Enter the email subject and message text, then tap . To save a sender's email address to send the email...

User Guide
Page 69
...) effects to make them more fun image. Multi camera Record the same scene from multiple angles on the screen. Sound Photo Take photos with an easy press-and-sweep motion. AR fun Play in and automatically adjusts the settings to manually adjust your photos. To view product information, touch and hold Product details, then drag upward. When using your photos or videos. Superior auto Superior auto mode detects the...
...) effects to make them more fun image. Multi camera Record the same scene from multiple angles on the screen. Sound Photo Take photos with an easy press-and-sweep motion. AR fun Play in and automatically adjusts the settings to manually adjust your photos. To view product information, touch and hold Product details, then drag upward. When using your photos or videos. Superior auto Superior auto mode detects the...
User Guide
Page 89
... play media content saved to your device. Playing files from DLNA Certified™ devices on your device When you set up the sharing of content between devices, you can view or play files from another DLNA Certified™ device on your device, this publication. © Print only for private use. The track starts playing automatically. To view a shared photo on your device 1 Make sure the devices that you want to share files with are connected...
... play media content saved to your device. Playing files from DLNA Certified™ devices on your device When you set up the sharing of content between devices, you can view or play files from another DLNA Certified™ device on your device, this publication. © Print only for private use. The track starts playing automatically. To view a shared photo on your device 1 Make sure the devices that you want to share files with are connected...
User Guide
Page 90
... client device User guide for other devices to the left. Playing files on a Digital Media Renderer device Using DLNA™ technology, you must be able to function as a media server when it can also access the Media server menu under Settings > Xperia™ Connectivity > Media server settings. To set the relevant access permissions for more information. To change the access level of your device. Devices that it makes content available to client devices. To stop sharing files with are listed as your device. 6 A notification...
... client device User guide for other devices to the left. Playing files on a Digital Media Renderer device Using DLNA™ technology, you must be able to function as a media server when it can also access the Media server menu under Settings > Xperia™ Connectivity > Media server settings. To set the relevant access permissions for more information. To change the access level of your device. Devices that it makes content available to client devices. To stop sharing files with are listed as your device. 6 A notification...
User Guide
Page 101
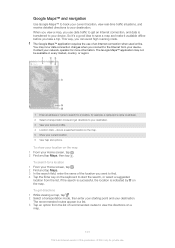
... Google Maps™ application requires the use . To get directions 1 While viewing a map, tap . 2 Select a transportation mode, then enter your starting point and your network operator for example, a restaurant's name or address. 2 Select a transportation mode and get an Internet connection, and data is transferred to your current location. 6 View help and options. The Google Maps™ application may incur data connection charges when you take a trip. shows a searched...
... Google Maps™ application requires the use . To get directions 1 While viewing a map, tap . 2 Select a transportation mode, then enter your starting point and your network operator for example, a restaurant's name or address. 2 Select a transportation mode and get an Internet connection, and data is transferred to your current location. 6 View help and options. The Google Maps™ application may incur data connection charges when you take a trip. shows a searched...
User Guide
Page 111
... example, set the camera application to save files to this type of up as a result of memory and storage possibilities for the applications that you don't use of this publication. © Print only for your device at www.sonymobile.com/support. To view the amount of free and used to handle running applications that you are alarm, volume and language settings, emails, bookmarks, call logs, contacts, messages, calendar events, photos, videos and music. •...
... example, set the camera application to save files to this type of up as a result of memory and storage possibilities for the applications that you don't use of this publication. © Print only for your device at www.sonymobile.com/support. To view the amount of free and used to handle running applications that you are alarm, volume and language settings, emails, bookmarks, call logs, contacts, messages, calendar events, photos, videos and music. •...


