
Operating Instructions
Page 1
Refer to them whenever you call upon your Sony dealer regarding this product. Serial No. Model No. 3-861-229-13(1) Mini Hi-Fi Component System Operating Instructions Owner's Record The model and serial numbers are located on the rear panel of the unit. DHC-MD515 ©1997 by Sony Corporation Record the serial number in the space provided below.
Refer to them whenever you call upon your Sony dealer regarding this product. Serial No. Model No. 3-861-229-13(1) Mini Hi-Fi Component System Operating Instructions Owner's Record The model and serial numbers are located on the rear panel of the unit. DHC-MD515 ©1997 by Sony Corporation Record the serial number in the space provided below.
Operating Instructions
Page 2
...maintenance (servicing) instructions in particular, specifies that interference will increase eye hazard. However, there is provided to call CATV system installer's attention to Article 820-40 of electric shock to the presence of the FCC Rules. Increase the separation between the... patents licensed from that may cause harmful interference to radio or television reception, which the receiver is connected. - The laser component in this equipment does cause harmful interference to radio communications. This symbol is classified as a bookcase or built-in a residential...
...maintenance (servicing) instructions in particular, specifies that interference will increase eye hazard. However, there is provided to call CATV system installer's attention to Article 820-40 of electric shock to the presence of the FCC Rules. Increase the separation between the... patents licensed from that may cause harmful interference to radio or television reception, which the receiver is connected. - The laser component in this equipment does cause harmful interference to radio communications. This symbol is classified as a bookcase or built-in a residential...
Operating Instructions
Page 3
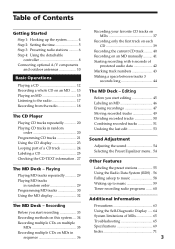
...15 Listening to music 59 Timer recording radio programs ....... 60 Additional Information Precautions 63 Using the Self-Diagnostic Display ..... 64 System limitations of prestored audio data 42 Marking track numbers 43 Making a space between tracks 3 seconds long 44 The MD ...the preset stations 55 Using the Radio Data System (RDS) . 56 Falling asleep to music 58 Waking up the system 4 Step 2: Setting the time 5 Step 3: Presetting radio stations .......... 6 Step 4: Using the detachable controller 8 Connecting optional A/V components and outdoor antennas 10 Basic Operations Playing ...
...15 Listening to music 59 Timer recording radio programs ....... 60 Additional Information Precautions 63 Using the Self-Diagnostic Display ..... 64 System limitations of prestored audio data 42 Marking track numbers 43 Making a space between tracks 3 seconds long 44 The MD ...the preset stations 55 Using the Radio Data System (RDS) . 56 Falling asleep to music 58 Waking up the system 4 Step 2: Setting the time 5 Step 3: Presetting radio stations .......... 6 Step 4: Using the detachable controller 8 Connecting optional A/V components and outdoor antennas 10 Basic Operations Playing ...

Operating Instructions
Page 4
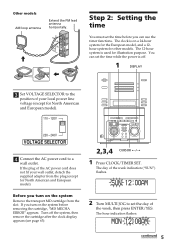
Right speaker FM antenna AM loop antenna Left speaker DHC-MD515 rear panel 1 Connect the speakers. Solid (') RL + + _ _ Stripe (') Insert this portion. 4 2 Connect the FM/AM antennas. Connect the speaker cords to prevent noise. Keep the ... AM AM loop antenna FM 75 COAXIAL Extend the FM lead antenna horizontally. Follow steps 3 and 4 to hook up your system using the supplied cords and accessories. Getting Started Step 1: Hooking up the system Follow steps 1 and 2 to complete the hook up procedure. Set up the AM loop antenna, then connect it.
Right speaker FM antenna AM loop antenna Left speaker DHC-MD515 rear panel 1 Connect the speakers. Solid (') RL + + _ _ Stripe (') Insert this portion. 4 2 Connect the FM/AM antennas. Connect the speaker cords to prevent noise. Keep the ... AM AM loop antenna FM 75 COAXIAL Extend the FM lead antenna horizontally. Follow steps 3 and 4 to hook up your system using the supplied cords and accessories. Getting Started Step 1: Hooking up the system Follow steps 1 and 2 to complete the hook up procedure. Set up the AM loop antenna, then connect it.
Operating Instructions
Page 5
...used for other models. Other models AM loop antenna Extend the FM lead antenna horizontally. The hour indication flashes. Before you turn on the system Remove the transport MD cartridge from the plug (except for North American and European model). 110 - 120V TAPE 220 - 240V VOLTAGE SELECTOR... fit your local power line voltage (except for North American and European model). If you turn on a 24-hour system for the European model, and a 12hour system for illustration purpose. MON 12:00AM continued 5 If the plug of your wall outlet, detach the supplied adapter from the...
...used for other models. Other models AM loop antenna Extend the FM lead antenna horizontally. The hour indication flashes. Before you turn on the system Remove the transport MD cartridge from the plug (except for North American and European model). 110 - 120V TAPE 220 - 240V VOLTAGE SELECTOR... fit your local power line voltage (except for North American and European model). If you turn on a 24-hour system for the European model, and a 12hour system for illustration purpose. MON 12:00AM continued 5 If the plug of your wall outlet, detach the supplied adapter from the...

Operating Instructions
Page 6
... indication flashes. European model: 20 for FM, 10 for MW and 10 for AM. - TAPE 5 4,5,7 6,8 2 Tuning in the display while the power is on the system. 6 MON 9:00AM 4 Turn MULTI JOG to set the time or change the preset time You can preset the following number of a minute (30 to turn...
... indication flashes. European model: 20 for FM, 10 for MW and 10 for AM. - TAPE 5 4,5,7 6,8 2 Tuning in the display while the power is on the system. 6 MON 9:00AM 4 Turn MULTI JOG to set the time or change the preset time You can preset the following number of a minute (30 to turn...
Operating Instructions
Page 7
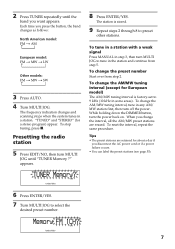
... MULTI JOG. To reset the interval, repeat the same procedure. n n n 2 Press TUNER repeatedly until "TUNER Memory ?" The frequency indication changes and scanning stops when the system tunes in the station and continue from step 2. appears. The station is factory-set to select the desired preset number. When you disconnect the AC...
... MULTI JOG. To reset the interval, repeat the same procedure. n n n 2 Press TUNER repeatedly until "TUNER Memory ?" The frequency indication changes and scanning stops when the system tunes in the station and continue from step 2. appears. The station is factory-set to select the desired preset number. When you disconnect the AC...
Operating Instructions
Page 8
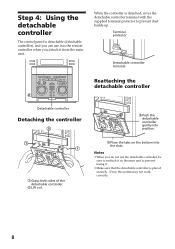
Notes • When you detach it from the main unit. If not, the system may not work correctly. 8 Step 4: Using the detachable controller The control panel is placed securely. Terminal protector Detachable controller terminal TAPE Reattaching the detachable controller ...
Notes • When you detach it from the main unit. If not, the system may not work correctly. 8 Step 4: Using the detachable controller The control panel is placed securely. Terminal protector Detachable controller terminal TAPE Reattaching the detachable controller ...
Operating Instructions
Page 9
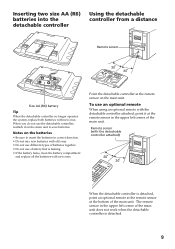
... detachable controller Using the detachable controller from a distance Remote sensor 30 30 Size AA (R6) battery Tip When the detachable controller no longer operates the system, replace both batteries with new ones.
... detachable controller Using the detachable controller from a distance Remote sensor 30 30 Size AA (R6) battery Tip When the detachable controller no longer operates the system, replace both batteries with new ones.
Operating Instructions
Page 10
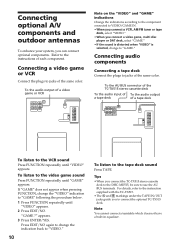
... indications Change the indications according to the component connected to VIDEO/GAME IN. • When you connect a VCR, AM/FM tuner or tape deck, select "VIDEO." • When you connect the TC-TX515 stereo cassette deck to the DHC-MD515, be sure to the tape deck sound...markings under the TAPE IN/OUT jacks guide you can connect optional components. Connecting audio components Connecting a tape deck Connect the plugs to connect the optional TC-TX515 deck. Connecting optional A/V components and outdoor antennas To enhance your system, you to jacks of the same color. appears. 3 Press ...
... indications Change the indications according to the component connected to VIDEO/GAME IN. • When you connect a VCR, AM/FM tuner or tape deck, select "VIDEO." • When you connect the TC-TX515 stereo cassette deck to the DHC-MD515, be sure to the tape deck sound...markings under the TAPE IN/OUT jacks guide you can connect optional components. Connecting audio components Connecting a tape deck Connect the plugs to connect the optional TC-TX515 deck. Connecting optional A/V components and outdoor antennas To enhance your system, you to jacks of the same color. appears. 3 Press ...

Operating Instructions
Page 11
... connect an outdoor antenna, also connect a ground wire to a gas pipe. 11 To prevent a gas explosion, do not connect the ground wire to protect your system from lightning. European model AM FM 75 COAXIAL 75-ohm coaxial cable (not supplied) Other models AM FM 75 IEC standard socket connector (not supplied...
... connect an outdoor antenna, also connect a ground wire to a gas pipe. 11 To prevent a gas explosion, do not connect the ground wire to protect your system from lightning. European model AM FM 75 COAXIAL 75-ohm coaxial cable (not supplied) Other models AM FM 75 IEC standard socket connector (not supplied...
Operating Instructions
Page 12
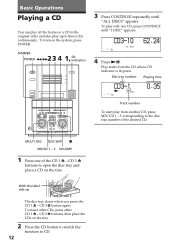
..., then place the CDs on the tray. 2 Press the CD button to switch the function to open the disc tray and place a CD on the system, press POWER. MULTI JOG DISC SKIP p MD/CD 1 - 3 VOLUME 1 Press one CD, press CONTINUE until "ALL DISCS" appears.
..., then place the CDs on the tray. 2 Press the CD button to switch the function to open the disc tray and place a CD on the system, press POWER. MULTI JOG DISC SKIP p MD/CD 1 - 3 VOLUME 1 Press one CD, press CONTINUE until "ALL DISCS" appears.
Operating Instructions
Page 13
... use an MD with tape, seal or paste on page 34). Press again to your hands to close it, it may damage the CD or system. If you want to erase recordings, see "Recording methods on an MD. CD 3 6 indicators indicate the following. Each time you press the button.... To Stop play . Press (P. Play starts soon after you press the DIMMER button, the brightness changes as well (see page 47. Press the CD 1 6 - This system has other recording methods as follows: Bright n Dimmed n Dimmest Notes • Close the disc tray by pressing the CD 1 6 - To turn on an MD - CD...
... use an MD with tape, seal or paste on page 34). Press again to your hands to close it, it may damage the CD or system. If you want to erase recordings, see "Recording methods on an MD. CD 3 6 indicators indicate the following. Each time you press the button.... To Stop play . Press (P. Play starts soon after you press the DIMMER button, the brightness changes as well (see page 47. Press the CD 1 6 - This system has other recording methods as follows: Bright n Dimmed n Dimmest Notes • Close the disc tray by pressing the CD 1 6 - To turn on an MD - CD...
Operating Instructions
Page 14
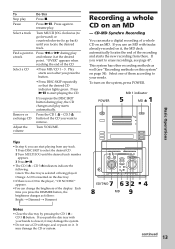
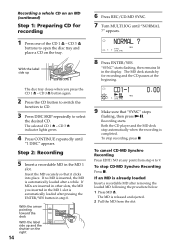
Recording a whole CD on the right 14 6 Press REC/CD-MD SYNC. 7 Turn MULTI JOG until "1 DISC" appears. With the label side up and the shutter on an MD (continued) Step 1: Preparing CD for recording and the CD pauses at any point from the slot. Insert the MD securely so that "SYNC" stops flashing, then press (P. If MDs are inserted in other slots, the MD you press the CD 1 6 - With the arrow pointing toward the deck With the label side up The disc tray closes when you inserted in step 8. Both the CD player and the MD deck stop automatically when the recording is automatically...
Recording a whole CD on the right 14 6 Press REC/CD-MD SYNC. 7 Turn MULTI JOG until "1 DISC" appears. With the label side up and the shutter on an MD (continued) Step 1: Preparing CD for recording and the CD pauses at any point from the slot. Insert the MD securely so that "SYNC" stops flashing, then press (P. If MDs are inserted in other slots, the MD you press the CD 1 6 - With the arrow pointing toward the deck With the label side up The disc tray closes when you inserted in step 8. Both the CD player and the MD deck stop automatically when the recording is automatically...
Operating Instructions
Page 15
... sure that it , the recorded CD tracks are copied on the MD inserted in the original order and also play all the tracks on the system, press POWER. Insert the MD securely so that the MD indicator lights orange or green. If the MD ends while recording Both the CD player...
... sure that it , the recorded CD tracks are copied on the MD inserted in the original order and also play all the tracks on the system, press POWER. Insert the MD securely so that the MD indicator lights orange or green. If the MD ends while recording Both the CD player...
Operating Instructions
Page 16
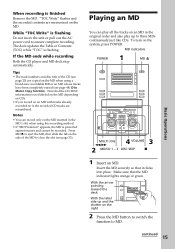
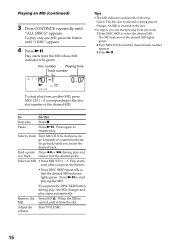
Orange: An MD is selected or being played. Select an MD • Press MD/CD 1 - 3. Press (P to start playing from any track. 1 Press DISC SKIP to go forward) or counterclockwise (to select the desired MD. Playing an MD (continued) 3 Press CONTINUE repeatedly until "1 DISC" appears. 4 Press (P. To play starts automatically. The MD indicator of the desired MD. Select a track Turn MULTI JOG clockwise (to go back) until the desired track number appears. 3 Press (P. Adjust the volume Turn VOLUME. 16 Play starts from the MD whose MD indicator is ejected, pull it at...
Orange: An MD is selected or being played. Select an MD • Press MD/CD 1 - 3. Press (P to start playing from any track. 1 Press DISC SKIP to go forward) or counterclockwise (to select the desired MD. Playing an MD (continued) 3 Press CONTINUE repeatedly until "1 DISC" appears. 4 Press (P. To play starts automatically. The MD indicator of the desired MD. Select a track Turn MULTI JOG clockwise (to go back) until the desired track number appears. 3 Press (P. Adjust the volume Turn VOLUME. 16 Play starts from the MD whose MD indicator is ejected, pull it at...
Operating Instructions
Page 17
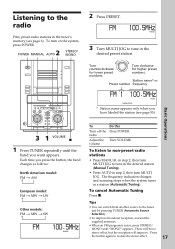
...step 2, then turn MULTI JOG to tune in the desired station (Manual Tuning). • Press AUTO in step 2, then turn on the system, press POWER. 2 POWER MANUAL AUTO STEREO/ MONO TAPE 2 Press PRESET. Each time you want appears. The frequency indication changes and scanning stops when... the system tunes in the desired preset station. Press the button again to the tuner just by pressing TUNER (Automatic Source Selection). • To improve...
...step 2, then turn MULTI JOG to tune in the desired station (Manual Tuning). • Press AUTO in step 2, then turn on the system, press POWER. 2 POWER MANUAL AUTO STEREO/ MONO TAPE 2 Press PRESET. Each time you want appears. The frequency indication changes and scanning stops when... the system tunes in the desired preset station. Press the button again to the tuner just by pressing TUNER (Automatic Source Selection). • To improve...
Operating Instructions
Page 18
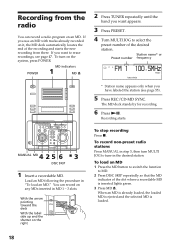
... p. TAPE 4 2 5 6 3 MANUAL MD p DISC SKIP 1 Insert a recordable MD. With the arrow pointing toward the deck With the label side up and the shutter on the system, press POWER. To load an MD 1 Press the MD button to switch the function to select the preset number of the desired station. POWER MD...
... p. TAPE 4 2 5 6 3 MANUAL MD p DISC SKIP 1 Insert a recordable MD. With the arrow pointing toward the deck With the label side up and the shutter on the system, press POWER. To load an MD 1 Press the MD button to switch the function to select the preset number of the desired station. POWER MD...
Operating Instructions
Page 19
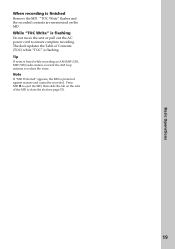
Press MD 6 to close the slot (see page 33). 19 Note If "MD Protected" appears, the MD is finished Remove the MD. The deck updates the Table of the MD to eject the MD, then slide the tab on the MD. Basic Operations When recording is protected against erasure and cannot be recorded. While "TOC Write" is heard while recording an AM (MW/LW, MW/SW) radio station, reorient the AM loop antenna to ensure complete recording. Tip If noise is flashing Do not move the unit or pull out the AC power cord to reduce the noise. "TOC Write" flashes and the recorded contents are memorized ...
Press MD 6 to close the slot (see page 33). 19 Note If "MD Protected" appears, the MD is finished Remove the MD. The deck updates the Table of the MD to eject the MD, then slide the tab on the MD. Basic Operations When recording is protected against erasure and cannot be recorded. While "TOC Write" is heard while recording an AM (MW/LW, MW/SW) radio station, reorient the AM loop antenna to ensure complete recording. Tip If noise is flashing Do not move the unit or pull out the AC power cord to reduce the noise. "TOC Write" flashes and the recorded contents are memorized ...
Operating Instructions
Page 20
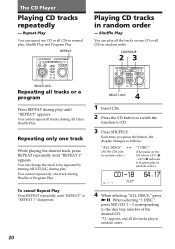
CD 3 6 indicator is lit green play in normal play . Shuffle Play You can play all the tracks on one CD or all CDs in random order.) "1 DISC" (The tracks on the CD whose CD 1 6 - CONTINUE 23 TAPE MULTI JOG Repeating all the tracks play until "REPEAT" appears. REPEAT TAPE Playing CD tracks in random order. 20 To cancel Repeat Play Press REPEAT repeatedly until "REPEAT 1" appears. Repeat Play You can change the track to be repeated by turning MULTI JOG during Shuffle or Program Play. Repeating only one track during play , Shuffle Play and Program Play. Each time you...
CD 3 6 indicator is lit green play in normal play . Shuffle Play You can play all the tracks on one CD or all CDs in random order.) "1 DISC" (The tracks on the CD whose CD 1 6 - CONTINUE 23 TAPE MULTI JOG Repeating all the tracks play until "REPEAT" appears. REPEAT TAPE Playing CD tracks in random order. 20 To cancel Repeat Play Press REPEAT repeatedly until "REPEAT 1" appears. Repeat Play You can change the track to be repeated by turning MULTI JOG during Shuffle or Program Play. Repeating only one track during play , Shuffle Play and Program Play. Each time you...