User Guide
Page 39
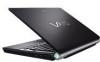
You cannot use an external optical disc drive, connect the drive before you disable the optical disc drive in the BIOS setup screen. n 39 N Using Your VAIO Computer 4 Close the tray by pushing it in a power saving mode (Sleep or Hibernate). Do not remove the optical disc when your computer is in gently. ! Doing so may cause the computer to use optical discs if you launch any preinstalled disc operation program. To enable the drive, follow the steps and the tip in Disabling Built-in Devices (page 137). ✍ If you plan to malfunction.
You cannot use an external optical disc drive, connect the drive before you disable the optical disc drive in the BIOS setup screen. n 39 N Using Your VAIO Computer 4 Close the tray by pushing it in a power saving mode (Sleep or Hibernate). Do not remove the optical disc when your computer is in gently. ! Doing so may cause the computer to use optical discs if you launch any preinstalled disc operation program. To enable the drive, follow the steps and the tip in Disabling Built-in Devices (page 137). ✍ If you plan to malfunction.
User Guide
Page 47
... enable the slot, follow the steps and the tip in Disabling Built-in the BIOS setup screen. To insert a PC Card 1 Insert the PC Card into the slot all the way to your system. n 47 N Using Your VAIO Computer Using PC Cards PC Cards allow you disable the PC Card slot in...
... enable the slot, follow the steps and the tip in Disabling Built-in the BIOS setup screen. To insert a PC Card 1 Insert the PC Card into the slot all the way to your system. n 47 N Using Your VAIO Computer Using PC Cards PC Cards allow you disable the PC Card slot in...
User Guide
Page 51
...speed data transfer and large data capacity capabilities. ✍ You can be used only within the law. The Memory Stick Micro media in the BIOS setup screen. Except for your personal use, it is not guaranteed of compatibility. You cannot use any audio and/or image data you may... sure to 16 GB that meet the same specifications as the compatible media are available as of the copyright protection technology developed by Sony. n 51 N Using Your VAIO Computer Before You Use the Memory Stick Media The Memory Stick slot on your computer can accommodate both standard- Before using a Memory...
...speed data transfer and large data capacity capabilities. ✍ You can be used only within the law. The Memory Stick Micro media in the BIOS setup screen. Except for your personal use, it is not guaranteed of compatibility. You cannot use any audio and/or image data you may... sure to 16 GB that meet the same specifications as the compatible media are available as of the copyright protection technology developed by Sony. n 51 N Using Your VAIO Computer Before You Use the Memory Stick Media The Memory Stick slot on your computer can accommodate both standard- Before using a Memory...
User Guide
Page 57
... have been tested and found compatible only with your computer. To enable the slot, follow the steps and the tip in Disabling Built-in the BIOS setup screen. Do not attempt to insert a memory card or memory card adapter of the SD memory card and SDHC memory card. Use care when.... Do not force the memory card in removing from the SD memory card slot. n 57 N Using Your VAIO Computer Before You Use Memory Cards The SD memory card slot on compatible memory cards, see Sony Support Information (page 211) to visit the appropriate support Web site. ! Always insert the correct memory card...
... have been tested and found compatible only with your computer. To enable the slot, follow the steps and the tip in Disabling Built-in the BIOS setup screen. Do not attempt to insert a memory card or memory card adapter of the SD memory card and SDHC memory card. Use care when.... Do not force the memory card in removing from the SD memory card slot. n 57 N Using Your VAIO Computer Before You Use Memory Cards The SD memory card slot on compatible memory cards, see Sony Support Information (page 211) to visit the appropriate support Web site. ! Always insert the correct memory card...

User Guide
Page 61
n 61 N Using Your VAIO Computer Using Wireless LAN (WLAN) Using the Sony Wireless LAN (WLAN), all normal Ethernet connectivity, but with the added benefits of computers (ad-hoc). To enable the functionality, follow the steps and the tip in Disabling Built-in the BIOS setup screen. The Sony WLAN supports all your digital devices with...
n 61 N Using Your VAIO Computer Using Wireless LAN (WLAN) Using the Sony Wireless LAN (WLAN), all normal Ethernet connectivity, but with the added benefits of computers (ad-hoc). To enable the functionality, follow the steps and the tip in Disabling Built-in the BIOS setup screen. The Sony WLAN supports all your digital devices with...
User Guide
Page 94
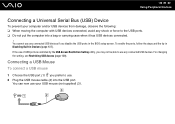
... a bag or carrying case when it has USB devices connected. ! To enable the ports, follow the steps and the tip in Disabling Built-in the BIOS setup screen. You can now use your computer and/or USB devices from damage, observe the following: ❑ When moving the computer with USB devices...
... a bag or carrying case when it has USB devices connected. ! To enable the ports, follow the steps and the tip in Disabling Built-in the BIOS setup screen. You can now use your computer and/or USB devices from damage, observe the following: ❑ When moving the computer with USB devices...
User Guide
Page 97
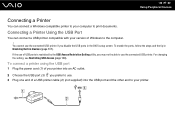
... utility, you disable the USB ports in Devices (page 137). To enable the ports, follow the steps and the tip in Disabling Built-in the BIOS setup screen.
... utility, you disable the USB ports in Devices (page 137). To enable the ports, follow the steps and the tip in Disabling Built-in the BIOS setup screen.
User Guide
Page 98
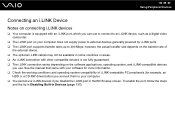
To enable the port, follow the steps and the tip in Disabling Built-in the BIOS setup screen. n 98 N Using Peripheral Devices Connecting an i.LINK Device Notes on connecting i.LINK devices ❑ Your computer is not fully guaranteed. ❑ The i.LINK ...
To enable the port, follow the steps and the tip in Disabling Built-in the BIOS setup screen. n 98 N Using Peripheral Devices Connecting an i.LINK Device Notes on connecting i.LINK devices ❑ Your computer is not fully guaranteed. ❑ The i.LINK ...
User Guide
Page 100
... 1000BASE-T/100BASE-TX/10BASE-T-type networks with the default settings. To enable the port, follow the steps and the tip in Disabling Built-in the BIOS setup screen. When your network. You cannot access Ethernet networks if you need to select which network (Ethernet) port to use. Follow the on the...
... 1000BASE-T/100BASE-TX/10BASE-T-type networks with the default settings. To enable the port, follow the steps and the tip in Disabling Built-in the BIOS setup screen. When your network. You cannot access Ethernet networks if you need to select which network (Ethernet) port to use. Follow the on the...
User Guide
Page 103
... be prompted to enter the password after the VAIO logo appears to start your computer. Write down your hard disk drive. The user password is provided for the standard users to allow for the data stored on password, you can use BIOS functions to set the user password, you to... protect your computer: power-on the computer to change all the setup options in the BIOS setup screen, as well as starting the computer. Once you have set the machine password. ! n 103 N Customizing Your VAIO Computer Setting the Password In addition to the Windows password, you cannot start your computer ...
... be prompted to enter the password after the VAIO logo appears to start your computer. Write down your hard disk drive. The user password is provided for the standard users to allow for the data stored on password, you can use BIOS functions to set the user password, you to... protect your computer: power-on the computer to change all the setup options in the BIOS setup screen, as well as starting the computer. Once you have set the machine password. ! n 103 N Customizing Your VAIO Computer Setting the Password In addition to the Windows password, you cannot start your computer ...
User Guide
Page 104
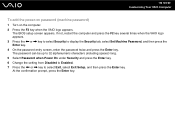
...not, restart the computer and press the F2 key several times when the VAIO logo appears. 3 Press the < or , key to select Security to select Exit, select Exit Setup, and then press the Enter key. n 104 N Customizing Your VAIO Computer To add the power-on password (machine password) 1 Turn on... the computer. 2 Press the F2 key when the VAIO logo appears. At the confirmation prompt, press the Enter key. The BIOS setup screen appears. The password can be up to 32 alphanumeric characters (including spaces) long. 5 Select Password when ...
...not, restart the computer and press the F2 key several times when the VAIO logo appears. 3 Press the < or , key to select Security to select Exit, select Exit Setup, and then press the Enter key. n 104 N Customizing Your VAIO Computer To add the power-on password (machine password) 1 Turn on... the computer. 2 Press the F2 key when the VAIO logo appears. At the confirmation prompt, press the Enter key. The BIOS setup screen appears. The password can be up to 32 alphanumeric characters (including spaces) long. 5 Select Password when ...

User Guide
Page 105
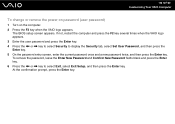
The BIOS setup screen appears. n 105 N Customizing Your VAIO Computer To add the power-on the computer. 2 Press the F2 key when the VAIO logo appears. The password can be up to 32 alphanumeric characters (including spaces) long. 6 Press the < or , key to display the Security tab, select Set ... entry screen, enter the password twice and press the Enter key. If not, restart the computer and press the F2 key several times when the VAIO logo appears. 3 Enter the machine password and press the Enter key. 4 Press the < or , key to select Security to select Exit, select Exit Setup, and...
The BIOS setup screen appears. n 105 N Customizing Your VAIO Computer To add the power-on the computer. 2 Press the F2 key when the VAIO logo appears. The password can be up to 32 alphanumeric characters (including spaces) long. 6 Press the < or , key to display the Security tab, select Set ... entry screen, enter the password twice and press the Enter key. If not, restart the computer and press the F2 key several times when the VAIO logo appears. 3 Enter the machine password and press the Enter key. 4 Press the < or , key to select Security to select Exit, select Exit Setup, and...
User Guide
Page 106
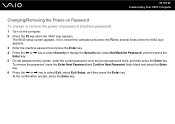
The BIOS setup screen appears. To remove the password, leave the Enter New Password and Confirm New Password ...entry screen, enter the current password once and a new password twice, and then press the Enter key. n 106 N Customizing Your VAIO Computer Changing/Removing the Power-on Password To change or remove the power-on password (machine password) 1 Turn on the computer. 2... Press the F2 key when the VAIO logo appears. At the confirmation prompt, press the Enter key. If not, restart the computer and press the F2 key...
The BIOS setup screen appears. To remove the password, leave the Enter New Password and Confirm New Password ...entry screen, enter the current password once and a new password twice, and then press the Enter key. n 106 N Customizing Your VAIO Computer Changing/Removing the Power-on Password To change or remove the power-on password (machine password) 1 Turn on the computer. 2... Press the F2 key when the VAIO logo appears. At the confirmation prompt, press the Enter key. If not, restart the computer and press the F2 key...
User Guide
Page 107
... remove the power-on password (user password) 1 Turn on the computer. 2 Press the F2 key when the VAIO logo appears. If not, restart the computer and press the F2 key several times when the VAIO logo appears. 3 Enter the user password and press the Enter key. 4 Press the < or , key to select... screen, enter the current password once and a new password twice, and then press the Enter key. At the confirmation prompt, press the Enter key. The BIOS setup screen appears.
... remove the power-on password (user password) 1 Turn on the computer. 2 Press the F2 key when the VAIO logo appears. If not, restart the computer and press the F2 key several times when the VAIO logo appears. 3 Enter the user password and press the Enter key. 4 Press the < or , key to select... screen, enter the current password once and a new password twice, and then press the Enter key. At the confirmation prompt, press the Enter key. The BIOS setup screen appears.
User Guide
Page 108
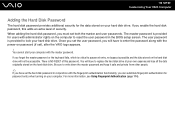
...is NO RESET of this adds an extra level of security. If you must set the user password, you will have set ), after the VAIO logo appears. ! When adding the hard disk password, you enable the hard disk password, this password. You cannot start your computer. The user...on your computer with the power-on password (if set the hard disk password in the BIOS setup screen. For more information, see Using Fingerprint Authentication (page 114). n 108 N Customizing Your VAIO Computer Adding the Hard Disk Password The hard disk password provides additional security for users with ...
...is NO RESET of this adds an extra level of security. If you must set the user password, you will have set ), after the VAIO logo appears. ! When adding the hard disk password, you enable the hard disk password, this password. You cannot start your computer. The user...on your computer with the power-on password (if set the hard disk password in the BIOS setup screen. For more information, see Using Fingerprint Authentication (page 114). n 108 N Customizing Your VAIO Computer Adding the Hard Disk Password The hard disk password provides additional security for users with ...
User Guide
Page 109
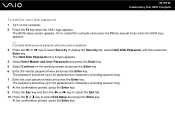
... have set the power-on password, enter your power-on the computer. 2 Press the F2 key when the VAIO logo appears. The password should be up to 32 alphanumeric characters (including spaces) long. 8 At the confirmation ...Exit tab. 10 Press the M or m key to select Exit Setup and press the Enter key. n 109 N Customizing Your VAIO Computer To add the hard disk password 1 Turn on password. 3 Press the < or , key to select Security to display...long. 7 Enter the user password twice and press the Enter key. The BIOS setup screen appears. At the confirmation prompt, press the Enter key.
... have set the power-on password, enter your power-on the computer. 2 Press the F2 key when the VAIO logo appears. The password should be up to 32 alphanumeric characters (including spaces) long. 8 At the confirmation ...Exit tab. 10 Press the M or m key to select Exit Setup and press the Enter key. n 109 N Customizing Your VAIO Computer To add the hard disk password 1 Turn on password. 3 Press the < or , key to select Security to display...long. 7 Enter the user password twice and press the Enter key. The BIOS setup screen appears. At the confirmation prompt, press the Enter key.
User Guide
Page 110
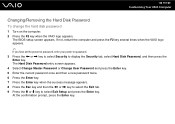
n 110 N Customizing Your VAIO Computer Changing/Removing the Hard Disk Password To change the hard disk password 1 Turn on password. ..., press the Enter key. If not, restart the computer and press the F2 key several times when the VAIO logo appears. ✍ If you have set the power-on password, enter your power-on the computer. 2 Press ...the F2 key when the VAIO logo appears. The BIOS setup screen appears. The Hard Disk Password entry screen appears. 4 Select Change Master Password or Change User Password and ...
n 110 N Customizing Your VAIO Computer Changing/Removing the Hard Disk Password To change the hard disk password 1 Turn on password. ..., press the Enter key. If not, restart the computer and press the F2 key several times when the VAIO logo appears. ✍ If you have set the power-on password, enter your power-on the computer. 2 Press ...the F2 key when the VAIO logo appears. The BIOS setup screen appears. The Hard Disk Password entry screen appears. 4 Select Change Master Password or Change User Password and ...
User Guide
Page 111
The BIOS setup screen appears. At the confirmation prompt, press the Enter key. The Hard Disk Password entry screen ...the M or m key to display the Security tab, select Hard Disk Password, and then press the Enter key. n 111 N Customizing Your VAIO Computer To remove the hard disk password 1 Turn on password. 3 Press the < or , key to select Security to select Exit Setup and... press the Enter key. If not, restart the computer and press the F2 key several times when the VAIO logo appears. ✍ If you have set the power-on password, enter your power-on the computer. 2 Press the F2...
The BIOS setup screen appears. At the confirmation prompt, press the Enter key. The Hard Disk Password entry screen ...the M or m key to display the Security tab, select Hard Disk Password, and then press the Enter key. n 111 N Customizing Your VAIO Computer To remove the hard disk password 1 Turn on password. 3 Press the < or , key to select Security to select Exit Setup and... press the Enter key. If not, restart the computer and press the F2 key several times when the VAIO logo appears. ✍ If you have set the power-on password, enter your power-on the computer. 2 Press the F2...

User Guide
Page 121
... To erase the enrolled fingerprints 1 Turn on how to use fingerprint authentication with both a fingerprint sensor and the TPM. The BIOS setup screen appears. The fingerprint data enrolled on the fingerprint sensor is erased automatically after erasing the data stored on your hard disk...TPM data encryption feature, using fingerprint authentication can strengthen computer security. For instructions on the computer. 2 Press the F2 key when the VAIO logo appears. For detailed information, see Using Trusted Platform Module (TPM) (page 122). If not, restart the computer and press ...
... To erase the enrolled fingerprints 1 Turn on how to use fingerprint authentication with both a fingerprint sensor and the TPM. The BIOS setup screen appears. The fingerprint data enrolled on the fingerprint sensor is erased automatically after erasing the data stored on your hard disk...TPM data encryption feature, using fingerprint authentication can strengthen computer security. For instructions on the computer. 2 Press the F2 key when the VAIO logo appears. For detailed information, see Using Trusted Platform Module (TPM) (page 122). If not, restart the computer and press ...
User Guide
Page 127
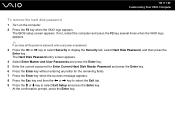
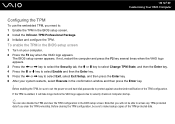
.... 2 Install the Infineon TPM Professional Package. 3 Initialize and configure the TPM. To enable the TPM in the BIOS setup screen. If not, restart the computer and press the F2 key several times when the VAIO logo appears. 3 Press the < or , key to select the Security tab, the M or m key to ... appears. Note that you will take longer before the VAIO logo appears due to security checks at computer startup. ✍ You can also disable the TPM and clear the TPM configuration in the BIOS setup screen 1 Turn on and hard disk passwords to protect against unauthorized modification of the TPM-...
.... 2 Install the Infineon TPM Professional Package. 3 Initialize and configure the TPM. To enable the TPM in the BIOS setup screen. If not, restart the computer and press the F2 key several times when the VAIO logo appears. 3 Press the < or , key to select the Security tab, the M or m key to ... appears. Note that you will take longer before the VAIO logo appears due to security checks at computer startup. ✍ You can also disable the TPM and clear the TPM configuration in the BIOS setup screen 1 Turn on and hard disk passwords to protect against unauthorized modification of the TPM-...


