

User Guide
Page 3
... Connecting an External Display ...87 Selecting Display Modes...95 Using the Multiple Monitors Function ...96 Connecting an External Microphone ...98 Connecting a Universal Serial Bus (USB) Device...99 Connecting a Printer ...102 Connecting an i.LINK Device ...103 Connecting to a Network (LAN) ...105 Customizing Your VAIO Computer ...107 Setting the Password ...108 Setting Up Your Computer with VAIO Control Center 110 Using the Power Saving Modes ...111 Managing Power with VAIO Power Management ...116 Configuring Your Modem ...118 Upgrading Your VAIO Computer...120 Adding and Removing Memory...
... Connecting an External Display ...87 Selecting Display Modes...95 Using the Multiple Monitors Function ...96 Connecting an External Microphone ...98 Connecting a Universal Serial Bus (USB) Device...99 Connecting a Printer ...102 Connecting an i.LINK Device ...103 Connecting to a Network (LAN) ...105 Customizing Your VAIO Computer ...107 Setting the Password ...108 Setting Up Your Computer with VAIO Control Center 110 Using the Power Saving Modes ...111 Managing Power with VAIO Power Management ...116 Configuring Your Modem ...118 Upgrading Your VAIO Computer...120 Adding and Removing Memory...
User Guide
Page 8
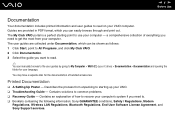
... My Club VAIO. 2 Click Documentation. 3 Select the guide you need to. ❑ Booklets containing the following information: Sony GUARANTEE conditions, Safety / Regulations, Modem Regulations, Wireless LAN Regulations, Bluetooth Regulations, End User Software License Agreement, and Sony Support services. Describes the process from your VAIO computer. Guides are collected under Documentation, which you need to get the most from unpacking to starting point to common problems. ❑ Recovery Guide - You...
... My Club VAIO. 2 Click Documentation. 3 Select the guide you need to. ❑ Booklets containing the following information: Sony GUARANTEE conditions, Safety / Regulations, Modem Regulations, Wireless LAN Regulations, Bluetooth Regulations, End User Software License Agreement, and Sony Support services. Describes the process from your VAIO computer. Guides are collected under Documentation, which you need to get the most from unpacking to starting point to common problems. ❑ Recovery Guide - You...

User Guide
Page 22
... Hibernate mode or off the indicator. The Scr Lk key functions differently depending on , blinks in the Memory Stick Duo/PRO Duo slot. (Do not enter Standby mode or turn off . Indicator Power 1 Battery e Memory Stick Duo/PRO Duo Muting % Built-in MOTION EYE camera* Optical disc drive Hard disk Num lock Caps lock Scroll lock Functions Illuminates when the power of power, and double-blinks when the battery is in uppercase. Illuminates when the computer is using and does not work with the following indicator lights. Illuminates...
... Hibernate mode or off the indicator. The Scr Lk key functions differently depending on , blinks in the Memory Stick Duo/PRO Duo slot. (Do not enter Standby mode or turn off . Indicator Power 1 Battery e Memory Stick Duo/PRO Duo Muting % Built-in MOTION EYE camera* Optical disc drive Hard disk Num lock Caps lock Scroll lock Functions Illuminates when the power of power, and double-blinks when the battery is in uppercase. Illuminates when the computer is using and does not work with the following indicator lights. Illuminates...

User Guide
Page 33
... keyboard, but has additional keys that perform model-specific tasks. To decrease lightness intensity, press Fn+F5 and then m or Combinations/Feature Fn + 8 (F5/F6): brightness control Fn + /T (F7): display output Functions Adjusts the LCD brightness of your computer screen. Combinations and Functions with the Fn Key ✍ Some functions are not available until Windows is very similar to help you use the keyboard. n 33 N Using Your VAIO Computer Using the Keyboard Your keyboard...
... keyboard, but has additional keys that perform model-specific tasks. To decrease lightness intensity, press Fn+F5 and then m or Combinations/Feature Fn + 8 (F5/F6): brightness control Fn + /T (F7): display output Functions Adjusts the LCD brightness of your computer screen. Combinations and Functions with the Fn Key ✍ Some functions are not available until Windows is very similar to help you use the keyboard. n 33 N Using Your VAIO Computer Using the Keyboard Your keyboard...

User Guide
Page 35
... the screen using the mouse. Scroll Move your finger along the bottom to scroll horizontally (the scroll function is available only with VAIO Control Center (page 110) to suit your finger along the right edge of the touch pad to place the pointer (2) on the touch pad while pressing the left button. Move your preference for using the touch pad. See Setting Up Your Computer with applications that support a touch pad scroll...
... the screen using the mouse. Scroll Move your finger along the bottom to scroll horizontally (the scroll function is available only with VAIO Control Center (page 110) to suit your finger along the right edge of the touch pad to place the pointer (2) on the touch pad while pressing the left button. Move your preference for using the touch pad. See Setting Up Your Computer with applications that support a touch pad scroll...
User Guide
Page 40
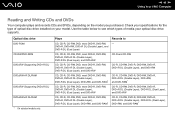
...), DVD-R DL (Dual Layer), DVD+RW, and DVD-RAM* CD, CD-R, CD-RW, DVD, most DVD-R, DVD-RW, DVD+R, DVD+R DL (Double Layer), DVD-R DL (Dual Layer), and DVD+RW CD, CD-R, CD-RW, DVD, most DVD-R, DVD-RW, DVD+R, DVD+R DL (Double Layer), DVD-R DL (Dual Layer), DVD+RW, and DVD-RAM* Records to see which types of optical disc drive installed on the model you purchased. Check your specifications for the type of media your model. Use the...
...), DVD-R DL (Dual Layer), DVD+RW, and DVD-RAM* CD, CD-R, CD-RW, DVD, most DVD-R, DVD-RW, DVD+R, DVD+R DL (Double Layer), DVD-R DL (Dual Layer), and DVD+RW CD, CD-R, CD-RW, DVD, most DVD-R, DVD-RW, DVD+R, DVD+R DL (Double Layer), DVD-R DL (Dual Layer), DVD+RW, and DVD-RAM* Records to see which types of optical disc drive installed on the model you purchased. Check your specifications for the type of media your model. Use the...
User Guide
Page 43
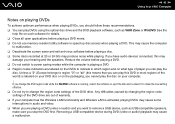
... changing the region code settings of the DVD drive are labeled on the DVDs to indicate in most regions of the world) is playing a DVD. ❑ Region codes indicators are out of warranty. ❑ If your computer has the Wireless LAN functionality and Wireless LAN is running, restart the software or eject the disc and re-insert it to make sure you stop the DVD first. If you have audio devices connected...
... changing the region code settings of the DVD drive are labeled on the DVDs to indicate in most regions of the world) is playing a DVD. ❑ Region codes indicators are out of warranty. ❑ If your computer has the Wireless LAN functionality and Wireless LAN is running, restart the software or eject the disc and re-insert it to make sure you stop the DVD first. If you have audio devices connected...

User Guide
Page 45
... files to a disc ! n 45 N Using Your VAIO Computer Copying Files to CDs See the online Specifications to find about the supported disc media. To copy files to CD. 8 Follow the instructions in the CD Writing Wizard. * The read/write drive letter designation may vary, depending on the left, locate the file(s) or folder(s) you want to copy listed under Devices with the...
... files to a disc ! n 45 N Using Your VAIO Computer Copying Files to CDs See the online Specifications to find about the supported disc media. To copy files to CD. 8 Follow the instructions in the CD Writing Wizard. * The read/write drive letter designation may vary, depending on the left, locate the file(s) or folder(s) you want to copy listed under Devices with the...
User Guide
Page 46
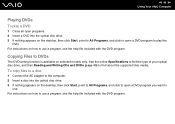
... type of your optical disc drive, and then Reading and Writing CDs and DVDs (page 40) to DVDs The DVD writing function is available on selected models only. See the online Specifications to find about the supported disc media. For instructions on how to use a program, see the help file included with the DVD program. n 46 N Using Your VAIO Computer Playing DVDs To play a DVD 1 Close all open programs. 2 Insert a DVD...
... type of your optical disc drive, and then Reading and Writing CDs and DVDs (page 40) to DVDs The DVD writing function is available on selected models only. See the online Specifications to find about the supported disc media. For instructions on how to use a program, see the help file included with the DVD program. n 46 N Using Your VAIO Computer Playing DVDs To play a DVD 1 Close all open programs. 2 Insert a DVD...

User Guide
Page 65
On models that support the Bluetooth functionality*1 and/or the IEEE 802.11a/b/g standard*1, double-click ( / ) on the WIRELESS or WIRELESS LAN switch. button. The Wireless network properties window appears. 8 Enter a network name (SSID)*2. Some information becomes visible. The Network Connections window appears. 5 Right-click Wireless Network Connection, then click Properties. The WIRELESS LAN indicator lights up. n 65 N Using Your VAIO Computer To communicate without an access point (ad-hoc) 1 Turn on the taskbar to display the Wireless Device Switch window. You can choose...
On models that support the Bluetooth functionality*1 and/or the IEEE 802.11a/b/g standard*1, double-click ( / ) on the WIRELESS or WIRELESS LAN switch. button. The Wireless network properties window appears. 8 Enter a network name (SSID)*2. Some information becomes visible. The Network Connections window appears. 5 Right-click Wireless Network Connection, then click Properties. The WIRELESS LAN indicator lights up. n 65 N Using Your VAIO Computer To communicate without an access point (ad-hoc) 1 Turn on the taskbar to display the Wireless Device Switch window. You can choose...
User Guide
Page 69
... display the Wireless Device Switch window. On models that came with your access point. ✍ For WPA-PSK or WPA2-PSK authentication, you want to use. 8 Enter the network key. 9 Click Connect. See the manual that came with your access point for more information about setting up . n 69 N Using Your VAIO Computer To connect to a wireless network 1 Make sure an access point is established. * See the online Specifications to see the manual that support the Bluetooth functionality...
... display the Wireless Device Switch window. On models that came with your access point. ✍ For WPA-PSK or WPA2-PSK authentication, you want to use. 8 Enter the network key. 9 Click Connect. See the manual that came with your access point for more information about setting up . n 69 N Using Your VAIO Computer To connect to a wireless network 1 Make sure an access point is established. * See the online Specifications to see the manual that support the Bluetooth functionality...
User Guide
Page 70
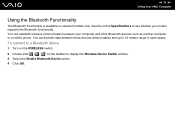
... or a mobile phone. To connect to a Bluetooth device 1 Turn on the WIRELESS switch. 2 Double-click ( / ) on selected models only. n 70 N Using Your VAIO Computer Using the Bluetooth Functionality The Bluetooth functionality is available on the taskbar to 10 meters range in open space. You can establish wireless communication between these devices without cables and up to display the Wireless Device Switch window. 3 Select the Enable Bluetooth Device option. 4 Click OK. You can transfer data between your model supports the Bluetooth functionality.
... or a mobile phone. To connect to a Bluetooth device 1 Turn on the WIRELESS switch. 2 Double-click ( / ) on selected models only. n 70 N Using Your VAIO Computer Using the Bluetooth Functionality The Bluetooth functionality is available on the taskbar to 10 meters range in open space. You can establish wireless communication between these devices without cables and up to display the Wireless Device Switch window. 3 Select the Enable Bluetooth Device option. 4 Click OK. You can transfer data between your model supports the Bluetooth functionality.

User Guide
Page 77
... ports on the computer. ❑ Connecting a Multi Function Bay Docking Station (page 78) ❑ Connecting External Speakers (page 86) ❑ Connecting an External Display (page 87) ❑ Selecting Display Modes (page 95) ❑ Using the Multiple Monitors Function (page 96) ❑ Connecting an External Microphone (page 98) ❑ Connecting a Universal Serial Bus (USB) Device (page 99) ❑ Connecting a Printer (page 102) ❑ Connecting an i.LINK Device (page 103) ❑ Connecting to a Network (LAN) (page 105) n 77 N Using...
... ports on the computer. ❑ Connecting a Multi Function Bay Docking Station (page 78) ❑ Connecting External Speakers (page 86) ❑ Connecting an External Display (page 87) ❑ Selecting Display Modes (page 95) ❑ Using the Multiple Monitors Function (page 96) ❑ Connecting an External Microphone (page 98) ❑ Connecting a Universal Serial Bus (USB) Device (page 99) ❑ Connecting a Printer (page 102) ❑ Connecting an i.LINK Device (page 103) ❑ Connecting to a Network (LAN) (page 105) n 77 N Using...
User Guide
Page 108
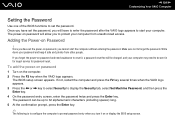
... to forget the password. Once you have set the password. The password can be sent in for depot service for password reset. The power-on password will allow you will be charged, and your password and keep it on or display the BIOS setup screen. Make sure not to display the Security tab, select Set Machine Password, and then press the Enter key. 4 On the password entry screen, enter the password twice and press the Enter key.
... to forget the password. Once you have set the password. The password can be sent in for depot service for password reset. The power-on password will allow you will be charged, and your password and keep it on or display the BIOS setup screen. Make sure not to display the Security tab, select Set Machine Password, and then press the Enter key. 4 On the password entry screen, enter the password twice and press the Enter key.
User Guide
Page 120
...: ❑ You contact your model, refer to install a new memory module. ❑ You do not install it yourself, if you need assistance. n 120 N Upgrading Your VAIO Computer Upgrading Your VAIO Computer Your computer and memory modules use high precision components and electronic connectors technology. To avoid the invalidation of memory installed on a computer. ❑ You do not touch the connectors or open the memory panel. Contact VAIO-Link if you are...
...: ❑ You contact your model, refer to install a new memory module. ❑ You do not install it yourself, if you need assistance. n 120 N Upgrading Your VAIO Computer Upgrading Your VAIO Computer Your computer and memory modules use high precision components and electronic connectors technology. To avoid the invalidation of memory installed on a computer. ❑ You do not touch the connectors or open the memory panel. Contact VAIO-Link if you are...

User Guide
Page 125
If you use only one memory module, make sure to the back of the computer. 11 Reinstall the battery and turn on the bottom of your computer. Do not touch any other components on the motherboard. 9 Replace the memory module compartment cover. 10 Tighten the screws on the computer. n 125 N Upgrading Your VAIO Computer 8 Slide the memory module into the memory module slot and push it in until it to the slot that is closer to insert it clicks into place. !
If you use only one memory module, make sure to the back of the computer. 11 Reinstall the battery and turn on the bottom of your computer. Do not touch any other components on the motherboard. 9 Replace the memory module compartment cover. 10 Tighten the screws on the computer. n 125 N Upgrading Your VAIO Computer 8 Slide the memory module into the memory module slot and push it in until it to the slot that is closer to insert it clicks into place. !
User Guide
Page 154
... Start and then Control Panel. 2 Click the Performance and Maintenance icon. 3 Click the System icon. 4 Click Device Manager on the Hardware tab. 5 Double-click Imaging devices. 6 Right-click Sony Visual Communication Camera VGP-VCC1 and click Update Driver. If another software application is in use the built-in MOTION EYE camera? ❑ The built-in MOTION EYE camera. ❑ If your computer into Standby or Hibernate mode...
... Start and then Control Panel. 2 Click the Performance and Maintenance icon. 3 Click the System icon. 4 Click Device Manager on the Hardware tab. 5 Double-click Imaging devices. 6 Right-click Sony Visual Communication Camera VGP-VCC1 and click Update Driver. If another software application is in use the built-in MOTION EYE camera? ❑ The built-in MOTION EYE camera. ❑ If your computer into Standby or Hibernate mode...
User Guide
Page 168
... to change the settings: 1 Click Start and then My Computer. 2 Right-click the optical disc drive icon and select Properties. 3 Click the Recording tab. 4 Click to DVD-RAM media using Windows functions? Attempt to add data to selected models only. This Q & A entry applies to such a disc will re-format the disc, resulting in disc formatting. n 168 N Troubleshooting What should I do if I cannot write data to cancel the Enable CD...
... to change the settings: 1 Click Start and then My Computer. 2 Right-click the optical disc drive icon and select Properties. 3 Click the Recording tab. 4 Click to DVD-RAM media using Windows functions? Attempt to add data to selected models only. This Q & A entry applies to such a disc will re-format the disc, resulting in disc formatting. n 168 N Troubleshooting What should I do if I cannot write data to cancel the Enable CD...
User Guide
Page 173
... printer cable is securely connected to the ports on the printer and computer. ❑ Make sure your printer is connected to an AC power source. Follow these steps: 1 Click Start and then Control Panel. 2 Click Printers and Other Hardware. 3 Click Printers and Faxes. 4 Right-click the printer icon and select Properties. 5 Click the Ports tab. 6 Click to the settings disables the bidirectional communication functions...
... printer cable is securely connected to the ports on the printer and computer. ❑ Make sure your printer is connected to an AC power source. Follow these steps: 1 Click Start and then Control Panel. 2 Click Printers and Other Hardware. 3 Click Printers and Faxes. 4 Right-click the printer icon and select Properties. 5 Click the Ports tab. 6 Click to the settings disables the bidirectional communication functions...

User Guide
Page 177
... pointer does not move while playing a disc, press the Ctrl+Alt+Delete keys simultaneously to change the left and right button assignments? See Using the Touch Pad (page 35). If your settings. Follow these steps: 1 Click Start and then Control Panel. 2 Click Printers and Other Hardware. 3 Click Mouse. 4 Click the Buttons tab. 5 Select your preferences in the Button Selection box, and then click Apply to...
... pointer does not move while playing a disc, press the Ctrl+Alt+Delete keys simultaneously to change the left and right button assignments? See Using the Touch Pad (page 35). If your settings. Follow these steps: 1 Click Start and then Control Panel. 2 Click Printers and Other Hardware. 3 Click Mouse. 4 Click the Buttons tab. 5 Select your preferences in the Button Selection box, and then click Apply to...


