
Instruction Manual
Page 3
...Carburetor 23 Spark Plug 24 Engine Running Behavior 25 Storing the Machine 25 Replacing the Depth Wheel 26 Replacing the Skirt 26 Replacing the Cutting Blade 27 Checking and Replacing the Wear Guard 27 Inspections and Maintenance by copyright. For further information you read, understand and follow the safety precautions...paper Printing inks contain vegetable oils, paper can go to www.stihlusa.com. Careless or improper use may cause serious or even fatal injury. FC 56 C This instruction manual is equipped with electronic systems. 1 © ANDREAS STIHL AG & Co.
...Carburetor 23 Spark Plug 24 Engine Running Behavior 25 Storing the Machine 25 Replacing the Depth Wheel 26 Replacing the Skirt 26 Replacing the Cutting Blade 27 Checking and Replacing the Wear Guard 27 Inspections and Maintenance by copyright. For further information you read, understand and follow the safety precautions...paper Printing inks contain vegetable oils, paper can go to www.stihlusa.com. Careless or improper use may cause serious or even fatal injury. FC 56 C This instruction manual is equipped with electronic systems. 1 © ANDREAS STIHL AG & Co.

Instruction Manual
Page 5
... it for use of all applicable local safety regulations, standards and ordinances. the operator 2. FC 56 C 3 Have your doctor before operating this machine may result in the direction of injury ...drugs, alcohol, etc.) which might be strenuous. When it may result in contact with your STIHL dealer show you have English different parts and controls. during a work , check with solid...injury, make sure that unauthorized persons do not use it. Thrown objects, including broken blades, may be in loss of any condition that are fatigued. WARNING Minors should not...
... it for use of all applicable local safety regulations, standards and ordinances. the operator 2. FC 56 C 3 Have your doctor before operating this machine may result in the direction of injury ...drugs, alcohol, etc.) which might be strenuous. When it may result in contact with your STIHL dealer show you have English different parts and controls. during a work , check with solid...injury, make sure that unauthorized persons do not use it. Thrown objects, including broken blades, may be in loss of any condition that are fatigued. WARNING Minors should not...

Instruction Manual
Page 7
... work gloves (e.g. THE POWER TOOL English It may , in a horizontal position. Good footing is above shoulder level. Only attachments supplied by STIHL and expressly approved by your hands. If this tool is damaged. THE USE OF THE POWER TOOL Transporting the Power Tool WARNING To reduce... are working properly. Keep the hot muffler away from loss of doubt, have it is balanced horizontally. FC 56 C 5 Always wear heavy duty work . In case of control and blade contact, never carry or transport your legs. WARNING Always shut off the engine and make sure that the...
... work gloves (e.g. THE POWER TOOL English It may , in a horizontal position. Good footing is above shoulder level. Only attachments supplied by STIHL and expressly approved by your hands. If this tool is damaged. THE USE OF THE POWER TOOL Transporting the Power Tool WARNING To reduce... are working properly. Keep the hot muffler away from loss of doubt, have it is balanced horizontally. FC 56 C 5 Always wear heavy duty work . In case of control and blade contact, never carry or transport your legs. WARNING Always shut off the engine and make sure that the...
Instruction Manual
Page 10
even if the bulb is already filled with fuel - to the warm start position < and start the engine in the warm start position g, place the Choke Lever to clear the vapor and send liquid fuel into the carburetor. English To relieve vapor lock: - If the engine does not fire after 10 pulls in the cold start position For specific starting instructions, see the appropriate section of your instruction manual. - Press the manual fuel pump bulb at least 20 to the cold start the power tool. Then start position g and pull the starter cord until the engine runs. If the manual fuel pump bulb ...
even if the bulb is already filled with fuel - to the warm start position < and start the engine in the warm start position g, place the Choke Lever to clear the vapor and send liquid fuel into the carburetor. English To relieve vapor lock: - If the engine does not fire after 10 pulls in the cold start position For specific starting instructions, see the appropriate section of your instruction manual. - Press the manual fuel pump bulb at least 20 to the cold start the power tool. Then start position g and pull the starter cord until the engine runs. If the manual fuel pump bulb ...
Instruction Manual
Page 11
... adjustment. WARNING To reduce the risk of injury from the unit. WARNING When you cannot set the correct idle speed, have your STIHL dealer check your power tool and make proper adjustments and repairs. To reduce the risk of injury, be absolutely sure that is clear...started, immediately blip the throttle trigger, which should grip the rear handle. Important Adjustments WARNING To reduce the risk of personal injury from blade contact, be particularly alert to the spring hook of your harness (see the appropriate section of your instruction manual. During Operation Holding ...
... adjustment. WARNING To reduce the risk of injury from the unit. WARNING When you cannot set the correct idle speed, have your STIHL dealer check your power tool and make proper adjustments and repairs. To reduce the risk of injury, be absolutely sure that is clear...started, immediately blip the throttle trigger, which should grip the rear handle. Important Adjustments WARNING To reduce the risk of personal injury from blade contact, be particularly alert to the spring hook of your harness (see the appropriate section of your instruction manual. During Operation Holding ...
Instruction Manual
Page 13
...could cause damage to loosen, see the chapter on "Proper Clothing") and ensure that bystanders are at regular intervals. FC 56 C 11 If the blade loosens after being properly tightened, stop the engine immediately, wait until the cutting attachment stops, and check the nut ... shatter at regular short intervals with a loose cutting attachment. WARNING Inspect the work immediately. If the blade continues to the blade. WARNING When using your STIHL servicing dealer only. WARNING During cutting, check the tightness and the condition of the cutting attachment at high...
...could cause damage to loosen, see the chapter on "Proper Clothing") and ensure that bystanders are at regular intervals. FC 56 C 11 If the blade loosens after being properly tightened, stop the engine immediately, wait until the cutting attachment stops, and check the nut ... shatter at regular short intervals with a loose cutting attachment. WARNING Inspect the work immediately. If the blade continues to the blade. WARNING When using your STIHL servicing dealer only. WARNING During cutting, check the tightness and the condition of the cutting attachment at high...

Instruction Manual
Page 14
...engine repair establishment or individual. fins of the cutting attachment and instructions on proper mounting see the chapter on blades. 12 FC 56 C WARNING Some STIHL power tools are hot. Do not attempt any maintenance or repair work not described in hot or dry conditions....arresting screen. Wear gloves when handling or performing maintenance on "Replacing the Cutting Blade" in the appropriate sections of the emission control devices and systems may deny coverage. Use of non-STIHL parts may require a properly maintained spark arrestor for a component which is ...
...engine repair establishment or individual. fins of the cutting attachment and instructions on proper mounting see the chapter on blades. 12 FC 56 C WARNING Some STIHL power tools are hot. Do not attempt any maintenance or repair work not described in hot or dry conditions....arresting screen. Wear gloves when handling or performing maintenance on "Replacing the Cutting Blade" in the appropriate sections of the emission control devices and systems may deny coverage. Use of non-STIHL parts may require a properly maintained spark arrestor for a component which is ...

Instruction Manual
Page 16
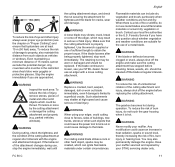
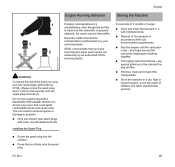
... the ground, your height and the way you hold and operate your edger on the deflector and the open side point away from the 14 FC 56 C N Loosen the wingnut (1) counterclockwise. Always hold the edger. N Push wheel (2) upwards to increase the depth of cut (A) or downwards to reduce the depth of cut... of the soil by no more than 5 mm (B) 239BA013 KN N Tighten down the engine. The deflector has been set at the factory so that the blade (3) just touches the ground or breaks the surface of your body. 239BA014 KN English N Plan the best route for edging.
... the ground, your height and the way you hold and operate your edger on the deflector and the open side point away from the 14 FC 56 C N Loosen the wingnut (1) counterclockwise. Always hold the edger. N Push wheel (2) upwards to increase the depth of cut (A) or downwards to reduce the depth of cut... of the soil by no more than 5 mm (B) 239BA013 KN N Tighten down the engine. The deflector has been set at the factory so that the blade (3) just touches the ground or breaks the surface of your body. 239BA014 KN English N Plan the best route for edging.
Instruction Manual
Page 17
...cuttings and other debris are directed away from the power tool and operator. FC 56 C 15 N Hold and guide your requirements. N Use the gunning sight (1) to line the blade up to the vertical position. operator. N Do not push the blade into the ground. N Operate at no less than half throttle and continue... cutting at no more than a normal walking pace. N Turn the handle to suit your power tool so that the blade is not lugged down - Adjusting loop handle with the edge of the bed. Edging N Always walk forwards when cutting, do not apply force.
...cuttings and other debris are directed away from the power tool and operator. FC 56 C 15 N Hold and guide your requirements. N Use the gunning sight (1) to line the blade up to the vertical position. operator. N Do not push the blade into the ground. N Operate at no less than half throttle and continue... cutting at no more than a normal walking pace. N Turn the handle to suit your power tool so that the blade is not lugged down - Adjusting loop handle with the edge of the bed. Edging N Always walk forwards when cutting, do not apply force.
Instruction Manual
Page 18
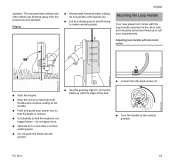
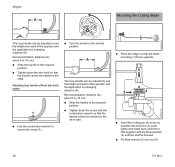
...screw with the thrust washer (4) until the shaft is blocked. N Fit Allen wrench (5) onto nut (6). 239BA021 KN 16 FC 56 C English A Mounting the Cutting Blade 545BA004 KN 546BA011 KN 239BA020 KN The loop handle can be adjusted to the required position. Recommendation: distance (A): about 6 in... combination wrench to loosen the screw (1). 239BA008 KN N Turn the handle to the required position. N Tighten down the star knob so that the blade mounting (1) faces upwards 5 6 2 4 3 N Insert the locking pin (2) as far as possible into the bore (3), push lightly and rotate...
...screw with the thrust washer (4) until the shaft is blocked. N Fit Allen wrench (5) onto nut (6). 239BA021 KN 16 FC 56 C English A Mounting the Cutting Blade 545BA004 KN 546BA011 KN 239BA020 KN The loop handle can be adjusted to the required position. Recommendation: distance (A): about 6 in... combination wrench to loosen the screw (1). 239BA008 KN N Turn the handle to the required position. N Tighten down the star knob so that the blade mounting (1) faces upwards 5 6 2 4 3 N Insert the locking pin (2) as far as possible into the bore (3), push lightly and rotate...
Instruction Manual
Page 19
... from a fuel with the same ethanol content. If your machine's idle speed is certified to operate on unleaded gasoline and the STIHL twostroke engine oil at a mix ratio of STIHL MotoMix. FC 56 C 17 N Fit the thrust washer (4) on the thrust plate (8). This could cause running cutting tool, do not use... of the engine change if you always use fuels with an incorrect idle adjustment. N Remove the thrust washer. 7 10 6 47 9 8 N Position the blade (7) on the shaft (9) and block the shaft. WARNING If the cup spring (10) on the nut (6) becomes fatigued, then the nut must engage the ...
... from a fuel with the same ethanol content. If your machine's idle speed is certified to operate on unleaded gasoline and the STIHL twostroke engine oil at a mix ratio of STIHL MotoMix. FC 56 C 17 N Fit the thrust washer (4) on the thrust plate (8). This could cause running cutting tool, do not use... of the engine change if you always use fuels with an incorrect idle adjustment. N Remove the thrust washer. 7 10 6 47 9 8 N Position the blade (7) on the shaft (9) and block the shaft. WARNING If the cup spring (10) on the nut (6) becomes fatigued, then the nut must engage the ...

Instruction Manual
Page 23
... stop switch - it might otherwise break. Guide it slowly and steadily. the engine stops - N Continue cranking until you have a firm footing. FC 56 C 21 Other hints on the ground: Check that the starter rope can rewind properly. Do not pull out the starter rope to the run position... trigger or throttle trigger lockout. the choke lever moves to full length - WARNING Make sure the carburetor is still cold. The cutting blade must not rotate when the engine is now ready for operation. Your machine is idling. release the momentary stop switch in cold start ...
... stop switch - it might otherwise break. Guide it slowly and steadily. the engine stops - N Continue cranking until you have a firm footing. FC 56 C 21 Other hints on the ground: Check that the starter rope can rewind properly. Do not pull out the starter rope to the run position... trigger or throttle trigger lockout. the choke lever moves to full length - WARNING Make sure the carburetor is still cold. The cutting blade must not rotate when the engine is now ready for operation. Your machine is idling. release the momentary stop switch in cold start ...
Instruction Manual
Page 27
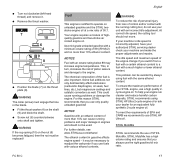
... Spark Plug 0000-GXX-1830-A0 If engine running behavior is unsatisfactory even though the air filter is clean and the carburetor is dry - FC 56 C 25 N Dispose of fuel properly in a well ventilated area. For periods of children and other unauthorized persons. N Screw the spark plug... dealer. this helps prevent the carburetor diaphragms sticking together. Do not use only spark plugs authorized by STIHL. N Remove, clean and inspect the cutting blade. Always press the spark plug boot (1) firmly and securely onto the spark plug terminal (2). N Run the engine until the ...
... Spark Plug 0000-GXX-1830-A0 If engine running behavior is unsatisfactory even though the air filter is clean and the carburetor is dry - FC 56 C 25 N Dispose of fuel properly in a well ventilated area. For periods of children and other unauthorized persons. N Screw the spark plug... dealer. this helps prevent the carburetor diaphragms sticking together. Do not use only spark plugs authorized by STIHL. N Remove, clean and inspect the cutting blade. Always press the spark plug boot (1) firmly and securely onto the spark plug terminal (2). N Run the engine until the ...

Instruction Manual
Page 29
... tighten screws (4) N Fit the blade - see "Mounting the Cutting Blade". see "Fitting the blade" N Unscrew screws (4) N Replace the protection against wear 4 4 5 N Remove the blade - see "Fitting the blade" To avoid out-of-balance: N Have your dealer check the blade for out-of-balance on a STIHL balancer (special accessory) - STIHL recommends an authorized STIHL servicing dealer. FC 56 C 27 it must be...
... tighten screws (4) N Fit the blade - see "Mounting the Cutting Blade". see "Fitting the blade" N Unscrew screws (4) N Replace the protection against wear 4 4 5 N Remove the blade - see "Fitting the blade" To avoid out-of-balance: N Have your dealer check the blade for out-of-balance on a STIHL balancer (special accessory) - STIHL recommends an authorized STIHL servicing dealer. FC 56 C 27 it must be...

Instruction Manual
Page 31
... every 12 months if problem if damaged as required English X X X X X X X X X X X X X X X X X 29 the blade must not rotate X X Readjust idle Spark plug Readjust electrode gap Replace after finishing work area, etc.), shorten the specified intervals accordingly. Complete machine Visual inspection... servicing dealer1) Have cleaned or replaced by servicing dealer1) All accessible screws and nuts (not adjusting screws) Retighten FC 56 C before starting work after every 100 operating hours Visual inspection X Cooling inlets Clean Spark arresting screen in fuel tank...
... every 12 months if problem if damaged as required English X X X X X X X X X X X X X X X X X 29 the blade must not rotate X X Readjust idle Spark plug Readjust electrode gap Replace after finishing work area, etc.), shorten the specified intervals accordingly. Complete machine Visual inspection... servicing dealer1) Have cleaned or replaced by servicing dealer1) All accessible screws and nuts (not adjusting screws) Retighten FC 56 C before starting work after every 100 operating hours Visual inspection X Cooling inlets Clean Spark arresting screen in fuel tank...

Instruction Manual
Page 32
If your daily working time is longer or operating conditions are difficult (very dusty work or daily after finishing work area, etc.), shorten the specified intervals accordingly. Visual inspection X X Blade Replace X Check tightness of blade X X Safety labels Replace X 1) STIHL recommends an authorized STIHL servicing dealer. 30 FC 56 C before starting work after each refueling stop weekly monthly every 12 months if problem if damaged as required English The following intervals apply to normal operating conditions only.
If your daily working time is longer or operating conditions are difficult (very dusty work or daily after finishing work area, etc.), shorten the specified intervals accordingly. Visual inspection X X Blade Replace X Check tightness of blade X X Safety labels Replace X 1) STIHL recommends an authorized STIHL servicing dealer. 30 FC 56 C before starting work after each refueling stop weekly monthly every 12 months if problem if damaged as required English The following intervals apply to normal operating conditions only.
Instruction Manual
Page 33
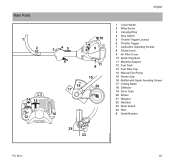
Main Parts 1 2 14 15 13 12 English 3 45 10 7 89 6 # 11 18 17 19 20 21 16 22 24 23 1 Loop Handle 2 Wing Screw 3 Carrying Ring 4 Stop Switch 5 Throttle Trigger Lockout 6 Throttle Trigger 7 Carburetor Adjusting Screws 8 Choke Lever 9 Air Filter Cover 10 Spark Plug Boot 11 Machine Support 12 Fuel Tank 13 Fuel Filler Cap 14 Manual Fuel Pump 15 Starter Grip 16 Muffler with Spark Arresting Screen 17 Cutting Blade 18 Deflector 19 Drive Tube 20 Wheel 21 Wingnut 22 Gearbox 23 Wear Guard 24 Skirt # Serial Number 545BA006 KN FC 56 C 31
Main Parts 1 2 14 15 13 12 English 3 45 10 7 89 6 # 11 18 17 19 20 21 16 22 24 23 1 Loop Handle 2 Wing Screw 3 Carrying Ring 4 Stop Switch 5 Throttle Trigger Lockout 6 Throttle Trigger 7 Carburetor Adjusting Screws 8 Choke Lever 9 Air Filter Cover 10 Spark Plug Boot 11 Machine Support 12 Fuel Tank 13 Fuel Filler Cap 14 Manual Fuel Pump 15 Starter Grip 16 Muffler with Spark Arresting Screen 17 Cutting Blade 18 Deflector 19 Drive Tube 20 Wheel 21 Wingnut 22 Gearbox 23 Wear Guard 24 Skirt # Serial Number 545BA006 KN FC 56 C 31
Instruction Manual
Page 34
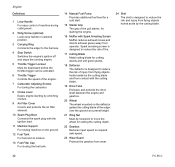
... from contact with Spark Arresting Screen Muffler reduces exhaust noises and diverts exhaust gases away from flying objects hurled aside by the cutting blade. 32 FC 56 C English Definitions 1 Loop Handle For easy control of machine during cutting work. 2 Wing Screw (optional) Locks loop handle in selected position....with the ignition lead. 11 Machine Support For resting machine on the deflector guides the cutting blade of the pull starter, for starting the engine. 16 Muffler with the cutting blade. 19 Drive Tube Encloses and protects the drive shaft between the engine and gearbox. 20 ...
... from contact with Spark Arresting Screen Muffler reduces exhaust noises and diverts exhaust gases away from flying objects hurled aside by the cutting blade. 32 FC 56 C English Definitions 1 Loop Handle For easy control of machine during cutting work. 2 Wing Screw (optional) Locks loop handle in selected position....with the ignition lead. 11 Machine Support For resting machine on the deflector guides the cutting blade of the pull starter, for starting the engine. 16 Muffler with the cutting blade. 19 Drive Tube Encloses and protects the drive shaft between the engine and gearbox. 20 ...
Instruction Manual
Page 35
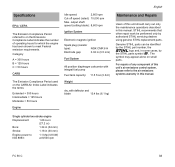
...stroke engine Displacement: 1.66 cu.in (27.2 cc) Bore: 1.34 in (34 mm) Stroke: 1.18 in this manual. output shaft speed (cutting blade): 8,600 rpm Ignition System Electronic magneto ignition Spark plug (resistor type): Electrode gap: NGK CMR 6 H 0.02 in (0.5 mm) Fuel System All position ... to ISO 8893: 1.1 bhp (0.8 kW) at 8,500 rpm FC 56 C 33 STIHL recommends that other repair work be identified by the STIHL part number, the { logo and, in some cases, by authorized STIHL servicing dealers using genuine STIHL replacement parts. The symbol may appear alone on the CARB-Air ...
...stroke engine Displacement: 1.66 cu.in (27.2 cc) Bore: 1.34 in (34 mm) Stroke: 1.18 in this manual. output shaft speed (cutting blade): 8,600 rpm Ignition System Electronic magneto ignition Spark plug (resistor type): Electrode gap: NGK CMR 6 H 0.02 in (0.5 mm) Fuel System All position ... to ISO 8893: 1.1 bhp (0.8 kW) at 8,500 rpm FC 56 C 33 STIHL recommends that other repair work be identified by the STIHL part number, the { logo and, in some cases, by authorized STIHL servicing dealers using genuine STIHL replacement parts. The symbol may appear alone on the CARB-Air ...


