
Instruction Manual
Page 3
... read, understand and follow the safety precautions and the operating and maintenance instructions in the two manuals. Printed on chlorine-free paper Printing inks contain vegetable oils, paper can go to reproduce, translate and process with an edger MultiTool is protected by copyright. Original Instruction Manual Contents MultiSystem 2 Guide to Using this power tool combination. To receive maximum performance and satisfaction from your...
... read, understand and follow the safety precautions and the operating and maintenance instructions in the two manuals. Printed on chlorine-free paper Printing inks contain vegetable oils, paper can go to reproduce, translate and process with an edger MultiTool is protected by copyright. Original Instruction Manual Contents MultiSystem 2 Guide to Using this power tool combination. To receive maximum performance and satisfaction from your...

Instruction Manual
Page 4
.... In addition to the operating instructions, this manual may contain item numbers that require your machine for the first time and keep them safe for future reference. 469BA028 KN Guide to or embossed on the machine are supported by illustrations. Accordingly, the instruction manuals for the MultiEngine and the MultiTool constitute the entire Instruction Manual for assistance. 2 FC-MM WARNING Indicates a hazardous situation...
.... In addition to the operating instructions, this manual may contain item numbers that require your machine for the first time and keep them safe for future reference. 469BA028 KN Guide to or embossed on the machine are supported by illustrations. Accordingly, the instruction manuals for the MultiEngine and the MultiTool constitute the entire Instruction Manual for assistance. 2 FC-MM WARNING Indicates a hazardous situation...
Instruction Manual
Page 5
... of your power tool will injure you how to use of a power tool involves 1. Careless or improper use of bystanders or the operator. Have your MultiEngine and MultiTool periodically. Observe all STIHL power tools. WARNING Do not lend or rent your power tool without the instruction manuals of your STIHL dealer show you . Be sure that you have different parts and controls. If the rotating blade comes in...
... of your power tool will injure you how to use of a power tool involves 1. Careless or improper use of bystanders or the operator. Have your MultiEngine and MultiTool periodically. Observe all STIHL power tools. WARNING Do not lend or rent your power tool without the instruction manuals of your STIHL dealer show you . Be sure that you have different parts and controls. If the rotating blade comes in...
Instruction Manual
Page 6
... checked by your STIHL servicing dealer. Wear sound barriers (ear plugs or ear mufflers) to hear warnings (shouts, alarms, etc.) is damaged. If this machine if it is in fact, be sturdy and snug-fitting, but allow complete freedom of movement. In case of doubt, have their use with the specific STIHL power tool models are recommended. WARNING Always switch off the engine...
... checked by your STIHL servicing dealer. Wear sound barriers (ear plugs or ear mufflers) to hear warnings (shouts, alarms, etc.) is damaged. If this machine if it is in fact, be sturdy and snug-fitting, but allow complete freedom of movement. In case of doubt, have their use with the specific STIHL power tool models are recommended. WARNING Always switch off the engine...
Instruction Manual
Page 7
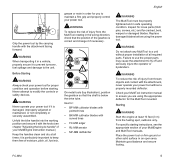
.... Failure to use the proper parts may cause the attachment to modify the controls or safety devices. Never attempt to fly off and seriously injure the operator or bystanders. Replace damaged blades before starting instructions, see chapter "Adjusting the bicycle handle" of your power tool without proper installation of the gearbox is correct and change it is below the drive tube. Starting WARNING Start the engine at all required...
.... Failure to use the proper parts may cause the attachment to modify the controls or safety devices. Never attempt to fly off and seriously injure the operator or bystanders. Replace damaged blades before starting instructions, see chapter "Adjusting the bicycle handle" of your power tool without proper installation of the gearbox is correct and change it is below the drive tube. Starting WARNING Start the engine at all required...

Instruction Manual
Page 8
... balance at all times. Be extremely cautious when changing direction with both hands on slopes. Operate it under control at all other part of the power tool may result in difficult, overgrown terrain. Wrap your fingers and thumbs around the handles, keeping the handles cradled between your power tool only outdoors in the instruction manual of control, never work area, even when starting -throttle, engine speed will be...
... balance at all times. Be extremely cautious when changing direction with both hands on slopes. Operate it under control at all other part of the power tool may result in difficult, overgrown terrain. Wrap your fingers and thumbs around the handles, keeping the handles cradled between your power tool only outdoors in the instruction manual of control, never work area, even when starting -throttle, engine speed will be...
Instruction Manual
Page 9
... are approached. WARNING Use the power tool at the source where possible. Operating Instructions WARNING Do not operate your power tool using the starting throttle lock, as you are no power cables near the ambient (background) level, the operator and any dust raised by the power tool away from the operator. If the MultiTool or deflector becomes clogged or stuck, always switch off the engine immediately - Stop the engine immediately if you...
... are approached. WARNING Use the power tool at the source where possible. Operating Instructions WARNING Do not operate your power tool using the starting throttle lock, as you are no power cables near the ambient (background) level, the operator and any dust raised by the power tool away from the operator. If the MultiTool or deflector becomes clogged or stuck, always switch off the engine immediately - Stop the engine immediately if you...
Instruction Manual
Page 10
... power tool. Use of water may cause serious or fatal injuries to superficial cracks. WARNING Never repair damaged attachments by welding, straightening or modifying the shape. Tighten all nuts, bolts and screws, except the carburetor adjustment screws, after each use the edger MultiTool on blades. The solid jet of non-STIHL parts may cause serious or fatal injury to loss of control of operation. Store the power tool in your STIHL servicing...
... power tool. Use of water may cause serious or fatal injuries to superficial cracks. WARNING Never repair damaged attachments by welding, straightening or modifying the shape. Tighten all nuts, bolts and screws, except the carburetor adjustment screws, after each use the edger MultiTool on blades. The solid jet of non-STIHL parts may cause serious or fatal injury to loss of control of operation. Store the power tool in your STIHL servicing...
Instruction Manual
Page 11
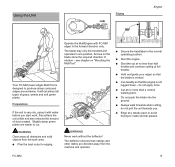
... edging. 481BA000 KN Operate the MultiEngine with water before you . Arrows on "Mounting the MultiTool". N Hold and guide your edger so that the blade is very dry, spray it with FC-MM edger in one position. do not pull the unit towards you start work: this softens the soil a little and also reduces the amount of grass, weeds and soft green plants...
... edging. 481BA000 KN Operate the MultiEngine with water before you . Arrows on "Mounting the MultiTool". N Hold and guide your edger so that the blade is very dry, spray it with FC-MM edger in one position. do not pull the unit towards you start work: this softens the soil a little and also reduces the amount of grass, weeds and soft green plants...

Instruction Manual
Page 12
... by STIHL or expressly approved by STIHL Removing Existing MultiTools for mounting instructions. 10 N Remove the hitch pins and pull the MultiTools (if fitted) off the axle. - Cleaning the blade Pieces of grass or roots may only be used in the instruction manual of injury from contact with the STIHL MM 56 MultiEngine. Shut off the engine. - Pull the hitch pins out of roots, plants and soil. Checking Position of...
... by STIHL or expressly approved by STIHL Removing Existing MultiTools for mounting instructions. 10 N Remove the hitch pins and pull the MultiTools (if fitted) off the axle. - Cleaning the blade Pieces of grass or roots may only be used in the instruction manual of injury from contact with the STIHL MM 56 MultiEngine. Shut off the engine. - Pull the hitch pins out of roots, plants and soil. Checking Position of...
Instruction Manual
Page 13
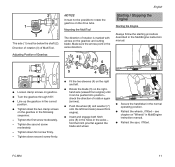
... the starting procedure described in the correct position. N Line up the gearbox in the MultiEngine instruction manual. 469BA061 AS 481BA007 KN 481BA011 KN 469BA062 AS N Loosen clamp screws on gearbox. N Insert and engage both hitch pins (8) in the holes in the following sequence: - Direction of rotation (3) of rotation again (arrows). N Push the wheel (6) and washer (7) onto the left . FC-MM...
... the starting procedure described in the correct position. N Line up the gearbox in the MultiEngine instruction manual. 469BA061 AS 481BA007 KN 481BA011 KN 469BA062 AS N Loosen clamp screws on gearbox. N Insert and engage both hitch pins (8) in the holes in the following sequence: - Direction of rotation (3) of rotation again (arrows). N Push the wheel (6) and washer (7) onto the left . FC-MM...
Instruction Manual
Page 14
... FC-MM the engine returns to move as soon as shown in a dry, high or locked location - Maintenance and Care The following intervals apply to the side of the power tool, never in the MultiEngine instruction manual. If your left hand on the loop handle, press the unit firmly against the ground - All accessible screws and nuts N Retighten if necessary Wheel N Visual inspection before starting work N Replace...
... FC-MM the engine returns to move as soon as shown in a dry, high or locked location - Maintenance and Care The following intervals apply to the side of the power tool, never in the MultiEngine instruction manual. If your left hand on the loop handle, press the unit firmly against the ground - All accessible screws and nuts N Retighten if necessary Wheel N Visual inspection before starting work N Replace...
Instruction Manual
Page 15
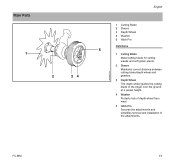
FC-MM 13 Main Parts 1 2 34 481BA009 KN English 1 Cutting Blade 2 Sleeve 3 Depth Wheel 4 Washer 5 Hitch Pin Definitions 5 1 Cutting Blade Metal cutting blade for cutting weeds and soft green plants. 2 Sleeve Maintains correct distance between cutting blade/depth wheel and gearbox. 3 Depth Wheel The depth wheel guides the cutting blade of the edger over the ground at a preset height. 4 Washer Protects hub of depth wheel from wear. 5 Hitch Pin Secures the attachments and simplifies removal and installation of the attachments.
FC-MM 13 Main Parts 1 2 34 481BA009 KN English 1 Cutting Blade 2 Sleeve 3 Depth Wheel 4 Washer 5 Hitch Pin Definitions 5 1 Cutting Blade Metal cutting blade for cutting weeds and soft green plants. 2 Sleeve Maintains correct distance between cutting blade/depth wheel and gearbox. 3 Depth Wheel The depth wheel guides the cutting blade of the edger over the ground at a preset height. 4 Washer Protects hub of depth wheel from wear. 5 Hitch Pin Secures the attachments and simplifies removal and installation of the attachments.

Instruction Manual
Page 16
... the product, accessories and packaging to the air emissions systems warranty in the garbage can be performed only by authorized STIHL servicing dealers using genuine STIHL replacement parts. Genuine STIHL parts can . Contact your STIHL servicing dealer for environmentfriendly recycling. English Specifications Attachment Blade Diameter: Weight 9.1 in (230 mm) Edger with wheel: 1.8 lbs (0.8 kg) Maintenance and Repairs Disposal Users of this unit's air emissions control system, please refer to an approved disposal site...
... the product, accessories and packaging to the air emissions systems warranty in the garbage can be performed only by authorized STIHL servicing dealers using genuine STIHL replacement parts. Genuine STIHL parts can . Contact your STIHL servicing dealer for environmentfriendly recycling. English Specifications Attachment Blade Diameter: Weight 9.1 in (230 mm) Edger with wheel: 1.8 lbs (0.8 kg) Maintenance and Repairs Disposal Users of this unit's air emissions control system, please refer to an approved disposal site...
Instruction Manual
Page 17
...; This listing of ANDREAS STIHL AG & Co. AutoCut® FARM BOSS® iCademy® MAGNUM® MasterWrench Service® MotoMix® OILOMATIC® 4-MIX ™ BioPlus ™ Easy2Start ™ EasySpool ™ ElastoStart ™ Ematic ™ FixCut ™ IntelliCarb ™ Master Control Lever ™ Micro ™ Pro Mark ™ Quiet Line ™ STIHL M-Tronic ™ FC-MM 15 Trademarks STIHL Registered Trademarks STIHL®...
...; This listing of ANDREAS STIHL AG & Co. AutoCut® FARM BOSS® iCademy® MAGNUM® MasterWrench Service® MotoMix® OILOMATIC® 4-MIX ™ BioPlus ™ Easy2Start ™ EasySpool ™ ElastoStart ™ Ematic ™ FixCut ™ IntelliCarb ™ Master Control Lever ™ Micro ™ Pro Mark ™ Quiet Line ™ STIHL M-Tronic ™ FC-MM 15 Trademarks STIHL Registered Trademarks STIHL®...


