

Owner's Manual
Page 2
..., in the operating instructions should be operated only from the type of power source indicated on the rear of the polarized plug. 12.Power-Cord Protection-Power-supply cords should never be retained for cleaning or any other similar surface. An appliance and cart combination should follow the manu- Un arrêt brusque, l'u- For TV/VCRs intended to operate from the wall outlet before cleaning...
..., in the operating instructions should be operated only from the type of power source indicated on the rear of the polarized plug. 12.Power-Cord Protection-Power-supply cords should never be retained for cleaning or any other similar surface. An appliance and cart combination should follow the manu- Un arrêt brusque, l'u- For TV/VCRs intended to operate from the wall outlet before cleaning...
Owner's Manual
Page 3
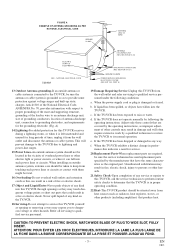
... fall into the TV/VCR. c. Adjust only those controls that could result in the vicinity of antenna-discharge unit, connection to grounding electrodes, and requirements for long periods of time, unplug it is grounded so as to qualified service personnel under the following the operating instructions. f. When installing an outside antenna system should not be sure the antenna or cable system is left...
... fall into the TV/VCR. c. Adjust only those controls that could result in the vicinity of antenna-discharge unit, connection to grounding electrodes, and requirements for long periods of time, unplug it is grounded so as to qualified service personnel under the following the operating instructions. f. When installing an outside antenna system should not be sure the antenna or cable system is left...
Owner's Manual
Page 4
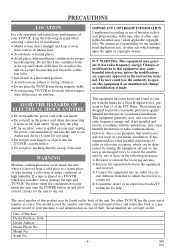
... OF ELECTRICAL SHOCK AND FIRE • Do not handle the power cord with insufficient ventilation for servicing. • Do not put your purchase to radio or television reception, which has moisture, it may generate or use of broadcast television programming, video tape, film or other TV/VCR has the same serial number as a permanent record of your fingers or objects into...
... OF ELECTRICAL SHOCK AND FIRE • Do not handle the power cord with insufficient ventilation for servicing. • Do not put your purchase to radio or television reception, which has moisture, it may generate or use of broadcast television programming, video tape, film or other TV/VCR has the same serial number as a permanent record of your fingers or objects into...

Owner's Manual
Page 5
... 4 WARNING 4 C FEATURES 6 C SUPPLIED ACCESSORIES 6 C OPERATING CONTROLS AND FUNCTIONS 7 C PREPARATION FOR USE 9 ANTENNA/CABLE CONNECTIONS 9 INSTALLING THE BATTERIES 10 EXTERNAL INPUT MODE 10 C SET UP FOR USE 10 CHANNEL SET UP FOR THE FIRST TIME .10 CLOCK SET UP (AUTO / MANUAL 11 CHANNEL SET UP AGAIN 12 DELETING (OR ADDING) CHANNEL . . . . .12 SELECTING THE LANGUAGE 13 DAYLIGHT-SAVING TIME 13 C TV OPERATION 14 WATCHING A TV PROGRAM 14 GAME MODE 14 DEGAUSSING 14 PICTURE CONTROL 14 CLOSED CAPTION SYSTEM 15 V-CHIP SET UP 15 C PLAYBACK...
... 4 WARNING 4 C FEATURES 6 C SUPPLIED ACCESSORIES 6 C OPERATING CONTROLS AND FUNCTIONS 7 C PREPARATION FOR USE 9 ANTENNA/CABLE CONNECTIONS 9 INSTALLING THE BATTERIES 10 EXTERNAL INPUT MODE 10 C SET UP FOR USE 10 CHANNEL SET UP FOR THE FIRST TIME .10 CLOCK SET UP (AUTO / MANUAL 11 CHANNEL SET UP AGAIN 12 DELETING (OR ADDING) CHANNEL . . . . .12 SELECTING THE LANGUAGE 13 DAYLIGHT-SAVING TIME 13 C TV OPERATION 14 WATCHING A TV PROGRAM 14 GAME MODE 14 DEGAUSSING 14 PICTURE CONTROL 14 CLOSED CAPTION SYSTEM 15 V-CHIP SET UP 15 C PLAYBACK...
Owner's Manual
Page 6
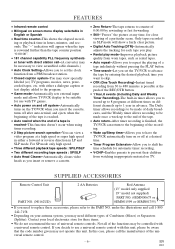
... appear when the tape is finished, the TV/VCR can view a video program at any time, for use with a universal remote control. The Daily timer allows recordings to repeat the playing of universal remote controls. under the illustrations and call -(A converter may be aware that the code number given may need to the beginning of daily broad- For SP mode only high speed. • Three different playback tape...
... appear when the tape is finished, the TV/VCR can view a video program at any time, for use with a universal remote control. The Daily timer allows recordings to repeat the playing of universal remote controls. under the illustrations and call -(A converter may be aware that the code number given may need to the beginning of daily broad- For SP mode only high speed. • Three different playback tape...
Owner's Manual
Page 7
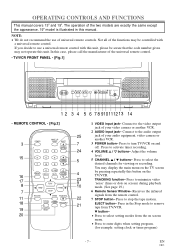
.... 4 VOLUME X / Y buttons- Press in this case, please call the manufacturer of your audio equipment, video camera or another VCR. 2 AUDIO input jack- EN 9I03 CLEAR GAME TIME SEARCH COUNTER RESET 22 21 20 1 VIDEO input jack- Connect to remove tape from TV/VCR. Press to select the desired channels for example: setting clock or timer program) -7- Press to enter digits when setting program. (for viewing or recording. L button- • Press to select setting modes from the remote control. 7 STOP button- You may not operate...
.... 4 VOLUME X / Y buttons- Press in this case, please call the manufacturer of your audio equipment, video camera or another VCR. 2 AUDIO input jack- EN 9I03 CLEAR GAME TIME SEARCH COUNTER RESET 22 21 20 1 VIDEO input jack- Connect to remove tape from TV/VCR. Press to select the desired channels for example: setting clock or timer program) -7- Press to enter digits when setting program. (for viewing or recording. L button- • Press to select setting modes from the remote control. 7 STOP button- You may not operate...

Owner's Manual
Page 8
... the sound. To select channels from 3 (present channel) to 10 (previously viewed channel), and pressing it again to cancel a setting of jack is 1/8" monaural (3.5mm). 14 Cassette compartment 15 Number buttons- Display the counter or the current channel number and current time on the TV/VCR) 12 RECORD indicator- Press to rapidly advance the tape, or to select desired channels for example: LANGUAGE or USER'S SET UP) 9 PLAY button- Sets the game mode and external input mode...
... the sound. To select channels from 3 (present channel) to 10 (previously viewed channel), and pressing it again to cancel a setting of jack is 1/8" monaural (3.5mm). 14 Cassette compartment 15 Number buttons- Display the counter or the current channel number and current time on the TV/VCR) 12 RECORD indicator- Press to rapidly advance the tape, or to select desired channels for example: LANGUAGE or USER'S SET UP) 9 PLAY button- Sets the game mode and external input mode...
Owner's Manual
Page 9
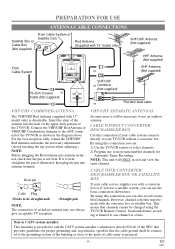
... connection of the TV/VCR. If it will ONLY record and view the same channel. Bent pin Cable Plug (Needs to Article 820-40 of the antenna into antenna terminal. By using this connection you can: 1) Use the TV/VCR remote to use the basic connection shown here. Note to CATV system installer: This reminder is provided to call the CATV system installer's attention to be changed using the TV/VCR Remote Control...
... connection of the TV/VCR. If it will ONLY record and view the same channel. Bent pin Cable Plug (Needs to Article 820-40 of the antenna into antenna terminal. By using this connection you can: 1) Use the TV/VCR remote to use the basic connection shown here. Note to CATV system installer: This reminder is provided to call the CATV system installer's attention to be changed using the TV/VCR Remote Control...
Owner's Manual
Page 10
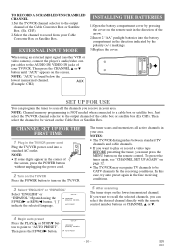
... the remote control number buttons or CHANNEL K or L. 4 Begin auto preset Press the PLAY/K or STOP/L button to point to "AUTO PRESET". LANGUAGE [ENGLISH] ESPAÑOL B AUTO PRESET - 10 - TO RECORD A SCRAMBLED/UNSCRAMBLED CHANNEL 1.Set the TV/VCR channel selector to the output channel of the cable box or satellite box (Ex CH3). EXTERNAL INPUT MODE When using the B LANGUAGE [ENGLISH] ESPAÑOL F.FWD/B or REW/s button. CHANNEL SET UP FOR THE FIRST TIME 1 Plug in the TV/VCR power cord Plug...
... the remote control number buttons or CHANNEL K or L. 4 Begin auto preset Press the PLAY/K or STOP/L button to point to "AUTO PRESET". LANGUAGE [ENGLISH] ESPAÑOL B AUTO PRESET - 10 - TO RECORD A SCRAMBLED/UNSCRAMBLED CHANNEL 1.Set the TV/VCR channel selector to the output channel of the cable box or satellite box (Ex CH3). EXTERNAL INPUT MODE When using the B LANGUAGE [ENGLISH] ESPAÑOL F.FWD/B or REW/s button. CHANNEL SET UP FOR THE FIRST TIME 1 Plug in the TV/VCR power cord Plug...

Owner's Manual
Page 11
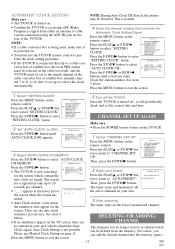
... manually adjust the clock. - 11 - TO CHANGE CLOCK SETTING 2 Select "MANUAL CLOCK SET" Press the PLAY/K or STOP/L button to point to "SETTING CLOCK". CLOCK SET UP (AUTO / MANUAL) The TV/VCR clock must proceed single-digit channel numbers with the correct time. NOTE: If you cannot receive a station with time signals, auto clock setting cannot be set manually when first setting up the TV/VCR. AUTO CLOCK [ON] AUTO CLOCK CH SEARCH AUTO CLOCK CH [ 02 ] B MANUAL CLOCK SET D.S.T. [OFF] 3 Select...
... manually adjust the clock. - 11 - TO CHANGE CLOCK SETTING 2 Select "MANUAL CLOCK SET" Press the PLAY/K or STOP/L button to point to "SETTING CLOCK". CLOCK SET UP (AUTO / MANUAL) The TV/VCR clock must proceed single-digit channel numbers with the correct time. NOTE: If you cannot receive a station with time signals, auto clock setting cannot be set manually when first setting up the TV/VCR. AUTO CLOCK [ON] AUTO CLOCK CH SEARCH AUTO CLOCK CH [ 02 ] B MANUAL CLOCK SET D.S.T. [OFF] 3 Select...
Owner's Manual
Page 12
... either an antenna or cable system connection using the ANT IN jack on the rear of the cable converter box or satellite box (usually chan- Press the PLAY/K or STOP/L button to select "AUTO CLOCK CH". TIMER PROGRAMMING PICTURE CONTROL SETTING CLOCK B CHANNEL SET UP USER'S SET UP V-CHIP SET UP LANGUAGE [ENGLISH] CAPTION [OFF] ZERO RETURN TIME SEARCH Press the F.FWD/B button. • The TV/VCR is normal. 4 Enter the channel number that appear on the 3 After scanning The tuner stops...
... either an antenna or cable system connection using the ANT IN jack on the rear of the cable converter box or satellite box (usually chan- Press the PLAY/K or STOP/L button to select "AUTO CLOCK CH". TIMER PROGRAMMING PICTURE CONTROL SETTING CLOCK B CHANNEL SET UP USER'S SET UP V-CHIP SET UP LANGUAGE [ENGLISH] CAPTION [OFF] ZERO RETURN TIME SEARCH Press the F.FWD/B button. • The TV/VCR is normal. 4 Enter the channel number that appear on the 3 After scanning The tuner stops...
Owner's Manual
Page 13
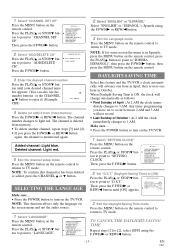
... the screen menu and not the audio source. 1 Select "LANGUAGE" Press the MENU button on the remote control. TIMER PROGRAMMING PICTURE CONTROL B SETTING CLOCK CHANNEL SET UP USER'S SET UP V-CHIP SET UP LANGUAGE [ENGLISH] CAPTION [OFF] ZERO RETURN TIME SEARCH 2 Set "D.S.T." (Daylight-Saving Time) to [ON] Press the PLAY/K or STOP/L button to point to "CHANNEL SET UP". AUTO CLOCK [ON] AUTO CLOCK CH SEARCH AUTO CLOCK CH [ 02 ] MANUAL CLOCK SET B D.S.T. [ON] 3 Exit the Daylight-Saving Time mode Press the MENU button on the remote control...
... the screen menu and not the audio source. 1 Select "LANGUAGE" Press the MENU button on the remote control. TIMER PROGRAMMING PICTURE CONTROL B SETTING CLOCK CHANNEL SET UP USER'S SET UP V-CHIP SET UP LANGUAGE [ENGLISH] CAPTION [OFF] ZERO RETURN TIME SEARCH 2 Set "D.S.T." (Daylight-Saving Time) to [ON] Press the PLAY/K or STOP/L button to point to "CHANNEL SET UP". AUTO CLOCK [ON] AUTO CLOCK CH SEARCH AUTO CLOCK CH [ 02 ] MANUAL CLOCK SET B D.S.T. [ON] 3 Exit the Daylight-Saving Time mode Press the MENU button on the remote control...

Owner's Manual
Page 14
... TV/VCR's picture controls - Press the GAME button on the remote control. TIMER PROGRAMMING B PICTURE CONTROL SETTING CLOCK CHANNEL SET UP USER'S SET UP V-CHIP SET UP LANGUAGE [ENGLISH] CAPTION [OFF] ZERO RETURN TIME SEARCH 2 Select item you to decrease the TV screen contrast and making it after 30 minutes. DEGAUSSING Magnetism from the appliance. EN 9I03 are usually the best, you press the GAME button; • The TV/VCR comes on . 3 Adjust sound Press the VOLUME X or Y button to factory specifications...
... TV/VCR's picture controls - Press the GAME button on the remote control. TIMER PROGRAMMING B PICTURE CONTROL SETTING CLOCK CHANNEL SET UP USER'S SET UP V-CHIP SET UP LANGUAGE [ENGLISH] CAPTION [OFF] ZERO RETURN TIME SEARCH 2 Select item you to decrease the TV screen contrast and making it after 30 minutes. DEGAUSSING Magnetism from the appliance. EN 9I03 are usually the best, you press the GAME button; • The TV/VCR comes on . 3 Adjust sound Press the VOLUME X or Y button to factory specifications...

Owner's Manual
Page 15
... MENU button on the remote control. To clear screen, select [CAPTION1], [CAPTION2] or [OFF]. Make sure ... • TV/VCR power must be turned on. 1 Select "V-CHIP SET UP" Press the MENU button on the remote control. M E N U - V-CHIP SET UP V-CHIP enables parents to the Television Parental Guidelines. V-CHIP reads the ratings for programming (except for news and sports programs, unedited movies on premium cable channels, and Emergency Broadcast System signals), then denies access to provide error free closed captions...
... MENU button on the remote control. To clear screen, select [CAPTION1], [CAPTION2] or [OFF]. Make sure ... • TV/VCR power must be turned on. 1 Select "V-CHIP SET UP" Press the MENU button on the remote control. M E N U - V-CHIP SET UP V-CHIP enables parents to the Television Parental Guidelines. V-CHIP reads the ratings for programming (except for news and sports programs, unedited movies on premium cable channels, and Emergency Broadcast System signals), then denies access to provide error free closed captions...

Owner's Manual
Page 16
... the F.FWD/B button to "MPAA RATING". TIMER PROGRAMMING PICTURE CONTROL SETTING CLOCK CHANNEL SET UP USER'S SET UP B V-CHIP SET UP LANGUAGE [ENGLISH] CAPTION [OFF] ZERO RETURN TIME SEARCH 2 Select "MPAA RATING" Press the PLAY/K or STOP/L button to point to select [BLOCK] or [VIEW]. G ton to point to original mode. - 16 - PG-13 Unsuitable for Violence) will turn to [VIEW] automatically. 4 Exit the V-Chip setting mode Press the MENU button on the remote control to return to...
... the F.FWD/B button to "MPAA RATING". TIMER PROGRAMMING PICTURE CONTROL SETTING CLOCK CHANNEL SET UP USER'S SET UP B V-CHIP SET UP LANGUAGE [ENGLISH] CAPTION [OFF] ZERO RETURN TIME SEARCH 2 Select "MPAA RATING" Press the PLAY/K or STOP/L button to point to select [BLOCK] or [VIEW]. G ton to point to original mode. - 16 - PG-13 Unsuitable for Violence) will turn to [VIEW] automatically. 4 Exit the V-Chip setting mode Press the MENU button on the remote control to return to...

Owner's Manual
Page 18
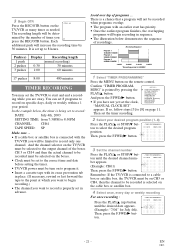
... selected time. TIMER PROGRAMMING PICTURE CONTROL SETTING CLOCK CHANNEL SET UP USER'S SET UP V-CHIP SET UP LANGUAGE [ENGLISH] CAPTION [OFF] B ZERO RETURN TIME SEARCH when the counter returns to "ZERO RETURN". If the tape was originally recorded in SP or LP mode, the still picture will be set up to a maximum of 9 hours 50 minutes (9:50) by 10 minutes at a high speed in either direction. 1 Insert a tape. 2 Select "TIME SEARCH" mode...
... selected time. TIMER PROGRAMMING PICTURE CONTROL SETTING CLOCK CHANNEL SET UP USER'S SET UP V-CHIP SET UP LANGUAGE [ENGLISH] CAPTION [OFF] B ZERO RETURN TIME SEARCH when the counter returns to "ZERO RETURN". If the tape was originally recorded in SP or LP mode, the still picture will be set up to a maximum of 9 hours 50 minutes (9:50) by 10 minutes at a high speed in either direction. 1 Insert a tape. 2 Select "TIME SEARCH" mode...
Owner's Manual
Page 21
... channel number appears. (Example: CH61) Then, press the F.FWD/B button. - Confirm "TIMER PROGRAMMING" is SHADED 1 Select "TIMER PROGRAMMING" Press the MENU button on the remote control. EN 9I03 Avoid over lap of the boxes CH 3 or CH 4 and then the actual channel to be recorded must be selected on the boxes. • Clock must be set to the correct time and date before setting the timer. • TV/VCR power must be turn...
... channel number appears. (Example: CH61) Then, press the F.FWD/B button. - Confirm "TIMER PROGRAMMING" is SHADED 1 Select "TIMER PROGRAMMING" Press the MENU button on the remote control. EN 9I03 Avoid over lap of the boxes CH 3 or CH 4 and then the actual channel to be recorded must be selected on the boxes. • Clock must be set to the correct time and date before setting the timer. • TV/VCR power must be turn...
Owner's Manual
Page 25
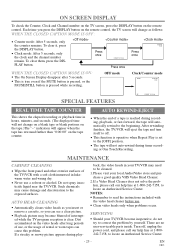
... Authorized Service Center. MAINTENANCE CABINET CLEANING • Wipe the front panel and other exterior surfaces of a tape is set to the [OFF] position. • The tape will change on a blank tape or blank portions on the remote control, the TV screen will not auto-rewind during timer record- AUTO HEAD CLEANING • Automatically cleans video heads as follows: WHEN THE CLOSED CAPTION MODE IS...
... Authorized Service Center. MAINTENANCE CABINET CLEANING • Wipe the front panel and other exterior surfaces of a tape is set to the [OFF] position. • The tape will change on a blank tape or blank portions on the remote control, the TV screen will not auto-rewind during timer record- AUTO HEAD CLEANING • Automatically cleans video heads as follows: WHEN THE CLOSED CAPTION MODE IS...
Owner's Manual
Page 26
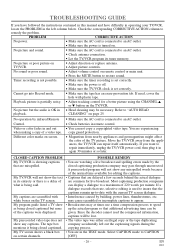
... errors made by infrared Remote • Make sure the AC cord is a delay of the TV picture. My program guide listed a TV show the text in its tuner memory. Select CAPTION mode to "AUTO HEAD • CLEANING" on screen. • Magnetism from the appliances, the TV/VCR can not copy a copyrighted video tape. Video or color fades in remote control. TROUBLESHOOTING GUIDE If you want to repair immediately, unplug the TV/VCR power cord, then plug...
... errors made by infrared Remote • Make sure the AC cord is a delay of the TV picture. My program guide listed a TV show the text in its tuner memory. Select CAPTION mode to "AUTO HEAD • CLEANING" on screen. • Magnetism from the appliances, the TV/VCR can not copy a copyrighted video tape. Video or color fades in remote control. TROUBLESHOOTING GUIDE If you want to repair immediately, unplug the TV/VCR power cord, then plug...

Owner's Manual
Page 27
...2 3 4 5 6 7 8 9 10 11 12 13 14 15 CATV channel C D E FGH I SUPER band : J~W HYPER band : W+1~W+84 Terminals Antenna input : VHF/UHF 75 ohms unbalanced Video input : RCA connector [ 1 Audio input : RCA connector [ 1 Earphone : 1/8" monaural (3.5 mm) ELECTRICAL SPECIFICATIONS Video input level : Audio input level : Video S/N ratio : Audio S/N ratio : 0.5~2.0Vp-p -15dBs More than 46dB More than 43dB OTHER SPECIFICATIONS [ 13 inch model ] Power requirement : Power consumption : Dimensions : Weight : AC 120V/60Hz 65W H:15-3/8" (389mm) W:14-1/2" (367mm) D:14-7/8" (377mm...
...2 3 4 5 6 7 8 9 10 11 12 13 14 15 CATV channel C D E FGH I SUPER band : J~W HYPER band : W+1~W+84 Terminals Antenna input : VHF/UHF 75 ohms unbalanced Video input : RCA connector [ 1 Audio input : RCA connector [ 1 Earphone : 1/8" monaural (3.5 mm) ELECTRICAL SPECIFICATIONS Video input level : Audio input level : Video S/N ratio : Audio S/N ratio : 0.5~2.0Vp-p -15dBs More than 46dB More than 43dB OTHER SPECIFICATIONS [ 13 inch model ] Power requirement : Power consumption : Dimensions : Weight : AC 120V/60Hz 65W H:15-3/8" (389mm) W:14-1/2" (367mm) D:14-7/8" (377mm...


