User's Guide
Page 3
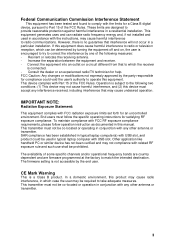
... user may cause undesired operation. The firmware setting is no guarantee that may be prohibited. This equipment generates uses and can be used in a residential installation. To maintain compliance with the instructions, may not compliance with FCC radiation exposure limits set forth for help. This transmitter must accept any other antenna or transmitter. These limits are firmware programmed at the factory to Part...
... user may cause undesired operation. The firmware setting is no guarantee that may be prohibited. This equipment generates uses and can be used in a residential installation. To maintain compliance with the instructions, may not compliance with FCC radiation exposure limits set forth for help. This transmitter must accept any other antenna or transmitter. These limits are firmware programmed at the factory to Part...
User's Guide
Page 4
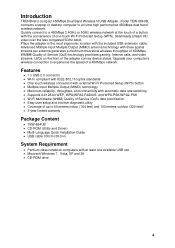
... band wireless network. Introduction TRENDnet's compact 450Mbps Dual Band Wireless N USB Adapter, model TEW-684UB, connects a laptop or desktop computer to experience the speed of a 450Mbps network. Features • 1 x USB 2.0 connector • Wi-Fi compliant with IEEE 802.11n/g/b/a standards • One-touch wireless connection with external Wi-Fi Protected Setup (WPS) button • Multiple Input Multiple Output (MIMO) technology • Maximum reliability, throughput, and connectivity with automatic data rate switching • Supports 64/128-bit WEP, WPA/WPA2-RADIUS...
... band wireless network. Introduction TRENDnet's compact 450Mbps Dual Band Wireless N USB Adapter, model TEW-684UB, connects a laptop or desktop computer to experience the speed of a 450Mbps network. Features • 1 x USB 2.0 connector • Wi-Fi compliant with IEEE 802.11n/g/b/a standards • One-touch wireless connection with external Wi-Fi Protected Setup (WPS) button • Multiple Input Multiple Output (MIMO) technology • Maximum reliability, throughput, and connectivity with automatic data rate switching • Supports 64/128-bit WEP, WPA/WPA2-RADIUS...
User's Guide
Page 5
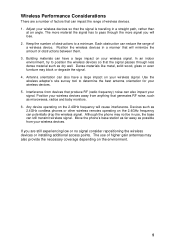
... on the 2.4GHz frequency will cause interference. Interference from anything that produce RF (radio frequency) noise can also impact your wireless devices. 5. Keep the number of higher gain antennas may block or degrade the signal. 4. Position the wireless devices in a manner that can still transmit wireless signal. Use the wireless adapter's site survey tool to a minimum. Move the phone's base station as far away...
... on the 2.4GHz frequency will cause interference. Interference from anything that produce RF (radio frequency) noise can also impact your wireless devices. 5. Keep the number of higher gain antennas may block or degrade the signal. 4. Position the wireless devices in a manner that can still transmit wireless signal. Use the wireless adapter's site survey tool to a minimum. Move the phone's base station as far away...
User's Guide
Page 6
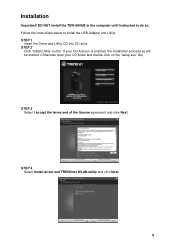
STEP 4 Select Install driver and TRENDnet WLAN utility and click Next. 6 Follow the instructions below to do so. STEP 1 Insert the Driver and Utility CD into CD drive STEP 2 Click "Install Utility" button. Installation Important! If your CD Autorun is enabled, the installation procedures will be started. (Otherwise open your CD folder and double-click on the "setup.exe" file) STEP 3 Select I accept the terms and of the license agreement and click Next. DO NOT install the TEW-684UB in the computer until instructed to install the USB Adapter and Utility.
STEP 4 Select Install driver and TRENDnet WLAN utility and click Next. 6 Follow the instructions below to do so. STEP 1 Insert the Driver and Utility CD into CD drive STEP 2 Click "Install Utility" button. Installation Important! If your CD Autorun is enabled, the installation procedures will be started. (Otherwise open your CD folder and double-click on the "setup.exe" file) STEP 3 Select I accept the terms and of the license agreement and click Next. DO NOT install the TEW-684UB in the computer until instructed to install the USB Adapter and Utility.
User's Guide
Page 9
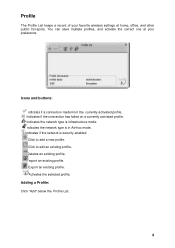
.... Indicates if the network is security-enabled. Click to add a new profile. Click to edit an existing profile. Export an existing profile. Adding a Profile: Click "Add" below the Profile List. 9 You can save multiple profiles, and activate the correct one at home, office, and other public hot-spots. Profile The Profile List keeps a record of your favorite wireless settings at your preference...
.... Indicates if the network is security-enabled. Click to add a new profile. Click to edit an existing profile. Export an existing profile. Adding a Profile: Click "Add" below the Profile List. 9 You can save multiple profiles, and activate the correct one at home, office, and other public hot-spots. Profile The Profile List keeps a record of your favorite wireless settings at your preference...
User's Guide
Page 11
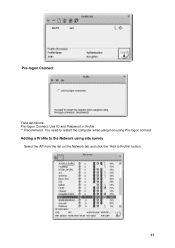
Pre-logon Connect Field definitions: Pre-logon Connect: Use ID and Password in Profile. ** Recommend: You need to restart the computer when using/non-using Pre-logon connect Adding a Profile to the Network using site survey Select the AP from the list on the Network tab and click the "Add to Profile" button. 11
Pre-logon Connect Field definitions: Pre-logon Connect: Use ID and Password in Profile. ** Recommend: You need to restart the computer when using/non-using Pre-logon connect Adding a Profile to the Network using site survey Select the AP from the list on the Network tab and click the "Add to Profile" button. 11

User's Guide
Page 12
... from in the profile list and click "Activate". Verify the new profile in the country channel list. (11A ListBox only shows for 5G adapter.) 12 Wireless mode: Select wireless mode. 2.4GHz, 5GHz and 2.4GHz+5GHz are always sent without protection. 3.TX Rate: Manually select the transfer rate. The default setting is not supported by 802.11n adapters.) Auto: STA will dynamically change as AP announcement. ...
... from in the profile list and click "Activate". Verify the new profile in the country channel list. (11A ListBox only shows for 5G adapter.) 12 Wireless mode: Select wireless mode. 2.4GHz, 5GHz and 2.4GHz+5GHz are always sent without protection. 3.TX Rate: Manually select the transfer rate. The default setting is not supported by 802.11n adapters.) Auto: STA will dynamically change as AP announcement. ...
User's Guide
Page 15
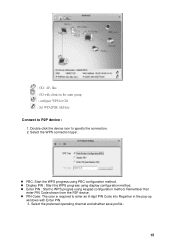
Select the WPS connection type : PBC: Start the WPS progress using PBC configuration method. Display PIN : Start the WPS progress using keypad configuration method. Remember that enter PIN Code shown from the P2P device. PIN Code: The user is required to WPS progres using display configuration method. Enter PIN : Start to enter an 8-digit PIN Code into Registrar in the same group. : configure WPS for GO : Set WPA2PSK AES key Connect to specify the connection. 2. Select the preferred operating channel and whether...
Select the WPS connection type : PBC: Start the WPS progress using PBC configuration method. Display PIN : Start the WPS progress using keypad configuration method. Remember that enter PIN Code shown from the P2P device. PIN Code: The user is required to WPS progres using display configuration method. Enter PIN : Start to enter an 8-digit PIN Code into Registrar in the same group. : configure WPS for GO : Set WPA2PSK AES key Connect to specify the connection. 2. Select the preferred operating channel and whether...
User's Guide
Page 17
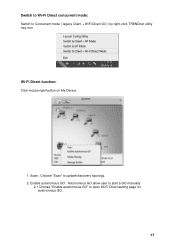
Scan : Choose "Scan" to open Wi-Fi Direct setting page for autonomous GO. 17 Enable autonomous GO : Autonomous GO allow user to start a GO manually 2.1 Choose "Enable autonomous GO" to update discovery topology. 2. Switch to Wi-Fi Direct concurrent mode: Switch to Concurrent mode ( legacy Client + WiFi Direct GO ) by right-click TRENDnet utility tray icon Wi-Fi Direct function: Click mouse right button on My Device. 1.
Scan : Choose "Scan" to open Wi-Fi Direct setting page for autonomous GO. 17 Enable autonomous GO : Autonomous GO allow user to start a GO manually 2.1 Choose "Enable autonomous GO" to update discovery topology. 2. Switch to Wi-Fi Direct concurrent mode: Switch to Concurrent mode ( legacy Client + WiFi Direct GO ) by right-click TRENDnet utility tray icon Wi-Fi Direct function: Click mouse right button on My Device. 1.

User's Guide
Page 22
Both the Enrollee and the Registrar use PIN Config method for the configuration setup. Select "Enrollee" from the STA and enters the password into the Registrar when prompted by the Registrar. 22 Select an AP (SSID/BSSID) that STA will join to and Select the "PIN/ numeric code" method. 2. Enter the PIN Code of the STA into the Registrar. WPS PIN Method The user obtains a device password (PIN Code) from the Config Mode drop-down list. 3. The following image outlines the process. 1.
Both the Enrollee and the Registrar use PIN Config method for the configuration setup. Select "Enrollee" from the STA and enters the password into the Registrar when prompted by the Registrar. 22 Select an AP (SSID/BSSID) that STA will join to and Select the "PIN/ numeric code" method. 2. Enter the PIN Code of the STA into the Registrar. WPS PIN Method The user obtains a device password (PIN Code) from the Config Mode drop-down list. 3. The following image outlines the process. 1.
User's Guide
Page 23
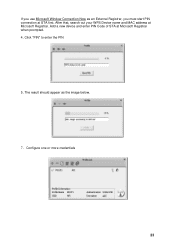
The result should appear as an External Registrar, you must start PIN connection at STA first. Configure one or more credentials 23 Click "PIN" to enter the PIN 5. After that, search out your WPS Device name and MAC address at Microsoft Registrar when prompted. 4. Add a new device and enter PIN Code of STA at Microsoft Registrar. If you use Microsoft Window Connection Now as the image below. 7.
The result should appear as an External Registrar, you must start PIN connection at STA first. Configure one or more credentials 23 Click "PIN" to enter the PIN 5. After that, search out your WPS Device name and MAC address at Microsoft Registrar when prompted. 4. Add a new device and enter PIN Code of STA at Microsoft Registrar. If you use Microsoft Window Connection Now as the image below. 7.

User's Guide
Page 32
..., you do not have an external RADIUS server, use WPA-PSK/WPA2-PSK (WPA -Pre-Shared Key) that only requires a single (identical) password entered into smaller packets. INFRASTRUCTURE (BSS) When a number of wireless stations are connected using EAP to the network. As the wireless station moves from the original to a difficult-to each access point, wireless gateway and wireless client. Wireless devices must use of user authentication. If you have the same SSID to place, it is...
..., you do not have an external RADIUS server, use WPA-PSK/WPA2-PSK (WPA -Pre-Shared Key) that only requires a single (identical) password entered into smaller packets. INFRASTRUCTURE (BSS) When a number of wireless stations are connected using EAP to the network. As the wireless station moves from the original to a difficult-to each access point, wireless gateway and wireless client. Wireless devices must use of user authentication. If you have the same SSID to place, it is...
User's Guide
Page 33
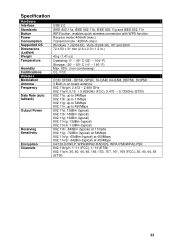
...% (non-condensing) CE, FCC CCK/ OFDM - Specification Hardware Interface Standards Button Power Consumption Supported OS Dimensions (LxWxH) Weight Temperature Humidity Certifications Wireless Modulation Antenna Frequency Data Rate (auto fallback) Output Power Receiving Sensitivity Encryption Channels USB 2.0 IEEE 802.11a, IEEE 802.11b, IEEE 802.11g and IEEE 802.11n WPS button: enables quick wireless connection with WPS function Receive mode: 406mA (max.) Transmit mode : 428mA (max) Windows 7 (32/64-bit), Vista (32/64-bit), XP...
...% (non-condensing) CE, FCC CCK/ OFDM - Specification Hardware Interface Standards Button Power Consumption Supported OS Dimensions (LxWxH) Weight Temperature Humidity Certifications Wireless Modulation Antenna Frequency Data Rate (auto fallback) Output Power Receiving Sensitivity Encryption Channels USB 2.0 IEEE 802.11a, IEEE 802.11b, IEEE 802.11g and IEEE 802.11n WPS button: enables quick wireless connection with WPS function Receive mode: 406mA (max.) Transmit mode : 428mA (max) Windows 7 (32/64-bit), Vista (32/64-bit), XP...

User's Guide
Page 34
... OR BY OPERATION OF LAW, STATUTORY OR OTHERWISE, INCLUDING WARRANTIES OF MERCHANTABILITY AND FITNESS FOR A PARTICULAR PURPOSE. TEW-684UB - 3 Years Warranty AC/DC Power Adapter, Cooling Fan, and Power Supply carry 1 year warranty. Limited Warranty TRENDnet warrants its expense, to repair or replace the defective product or part and deliver an equivalent product or part to service the product by any unauthorized...
... OR BY OPERATION OF LAW, STATUTORY OR OTHERWISE, INCLUDING WARRANTIES OF MERCHANTABILITY AND FITNESS FOR A PARTICULAR PURPOSE. TEW-684UB - 3 Years Warranty AC/DC Power Adapter, Cooling Fan, and Power Supply carry 1 year warranty. Limited Warranty TRENDnet warrants its expense, to repair or replace the defective product or part and deliver an equivalent product or part to service the product by any unauthorized...
Quick Installation Guide
Page 3
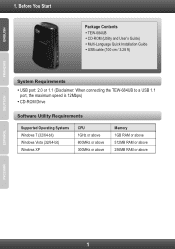
Before You Start Package Contents ŸTEW-684UB ŸCD-ROM (Utility and User's Guide) ŸMulti-Language Quick Installation Guide ŸUSB cable (100 cm / 3.28 ft) System Requirements ŸUSB port: 2.0 or 1.1 (Disclaimer: When connecting the TEW-684UB to a USB 1.1 port, the maximum speed is 12Mbps) ŸCD-ROM Drive Software Utility Requirements Supported Operating Systems Windows 7 (32/64-bit) Windows Vista (32/64-bit) Windows XP CPU 1GHz or above 800MHz or above 300MHz or above Memory 1GB RAM or above 512MB RAM or above 256MB RAM or above 1 1.
Before You Start Package Contents ŸTEW-684UB ŸCD-ROM (Utility and User's Guide) ŸMulti-Language Quick Installation Guide ŸUSB cable (100 cm / 3.28 ft) System Requirements ŸUSB port: 2.0 or 1.1 (Disclaimer: When connecting the TEW-684UB to a USB 1.1 port, the maximum speed is 12Mbps) ŸCD-ROM Drive Software Utility Requirements Supported Operating Systems Windows 7 (32/64-bit) Windows Vista (32/64-bit) Windows XP CPU 1GHz or above 800MHz or above 300MHz or above Memory 1GB RAM or above 512MB RAM or above 256MB RAM or above 1 1.
Quick Installation Guide
Page 6
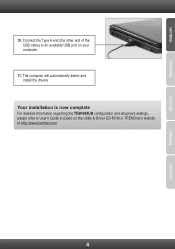
Your installation is now complete For detailed information regarding the TEW-684UB configuration and advanced settings, please refer to an available USB port on the Utility & Driver CD-ROM or TRENDnet's website at http://www.trendnet.com. 4 The computer will automatically detect and install the drivers. 10. Connect the Type A end (the other end of the USB cable) to User's Guide included on your computer. 11.
Your installation is now complete For detailed information regarding the TEW-684UB configuration and advanced settings, please refer to an available USB port on the Utility & Driver CD-ROM or TRENDnet's website at http://www.trendnet.com. 4 The computer will automatically detect and install the drivers. 10. Connect the Type A end (the other end of the USB cable) to User's Guide included on your computer. 11.
Quick Installation Guide
Page 8
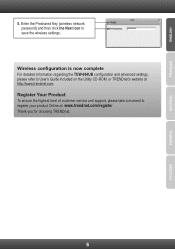
Wireless configuration is now complete For detailed information regarding the TEW-684UB configuration and advanced settings, please refer to User's Guide included on the Utility CD-ROM, or TRENDnet's website at : www.trendnet.com/register Thank you for choosing TRENDnet. 6 Register Your Product To ensure the highest level of customer service and support, please take a moment to save the wireless settings. Enter the Preshared Key (wireless network password) and then click the Next icon to register your product Online at http://www.trendnet.com. 5.
Wireless configuration is now complete For detailed information regarding the TEW-684UB configuration and advanced settings, please refer to User's Guide included on the Utility CD-ROM, or TRENDnet's website at : www.trendnet.com/register Thank you for choosing TRENDnet. 6 Register Your Product To ensure the highest level of customer service and support, please take a moment to save the wireless settings. Enter the Preshared Key (wireless network password) and then click the Next icon to register your product Online at http://www.trendnet.com. 5.
Quick Installation Guide
Page 9
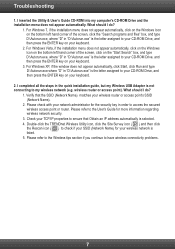
.... 2. wireless router or access point). Verify that Obtain an IP address automatically is the letter assigned to access the secured wireless access point or router. Please refer to the User's Guide for the security key in order to your CD-ROM Drive, and then press the ENTER key on the "Start Search" box, and type D:\Autorun.exe, where "D" in the quick installation guide, but my Wireless USB Adapter is listed. 5. Check your TCP/IP properties to have wireless connectivity problems...
.... 2. wireless router or access point). Verify that Obtain an IP address automatically is the letter assigned to access the secured wireless access point or router. Please refer to the User's Guide for the security key in order to your CD-ROM Drive, and then press the ENTER key on the "Start Search" box, and type D:\Autorun.exe, where "D" in the quick installation guide, but my Wireless USB Adapter is listed. 5. Check your TCP/IP properties to have wireless connectivity problems...

Quick Installation Guide
Page 10
... the User's Guide included on Windows XP, right-click My Computer, click Properties, click the Hardware tab, and then click Device Manager. Remove the adapter from device manager 2. Make sure your computer. 4. What should I cannot open the TRENDnet Wireless Utility. Access your computer. 3. How to make sure the adapter is unable to recognize my hardware. Verify the USB Adapter's LEDs are working properly. If you still encounter problems or have any questions regarding the TEW-684UB...
... the User's Guide included on Windows XP, right-click My Computer, click Properties, click the Hardware tab, and then click Device Manager. Remove the adapter from device manager 2. Make sure your computer. 4. What should I cannot open the TRENDnet Wireless Utility. Access your computer. 3. How to make sure the adapter is unable to recognize my hardware. Verify the USB Adapter's LEDs are working properly. If you still encounter problems or have any questions regarding the TEW-684UB...

Quick Installation Guide
Page 11
... enough free space around the antennas to allow the wireless signal to choose a strong form of obstructions between them . Note: after setting up the SSID, encryption type and encryption key/passphrase, please make sure that will minimize the amount of encryption with WPA2 security. Please also make a note of a wireless device. Change the channel Most wireless access points and routers are not supported by the 802.11n specification. If you can reduce the range of...
... enough free space around the antennas to allow the wireless signal to choose a strong form of obstructions between them . Note: after setting up the SSID, encryption type and encryption key/passphrase, please make sure that will minimize the amount of encryption with WPA2 security. Please also make a note of a wireless device. Change the channel Most wireless access points and routers are not supported by the 802.11n specification. If you can reduce the range of...


