User's Guide
Page 4
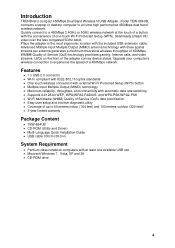
...Quick Installation Guide • USB cable 100cm (39.3 in the most ergonomic location with the convenience of one available USB slot • Microsoft Windows 7, Vista, XP and 2K • CD-ROM drive 4 WMM® Quality of Service (QoS) technology prioritizes gaming, Internet calls, ...extension cable. Upgrade your computer's wireless connection to an ultra-high performance 450Mbps dual band wireless network. Introduction TRENDnet's compact 450Mbps Dual Band Wireless N USB Adapter, model TEW-684UB, connects a laptop or desktop computer to experience the speed of a 450Mbps network.
...Quick Installation Guide • USB cable 100cm (39.3 in the most ergonomic location with the convenience of one available USB slot • Microsoft Windows 7, Vista, XP and 2K • CD-ROM drive 4 WMM® Quality of Service (QoS) technology prioritizes gaming, Internet calls, ...extension cable. Upgrade your computer's wireless connection to an ultra-high performance 450Mbps dual band wireless network. Introduction TRENDnet's compact 450Mbps Dual Band Wireless N USB Adapter, model TEW-684UB, connects a laptop or desktop computer to experience the speed of a 450Mbps network.
User's Guide
Page 10
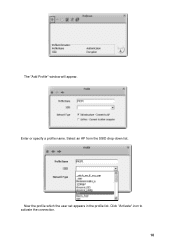
The "Add Profile" window will appear. Click "Activate" icon to activate the connection. 10 Select an AP from the SSID drop-down list. Enter or specify a profile name. Now the profile which the user set appears in the profile list.
The "Add Profile" window will appear. Click "Activate" icon to activate the connection. 10 Select an AP from the SSID drop-down list. Enter or specify a profile name. Now the profile which the user set appears in the profile list.
User's Guide
Page 15
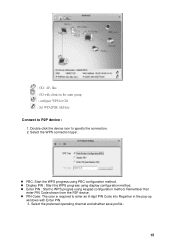
: GO : AP- like. : GO with clients in the pop-up windows with Enter PIN. 3. Remember that enter PIN Code shown from the P2P device. PIN Code: The user is required to enter an 8-digit PIN ...
: GO : AP- like. : GO with clients in the pop-up windows with Enter PIN. 3. Remember that enter PIN Code shown from the P2P device. PIN Code: The user is required to enter an 8-digit PIN ...
User's Guide
Page 23
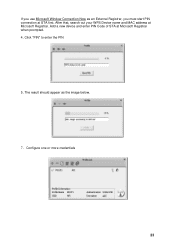
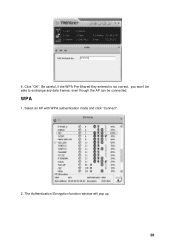
The result should appear as an External Registrar, you use Microsoft Window Connection Now as the image below. 7. After that, search out your WPS Device name and MAC address at STA first. If you must start PIN connection at Microsoft Registrar. Configure one or more credentials 23 Add a new device and enter PIN Code of STA at Microsoft Registrar when prompted. 4. Click "PIN" to enter the PIN 5.
The result should appear as an External Registrar, you use Microsoft Window Connection Now as the image below. 7. After that, search out your WPS Device name and MAC address at STA first. If you must start PIN connection at Microsoft Registrar. Configure one or more credentials 23 Add a new device and enter PIN Code of STA at Microsoft Registrar when prompted. 4. Click "PIN" to enter the PIN 5.
User's Guide
Page 28
WPA 1. The Authentication \Encryption function window will pop up. 28 Select an AP with WPA authentication mode and click "Connect". 2. Click "OK". Be careful, if the WPA Pre-Shared Key entered is not correct, you won't be able to exchange any data frames, even though the AP can be connected. 4.
WPA 1. The Authentication \Encryption function window will pop up. 28 Select an AP with WPA authentication mode and click "Connect". 2. Click "OK". Be careful, if the WPA Pre-Shared Key entered is not correct, you won't be able to exchange any data frames, even though the AP can be connected. 4.
User's Guide
Page 33
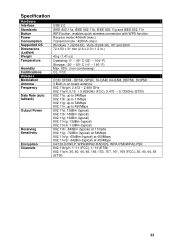
....11b, IEEE 802.11g and IEEE 802.11n WPS button: enables quick wireless connection with WPS function Receive mode: 406mA (max.) Transmit mode : 428mA (max) Windows 7 (32/64-bit), Vista (32/64-bit), XP and 2000 72 x 50 x 31 mm (2.8 x 2.0 x 1.2 in on board antenna 802.11b/g/n: 2.412 ~ 2.484 GHz 802.11a...
....11b, IEEE 802.11g and IEEE 802.11n WPS button: enables quick wireless connection with WPS function Receive mode: 406mA (max.) Transmit mode : 428mA (max) Windows 7 (32/64-bit), Vista (32/64-bit), XP and 2000 72 x 50 x 31 mm (2.8 x 2.0 x 1.2 in on board antenna 802.11b/g/n: 2.412 ~ 2.484 GHz 802.11a...
Quick Installation Guide
Page 3
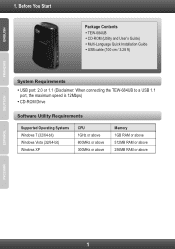
1. Before You Start Package Contents ŸTEW-684UB ŸCD-ROM (Utility and User's Guide) ŸMulti-Language Quick Installation Guide ŸUSB cable (100 cm / 3.28 ft) System Requirements ŸUSB port: 2.0 or 1.1 (Disclaimer: When connecting the TEW-684UB to a USB 1.1 port, the maximum speed is 12Mbps) ŸCD-ROM Drive Software Utility Requirements Supported Operating Systems Windows 7 (32/64-bit) Windows Vista (32/64-bit) Windows XP CPU 1GHz or above 800MHz or above 300MHz or above Memory 1GB RAM or above 512MB RAM or above 256MB RAM or above 1
1. Before You Start Package Contents ŸTEW-684UB ŸCD-ROM (Utility and User's Guide) ŸMulti-Language Quick Installation Guide ŸUSB cable (100 cm / 3.28 ft) System Requirements ŸUSB port: 2.0 or 1.1 (Disclaimer: When connecting the TEW-684UB to a USB 1.1 port, the maximum speed is 12Mbps) ŸCD-ROM Drive Software Utility Requirements Supported Operating Systems Windows 7 (32/64-bit) Windows Vista (32/64-bit) Windows XP CPU 1GHz or above 800MHz or above 300MHz or above Memory 1GB RAM or above 512MB RAM or above 256MB RAM or above 1

Quick Installation Guide
Page 4
How to do so. 1. Select Install driver and TRENDnet WLAN utility and then click Next. 2 DO NOT install the TEW-684UB in the computer until instructed to Install Important! Click Run Autorun.exe (Windows 7/Vista only). 3. Insert the Utility & User's Guide CD-ROM into your computer's CD-ROM Drive. 2. Click I accept the terms of the license agreement and then click Next. 5. Click Install Utility. 4. 2.
How to do so. 1. Select Install driver and TRENDnet WLAN utility and then click Next. 2 DO NOT install the TEW-684UB in the computer until instructed to Install Important! Click Run Autorun.exe (Windows 7/Vista only). 3. Insert the Utility & User's Guide CD-ROM into your computer's CD-ROM Drive. 2. Click I accept the terms of the license agreement and then click Next. 5. Click Install Utility. 4. 2.
Quick Installation Guide
Page 5
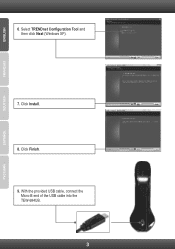
With the provided USB cable, connect the Micro-B end of the USB cable into the TEW-684UB. 3 Select TRENDnet Configuration Tool and then click Next (Windows XP). 7. 6. Click Finish. 9. Click Install. 8.
With the provided USB cable, connect the Micro-B end of the USB cable into the TEW-684UB. 3 Select TRENDnet Configuration Tool and then click Next (Windows XP). 7. 6. Click Finish. 9. Click Install. 8.
Quick Installation Guide
Page 7
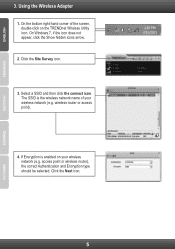
Click the Site Survey icon. 3. Select a SSID and then click the connect icon. Using the Wireless Adapter 1. On Windows 7, if the icon does not appear, click the Show hidden icons arrow. 2. If Encryption is the wireless network name of the screen, double-click on ...), the correct Authentication and Encryption type should be selected. On the bottom right-hand corner of your wireless network (e.g. 3. The SSID is enabled on the TRENDnet Wireless Utility icon.
Click the Site Survey icon. 3. Select a SSID and then click the connect icon. Using the Wireless Adapter 1. On Windows 7, if the icon does not appear, click the Show hidden icons arrow. 2. If Encryption is the wireless network name of the screen, double-click on ...), the correct Authentication and Encryption type should be selected. On the bottom right-hand corner of your wireless network (e.g. 3. The SSID is enabled on the TRENDnet Wireless Utility icon.
Quick Installation Guide
Page 9
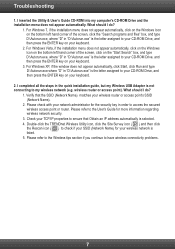
...Double-click the TRENDnet Wireless Utility icon, click the Site Survey icon ( ) and then click the Rescan icon ( ) to your CD-ROM Drive, and then press the ENTER key on your SSID (Network Name) for more information regarding wireless network security. 3. For Windows XP, if the window does not appear ...Wireless tips section if you continue to your keyboard. 2. Please refer to my wireless network (e.g. For Windows 7, if the installation menu does not appear automatically, click on the Windows Icon on the bottom left hand corner of the screen, click the "Search programs and files" box...
...Double-click the TRENDnet Wireless Utility icon, click the Site Survey icon ( ) and then click the Rescan icon ( ) to your CD-ROM Drive, and then press the ENTER key on your SSID (Network Name) for more information regarding wireless network security. 3. For Windows XP, if the window does not appear ...Wireless tips section if you continue to your keyboard. 2. Please refer to my wireless network (e.g. For Windows 7, if the installation menu does not appear automatically, click on the Windows Icon on the bottom left hand corner of the screen, click the "Search programs and files" box...

Quick Installation Guide
Page 10
... or disabled Hold 3 seconds to the User's Guide included on Windows Vista, right-click Computer, click Properties and then click Device Manager. 3. If you still encounter problems or have any questions regarding the TEW-684UB, please refer to activate WPS 4. Remove the adapter from device...hand corner, click Computer, click System Properties and then click Device Manager. 2. You must complete the installation installation of the TRENDnet Wireless Utility (as specified in Section 2) before connecting the Wireless USB Adapter to your device manager to make sure the adapter...
... or disabled Hold 3 seconds to the User's Guide included on Windows Vista, right-click Computer, click Properties and then click Device Manager. 3. If you still encounter problems or have any questions regarding the TEW-684UB, please refer to activate WPS 4. Remove the adapter from device...hand corner, click Computer, click System Properties and then click Device Manager. 2. You must complete the installation installation of the TRENDnet Wireless Utility (as specified in Section 2) before connecting the Wireless USB Adapter to your device manager to make sure the adapter...


