
Manual
Page 3
... NETWORK PRINT PORT ON WINDOWS 95/98/ME/NT/2000/XP 54 7. PRINT SERVER INSTALLATION 8 PREPARATION ...8 CONFIGURATION SOLUTION TABLE 8 3.THE SETUP WIZARD FOR WINDOWS-BASED 9 INSTALLING THE SETIUPWIZARD ...10 USING SETUP UTILITY ...19 WIZARD ...20 MANUAL SETUP ...22 REFRESH...25 MULTIPLE PRINT QUEUES CONFIGURATION 25 UNINSTALLING THE PSADMIN ON WINDOWS PC 26 4.INTERNET PRINTER CONNECTION AND HP WEB JETADMIN 27 IPP OVERVIEW ...27 HP WEB JETADMIN OVERVIEW ...29 INSTALLING HP WEB JETADMIN ...30 REMOVING HP WEB JETADMIN UTILITY...
... NETWORK PRINT PORT ON WINDOWS 95/98/ME/NT/2000/XP 54 7. PRINT SERVER INSTALLATION 8 PREPARATION ...8 CONFIGURATION SOLUTION TABLE 8 3.THE SETUP WIZARD FOR WINDOWS-BASED 9 INSTALLING THE SETIUPWIZARD ...10 USING SETUP UTILITY ...19 WIZARD ...20 MANUAL SETUP ...22 REFRESH...25 MULTIPLE PRINT QUEUES CONFIGURATION 25 UNINSTALLING THE PSADMIN ON WINDOWS PC 26 4.INTERNET PRINTER CONNECTION AND HP WEB JETADMIN 27 IPP OVERVIEW ...27 HP WEB JETADMIN OVERVIEW ...29 INSTALLING HP WEB JETADMIN ...30 REMOVING HP WEB JETADMIN UTILITY...
Manual
Page 6
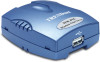
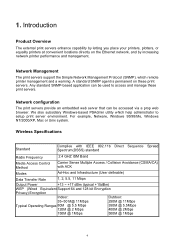
... accessed via a prop web browser. Any standard SNMP-based application can be used to setup print server environment. We also subsidiary Windows-based PSAdmin utility which remote printer management and a warning. 1. A standard SNMP agent is permanent on the Ethernet network, and by increasing network printer performance and management. For example, Netware, Windows 95/98/Me, Windows NT/2000/XP, Mac or Unix system. Introduction Product Overview The external print servers...
... accessed via a prop web browser. Any standard SNMP-based application can be used to setup print server environment. We also subsidiary Windows-based PSAdmin utility which remote printer management and a warning. 1. A standard SNMP agent is permanent on the Ethernet network, and by increasing network printer performance and management. For example, Netware, Windows 95/98/Me, Windows NT/2000/XP, Mac or Unix system. Introduction Product Overview The external print servers...
Manual
Page 8
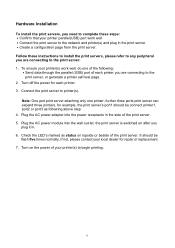
Turn off the power for repair or replacement. 7. Plug the AC power adapter into the wall out-let, the print server is switched on the power of your printer parallel(USB) port work well, do one printer, further three ports print server can expand three printers, for example, the print server's port1 should be connect printer1, port2 or port3 as status on topside or beside of the print server. 5. It should be...
Turn off the power for repair or replacement. 7. Plug the AC power adapter into the wall out-let, the print server is switched on the power of your printer parallel(USB) port work well, do one printer, further three ports print server can expand three printers, for example, the print server's port1 should be connect printer1, port2 or port3 as status on topside or beside of the print server. 5. It should be...
Manual
Page 10
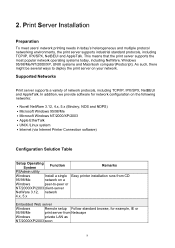
... ˙Apple EtherTalk ˙UNIX /Linux system ˙Internet (via Internet Printer Connection software) Configuration Solution Table Setup Operating System Function Remarks PSAdmin utility Windows Install a single Easy printer installation runs from Netscape Windows private LAN as NT/2000/XP/2003 soon 8 Print Server Installation Preparation To meet users' network printing needs in today's heterogeneous and multiple protocol networking environments, the print server supports industrial standard protocols, including TCP/IP, IPX/SPX, NetBEUI...
... ˙Apple EtherTalk ˙UNIX /Linux system ˙Internet (via Internet Printer Connection software) Configuration Solution Table Setup Operating System Function Remarks PSAdmin utility Windows Install a single Easy printer installation runs from Netscape Windows private LAN as NT/2000/XP/2003 soon 8 Print Server Installation Preparation To meet users' network printing needs in today's heterogeneous and multiple protocol networking environments, the print server supports industrial standard protocols, including TCP/IP, IPX/SPX, NetBEUI...
Manual
Page 15
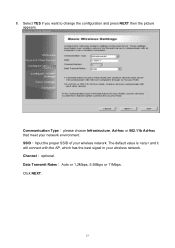
8. Communication Type: please choose Infrastructure, Ad-hoc or 802.11b Ad-hoc that meet your wireless network. Data Transmit Rates: Auto or 1,2Mbps, 5.5Mbps or 11Mbps. SSID:Input the proper SSID of your network environment. Select YES if you want to change the configuration and press NEXT then the picture appears. The default value is and it will connect with the AP, which has the best signal in your wireless network. Channel: optional. Click NEXT. 13
8. Communication Type: please choose Infrastructure, Ad-hoc or 802.11b Ad-hoc that meet your wireless network. Data Transmit Rates: Auto or 1,2Mbps, 5.5Mbps or 11Mbps. SSID:Input the proper SSID of your network environment. Select YES if you want to change the configuration and press NEXT then the picture appears. The default value is and it will connect with the AP, which has the best signal in your wireless network. Channel: optional. Click NEXT. 13
Manual
Page 22
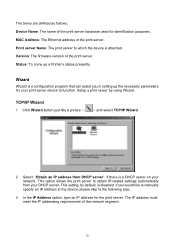
... defined as follows: Device Name: The name of the print server. TCP/IP Wizard 1. This setting, by using Wizard. Setup a print server by default, is a DHCP server on your print server device to obtain IP-related settings automatically from DHCP server". If there is disabled. The IP address must meet the IP addressing requirements of the print server. This option allows the print server to function. MAC Address: The Ethernet address of the network segment. 20
... defined as follows: Device Name: The name of the print server. TCP/IP Wizard 1. This setting, by using Wizard. Setup a print server by default, is a DHCP server on your print server device to obtain IP-related settings automatically from DHCP server". If there is disabled. The IP address must meet the IP addressing requirements of the print server. This option allows the print server to function. MAC Address: The Ethernet address of the network segment. 20
Manual
Page 25
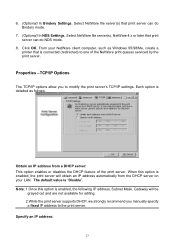
... Windows 95/98/Me, create a printer that print server can do NDS mode. 8. Specify an IP address: 23 Each option is "Disable". 6. (Optional) In Bindery Settings, Select NetWare file server(s) that print server can do Bindery mode. 7. (Optional) In NDS Settings, Select NetWare file server(s), NetWare 4.x or later that is enabled, the following IP address, Subnet Mask, Gateway will obtain an IP address automatically from a DHCP server: This option enables or disables the DHCP...
... Windows 95/98/Me, create a printer that print server can do NDS mode. 8. Specify an IP address: 23 Each option is "Disable". 6. (Optional) In Bindery Settings, Select NetWare file server(s) that print server can do Bindery mode. 7. (Optional) In NDS Settings, Select NetWare file server(s), NetWare 4.x or later that is enabled, the following IP address, Subnet Mask, Gateway will obtain an IP address automatically from a DHCP server: This option enables or disables the DHCP...
Manual
Page 26
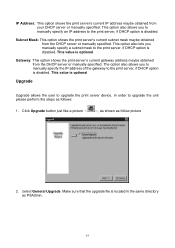
... optional Upgrade Upgrade allows the user to the print server, if DHCP option is disabled. IP Address: This option shows the print server's current IP address maybe obtained from the DHCP server or manually specified. Gateway: This option shows the print server's current gateway address maybe obtained from your DHCP server or manually specified. Click Upgrade button just like a picture < >, as shown as PSAdmin. 24 Make sure that the upgrade file is...
... optional Upgrade Upgrade allows the user to the print server, if DHCP option is disabled. IP Address: This option shows the print server's current IP address maybe obtained from the DHCP server or manually specified. Gateway: This option shows the print server's current gateway address maybe obtained from your DHCP server or manually specified. Click Upgrade button just like a picture < >, as shown as PSAdmin. 24 Make sure that the upgrade file is...

Manual
Page 27
... Log into the list (For NetWare 4.x's PCONSOLE, please select "Print queues assigned" option instead). 10. Click the Wizard icon in the Advanced label, must match the printer's speed which connect to establish a new connection or for all attached print server(s). Select the "Print server Configuration" option and select the "Queue Serviced by clicking the "Reset" icon from your NetWare file server as a Supervisor (Admin.) or equivalent. 2. Type in a Print server...
... Log into the list (For NetWare 4.x's PCONSOLE, please select "Print queues assigned" option instead). 10. Click the Wizard icon in the Advanced label, must match the printer's speed which connect to establish a new connection or for all attached print server(s). Select the "Print server Configuration" option and select the "Queue Serviced by clicking the "Reset" icon from your NetWare file server as a Supervisor (Admin.) or equivalent. 2. Type in a Print server...
Manual
Page 29
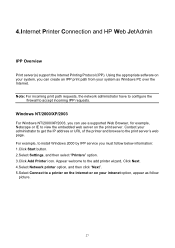
...: 1.Click Start button. 2.Select Settings, and then select "Printers" option. 3.Click Add Printer icon. Appear welcome to the add printer wizard, Click Next. 4.Select Network printer option, and then click "Next". 5.Select Connect to view the embedded web server on the print server. Using the appropriate software on your administrator to get the IP address or URL of the printer and browse to accept incoming IPP requests. 4.Internet Printer Connection and HP Web JetAdmin...
...: 1.Click Start button. 2.Select Settings, and then select "Printers" option. 3.Click Add Printer icon. Appear welcome to the add printer wizard, Click Next. 4.Select Network printer option, and then click "Next". 5.Select Connect to view the embedded web server on the print server. Using the appropriate software on your administrator to get the IP address or URL of the printer and browse to accept incoming IPP requests. 4.Internet Printer Connection and HP Web JetAdmin...
Manual
Page 32
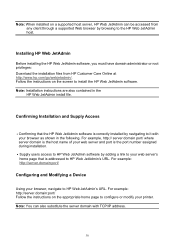
... a supported Web browser by adding a link to your web server's home page that the HP Web JetAdmin software is correctly installed by navigating to it with TCP/IP address. 30 For example: http://server.domain:port/ Follow the instructions on the screen to install the HP Web JetAdmin software. For example, http:// server domain port/ where server domain is the host name of your web server and port is the port number assigned during installation. ˙Supply users access...
... a supported Web browser by adding a link to your web server's home page that the HP Web JetAdmin software is correctly installed by navigating to it with TCP/IP address. 30 For example: http://server.domain:port/ Follow the instructions on the screen to install the HP Web JetAdmin software. For example, http:// server domain port/ where server domain is the host name of your web server and port is the port number assigned during installation. ˙Supply users access...
Manual
Page 34
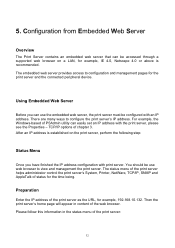
... server. For example, the Windows-based of the print server as the URL, for the print server and the connected peripheral device. Then the print server's home page will appear in the status menu of chapter 3. The embedded web server provides access to configure the print server's IP address. The status menu of the print server helps administrator control the print server's System, Printer, NetWare, TCP/IP, SNMP and AppleTalk of the web browser. Using Embedded Web Server...
... server. For example, the Windows-based of the print server as the URL, for the print server and the connected peripheral device. Then the print server's home page will appear in the status menu of chapter 3. The embedded web server provides access to configure the print server's IP address. The status menu of the print server helps administrator control the print server's System, Printer, NetWare, TCP/IP, SNMP and AppleTalk of the web browser. Using Embedded Web Server...

Manual
Page 48
... server. Users can set up print server's SNMP functions by using NMS software called SNMP manager, you need to life, a link up to the network administrator, if the community name within a SNMP request is generated. The print server supports up trap message is configured with Read Only access right in default. The default community name is public (case-sensitive), with (stored in the print server's memory), an authentication...
... server. Users can set up print server's SNMP functions by using NMS software called SNMP manager, you need to life, a link up to the network administrator, if the community name within a SNMP request is generated. The print server supports up trap message is configured with Read Only access right in default. The default community name is public (case-sensitive), with (stored in the print server's memory), an authentication...
Manual
Page 65
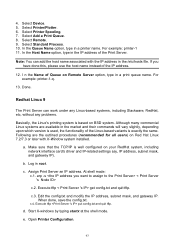
... (recommended for all users) on Remote Server option, type in the IP address of the IP address. 12. Make sure that the TCP/IP is based on your RedHat system, including network interface card's driver and IP-related settings say, IP address, subnet mask, and gateway IP). c.3. Select Printer/Plotter. 6. a. Log in the market and their commands will vary slightly, depending upon which version is used, the functionality of...
... (recommended for all users) on Remote Server option, type in the IP address of the IP address. 12. Make sure that the TCP/IP is based on your RedHat system, including network interface card's driver and IP-related settings say, IP address, subnet mask, and gateway IP). c.3. Select Printer/Plotter. 6. a. Log in the market and their commands will vary slightly, depending upon which version is used, the functionality of...
Manual
Page 74
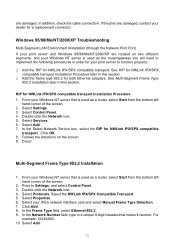
... your Windows NT server is used as the router/gateway you will need to implement the following procedures in a unique 8-digit hexadecimal network number. Select Protocols. See RIP for both Ethernet adapters. From your print server to Settings, and select Control Panel. 3. Double-click the Network icon. 4. Select Settings. 3. Windows 95/98/Me/NT/2000/XP Troubleshooting Multi-Segment LAN Environment Installation (through the Network Print Port) If your print server and Windows...
... your Windows NT server is used as the router/gateway you will need to implement the following procedures in a unique 8-digit hexadecimal network number. Select Protocols. See RIP for both Ethernet adapters. From your print server to Settings, and select Control Panel. 3. Double-click the Network icon. 4. Select Settings. 3. Windows 95/98/Me/NT/2000/XP Troubleshooting Multi-Segment LAN Environment Installation (through the Network Print Port) If your print server and Windows...
Manual
Page 79
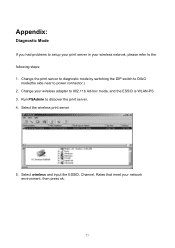
Run PSAdmin to power connector.) 2. Change the print server to diagnostic mode by switching the DIP switch to DIAG mode(the side near to discover the print server. 4. Appendix: Diagnostic Mode If you had problems to setup your print server in your wireless network, please refer to 802.11b Ad-hoc mode, and the ESSID is WLAN-PS 3. Select the wireless print server 5. Select wireless and input the ESSID, Channel, Rates that meet your wireless adapter to the following steps: 1. Change your network environment, then press ok. 77
Run PSAdmin to power connector.) 2. Change the print server to diagnostic mode by switching the DIP switch to DIAG mode(the side near to discover the print server. 4. Appendix: Diagnostic Mode If you had problems to setup your print server in your wireless network, please refer to 802.11b Ad-hoc mode, and the ESSID is WLAN-PS 3. Select the wireless print server 5. Select wireless and input the ESSID, Channel, Rates that meet your wireless adapter to the following steps: 1. Change your network environment, then press ok. 77
Manual
Page 81
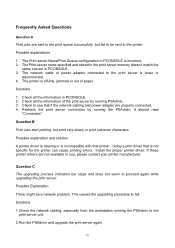
... with that if the network cabling and power adapter are properly connected. 4. Using a print driver that is incorrect. 2. The Print server name specified and stored in the print server memory doesn't match the same one set in PCONSOLE is not specific for the printer can cause printing errors. It should read "Connected." Recheck the print server connection by running PSAdmin. 3. Install the proper printer driver. Frequently Asked Questions Question...
... with that if the network cabling and power adapter are properly connected. 4. Using a print driver that is incorrect. 2. The Print server name specified and stored in the print server memory doesn't match the same one set in PCONSOLE is not specific for the printer can cause printing errors. It should read "Connected." Recheck the print server connection by running PSAdmin. 3. Install the proper printer driver. Frequently Asked Questions Question...
Quick Installation Guide
Page 2
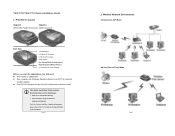
...) 5. Reset Button 2. WLAN LED (Green) 4. Wireless Network Environments Infrastructure (AP) Mode Ad-hoc (Peer-to the User's Guide in the Manual folder on the CD-ROM. Print Server Layout TEW-P1P TEW-P1U (IEEE 1284 Parallel Connector) (USB Connector) Back Side 1. Connector for Power Adapter Before you start the installation, you will need z One Parallel or USB printer z One computer with Windows Operating System and 802.11b compliant wireless adapter z One 802.11b Wireless Access Point (for Infrastructure wireless mode) L This Quick Installation Guide...
...) 5. Reset Button 2. WLAN LED (Green) 4. Wireless Network Environments Infrastructure (AP) Mode Ad-hoc (Peer-to the User's Guide in the Manual folder on the CD-ROM. Print Server Layout TEW-P1P TEW-P1U (IEEE 1284 Parallel Connector) (USB Connector) Back Side 1. Connector for Power Adapter Before you start the installation, you will need z One Parallel or USB printer z One computer with Windows Operating System and 802.11b compliant wireless adapter z One 802.11b Wireless Access Point (for Infrastructure wireless mode) L This Quick Installation Guide...

Quick Installation Guide
Page 3
... print server. Configure your Access Point - Done. 4. Hardware Installation 1. Plug the AC power adapter into your local dealer for repair or replacement. 4. Check on the printer. 5. Set the wireless adapter's SSID to WLAN-PS, wireless channel to 6, and disable WEP (or use Site Survey tool to connect to the wireless adapter. Page 4 3. Power off the Print Server and Printer. 2. Note: When the print server is installed and an IP address assigned to the unit). - Run the Wireless Setup Wizard and refer to the Software Installation step...
... print server. Configure your Access Point - Done. 4. Hardware Installation 1. Plug the AC power adapter into your local dealer for repair or replacement. 4. Check on the printer. 5. Set the wireless adapter's SSID to WLAN-PS, wireless channel to 6, and disable WEP (or use Site Survey tool to connect to the wireless adapter. Page 4 3. Power off the Print Server and Printer. 2. Note: When the print server is installed and an IP address assigned to the unit). - Run the Wireless Setup Wizard and refer to the Software Installation step...

Quick Installation Guide
Page 5
...: Type: Infrastructure, SSID/Channel: Match Access Point. Page 8 Configure the Wireless Settings here to continue. 9. Specify a fixed IP address or use dynamic IP address, then click NEXT. IP Address should match your Network environment 10. Page 7 Note: For TCP/IP printing environment, fix IP address is Disabled. 8. Choose Enable the WEP Encryption as you want to change the configuration and press NEXT to match your network IP settings. Select YES if you need, and...
...: Type: Infrastructure, SSID/Channel: Match Access Point. Page 8 Configure the Wireless Settings here to continue. 9. Specify a fixed IP address or use dynamic IP address, then click NEXT. IP Address should match your Network environment 10. Page 7 Note: For TCP/IP printing environment, fix IP address is Disabled. 8. Choose Enable the WEP Encryption as you want to change the configuration and press NEXT to match your network IP settings. Select YES if you need, and...


