
Manual
Page 3
... ON WINDOWS 95/98/ME/NT/2000/XP 54 7. TABLE OF CONTENTS COPYRIGHT...3 1.INTRODUCTION...4 PRODUCT OVERVIEW ...4 WIRELESS SPECIFICATIONS ...4 COMPONENTS AND FEATURES ...5 HARDWARE INSTALLATION...6 WIRELESS NETWORK ENVIRONMENT 7 2. PRINT SERVER INSTALLATION 8 PREPARATION ...8 CONFIGURATION SOLUTION TABLE 8 3.THE SETUP WIZARD FOR WINDOWS-BASED 9 INSTALLING THE SETIUPWIZARD ...10 USING SETUP UTILITY ...19 WIZARD ...20 MANUAL SETUP ...22 REFRESH......
... ON WINDOWS 95/98/ME/NT/2000/XP 54 7. TABLE OF CONTENTS COPYRIGHT...3 1.INTRODUCTION...4 PRODUCT OVERVIEW ...4 WIRELESS SPECIFICATIONS ...4 COMPONENTS AND FEATURES ...5 HARDWARE INSTALLATION...6 WIRELESS NETWORK ENVIRONMENT 7 2. PRINT SERVER INSTALLATION 8 PREPARATION ...8 CONFIGURATION SOLUTION TABLE 8 3.THE SETUP WIZARD FOR WINDOWS-BASED 9 INSTALLING THE SETIUPWIZARD ...10 USING SETUP UTILITY ...19 WIZARD ...20 MANUAL SETUP ...22 REFRESH......
Manual
Page 6
Network configuration The print servers provide an embedded web server that can be accessed via a prop web browser. Wireless Specifications Standard Complies with IEEE 802.11b Direct Sequence Spread Spectrum(DSSS) standard Radio ... which remote printer management and a warning. Network Management The print servers support the Simple Network Management Protocol (SNMP), which help administrator to access and manage these print servers. 1. Introduction Product Overview The external print servers enhance capability by increasing network printer performance and management. For...
Network configuration The print servers provide an embedded web server that can be accessed via a prop web browser. Wireless Specifications Standard Complies with IEEE 802.11b Direct Sequence Spread Spectrum(DSSS) standard Radio ... which remote printer management and a warning. Network Management The print servers support the Simple Network Management Protocol (SNMP), which help administrator to access and manage these print servers. 1. Introduction Product Overview The external print servers enhance capability by increasing network printer performance and management. For...
Manual
Page 7
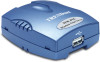
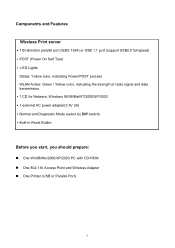
Components and Features Wireless Print server ˙1 Bi-direction parallel port (IEEE 1284) or USB 1.1 port (support USB2.0 full speed) ˙POST (Power On Self Test) ˙ LED Lights Status: Yellow ...-in Reset Button Before you start, you should prepare: One Win98/Me/2000/XP/2003 PC with CD-ROM One 802.11b Access Point and Wireless Adapter One Printer (USB or Parallel Port) 5
Components and Features Wireless Print server ˙1 Bi-direction parallel port (IEEE 1284) or USB 1.1 port (support USB2.0 full speed) ˙POST (Power On Self Test) ˙ LED Lights Status: Yellow ...-in Reset Button Before you start, you should prepare: One Win98/Me/2000/XP/2003 PC with CD-ROM One 802.11b Access Point and Wireless Adapter One Printer (USB or Parallel Port) 5
Manual
Page 14
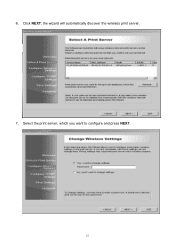
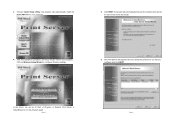
the wizard will automatically discover the wireless print server. 7. 6. Select the print server, which you want to configure and press NEXT. 12 Click NEXT;
the wizard will automatically discover the wireless print server. 7. 6. Select the print server, which you want to configure and press NEXT. 12 Click NEXT;
Manual
Page 17
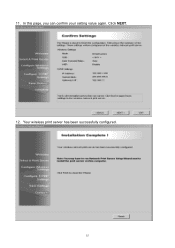
11. Your wireless print server has been successfully configured. 15 In this page, you can confirm your setting value again. Click NEXT. 12.
11. Your wireless print server has been successfully configured. 15 In this page, you can confirm your setting value again. Click NEXT. 12.

Manual
Page 18
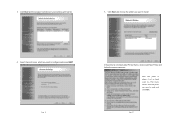
Click NEXT; Click Network Print Server Setup Wizard and the following message appear. 15. the wizard will automatically discover the wireless print server. 16 13. Now, you may have to run the Network Print Server Setup Wizard next to install the print server on your computer. 14.
Click NEXT; Click Network Print Server Setup Wizard and the following message appear. 15. the wizard will automatically discover the wireless print server. 16 13. Now, you may have to run the Network Print Server Setup Wizard next to install the print server on your computer. 14.
Manual
Page 35
... view contact name of the print server. Wireless MAC Address: This option allows you to view Node ID of the print server. To correct the print server's device name. System Location: This option allows you to view Location name of the print server. To confirm the print server's location name where the print server is unique from start the print server, it then as shown...
... view contact name of the print server. Wireless MAC Address: This option allows you to view Node ID of the print server. To correct the print server's device name. System Location: This option allows you to view Location name of the print server. To confirm the print server's location name where the print server is unique from start the print server, it then as shown...

Manual
Page 36
... in the model box. When the printer connected with the print server, it will be show in the status box. For Example, Waiting for job. Model Number: This option allows you to view manufacturer of the printer. Wireless Status 1.Click Status, it will be show in the command... box. When the printer connected with the print server, it will be show in the following picture. When the printer connected with the...
... in the model box. When the printer connected with the print server, it will be show in the status box. For Example, Waiting for job. Model Number: This option allows you to view manufacturer of the printer. Wireless Status 1.Click Status, it will be show in the command... box. When the printer connected with the print server, it will be show in the following picture. When the printer connected with the...

Manual
Page 37
Mode: This option shows the wireless operation mode of your wireless network. Data Transmit Rate: Current transmit rate. WEP Encryption: The status of your print server. Channel Number: Current channel number. 2.Click Wireless, it then as shown in the following picture. SSID: The ESSID of WEP encryption. TCP/IP Status 1.Click Status, it then appears the sub-menu. 2.Click TCP/IP, it then as shown in the following picture. 35 AP's MAC Address: This option shows the MAC address your wireless AP.
Mode: This option shows the wireless operation mode of your wireless network. Data Transmit Rate: Current transmit rate. WEP Encryption: The status of your print server. Channel Number: Current channel number. 2.Click Wireless, it then as shown in the following picture. SSID: The ESSID of WEP encryption. TCP/IP Status 1.Click Status, it then appears the sub-menu. 2.Click TCP/IP, it then as shown in the following picture. 35 AP's MAC Address: This option shows the MAC address your wireless AP.
Manual
Page 43
˙User Name: You must be input the default administration user name, admin as shown in the following picture. Wireless Setup: 1.Click Setup, it then appears the sub-menu. 2.Click Wireless, it then as login user name. ˙Password: The default password is completed from the print server, you should to remember this password to input password box. Basic Settings: Mode: Infrastructure, Ad-hoc or 802.11b Ad-Hoc. 41 After setup password is empty.
˙User Name: You must be input the default administration user name, admin as shown in the following picture. Wireless Setup: 1.Click Setup, it then appears the sub-menu. 2.Click Wireless, it then as login user name. ˙Password: The default password is completed from the print server, you should to remember this password to input password box. Basic Settings: Mode: Infrastructure, Ad-hoc or 802.11b Ad-Hoc. 41 After setup password is empty.
Manual
Page 44
... select DHCP/ BOOTP option. TCP/IP Status: 1. WEP Settings: USE WEP: Disabled or Enabled. If there is a DHCP/BOOTP server on your DHCP server. 42 Channel: Specify a Channel number that meet your wireless print server. Data Transmit Rates: Choose the transmit rate of your environment. WEP key: Input your WEP key in manually. Click Setup...
... select DHCP/ BOOTP option. TCP/IP Status: 1. WEP Settings: USE WEP: Disabled or Enabled. If there is a DHCP/BOOTP server on your DHCP server. 42 Channel: Specify a Channel number that meet your wireless print server. Data Transmit Rates: Choose the transmit rate of your environment. WEP key: Input your WEP key in manually. Click Setup...
Manual
Page 79
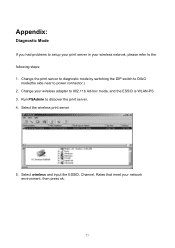
Select the wireless print server 5. Change the print server to diagnostic mode by switching the DIP switch to DIAG mode(the side near to the following steps: 1. Appendix: Diagnostic Mode If you had problems to setup your print server in your wireless network, please refer to power connector.) 2. Select wireless and input the ESSID, Channel, Rates that meet your wireless adapter to discover the print server. 4. Change your network environment, then press ok. 77 Run PSAdmin to 802.11b Ad-hoc mode, and the ESSID is WLAN-PS 3.
Select the wireless print server 5. Change the print server to diagnostic mode by switching the DIP switch to DIAG mode(the side near to the following steps: 1. Appendix: Diagnostic Mode If you had problems to setup your print server in your wireless network, please refer to power connector.) 2. Select wireless and input the ESSID, Channel, Rates that meet your wireless adapter to discover the print server. 4. Change your network environment, then press ok. 77 Run PSAdmin to 802.11b Ad-hoc mode, and the ESSID is WLAN-PS 3.

Manual
Page 80
The print server will restart. 8. 6. 7. Load Default Value You can load the default value of wireless print server by press the reset button. Done! Switch the DIP back to 10 seconds until the status LED flash and the default value is restored. 78 Please press 5 to normal mode and change your wireless adapter setting.
The print server will restart. 8. 6. 7. Load Default Value You can load the default value of wireless print server by press the reset button. Done! Switch the DIP back to 10 seconds until the status LED flash and the default value is restored. 78 Please press 5 to normal mode and change your wireless adapter setting.
Quick Installation Guide
Page 2
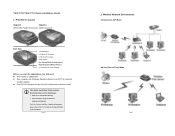
...Print Server Layout TEW-P1P TEW-P1U (IEEE 1284 Parallel Connector) (USB Connector) Back Side 1. Status LED (Orange) 3. DIP Switch Nor- Connector for Power Adapter Before you start the installation, you will need z One Parallel or USB printer z One computer with Windows Operating System and 802.11b compliant wireless adapter z One 802.11b Wireless... Access Point (for Infrastructure wireless mode) L This Quick Installation Guide contains brief instructions of the followings: • Print Server Installation & Setup •...
...Print Server Layout TEW-P1P TEW-P1U (IEEE 1284 Parallel Connector) (USB Connector) Back Side 1. Status LED (Orange) 3. DIP Switch Nor- Connector for Power Adapter Before you start the installation, you will need z One Parallel or USB printer z One computer with Windows Operating System and 802.11b compliant wireless adapter z One 802.11b Wireless... Access Point (for Infrastructure wireless mode) L This Quick Installation Guide contains brief instructions of the followings: • Print Server Installation & Setup •...

Quick Installation Guide
Page 3
... on , the status indicator should flash 5 times and then turn solid. Run the utility of the print server. The Autorun program starts and the following window appears. Configure your wireless adapter and connect it to the wireless adapter. 3. Run the Wireless Setup Wizard and refer to the Software Installation step 2 ~ 14 (page 4) to configure your...
... on , the status indicator should flash 5 times and then turn solid. Run the utility of the print server. The Autorun program starts and the following window appears. Configure your wireless adapter and connect it to the wireless adapter. 3. Run the Wireless Setup Wizard and refer to the Software Installation step 2 ~ 14 (page 4) to configure your...
Quick Installation Guide
Page 4
3. Choose Install Setup Utility, the program will automatically discover the wireless print server, if it can go to Start Æ Program Æ Network Print Server Æ SetupWizard to run the program again Page 5 Page 6 The Print Server will appear in the list, select the print server you can not be found, try rescan. 4. Click NEXT, the wizard will automatically install...
3. Choose Install Setup Utility, the program will automatically discover the wireless print server, if it can go to Start Æ Program Æ Network Print Server Æ SetupWizard to run the program again Page 5 Page 6 The Print Server will appear in the list, select the print server you can not be found, try rescan. 4. Click NEXT, the wizard will automatically install...

Quick Installation Guide
Page 6
Click the Network Print Server Setup Wizard and the following window appears. Click NEXT. Page 9 Page 10 Wireless Configurations Complete. 2. 11. Go back to Setup Wizard and select Network Print Server Setup 12. In this page, you can confirm your settings again. Printer Installation 1.
Click the Network Print Server Setup Wizard and the following window appears. Click NEXT. Page 9 Page 10 Wireless Configurations Complete. 2. 11. Go back to Setup Wizard and select Network Print Server Setup 12. In this page, you can confirm your settings again. Printer Installation 1.
Quick Installation Guide
Page 7
Page 11 If the printer is added, it will discover your wireless print server. 5. Click Next and choose the printer you want to configure and press NEXT. After new printer is not listed under the Print Name section, select the printer you want to install and click NEXT. Click Next and the program will be listed under Printer Name, click on Add New Printer and follow the below instruction. Page 12 Select the print server which you want to install. 4. 3.
Page 11 If the printer is added, it will discover your wireless print server. 5. Click Next and choose the printer you want to configure and press NEXT. After new printer is not listed under the Print Name section, select the printer you want to install and click NEXT. Click Next and the program will be listed under Printer Name, click on Add New Printer and follow the below instruction. Page 12 Select the print server which you want to install. 4. 3.

Quick Installation Guide
Page 8
... Next and setup program will display the summary of your printer's configuration. 7. Run Network Print Server Wizard and refer to the Printer Installation step 1 to DIAG mode. 2. Run the utility of your wireless adapter and set it to the wireless adapter. TRENDware Technical Support (USA) Tel: +1-310-891-1100 Fax: +1-310-891-1111 E-mail...
... Next and setup program will display the summary of your printer's configuration. 7. Run Network Print Server Wizard and refer to the Printer Installation step 1 to DIAG mode. 2. Run the utility of your wireless adapter and set it to the wireless adapter. TRENDware Technical Support (USA) Tel: +1-310-891-1100 Fax: +1-310-891-1111 E-mail...

