933261.PDF
Page 2
... 4 1.3 Target Server Compatibility 4 1.4 Client Computer Compatibility 4 1.5 Safety 4 1.6 System Components 5 1.7 The NetCommander IP Unit 5 1.8 Rackmounting the NetCommander IP 6 1.9 Connecting the System 7 1.10 Initial Settings (Default IP Address 7 2. Table of Contents Legal Notice 3 1.
... 4 1.3 Target Server Compatibility 4 1.4 Client Computer Compatibility 4 1.5 Safety 4 1.6 System Components 5 1.7 The NetCommander IP Unit 5 1.8 Rackmounting the NetCommander IP 6 1.9 Connecting the System 7 1.10 Initial Settings (Default IP Address 7 2. Table of Contents Legal Notice 3 1.

933261.PDF
Page 6
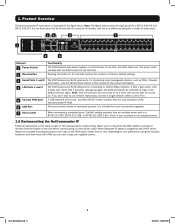
...Rackmounting the NetCommander IP Follow all models, with the KVM connect to make it the default LAN port again. If LAN 1 goes down the MAC Address and Device Number from an available server port to a B078-101-PS2, B078-101-USB, or B078-101-USB-1 SIU, which in turn connects .... 3 Serial Ports 1 and 2 The KVM features two RJ45 serial ports, for all instructions in the figure below shows the back panel for a B072-032-IP2 and B072-032-IP4, but the back panel will be functionally the same for connecting serial manageable devices, such as PDUs, firewalls, and routers. (see the Serial Pinout...
...Rackmounting the NetCommander IP Follow all models, with the KVM connect to make it the default LAN port again. If LAN 1 goes down the MAC Address and Device Number from an available server port to a B078-101-PS2, B078-101-USB, or B078-101-USB-1 SIU, which in turn connects .... 3 Serial Ports 1 and 2 The KVM features two RJ45 serial ports, for all instructions in the figure below shows the back panel for a B072-032-IP2 and B072-032-IP4, but the back panel will be functionally the same for connecting serial manageable devices, such as PDUs, firewalls, and routers. (see the Serial Pinout...

933261.PDF
Page 7
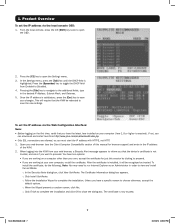
... address for the computer you can use the local console OSD or the Web Configuration Interface. There are described in this manual for each computer/server you will power on the computer/server. 7. Product Overview 1.9 Connecting the System The figure below shows a B072-032-IP4 4-User installation. Connect a Cat5e/6 cable from your network into a Tripp Lite...
... address for the computer you can use the local console OSD or the Web Configuration Interface. There are described in this manual for each computer/server you will power on the computer/server. 7. Product Overview 1.9 Connecting the System The figure below shows a B072-032-IP4 4-User installation. Connect a Cat5e/6 cable from your network into a Tripp Lite...

933261.PDF
Page 8
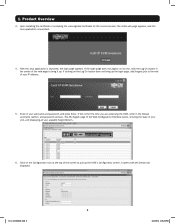
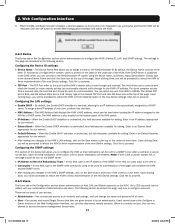
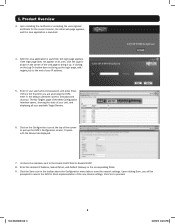
...on a computer other than your computer (Java 1.6 or higher is satisfactory, press the [Esc] key to the additional fields, type in the desired IP Address, Subnet Mask, and Gateway. 5. You have two options: • If you are working at your web browser, a Security Alert message appears to ... the first time, verify that the device's certificate is installed, it will require that the KVM be recognized as an Administrator in the IP address of this session by clicking to view and install the certificate. o When the Wizard presents a caution screen, click Yes. In the Settings ...
...on a computer other than your computer (Java 1.6 or higher is satisfactory, press the [Esc] key to the additional fields, type in the desired IP Address, Subnet Mask, and Gateway. 5. You have two options: • If you are working at your web browser, a Security Alert message appears to ... the first time, verify that the device's certificate is installed, it will require that the KVM be recognized as an Administrator in the IP address of this session by clicking to view and install the certificate. o When the Wizard presents a caution screen, click Yes. In the Settings ...
933261.PDF
Page 9
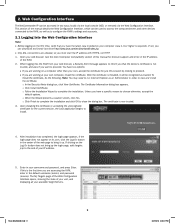
... to the end of the web page to pull up . If this is the first time you are accessing the KVM, enter in your IP address. 5. It opens with the Device tab displayed. 9 12-12-107-933261.indd 9 3/27/2013 4:06:20 PM Enter in the default username (admin) and password...
... to the end of the web page to pull up . If this is the first time you are accessing the KVM, enter in your IP address. 5. It opens with the Device tab displayed. 9 12-12-107-933261.indd 9 3/27/2013 4:06:20 PM Enter in the default username (admin) and password...
933261.PDF
Page 10
1. Product Overview 7. Click Yes to save the network settings. Click the Save icon in the corresponding fields. 9. Enter the desired IP Address, Subnet Mask, and Default Gateway in the toolbar above the Configuration menu tabs to proceed. 10 12-12-107-933261.indd 10 3/27/2013 4:06:20 PM Uncheck the checkbox next to the Enable DHCP field to finish implementation of the new Device settings. Upon clicking Save, you will be prompted to reboot the KVM to disable DHCP. 8.
1. Product Overview 7. Click Yes to save the network settings. Click the Save icon in the corresponding fields. 9. Enter the desired IP Address, Subnet Mask, and Default Gateway in the toolbar above the Configuration menu tabs to proceed. 10 12-12-107-933261.indd 10 3/27/2013 4:06:20 PM Uncheck the checkbox next to the Enable DHCP field to finish implementation of the new Device settings. Upon clicking Save, you will be prompted to reboot the KVM to disable DHCP. 8.
933261.PDF
Page 11
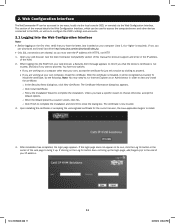
... Interface, which can be recognized as an Administrator in two ways; After the certificate is not trusted, and asks if you must start the IP address with HTTPS, not HTTP. 1. The Certificate Information dialog box appears. o Follow the Installation Wizard to close the dialog box. o When the Wizard presents... application begins to configure the KVM's settings and accounts. 2.1 Logging Into the Web Configuration Interface Note: • Before logging on your IP address. 11 12-12-107-933261.indd 11 3/27/2013 4:06:22 PM If clicking on the Log On button does not bring it will be...
... Interface, which can be recognized as an Administrator in two ways; After the certificate is not trusted, and asks if you must start the IP address with HTTPS, not HTTP. 1. The Certificate Information dialog box appears. o Follow the Installation Wizard to close the dialog box. o When the Wizard presents... application begins to configure the KVM's settings and accounts. 2.1 Logging Into the Web Configuration Interface Note: • Before logging on your IP address. 11 12-12-107-933261.indd 11 3/27/2013 4:06:22 PM If clicking on the Log On button does not bring it will be...

933261.PDF
Page 12
... Web Configuration Interface screens in account to a page that gives you can access. Web Configuration Interface 5. If this is displayed the product description and IP address. The right-hand side includes the standard browser buttons for restoring, moving, sizing, minimizing, maximizing, or closing the screen. The My Targets icon brings you...
... Web Configuration Interface screens in account to a page that gives you can access. Web Configuration Interface 5. If this is displayed the product description and IP address. The right-hand side includes the standard browser buttons for restoring, moving, sizing, minimizing, maximizing, or closing the screen. The My Targets icon brings you...
933261.PDF
Page 19
... implementation of the new Device settings. Upon receiving notification of the new Device settings. In this field becomes available for an IP address to be prompted to reboot the KVM to finish implementation of the new Device settings. Upon clicking Save, you will be sent ... or router security access list must enable inbound traffic through and received. 2. Upon clicking Save, you will be used when locating the IP address assigned to by an administrator. Upon clicking Save, you know the installation was successful, and that they are described in a remote session,...
... implementation of the new Device settings. Upon receiving notification of the new Device settings. In this field becomes available for an IP address to be prompted to reboot the KVM to finish implementation of the new Device settings. Upon clicking Save, you will be sent ... or router security access list must enable inbound traffic through and received. 2. Upon clicking Save, you will be used when locating the IP address assigned to by an administrator. Upon clicking Save, you know the installation was successful, and that they are described in a remote session,...
933261.PDF
Page 23
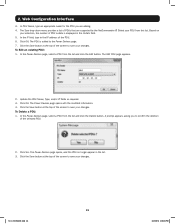
... list. 3. Click OK. The Edit PDU page appears. 2. To Delete a PDU: 1. The Power Devices page opens, and the PDU no longer appear in the IP address of the screen to the Power Devices page. 7. Web Configuration Interface 3. Update the PDU Name, Type, and/or IP fields as required. 3. In the Power...
... list. 3. Click OK. The Edit PDU page appears. 2. To Delete a PDU: 1. The Power Devices page opens, and the PDU no longer appear in the IP address of the screen to the Power Devices page. 7. Web Configuration Interface 3. Update the PDU Name, Type, and/or IP fields as required. 3. In the Power...

933261.PDF
Page 26
... to block the account for a specified period of unsuccessful login attempts that an account will be blocked for serial ports 1 and 2 (by providing 1) the IP address of the Security page; By default, this field the time in a given time period. To configure the date and time: From the Configuration section, select...
... to block the account for a specified period of unsuccessful login attempts that an account will be blocked for serial ports 1 and 2 (by providing 1) the IP address of the Security page; By default, this field the time in a given time period. To configure the date and time: From the Configuration section, select...
933261.PDF
Page 40
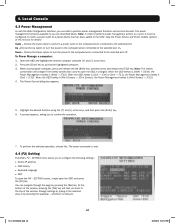
... the [Tab] key. Up -Choose the Up option to turn the power to the computer/server connected to configure the following settings: • Device IP address • OSD hotkey • Keyboard language • DDC To open the FW - Highlight the desired function using the [h] and [i] arrow keys. 2. Open the OSD and...
... the [Tab] key. Up -Choose the Up option to turn the power to the computer/server connected to configure the following settings: • Device IP address • OSD hotkey • Keyboard language • DDC To open the FW - Highlight the desired function using the [h] and [i] arrow keys. 2. Open the OSD and...

933261.PDF
Page 41
...DHCP field and press the [Spacebar] key to French (FR) or German (DE). You can change the keyboard language to toggle its IP address automatically assigned by a DHCP server. the right [Shift] key will automatically reboot the NetCommander IP and save the new settings. You can ... window. The SIU emulates the DDC information to the Keyboard Language field. 2. In the F2 - 4. If you will be set a static IP address for the KVM, the DHCP field should update the DDC information in the fields on this hotkey in information appropriate for communication between a monitor and...
...DHCP field and press the [Spacebar] key to French (FR) or German (DE). You can change the keyboard language to toggle its IP address automatically assigned by a DHCP server. the right [Shift] key will automatically reboot the NetCommander IP and save the new settings. You can ... window. The SIU emulates the DDC information to the Keyboard Language field. 2. In the F2 - 4. If you will be set a static IP address for the KVM, the DHCP field should update the DDC information in the fields on this hotkey in information appropriate for communication between a monitor and...
93328C.PDF
Page 5
.../server, Cat5e/6 cabling connects from the bottom of the KVM switch (either front or rear, depending on at a time; If LAN 1 goes down the MAC Address and Device Number from an available server port to the unit here. It is illustrated in turn connects to the computer/server. 1.8 Rackmounting the NetCommander... the KVM connect to a B078-101-PS2, B078-101-USB, or B078-101-USB-1 SIU, which in the figure below shows the back panel for a B072-032-IP2 and B072-032-IP4, but the back panel will be useful when finding the IP address assigned by the DHCP server.
.../server, Cat5e/6 cabling connects from the bottom of the KVM switch (either front or rear, depending on at a time; If LAN 1 goes down the MAC Address and Device Number from an available server port to the unit here. It is illustrated in turn connects to the computer/server. 1.8 Rackmounting the NetCommander... the KVM connect to a B078-101-PS2, B078-101-USB, or B078-101-USB-1 SIU, which in the figure below shows the back panel for a B072-032-IP2 and B072-032-IP4, but the back panel will be useful when finding the IP address assigned by the DHCP server.

93328C.PDF
Page 6
... C14 outlets on the bottom panel of the KVM, have a DHCP server, the KVM boots with the default static IP address of the KVM, and plug them into a Tripp Lite Surge Suppressor, Power Distribution Unit (PDU), or Uninterruptible Power Supply (UPS). Connect the SIU's connectors to the F2 Settings ... plugging in the power cords will be found on the back of 192.168.0.254. 1. Product Overview 1.9 Connecting the System The figure below shows a B072-032-IP4 4-User installation. Set up to two serial devices to the LAN 1 port on the back of the KVM. 5. Connect the mouse's USB connector to...
... C14 outlets on the bottom panel of the KVM, have a DHCP server, the KVM boots with the default static IP address of the KVM, and plug them into a Tripp Lite Surge Suppressor, Power Distribution Unit (PDU), or Uninterruptible Power Supply (UPS). Connect the SIU's connectors to the F2 Settings ... plugging in the power cords will be found on the back of 192.168.0.254. 1. Product Overview 1.9 Connecting the System The figure below shows a B072-032-IP4 4-User installation. Set up to two serial devices to the LAN 1 port on the back of the KVM. 5. Connect the mouse's USB connector to...
93328C.PDF
Page 7
... the [Tab] key until the DHCP field is now trusted. 7 13-02-056-93328C.indd 7 3/27/2013 4:08:07 PM Once the IP address is required). Open your web browser, a Security Alert message appears to inform you want to Disabled. 4. When logging into the KVM from Enabled to ... will be rebooted to save your computer (Java 1.6 or higher is satisfactory, press the [Esc] key to the additional fields, type in the desired IP Address, Subnet Mask, and Gateway. 5. o In the Security Alerts dialog box, click View Certificate. Pressing the [Tab] key to navigate to save the new settings...
... the [Tab] key until the DHCP field is now trusted. 7 13-02-056-93328C.indd 7 3/27/2013 4:08:07 PM Once the IP address is required). Open your web browser, a Security Alert message appears to inform you want to Disabled. 4. When logging into the KVM from Enabled to ... will be rebooted to save your computer (Java 1.6 or higher is satisfactory, press the [Esc] key to the additional fields, type in the desired IP Address, Subnet Mask, and Gateway. 5. o In the Security Alerts dialog box, click View Certificate. Pressing the [Tab] key to navigate to save the new settings...
93328C.PDF
Page 8
... login page does not appear on its own, click the Log On button in your available Target Servers. 6. Enter in the center of your IP address. 5. 1. If clicking on the Configuration icon at the top of the new Device settings. Click on the Log On button does not bring up the... login page, add / targets.jnlp to the end of the web page to bring it up the KVM's Configuration screen. Enter the desired IP Address, Subnet Mask, and Default Gateway in the default username (admin) and password (access). Upon clicking Save, you are accessing the KVM, enter in the corresponding...
... login page does not appear on its own, click the Log On button in your available Target Servers. 6. Enter in the center of your IP address. 5. 1. If clicking on the Configuration icon at the top of the new Device settings. Click on the Log On button does not bring up the... login page, add / targets.jnlp to the end of the web page to bring it up the KVM's Configuration screen. Enter the desired IP Address, Subnet Mask, and Default Gateway in the default username (admin) and password (access). Upon clicking Save, you are accessing the KVM, enter in the corresponding...
93328C.PDF
Page 9
... certificate. You have two options: • If you can be recognized as an Administrator in the center of your unit, and displaying all your IP address. 5. Note: You may need to bring up . After installation has completed, the login page appears. The My Targets page of the Web Configuration Interface opens... to proceed. • If you have the latest Java installed on the Log On button does not bring it will be accessed in the IP address of your available Target Servers. 9 13-02-056-93328C.indd 9 3/27/2013 4:08:27 PM If this manual for browser support) and enter in ...
... certificate. You have two options: • If you can be recognized as an Administrator in the center of your unit, and displaying all your IP address. 5. Note: You may need to bring up . After installation has completed, the login page appears. The My Targets page of the Web Configuration Interface opens... to proceed. • If you have the latest Java installed on the Log On button does not bring it will be accessed in the IP address of your available Target Servers. 9 13-02-056-93328C.indd 9 3/27/2013 4:08:27 PM If this manual for browser support) and enter in ...