
Owners Manual
Page 1
...! Installation 4 5.1. Storage and Service 7 9. Owner's Manual Low-Profile Wall-Mount SmartRack® Enclosures Models: SRWF12U38, SRWF16U38 Table of mind. Enclosure Configuration 7 6.1. Unpacking 3 4.2. Cable Access and Management 7 6.2. www.tripplite.com/warranty 16-04-227-9335C5.indb 1 1111 W. 35th Street, Chicago, IL 60609 USA • www.tripplite.com/support Copyright © 2016 Tripp Lite. Feature Identification 2 4. Register your product for quicker service and...
...! Installation 4 5.1. Storage and Service 7 9. Owner's Manual Low-Profile Wall-Mount SmartRack® Enclosures Models: SRWF12U38, SRWF16U38 Table of mind. Enclosure Configuration 7 6.1. Unpacking 3 4.2. Cable Access and Management 7 6.2. www.tripplite.com/warranty 16-04-227-9335C5.indb 1 1111 W. 35th Street, Chicago, IL 60609 USA • www.tripplite.com/support Copyright © 2016 Tripp Lite. Feature Identification 2 4. Register your product for quicker service and...
Owners Manual
Page 2
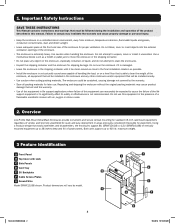
...installation and operation of the product described in the presence of patch panels. Do not use this equipment in this manual. maximum weight. 3 Feature Identification A Front Panel B Top Cover with air, oxygen or nitrous oxide. 2. Do not use . Both units support...scratched, causing damage not covered by model. The enclosure could be installed nearby. • Use caution ...support 8U (SRWF12U38) or 12U (SRWF16U38) of vertically mounted equipment up to bear the weight of the enclosure for shipping damage. Use a mechanical device such as possible. • Install...
...installation and operation of the product described in the presence of patch panels. Do not use this equipment in this manual. maximum weight. 3 Feature Identification A Front Panel B Top Cover with air, oxygen or nitrous oxide. 2. Do not use . Both units support...scratched, causing damage not covered by model. The enclosure could be installed nearby. • Use caution ...support 8U (SRWF12U38) or 12U (SRWF16U38) of vertically mounted equipment up to bear the weight of the enclosure for shipping damage. Use a mechanical device such as possible. • Install...
Owners Manual
Page 3
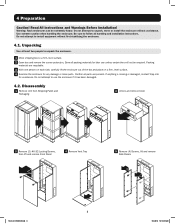
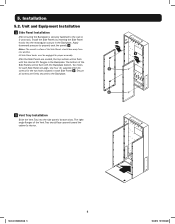
... damaged, contact Tripp Lite for any damage or loose parts. Use extreme caution when handling the enclosure. Do not attempt to install equipment without assistance. Confirm all handling and installation instructions. Disassembly 1 Remove Unit from Shipping Pallet and Packaging 2 Unlock and remove Cover 3 Remove (2) #6-32 Locking Screws, then lift and remove Front Panel 4 Remove Vent Tray 5 Remove (4) Screws, lift and remove Side Panels 3 16-04...
... damaged, contact Tripp Lite for any damage or loose parts. Use extreme caution when handling the enclosure. Do not attempt to install equipment without assistance. Confirm all handling and installation instructions. Disassembly 1 Remove Unit from Shipping Pallet and Packaging 2 Unlock and remove Cover 3 Remove (2) #6-32 Locking Screws, then lift and remove Front Panel 4 Remove Vent Tray 5 Remove (4) Screws, lift and remove Side Panels 3 16-04...
Owners Manual
Page 4
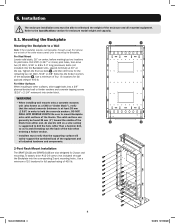
... for enclosure model weight and capacity. 5.1. Tighten the first two bolts A , and then drill holes for pilot holes. WARNING • When installing wall mounts onto a concrete masonry unit (also known as to the Specifications section for full payload rating of the enclosure and all attached hardware and components. 2-Post Rack-Mount Installation The SRWF12U38 and SRWF16U38 are...
... for enclosure model weight and capacity. 5.1. Tighten the first two bolts A , and then drill holes for pilot holes. WARNING • When installing wall mounts onto a concrete masonry unit (also known as to the Specifications section for full payload rating of the enclosure and all attached hardware and components. 2-Post Rack-Mount Installation The SRWF12U38 and SRWF16U38 are...
Owners Manual
Page 5
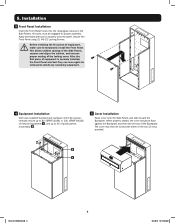
... the Backplate bottom. Unit and Equipment Installation 1 Side Panel Installation After ensuring the Backplate is securely fastened to properly seat the panels A . Apply downward pressure to the wall or 2-post rack, install the Side Panels by inserting the Side Panel hooks into the side panels' bottom slots. Two holes for proper assembly. Installation 5.2. Use four (4) supplied #12-24 screws for the...
... the Backplate bottom. Unit and Equipment Installation 1 Side Panel Installation After ensuring the Backplate is securely fastened to properly seat the panels A . Apply downward pressure to the wall or 2-post rack, install the Side Panels by inserting the Side Panel hooks into the side panels' bottom slots. Two holes for proper assembly. Installation 5.2. Use four (4) supplied #12-24 screws for the...
Owners Manual
Page 6
.... The cover may then be removed to install any remaining equipment. 4 Equipment Installation With user-supplied standard rack hardware (#12-24 screws), vertically mount up to 8U (SRWF12U38) or 12U (SRWF16U38) of network equipment A , and up to 4U of the Backplate. After the first piece of equipment is securely installed, the Front Panel and Vent Tray can once again...
.... The cover may then be removed to install any remaining equipment. 4 Equipment Installation With user-supplied standard rack hardware (#12-24 screws), vertically mount up to 8U (SRWF12U38) or 12U (SRWF16U38) of network equipment A , and up to 4U of the Backplate. After the first piece of equipment is securely installed, the Front Panel and Vent Tray can once again...
Owners Manual
Page 7
...'s model and serial numbers, along with Tripp Lite's SRBRUSHWM Brush Strip Plate accessory. Review the installation and operation procedures in this manual to you can be stored in a controlled indoor environment, away from a misreading of the enclosure are also available from Tripp Lite. Instead, visit www.tripplite.com/support. 3. If the problem requires service, visit www.tripplite.com/support and click the Product...
...'s model and serial numbers, along with Tripp Lite's SRBRUSHWM Brush Strip Plate accessory. Review the installation and operation procedures in this manual to you can be stored in a controlled indoor environment, away from a misreading of the enclosure are also available from Tripp Lite. Instead, visit www.tripplite.com/support. 3. If the problem requires service, visit www.tripplite.com/support and click the Product...
Owners Manual
Page 8
....com/support 8 9/2/2016 10:19:06 AM 9. SELLER MAKES NO EXPRESS WARRANTIES OTHER THAN THE WARRANTY EXPRESSLY SET FORTH HEREIN. WARNING: The individual user should not be found on how long an implied warranty lasts, and some states do not allow the exclusion or limitation of regulatory compliance certifications and identification, your new Tripp Lite product...
....com/support 8 9/2/2016 10:19:06 AM 9. SELLER MAKES NO EXPRESS WARRANTIES OTHER THAN THE WARRANTY EXPRESSLY SET FORTH HEREIN. WARNING: The individual user should not be found on how long an implied warranty lasts, and some states do not allow the exclusion or limitation of regulatory compliance certifications and identification, your new Tripp Lite product...