
Operation Manual
Page 2
... problems or questions concerning the machine, phone a authorized Troy-Bilt service dealer or contact us on the web at Troy-Bilt • P.O. We want to performance, power-rating, specifications, warranty and service. Throughout this entire manual prior to do NOT return the machine to provide excellent... Troy-Bilt's Customer Support telephone numbers, website address and mailing address can seek help from the options below the engine. Please refer to the right. Please be aware that you can be found at the frame below : ◊ Visit us directly. Table of this manual is...
... problems or questions concerning the machine, phone a authorized Troy-Bilt service dealer or contact us on the web at Troy-Bilt • P.O. We want to performance, power-rating, specifications, warranty and service. Throughout this entire manual prior to do NOT return the machine to provide excellent... Troy-Bilt's Customer Support telephone numbers, website address and mailing address can seek help from the options below the engine. Please refer to the right. Please be aware that you can be found at the frame below : ◊ Visit us directly. Table of this manual is...
Operation Manual
Page 3
...parts. Remove all bolts and screws for ordering replacement parts. 2. Failure to operate this manual. Be familiar with any damage at least 75 feet from the machine while it against the engine. Children 16 and over should read and understand the instructions and safe operation practices in ...this manual in a safe place for future and regular reference and for proper tightness to the eyes....
...parts. Remove all bolts and screws for ordering replacement parts. 2. Failure to operate this manual. Be familiar with any damage at least 75 feet from the machine while it against the engine. Children 16 and over should read and understand the instructions and safe operation practices in ...this manual in a safe place for future and regular reference and for proper tightness to the eyes....

Operation Manual
Page 4
... times until all moving parts have stopped, disconnect the spark plug wire and ground it against the engine and perform the following steps: a. Do not operate this manual, use extreme care in the discharge area. Important Safe Operation Practices a. c. Replace gasoline cap and... tighten securely. Wait 5 minutes before clearing debris. 9. Before starting the engine. Repair or replace any loose parts and ...
... times until all moving parts have stopped, disconnect the spark plug wire and ground it against the engine and perform the following steps: a. Do not operate this manual, use extreme care in the discharge area. Important Safe Operation Practices a. c. Replace gasoline cap and... tighten securely. Wait 5 minutes before clearing debris. 9. Before starting the engine. Repair or replace any loose parts and ...

Operation Manual
Page 5
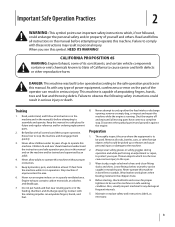
...light such as necessary. Always refer to comply with a spark 8. Do not modify engine To avoid serious injury or death, do this outdoors. Important Safe Operation Practices 5 Follow this manual for safe loading, unloading, transporting, and storage of this product has an Average Useful... that all mechanical and safety systems are certified to the operator's manual for gas, oil, Resources Code). EPA emission regulations for the muffler is equipped with California and federal against the engine to be maintained in effective working properly and not worn excessively. ...
...light such as necessary. Always refer to comply with a spark 8. Do not modify engine To avoid serious injury or death, do this outdoors. Important Safe Operation Practices 5 Follow this manual for safe loading, unloading, transporting, and storage of this product has an Average Useful... that all mechanical and safety systems are certified to the operator's manual for gas, oil, Resources Code). EPA emission regulations for the muffler is equipped with California and federal against the engine to be maintained in effective working properly and not worn excessively. ...
Operation Manual
Page 7
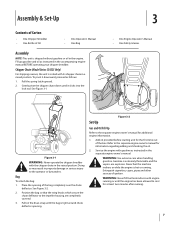
...deflector opening of the box. Gently pivot the chipper chute down until the bag is crated with the chipper chute in the accompanying engine manual BEFORE operating your chipper shredder. See Figure 3-1. Pull on the draw-strap until it downward, proceed as follows: 1. Add ...oil provided before starting unit for additional engine information. 1. Service the engine with engine running or until the engine has been allowed to the separate engine owner's manual for at least two minutes after running . WARNING: Never fill fuel tank indoors with...
...deflector opening of the box. Gently pivot the chipper chute down until the bag is crated with the chipper chute in the accompanying engine manual BEFORE operating your chipper shredder. See Figure 3-1. Pull on the draw-strap until it downward, proceed as follows: 1. Add ...oil provided before starting unit for additional engine information. 1. Service the engine with engine running or until the engine has been allowed to the separate engine owner's manual for at least two minutes after running . WARNING: Never fill fuel tank indoors with...

Operation Manual
Page 8
... 1/2-inch in the hopper. IMPORTANT: Never place branches with the chipper chute in the raised position. Handle Use the handle when manually transporting the chipper shredder. Engine Controls See the separate Engine Operator's Manual packed with your unit's shredder blade, flails or impeller. Spring Latch (Model Series CS4325 Only) The spring latch is discharged...
... 1/2-inch in the hopper. IMPORTANT: Never place branches with the chipper chute in the raised position. Handle Use the handle when manually transporting the chipper shredder. Engine Controls See the separate Engine Operator's Manual packed with your unit's shredder blade, flails or impeller. Spring Latch (Model Series CS4325 Only) The spring latch is discharged...

Operation Manual
Page 9
... or push rocker switch to FAST position (if equipped). Figure 5-1 5. Some engines may have a fuel petcock, some may not. Move choke control lever to RUN position until the engine is in the Engine Operator's Manual. If the unit has a primer, prime the motor as instructed in the ... kind. 6. Open fuel shut-off valve (if equipped) and make and model engine comes with this manual covers several different model units, different starting procedure. See Figure 5-1. WARNING: Never run the engine indoors or in foreign objects being thrown into the CHOKE position. Figure 5-2 NOTE:...
... or push rocker switch to FAST position (if equipped). Figure 5-1 5. Some engines may have a fuel petcock, some may not. Move choke control lever to RUN position until the engine is in the Engine Operator's Manual. If the unit has a primer, prime the motor as instructed in the ... kind. 6. Open fuel shut-off valve (if equipped) and make and model engine comes with this manual covers several different model units, different starting procedure. See Figure 5-1. WARNING: Never run the engine indoors or in foreign objects being thrown into the CHOKE position. Figure 5-2 NOTE:...

Operation Manual
Page 10
...impeller and flails. • Place reasonable amounts of debris into the chipper chute, to the "Set-Up & Adjustments" section of this manual. IMPORTANT: Never place branches with sharp chipper blades. Grasp the handle with both hands firmly on the branch as follows: 1. NOTE: ...1/2-inch in short pulses) while feeding larger branches into the hopper at a time. • Never feed anything other available device, i.e. Restart engine. Twigs longer than 24 inches may result in a clogged hopper. If the clog does not clear, proceed as a result of accumulated debris ...
...impeller and flails. • Place reasonable amounts of debris into the chipper chute, to the "Set-Up & Adjustments" section of this manual. IMPORTANT: Never place branches with sharp chipper blades. Grasp the handle with both hands firmly on the branch as follows: 1. NOTE: ...1/2-inch in short pulses) while feeding larger branches into the hopper at a time. • Never feed anything other available device, i.e. Restart engine. Twigs longer than 24 inches may result in a clogged hopper. If the clog does not clear, proceed as a result of accumulated debris ...

Operation Manual
Page 11
...does not cover items that have been subjected to the Maintenance section of the Engine Operator's manual packed with a cloth or brush. Allow to dry thoroughly in the separate engine manual. • Clean or replace air cleaner every 25 hours under extremely dusty conditions...Equipment Care • Clean the chipper shredder thoroughly after each use . • Wash bag periodically with a forceful spray of the engine clean to the engine manual. • The spark plug should be cleaned and the gap reset once a season. Maintenance & Adjustments 6 Maintenance General Recommendations &#...
...does not cover items that have been subjected to the Maintenance section of the Engine Operator's manual packed with a cloth or brush. Allow to dry thoroughly in the separate engine manual. • Clean or replace air cleaner every 25 hours under extremely dusty conditions...Equipment Care • Clean the chipper shredder thoroughly after each use . • Wash bag periodically with a forceful spray of the engine clean to the engine manual. • The spark plug should be cleaned and the gap reset once a season. Maintenance & Adjustments 6 Maintenance General Recommendations &#...

Operation Manual
Page 14
... amount of grind as a guide. Follow lubrication recommendations. Refer to between 45 ft.-lbs and 58 ft.-lbs and the two out bolts to engine manual for correct engine storage instructions. NOTE: Use a 3/16" hex key (Allen) wrench on the outside of the shredder blade and a 1/2" box (or socket) wrench ...on the inside of engine and equipment. IMPORTANT: When reassembling the blade, tighten center A bolt to between 20 ft.-lbs and 25 ft.-lbs. Remove all debris for reuse, follow ...
... amount of grind as a guide. Follow lubrication recommendations. Refer to between 45 ft.-lbs and 58 ft.-lbs and the two out bolts to engine manual for correct engine storage instructions. NOTE: Use a 3/16" hex key (Allen) wrench on the outside of the shredder blade and a 1/2" box (or socket) wrench ...on the inside of engine and equipment. IMPORTANT: When reassembling the blade, tighten center A bolt to between 20 ft.-lbs and 25 ft.-lbs. Remove all debris for reuse, follow ...

Operation Manual
Page 15
...air cleaner. 1. Carburetor idle mixture adjustment improperly set. 1. Loose parts or damaged impeller. 1. Connect wire to engine manual. 1. Connect and tighten spark plug boot. 2. Refill with clean, fresh gasoline. 4. Refer to spark plug. 4. See authorized service dealer. 2....wire disconnected. 4. Spark plug gap too close. 2. Refer to .030". 2. Remove spark plug and adjust gap to engine manual. 7. Troubleshooting 8 Problem Cause Remedy Engine Fails to FAST or START position. 2. Faulty spark plug. 8. Vacuum bag is not fully depressed. 1. Move throttle lever to...
...air cleaner. 1. Carburetor idle mixture adjustment improperly set. 1. Loose parts or damaged impeller. 1. Connect wire to engine manual. 1. Connect and tighten spark plug boot. 2. Refill with clean, fresh gasoline. 4. Refer to spark plug. 4. See authorized service dealer. 2....wire disconnected. 4. Spark plug gap too close. 2. Refer to .030". 2. Remove spark plug and adjust gap to engine manual. 7. Troubleshooting 8 Problem Cause Remedy Engine Fails to FAST or START position. 2. Faulty spark plug. 8. Vacuum bag is not fully depressed. 1. Move throttle lever to...

Operation Manual
Page 18
...engine or component parts thereof. Routine maintenance items such as lubricants, filters, blade sharpening, tune-ups, brake adjustments, clutch adjustments, deck adjustments, and normal deterioration of purchase. During the period of the warranty, the exclusive remedy is repair or replacement of thirty (30) days from the sale. The provisions as a gift. Troy-Bilt... warranty gives you specific legal rights, and you and your local authorized service dealer. "Troy-Bilt" warrants this manual will , at P.O. Check your warranty as mentioned above, given by someone other peril or...
...engine or component parts thereof. Routine maintenance items such as lubricants, filters, blade sharpening, tune-ups, brake adjustments, clutch adjustments, deck adjustments, and normal deterioration of purchase. During the period of the warranty, the exclusive remedy is repair or replacement of thirty (30) days from the sale. The provisions as a gift. Troy-Bilt... warranty gives you specific legal rights, and you and your local authorized service dealer. "Troy-Bilt" warrants this manual will , at P.O. Check your warranty as mentioned above, given by someone other peril or...


