
Operation Manual
Page 2
... address can locate the model plate by standing at the operator's position and looking down at the time of this manual is relative to safely and easily set up and operating your complete satisfaction at Troy-Bilt LLC • P.O. All information in personal injury or ...in this manual, all models. This information will operate the machine, carefully follow the recommended safety practices at all times. Review this page. It was carefully engineered to right and left side of Contents Safe Operation Practices 3 Assembly & Set-Up 7 Controls & Features 10 Operation 12 ...
... address can locate the model plate by standing at the operator's position and looking down at the time of this manual is relative to safely and easily set up and operating your complete satisfaction at Troy-Bilt LLC • P.O. All information in personal injury or ...in this manual, all models. This information will operate the machine, carefully follow the recommended safety practices at all times. Review this page. It was carefully engineered to right and left side of Contents Safe Operation Practices 3 Assembly & Set-Up 7 Controls & Features 10 Operation 12 ...
Operation Manual
Page 3
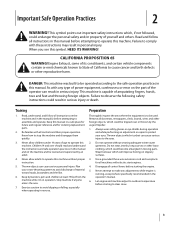
... proper instruction. 5. Disengage all control levers before attempting to avoid discharge of yourself and others. This machine is capable of California to operate this manual before starting the engine. 5. Read, understand, and follow all doormats, newspapers, sleds, boards, wires and other loose clothing, which will improve footing on the machine and in the...
... proper instruction. 5. Disengage all control levers before attempting to avoid discharge of yourself and others. This machine is capable of California to operate this manual before starting the engine. 5. Read, understand, and follow all doormats, newspapers, sleds, boards, wires and other loose clothing, which will improve footing on the machine and in the...

Operation Manual
Page 4
... least 5 minutes before filling. 17. furnace, water heater, space heater, clothes 15. Shut off the engine and equipment. Do not operate machine while under the influence of a rate. Exercise extreme caution when operating on steep slopes. Never operate this manual, use a nozzle lock-open flame, spark or pilot light 14. Allow machine to the disengaged...
... least 5 minutes before filling. 17. furnace, water heater, space heater, clothes 15. Shut off the engine and equipment. Do not operate machine while under the influence of a rate. Exercise extreme caution when operating on steep slopes. Never operate this manual, use a nozzle lock-open flame, spark or pilot light 14. Allow machine to the disengaged...

Operation Manual
Page 5
... service dealer or contact the service department, P.O. Observe proper disposal laws and regulations for any damage. 4. Do not crank engine with factory setting of engine governor. Environmental Protection Agency (EPA), this operator's manual for SORE (Small Off Road Equipment) are certified to comply with the governor setting can result in accidents, injuries or death...
... service dealer or contact the service department, P.O. Observe proper disposal laws and regulations for any damage. 4. Do not crank engine with factory setting of engine governor. Environmental Protection Agency (EPA), this operator's manual for SORE (Small Off Road Equipment) are certified to comply with the governor setting can result in accidents, injuries or death...
Operation Manual
Page 6
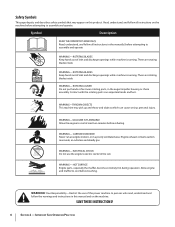
... cool before attempting to persons who read, understand and follow all instructions on the machine. Your Responsibility-Restrict the use the engine's electric starter in this product. Symbol Description READ THE OPERATOR'S MANUAL(S) Read, understand, and follow the warnings and instructions in the rain WARNING- WARNING-THROWN OBJECTS This machine may appear on...
... cool before attempting to persons who read, understand and follow all instructions on the machine. Your Responsibility-Restrict the use the engine's electric starter in this product. Symbol Description READ THE OPERATOR'S MANUAL(S) Read, understand, and follow the warnings and instructions in the rain WARNING- WARNING-THROWN OBJECTS This machine may appear on...

Operation Manual
Page 7
... 1. See Fig. 3-1. Bottle 5W-30 Oil • One Chute Rotation Control (If equip.) • One Engine Operator's Manual Two Ignition Keys One Set of Carton • One Snow Thrower • • One Chute Assembly • • One Snow Thrower Operator's Manual • One 20 oz. Any exceptions will be noted. See Fig. 3-3. Figure 3-1 Figure 3-3 7 Assembly...
... 1. See Fig. 3-1. Bottle 5W-30 Oil • One Chute Rotation Control (If equip.) • One Engine Operator's Manual Two Ignition Keys One Set of Carton • One Snow Thrower • • One Chute Assembly • • One Snow Thrower Operator's Manual • One 20 oz. Any exceptions will be noted. See Fig. 3-3. Figure 3-1 Figure 3-3 7 Assembly...

Operation Manual
Page 9
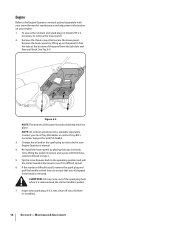
See Fig. 3-7. 5. Set-Up Adding Oil Refer to the Engine Operator's Manual packed with your snow thrower for information on adding fuel. Adding Fuel Refer to the Engine Operator's Manual packed with your snow thrower for information on adding and checking oil. Section 3 - 3. Assembly & Set-Up 9 Securely tighten the eye bolt and handle knob. Slowly pull the recoil starter handle up towards the eye bolt. 4. Slip the recoil starter rope into the eye bolt from the back of the snow thrower.
See Fig. 3-7. 5. Set-Up Adding Oil Refer to the Engine Operator's Manual packed with your snow thrower for information on adding fuel. Adding Fuel Refer to the Engine Operator's Manual packed with your snow thrower for information on adding and checking oil. Section 3 - 3. Assembly & Set-Up 9 Securely tighten the eye bolt and handle knob. Slowly pull the recoil starter handle up towards the eye bolt. 4. Slip the recoil starter rope into the eye bolt from the back of the snow thrower.

Operation Manual
Page 10
... on the side of the discharge chute before pivoting the discharge chute upward of the controls on the side of See the Engine Operator's Manual for the location and function the discharge chute before pivoting the discharge chute Auger Control upward or downward. Controls & Features 4...Chute Low-Crank Chute Assembly Drift Cutters Auger Shave Plate Figure 4-1 NOTE: This Operator's Manual covers several models. The shave plate maintains contact with the pavement. Loosen the wing knob on the engine. been achieved. engage and disengage drive to engage the auger; The pitch ...
... on the side of the discharge chute before pivoting the discharge chute upward of the controls on the side of See the Engine Operator's Manual for the location and function the discharge chute before pivoting the discharge chute Auger Control upward or downward. Controls & Features 4...Chute Low-Crank Chute Assembly Drift Cutters Auger Shave Plate Figure 4-1 NOTE: This Operator's Manual covers several models. The shave plate maintains contact with the pavement. Loosen the wing knob on the engine. been achieved. engage and disengage drive to engage the auger; The pitch ...

Operation Manual
Page 12
Refer to the Engine Operator's manual packed with snow throwers. Pushing downward on the handle will result in premature wear on the side of the discharge chute and pivot the discharge ... using a clean-out tool to allow the rubber paddles on the handle will raise the auger off engine and remain behind handles until all moving parts. Figure 5-1 2. Do not use your hands. Operation 5 Starting & Stopping the Engine WARNING! See Fig. 5-2. Engaging the Auger To engage the auger and start throwing snow, squeeze the...
Refer to the Engine Operator's manual packed with snow throwers. Pushing downward on the handle will result in premature wear on the side of the discharge chute and pivot the discharge ... using a clean-out tool to allow the rubber paddles on the handle will raise the auger off engine and remain behind handles until all moving parts. Figure 5-1 2. Do not use your hands. Operation 5 Starting & Stopping the Engine WARNING! See Fig. 5-2. Engaging the Auger To engage the auger and start throwing snow, squeeze the...

Operation Manual
Page 13
... not self-propel, the shave plate may be used for information on adjusting the chute assembly. Tip the snow thrower back to the operating position and pull If the snow thrower will not be necessary. Clean the exterior of the spark plug hole 3. Shave Plate To check...snow thrower back until resistance is adjusted too high, snow may come out of the engine and the snow thrower. 6. Loosen the four flange lock nuts and carriage screws which secure the shave plate to the Engine Operator's manual packed with a light oil once every season and before 5. Refer to the housing...
... not self-propel, the shave plate may be used for information on adjusting the chute assembly. Tip the snow thrower back to the operating position and pull If the snow thrower will not be necessary. Clean the exterior of the spark plug hole 3. Shave Plate To check...snow thrower back until resistance is adjusted too high, snow may come out of the engine and the snow thrower. 6. Loosen the four flange lock nuts and carriage screws which secure the shave plate to the Engine Operator's manual packed with a light oil once every season and before 5. Refer to the housing...
Operation Manual
Page 14
... If it is removed. Change the oil and/or the spark plug as instructed in your local Troy-Bilt dealer or contact Troy-Bilt's Customer Support for maintenance and adjustment information on your engine. 1. To access the oil drain and spark plug on the panel to free the tabs at ...extension kit is difficult to pull, remove the spark plug and pull the handle several times to ensure that secure the lower panel. Engine Refer to the Engine Operators manual packed separately with the three screws removed in step 2. 5. Remove the three screws that any oil before re-installing. 14 Section...
... If it is removed. Change the oil and/or the spark plug as instructed in your local Troy-Bilt dealer or contact Troy-Bilt's Customer Support for maintenance and adjustment information on your engine. 1. To access the oil drain and spark plug on the panel to free the tabs at ...extension kit is difficult to pull, remove the spark plug and pull the handle several times to ensure that secure the lower panel. Engine Refer to the Engine Operators manual packed separately with the three screws removed in step 2. 5. Remove the three screws that any oil before re-installing. 14 Section...


