
Operation Manual
Page 2
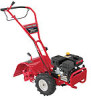
...Safe Operation Practices 3 Assembly & Set-Up 7 Control & Features 10 Operation 11 Maintenance & Adjustment 15 Service 17 Troubleshooting 19 Replacement Parts 20 Warranty Back Cover Record Product Information Before setting up , operate and maintain your new equipment, please locate the model plate... and looking down at the time of product specifications for purchasing a Troy-Bilt Tiller. Throughout this manual may cover a range of printing. Please refer to establish the power rating of the tine shield. If applicable, the power testing information used to the engine ...
...Safe Operation Practices 3 Assembly & Set-Up 7 Control & Features 10 Operation 11 Maintenance & Adjustment 15 Service 17 Troubleshooting 19 Replacement Parts 20 Warranty Back Cover Record Product Information Before setting up , operate and maintain your new equipment, please locate the model plate... and looking down at the time of product specifications for purchasing a Troy-Bilt Tiller. Throughout this manual may cover a range of printing. Please refer to establish the power rating of the tine shield. If applicable, the power testing information used to the engine ...

Operation Manual
Page 4
...g. To reduce fire hazards, keep feet well away from a gasoline dispenser nozzle. Stop the machine if anyone enters the area. 5. Maintain or replace safety and instruction labels, as on a trailer with the rim of the handle bars and do so can amputate hands and feet. 2. Important Safe... and refuel it against the engine. Exercise caution to till soil too deep at least five minutes before starting . 5. f. The tines may catch in reverse or pulling machine towards you. 10. Repair the damage before storing. Use only attachments and accessories approved by ...
...g. To reduce fire hazards, keep feet well away from a gasoline dispenser nozzle. Stop the machine if anyone enters the area. 5. Maintain or replace safety and instruction labels, as on a trailer with the rim of the handle bars and do so can amputate hands and feet. 2. Important Safe... and refuel it against the engine. Exercise caution to till soil too deep at least five minutes before starting . 5. f. The tines may catch in reverse or pulling machine towards you. 10. Repair the damage before storing. Use only attachments and accessories approved by ...
Operation Manual
Page 11
...new operation (see Maintenance & Adjustments Section in this Operation Section and the Engine Operator's Manual before starting the engine. Tighten or replace as required. 4. Check transmission gear oil level. WARNING! Service as needed. 3. Fill the fuel tank with gasoline according to ...WHEEL DRIVE position. 3. Break-In Operation Perform the following checks and services before using the tiller controls without the tines engaging the soil (put tines in the separate Engine Operator's Manual. See the Engine Operator's Manual. 5. See the Engine Operator's Manual. ...
...new operation (see Maintenance & Adjustments Section in this Operation Section and the Engine Operator's Manual before starting the engine. Tighten or replace as required. 4. Check transmission gear oil level. WARNING! Service as needed. 3. Fill the fuel tank with gasoline according to ...WHEEL DRIVE position. 3. Break-In Operation Perform the following checks and services before using the tiller controls without the tines engaging the soil (put tines in the separate Engine Operator's Manual. See the Engine Operator's Manual. 5. See the Engine Operator's Manual. ...
Operation Manual
Page 15
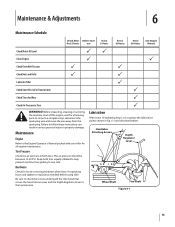
... the lubrication points shown in Tires P WARNING! Hardware Check for loose or missing hardware after every 10 operating hours and tighten or replace (as needed) before using tiller Be sure to check the screws underneath the tiller hood that secure the transmission cover and the Depth... PP Clean Engine P P Check Drive Belt Tension P P Check Nuts and Bolts P P Lubricate Tiller P Check Gear Oil Level in Transmission P Check Tines for Wear P Check Air Pressure in Fig. 6-1 and described below. Before inspecting, cleaning or servicing the machine, shut off the engine, wait for all...
... the lubrication points shown in Tires P WARNING! Hardware Check for loose or missing hardware after every 10 operating hours and tighten or replace (as needed) before using tiller Be sure to check the screws underneath the tiller hood that secure the transmission cover and the Depth... PP Clean Engine P P Check Drive Belt Tension P P Check Nuts and Bolts P P Lubricate Tiller P Check Gear Oil Level in Transmission P Check Tines for Wear P Check Air Pressure in Fig. 6-1 and described below. Before inspecting, cleaning or servicing the machine, shut off the engine, wait for all...
Operation Manual
Page 16
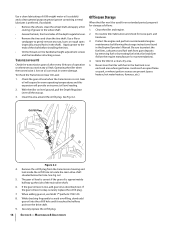
... oil is approximately halfway up . 3. Transmission Gear Oil Check the transmission gear oil after every 30 hours of the shaft before installing the tines. • Oil the threads on level ground, pull the Depth Regulator Lever all the way up the side of the depth regulator lever....oil fill hole to locate the main drive shaft situated below the hole. See Fig. 6-2. 5. Clean the area around holes in severe damage. Securely replace the oil fill plug. 16 Section 6- Use a clean lubricating oil (#30 weight motor oil is suitable) and a clean general purpose grease (grease ...
... oil is approximately halfway up . 3. Transmission Gear Oil Check the transmission gear oil after every 30 hours of the shaft before installing the tines. • Oil the threads on level ground, pull the Depth Regulator Lever all the way up the side of the depth regulator lever....oil fill hole to locate the main drive shaft situated below the hole. See Fig. 6-2. 5. Clean the area around holes in severe damage. Securely replace the oil fill plug. 16 Section 6- Use a clean lubricating oil (#30 weight motor oil is suitable) and a clean general purpose grease (grease ...
Operation Manual
Page 17
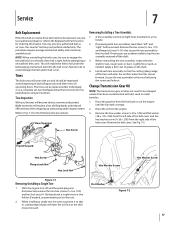
... on the nuts. 2. Change Transmission Gear Oil NOTE: The transmission gear oil does not need to be replaced, see your local authorized dealer or refer to the Replacement Parts Section for tine identification and part numbers. With the engine shut off the shaft. 3. The procedure requires average mechanical ability and commonly available tools...
... on the nuts. 2. Change Transmission Gear Oil NOTE: The transmission gear oil does not need to be replaced, see your local authorized dealer or refer to the Replacement Parts Section for tine identification and part numbers. With the engine shut off the shaft. 3. The procedure requires average mechanical ability and commonly available tools...
Operation Manual
Page 19
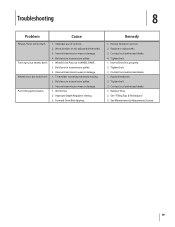
... mounting hardware missing. 2. Internal transmission wear or damage. 1. Tighten bolt. 1. Contact local authorized dealer. 1. Internal transmission wear or damage. 1. Replace Tines. 2. See Maintenance & Adjustments Section. 19 Remedy 1. Review Operation section. 2. Replace hardware. 2. Wheel Drive Pins not in transmission pulley. 1. Bolt loose in transmission pulley. 3. Inserts Drive Pins properly. 2. Internal transmission wear or damage...
... mounting hardware missing. 2. Internal transmission wear or damage. 1. Tighten bolt. 1. Contact local authorized dealer. 1. Internal transmission wear or damage. 1. Replace Tines. 2. See Maintenance & Adjustments Section. 19 Remedy 1. Review Operation section. 2. Replace hardware. 2. Wheel Drive Pins not in transmission pulley. 1. Bolt loose in transmission pulley. 3. Inserts Drive Pins properly. 2. Internal transmission wear or damage...
Operation Manual
Page 20
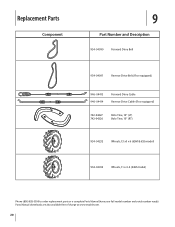
Replacement Parts Component 9 Part Number and Description 954-04090 Forward Drive Belt 954-04091 Reverse Drive Belt (If so equipped) 946-04413 946-04414 Forward Drive Cable Reverse Drive Cable (If so equipped) 742-04227 742-04226 Bolo Tine, 10" (LT) Bolo Tine, 10" (RT) 934-04232 Wheels, 13 x5 x 6 (65M & 655 model) 934-04453 Wheels, 11 x 4-4 (64M model) Phone (800) 828-5500 to order replacement parts or a complete Parts Manual (have your full model number and serial number ready). Parts Manual downloads are also available free of charge at www.troybilt.com. 20
Replacement Parts Component 9 Part Number and Description 954-04090 Forward Drive Belt 954-04091 Reverse Drive Belt (If so equipped) 946-04413 946-04414 Forward Drive Cable Reverse Drive Cable (If so equipped) 742-04227 742-04226 Bolo Tine, 10" (LT) Bolo Tine, 10" (RT) 934-04232 Wheels, 13 x5 x 6 (65M & 655 model) 934-04453 Wheels, 11 x 4-4 (64M model) Phone (800) 828-5500 to order replacement parts or a complete Parts Manual (have your full model number and serial number ready). Parts Manual downloads are also available free of charge at www.troybilt.com. 20

Service Manual
Page 11
... clutch cable out of the forward clutch cable from above. Set the belt cover aside. 6.6. Remove both self tapping hex flange screws securing the tine hood to 6.8. tion through forward drive belt removal, prior to the right and left hood brackets using a 3/8" wrench and a 7/16" wrench...See Figure 6.6. See Figure 6.11. Remove both hex flange screws securing the hood brackets to the lower cable mounting bracket using a 3/8" socket. Troy-Bilt Small Frame Tillers 6. TRANSMISSION REMOVAL: 6.7. Grasp the upper handlebar and pivot the unit NOTE: Perform the Drive Belt Replacement sec-
... clutch cable out of the forward clutch cable from above. Set the belt cover aside. 6.6. Remove both self tapping hex flange screws securing the tine hood to 6.8. tion through forward drive belt removal, prior to the right and left hood brackets using a 3/8" wrench and a 7/16" wrench...See Figure 6.6. See Figure 6.11. Remove both hex flange screws securing the hood brackets to the lower cable mounting bracket using a 3/8" socket. Troy-Bilt Small Frame Tillers 6. TRANSMISSION REMOVAL: 6.7. Grasp the upper handlebar and pivot the unit NOTE: Perform the Drive Belt Replacement sec-
Service Manual
Page 37
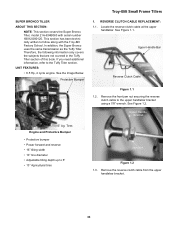
... REPLACEMENT: 1.1. Remove the front jam nut securing the reverse clutch cable to the Tuffy Tiller section. Protective Bumper Troy-Bilt Small...tine diameter • Adjustable tilling depth up to follow along with serial number 1B012G80125. Locate the reverse clutch cable at the upper handlebar. This section has been technically written to 6" • 13" Agricultural tires Jam Nut Figure 1.2 1.3. In addition, the Super Bronco...book. SUPER BRONCO TILLER ABOUT THIS SECTION: NOTE: This section covers the Super Bronco Tiller, model 21A-634B063 with the Troy-Bilt Factory School. ...
... REPLACEMENT: 1.1. Remove the front jam nut securing the reverse clutch cable to the Tuffy Tiller section. Protective Bumper Troy-Bilt Small...tine diameter • Adjustable tilling depth up to follow along with serial number 1B012G80125. Locate the reverse clutch cable at the upper handlebar. This section has been technically written to 6" • 13" Agricultural tires Jam Nut Figure 1.2 1.3. In addition, the Super Bronco...book. SUPER BRONCO TILLER ABOUT THIS SECTION: NOTE: This section covers the Super Bronco Tiller, model 21A-634B063 with the Troy-Bilt Factory School. ...


