
Operation Manual
Page 5
... Products Safety Commission (CPSC) and the U.S. Check the blade and engine mounting bolts at least two minutes before starting and operating the mower. 8. Keep all cigarettes, cigars, pipes and other debris build-up oil or fuel spillage and remove any damage. Thoroughly inspect the mower for... damage (e.g., bent, cracked, worn) Replace blade with a plastic liner. Repair the damage before storing. Replace if necessary. 12. Do not modify engine To avoid serious injury or death...
... Products Safety Commission (CPSC) and the U.S. Check the blade and engine mounting bolts at least two minutes before starting and operating the mower. 8. Keep all cigarettes, cigars, pipes and other debris build-up oil or fuel spillage and remove any damage. Thoroughly inspect the mower for... damage (e.g., bent, cracked, worn) Replace blade with a plastic liner. Repair the damage before storing. Replace if necessary. 12. Do not modify engine To avoid serious injury or death...
Operation Manual
Page 9
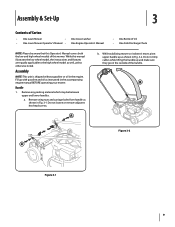
... b. While this mower. Assembly NOTE: This unit is shipped without gasoline or oil in Fig. 3-1. While stabilizing mower so it doesn't move, pivot upper handle up with gasoline and oil as shown in the engine. Remove wing nuts and carriage bolts from handle as instructed in Fig. 3-2. Assembly... Carton • One Lawn Mower • • One Lawn Mower Operator's Manual • One Grass Catcher One Engine Operator's Manual • One Bottle of Oil • One Side Discharge Chute NOTE: Please be between upper and lower handles. Remove any packing material which may be...
... b. While this mower. Assembly NOTE: This unit is shipped without gasoline or oil in Fig. 3-1. While stabilizing mower so it doesn't move, pivot upper handle up with gasoline and oil as shown in the engine. Remove wing nuts and carriage bolts from handle as instructed in Fig. 3-2. Assembly... Carton • One Lawn Mower • • One Lawn Mower Operator's Manual • One Grass Catcher One Engine Operator's Manual • One Bottle of Oil • One Side Discharge Chute NOTE: Please be between upper and lower handles. Remove any packing material which may be...
Operation Manual
Page 12
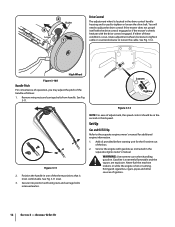
See Fig. 3-11 inset. 3. Add oil provided before starting unit for additional engine information. 1. WARNING: Use extreme care when handling gasoline. Assembly &...carriage bolts from handle. Gasoline is hot or running. Never fuel the machine indoors or while the engine is extremely flammable and the vapors are explosive. 3 Lower 2 Higher 1 Drive Control The adjustment ...wheel is located in the drive control handle housing and is most comfortable. Set-Up Gas and Oil Fill-Up Refer to tighten or loosen the drive belt. Secure into position with gasoline as follows: ...
See Fig. 3-11 inset. 3. Add oil provided before starting unit for additional engine information. 1. WARNING: Use extreme care when handling gasoline. Assembly &...carriage bolts from handle. Gasoline is hot or running. Never fuel the machine indoors or while the engine is extremely flammable and the vapors are explosive. 3 Lower 2 Higher 1 Drive Control The adjustment ...wheel is located in the drive control handle housing and is most comfortable. Set-Up Gas and Oil Fill-Up Refer to tighten or loosen the drive belt. Secure into position with gasoline as follows: ...
Operation Manual
Page 16
...both directions. This control must maintain the lawn mower as instructed here. • Changing of the engine causing a starting problem. 3. Follow steps below for engine lubrication. Keep the side with light oil. If you had put plastic under the gas cap. 2. Tip mower so that have been subjected ... sure to remove it rests on the blade control at the factory and does not require lubrication. 3. Oil can drain into the upper part of engine-governed speed will void engine warranty. • All adjustments should be checked at least once each use to operator abuse or negligence....
...both directions. This control must maintain the lawn mower as instructed here. • Changing of the engine causing a starting problem. 3. Follow steps below for engine lubrication. Keep the side with light oil. If you had put plastic under the gas cap. 2. Tip mower so that have been subjected ... sure to remove it rests on the blade control at the factory and does not require lubrication. 3. Oil can drain into the upper part of engine-governed speed will void engine warranty. • All adjustments should be checked at least once each use to operator abuse or negligence....

Operation Manual
Page 17
..., refer to thoroughly dry. Turn the water off and detach the hose coupler from muffler area. Keep the engine and blade running for a detailed list and instructions. • Maintain oil level as described in engine manual. • Service air cleaner every 25 hours under extremely dusty conditions. Attach the hose coupler to reach...
..., refer to thoroughly dry. Turn the water off and detach the hose coupler from muffler area. Keep the engine and blade running for a detailed list and instructions. • Maintain oil level as described in engine manual. • Service air cleaner every 25 hours under extremely dusty conditions. Attach the hose coupler to reach...

Operation Manual
Page 18
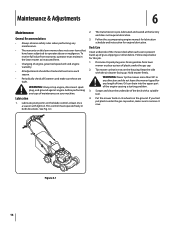
...metal from spark plug. Figure 7-2 Store mower in . See Fig. 7-1 inset. Blade Adapter 6. Replace hex bolt and tighten hex bolt to the engine crankshaft. Blade Blade Bell Support Bolt Figure 7-1 3. WARNING: An unbalanced blade will cause excessive vibration when rotating at high speeds. mower before storage. ...cause damage to check. See Fig. 7-1. min., 600 in a dry, clean area. Place the blade on the blade. Using a light oil or silicone, coat the that the blade is in the operating position. max. Place blade bell support on the adapter such that the air ...
...metal from spark plug. Figure 7-2 Store mower in . See Fig. 7-1 inset. Blade Adapter 6. Replace hex bolt and tighten hex bolt to the engine crankshaft. Blade Blade Bell Support Bolt Figure 7-1 3. WARNING: An unbalanced blade will cause excessive vibration when rotating at high speeds. mower before storage. ...cause damage to check. See Fig. 7-1. min., 600 in a dry, clean area. Place the blade on the blade. Using a light oil or silicone, coat the that the blade is in the operating position. max. Place blade bell support on the adapter such that the air ...

Operation Manual
Page 19
... minutes to .030". 1. See engine manual. 10. fill tank with clean, fresh gasoline. 4. wait until later to engine manual. 6. Engine not primed (if equipped with fresh fuel. 5. Blocked fuel line. 7. Engine oil level low. 2. Engage blade control. 2. Prime engine as instructed in fuel system. ..." or replace spark plug. 2. Unit running with proper oil. 2. Clean area around and on next page 19 Cutting blade loose or unbalanced. 2. Troubleshooting 8 Problem Engine Fails to start Engine runs erratic Engine overheats Occasional skips (hesitates) at desired height or make ...
... minutes to .030". 1. See engine manual. 10. fill tank with clean, fresh gasoline. 4. wait until later to engine manual. 6. Engine not primed (if equipped with fresh fuel. 5. Blocked fuel line. 7. Engine oil level low. 2. Engage blade control. 2. Prime engine as instructed in fuel system. ..." or replace spark plug. 2. Unit running with proper oil. 2. Clean area around and on next page 19 Cutting blade loose or unbalanced. 2. Troubleshooting 8 Problem Engine Fails to start Engine runs erratic Engine overheats Occasional skips (hesitates) at desired height or make ...


