
English Owners Manual
Page 2
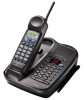
... Battery Life • Handset Earpiece and Ringer Volume Control • Speakerphone • 3-Way Conference Operation This phone is designed to exacting standards that provide reliability, long life and outstanding performance. INTRODUCTION TO YOUR NEW PHONE Introduction Thank you for explanation purposes. Note: Some illustrations in this manual may differ from the actual...
... Battery Life • Handset Earpiece and Ringer Volume Control • Speakerphone • 3-Way Conference Operation This phone is designed to exacting standards that provide reliability, long life and outstanding performance. INTRODUCTION TO YOUR NEW PHONE Introduction Thank you for explanation purposes. Note: Some illustrations in this manual may differ from the actual...
English Owners Manual
Page 4
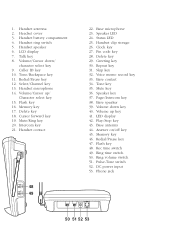
.... Rec time switch 49. LCD display 7. Intercom key 21. Skip key 32. Redial/Pause key 12. Clock key 27. Base antenna 44. Flash key 48. Phone jack 50 51 52 53 Tone/Backspace key 11. Delete key 18. Handset clip storage 26. Play/Stop key 43. Ring volume switch 51. Handset...
.... Rec time switch 49. LCD display 7. Intercom key 21. Skip key 32. Redial/Pause key 12. Clock key 27. Base antenna 44. Flash key 48. Phone jack 50 51 52 53 Tone/Backspace key 11. Delete key 18. Handset clip storage 26. Play/Stop key 43. Ring volume switch 51. Handset...

English Owners Manual
Page 5
... Receiving a call 15 Mute 16 Adjusting ringer and earpiece volume 17 Redialing a call 18 Using the speaker phone 20 Using your EXAI 8985 intercom 21 Transferring a call 22 Memory Dialing Storing phone numbers and names 23 Making calls with memory dialing 26 Editing a stored name and/or... phone number ...28 Erasing a stored name and phone number........30 3-way Conference Feature 3-way conferencing 32 Caller ID features ...
... Receiving a call 15 Mute 16 Adjusting ringer and earpiece volume 17 Redialing a call 18 Using the speaker phone 20 Using your EXAI 8985 intercom 21 Transferring a call 22 Memory Dialing Storing phone numbers and names 23 Making calls with memory dialing 26 Editing a stored name and/or... phone number ...28 Erasing a stored name and phone number........30 3-way Conference Feature 3-way conferencing 32 Caller ID features ...

English Owners Manual
Page 6
... 12 hours before use the Caller ID service. You have to your area code in the memory to 13) Finally, set up before using the phone. About the digital security code This cordless telephone uses a digital security code to prevent unauthorized access to charge the battery pack for the first time...
... 12 hours before use the Caller ID service. You have to your area code in the memory to 13) Finally, set up before using the phone. About the digital security code This cordless telephone uses a digital security code to prevent unauthorized access to charge the battery pack for the first time...
English Owners Manual
Page 8
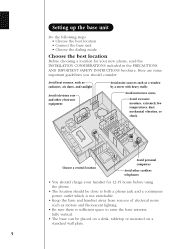
... dust, mechanical vibration, or shock Choose a central location Avoid personal computers Avoid other cordless telephones • You should charge your new phone, read the INSTALLATION CONSIDERATIONS included in the PRECAUTIONS AND IMPORTANT SAFETY INSTRUCTIONS brochure. Setting up the base unit Do the following steps. &#...mode Choose the best location Before choosing a location for your handset for 12-15 hours before using the phone. • The location should be close to both a phone jack and a continuous power outlet which is not switchable. • Keep the base and handset away from...
... dust, mechanical vibration, or shock Choose a central location Avoid personal computers Avoid other cordless telephones • You should charge your new phone, read the INSTALLATION CONSIDERATIONS included in the PRECAUTIONS AND IMPORTANT SAFETY INSTRUCTIONS brochure. Setting up the base unit Do the following steps. &#...mode Choose the best location Before choosing a location for your handset for 12-15 hours before using the phone. • The location should be close to both a phone jack and a continuous power outlet which is not switchable. • Keep the base and handset away from...

English Owners Manual
Page 11
Push in and down until the phone is firmly seated. 8 Then wrap the cord around the strain relief notch. AC outlet AC adapter 7 Align the mounting slots on the wall. with the ... into the telephone outlet. 4 Wrap the AC adapter cord inside the molded wiring channel. Mounting the base unit on a wall Standard wall plate mounting This phone can be mounted on any standard telephone wall plate. 1 1 Snap the wall mount adapter into the notches on the base. 2 Plug the telephone line cord...
Push in and down until the phone is firmly seated. 8 Then wrap the cord around the strain relief notch. AC outlet AC adapter 7 Align the mounting slots on the wall. with the ... into the telephone outlet. 4 Wrap the AC adapter cord inside the molded wiring channel. Mounting the base unit on a wall Standard wall plate mounting This phone can be mounted on any standard telephone wall plate. 1 1 Snap the wall mount adapter into the notches on the base. 2 Plug the telephone line cord...

English Owners Manual
Page 12
... the retainer from front to the wall. Direct wall plate mounting If you don't have a standard wall plate, you can mount your phone within 10 - 15 feet of a working phone jack to mount the telephone. 9 The retainer holds the handset in . 1 Insert two mounting screws into the wall. • Try to ...mount your phone directly to back. TOP 3/16 in. 3-15/16 in place. Allow about 3/16 of the base and handset. • Use #10 screws with their ...
... the retainer from front to the wall. Direct wall plate mounting If you don't have a standard wall plate, you can mount your phone within 10 - 15 feet of a working phone jack to mount the telephone. 9 The retainer holds the handset in . 1 Insert two mounting screws into the wall. • Try to ...mount your phone directly to back. TOP 3/16 in. 3-15/16 in place. Allow about 3/16 of the base and handset. • Use #10 screws with their ...
English Owners Manual
Page 13
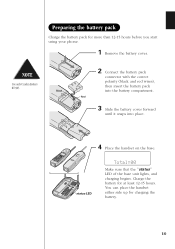
... battery for charging the battery. 10 Preparing the battery pack Charge the battery pack for more than 12-15 hours before you start using your phone. 1 Remove the battery cover. Use only Uniden Battery BT-905.
... battery for charging the battery. 10 Preparing the battery pack Charge the battery pack for more than 12-15 hours before you start using your phone. 1 Remove the battery cover. Use only Uniden Battery BT-905.
English Owners Manual
Page 14
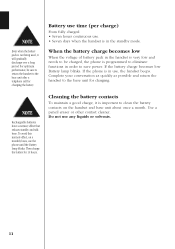
...to return the handset to save power. Rechargeable batteries have a memory effect that reduces standby and talk time. For optimum performance, be charged, the phone is important to the base unit for charging the battery. Battery use time (per charge) From fully charged • Seven hours coutinuous use. &#... battery charge becomes low Battery lamp blinks. To avoid this memory effect, on the handset and base unit about once a month. If the phone is in the standby mode. Use a pencil eraser or other contact cleaner. Even when the battery pack is not being used, it is programmed...
...to return the handset to save power. Rechargeable batteries have a memory effect that reduces standby and talk time. For optimum performance, be charged, the phone is important to the base unit for charging the battery. Battery use time (per charge) From fully charged • Seven hours coutinuous use. &#... battery charge becomes low Battery lamp blinks. To avoid this memory effect, on the handset and base unit about once a month. If the phone is in the standby mode. Use a pencil eraser or other contact cleaner. Even when the battery pack is not being used, it is programmed...
English Owners Manual
Page 16
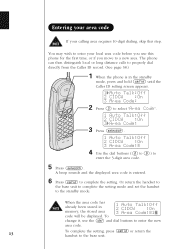
... then distinguish local or long distance calls to properly dial directly from the Caller ID record. (See page 38.) 1 When the phone is entered. 6 Press call id to the base unit. To change it, use this step. You may wish to the standby mode. A beep sounds and ... handset to the base unit to complete the setting mode and set the handset to enter your calling area requires 10-digit dialing, skip this phone for the first time, or if you use the del and dial buttons to enter the 3-digit area code. 5 Press select/ch .
... then distinguish local or long distance calls to properly dial directly from the Caller ID record. (See page 38.) 1 When the phone is entered. 6 Press call id to the base unit. To change it, use this step. You may wish to the standby mode. A beep sounds and ... handset to the base unit to complete the setting mode and set the handset to enter your calling area requires 10-digit dialing, skip this phone for the first time, or if you use the del and dial buttons to enter the 3-digit area code. 5 Press select/ch .
English Owners Manual
Page 17
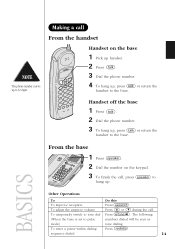
...Operations To Do this To improve reception Press select/ch . To enter a pause within dialing Press redial/p . Handset off the base 1 Press talk . 2 Dial the phone number. 3 To hang up, press talk or return the handset to 32 digits. From the base 1 Press speaker . 2 Dial the number on the base 1 Pick... up handset. 2 Press talk . 3 Dial the phone number. 4 To hang up, press talk or return the handset to hang up to the base. The phone number can be sent as mode) tone dialing. The following (When the base is set to tone...
...Operations To Do this To improve reception Press select/ch . To enter a pause within dialing Press redial/p . Handset off the base 1 Press talk . 2 Dial the phone number. 3 To hang up, press talk or return the handset to 32 digits. From the base 1 Press speaker . 2 Dial the number on the base 1 Pick... up handset. 2 Press talk . 3 Dial the phone number. 4 To hang up, press talk or return the handset to hang up to the base. The phone number can be sent as mode) tone dialing. The following (When the base is set to tone...
English Owners Manual
Page 18
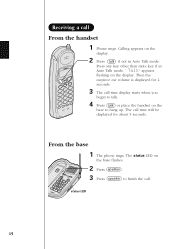
Calling appears on the base to finish the call From the handset 1 Phone rings. From the base 1 The phone rings. The call time will be displayed for 2 seconds. 3 The call-time display starts when you begin to talk. 4 Press talk or place the handset ...
Calling appears on the base to finish the call From the handset 1 Phone rings. From the base 1 The phone rings. The call time will be displayed for 2 seconds. 3 The call-time display starts when you begin to talk. 4 Press talk or place the handset ...

English Owners Manual
Page 19
When speaking with the base 1 Press mute during a telephone call . The ringer sound is turned off . 16 Mute 5:39 talk The microphone is turned off . 2 To cancel mute, press mute/ring or talk . The mocrophone is ringing Press mute/ring when the phone rings. When phone is turned off the base or the handset microphone so that the person you are talking with the handset 1 Press mute/ring during a telephone call . speaker When speaking with cannot hear you. Mute You can turn off . 2 To cancel mute, press mute , or speaker .
When speaking with the base 1 Press mute during a telephone call . The ringer sound is turned off . 16 Mute 5:39 talk The microphone is turned off . 2 To cancel mute, press mute/ring or talk . The mocrophone is ringing Press mute/ring when the phone rings. When phone is turned off the base or the handset microphone so that the person you are talking with the handset 1 Press mute/ring during a telephone call . speaker When speaking with cannot hear you. Mute You can turn off . 2 To cancel mute, press mute , or speaker .
English Owners Manual
Page 21
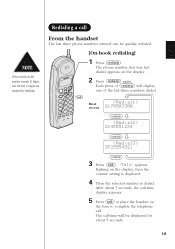
Redialing a call -time will display one of redial/p will be quickly redialed. [On-hook redialing] 1 Press redial/p . The phone number that was last dialed appears on the display, then the volume setting is displayed. 4 Then the selected number is dialed. talk... redial/p 9725554321 redial/p 3 Press talk . "Talk" appears flashing on the display. 2 Press redial/p again. The call From the handset The last three phone numbers entered can be displayed for redialing. Each press of the last three numbers dialed. If the recently dialed number exceeds 32 digits, only the...
Redialing a call -time will display one of redial/p will be quickly redialed. [On-hook redialing] 1 Press redial/p . The phone number that was last dialed appears on the display, then the volume setting is displayed. 4 Then the selected number is dialed. talk... redial/p 9725554321 redial/p 3 Press talk . "Talk" appears flashing on the display. 2 Press redial/p again. The call From the handset The last three phone numbers entered can be displayed for redialing. Each press of the last three numbers dialed. If the recently dialed number exceeds 32 digits, only the...

English Owners Manual
Page 23
Using the speaker phone You may use the phone as speaker phone to answer calls pressing the speaker button on the base. Position yourself approximately 12 inches away from the base and speaker clearly. 12" 20 The base microphone is located under the phone. To hung up, press speaker again.
Using the speaker phone You may use the phone as speaker phone to answer calls pressing the speaker button on the base. Position yourself approximately 12 inches away from the base and speaker clearly. 12" 20 The base microphone is located under the phone. To hung up, press speaker again.

English Owners Manual
Page 25
... speaker on the handset. 22 To transfer from the handset to the handset 1 Press page/int'com on the base while speaking on the speaker phone. The line will be held , and the inter'com tone will be sounded on the base. 2 Press page/int'com or speaker on the base...
... speaker on the handset. 22 To transfer from the handset to the handset 1 Press page/int'com on the base while speaking on the speaker phone. The line will be held , and the inter'com tone will be sounded on the base. 2 Press page/int'com or speaker on the base...
English Owners Manual
Page 26
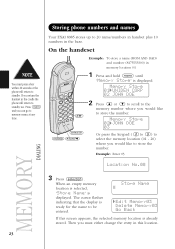
..." is displayed. Store Name Edit Memory03 Delete Memory03 Go Back If this location. 23 Memory Store 01 UNIDEN CORP 02 JOHN DOE 2 Press • or ª to scroll to the memory number where you...) to select the memory location (01 - 20) where you must press a key within 20 seconds or the phone will return to 20 name/numbers in handset plus 10 numbers in memory location 03. 1 Press and hold mem... until "Memory Store" is displayed. Storing phone numbers and names Your EXAI 8985 stores up to standby too. Then you would like to store...
..." is displayed. Store Name Edit Memory03 Delete Memory03 Go Back If this location. 23 Memory Store 01 UNIDEN CORP 02 JOHN DOE 2 Press • or ª to scroll to the memory number where you...) to select the memory location (01 - 20) where you must press a key within 20 seconds or the phone will return to 20 name/numbers in handset plus 10 numbers in memory location 03. 1 Press and hold mem... until "Memory Store" is displayed. Storing phone numbers and names Your EXAI 8985 stores up to standby too. Then you would like to store...

English Owners Manual
Page 27
... del keys to enter pause in the dialing sequence. Memory storage is displayed. Memory03 Stored After about 2 seconds, "Memory Store" is complete. The phone number cannot exceed 20 digits. • Use the redial/p key to enter the name. The name cannot exceed 13 characters. • Use the ...• and ª key to enter the Store Number 817555330 phone number. The cursor flashes indicating that reguire a pause between digits. • Use the del key to delete characters as needed . 5 Press ...
... del keys to enter pause in the dialing sequence. Memory storage is displayed. Memory03 Stored After about 2 seconds, "Memory Store" is complete. The phone number cannot exceed 20 digits. • Use the redial/p key to enter the name. The name cannot exceed 13 characters. • Use the ...• and ª key to enter the Store Number 817555330 phone number. The cursor flashes indicating that reguire a pause between digits. • Use the del key to delete characters as needed . 5 Press ...
English Owners Manual
Page 29
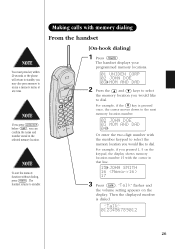
... display shows memory location number 15 with memory dialing From the handset [On-hook dialing] 1 Press mem . The handset displays your programmed memory locations. 01 UNIDEN CORP 02 JOHN DOE 03 MOM AND DAD 2 Press the • and ª keys to select the memory location you would like to access a memory...-digit number with the number keypad to select the memory location you would like to standby. You must press key within 20 seconds or the phone will return to standby, you may also press memory to dial. If you press select/ch before talk , you can confirm the name and number...
... display shows memory location number 15 with memory dialing From the handset [On-hook dialing] 1 Press mem . The handset displays your programmed memory locations. 01 UNIDEN CORP 02 JOHN DOE 03 MOM AND DAD 2 Press the • and ª keys to select the memory location you would like to access a memory...-digit number with the number keypad to select the memory location you would like to standby. You must press key within 20 seconds or the phone will return to standby, you may also press memory to dial. If you press select/ch before talk , you can confirm the name and number...

English Owners Manual
Page 30
... display and the numbers display. Display a Programmed Number Use the #/ 1 and */tone/0 keys to select the memory location (01 - 20) of the desired phone number. Talk Talk 2 Press mem . Talk 0:35 0123456789012 27 Press #/ 1 to see the extra digits and */tone/0 to the 12th digit. "Talk" ...flashes and the volume setting appears. Program name Program number 01 UNIDEN CORP 02 JOHN DOE 03 MOM AND DAD 1 01 8178583300 02 5452930 03 8175551212 1 When the stored phone number has 14 or more digits, " \ " is displayed next to return. 15 0123456789012 16...
... display and the numbers display. Display a Programmed Number Use the #/ 1 and */tone/0 keys to select the memory location (01 - 20) of the desired phone number. Talk Talk 2 Press mem . Talk 0:35 0123456789012 27 Press #/ 1 to see the extra digits and */tone/0 to the 12th digit. "Talk" ...flashes and the volume setting appears. Program name Program number 01 UNIDEN CORP 02 JOHN DOE 03 MOM AND DAD 1 01 8178583300 02 5452930 03 8175551212 1 When the stored phone number has 14 or more digits, " \ " is displayed next to return. 15 0123456789012 16...


