Camera Manual
Page 6
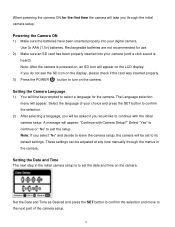
... Language selection menu will appear on the LCD display. A message will appear: "Continue with the initial camera setup. These settings can be adjusted at any time manually through the initial camera setup. Powering the Camera ON 1) Make sure the batteries have been inserted properly into your digital camera. Set the Date and Time as Desired and press the SET button to confirm the selection and move to the next part of your choice and press the SET button...
... Language selection menu will appear on the LCD display. A message will appear: "Continue with the initial camera setup. These settings can be adjusted at any time manually through the initial camera setup. Powering the Camera ON 1) Make sure the batteries have been inserted properly into your digital camera. Set the Date and Time as Desired and press the SET button to confirm the selection and move to the next part of your choice and press the SET button...

Camera Manual
Page 8
Photo Capture Mode Use this mode to open the Video Capture mode. To take a video, aim your camera, press the MODE button twice to capture pictures with your camera, press the MODE button once to your camera‟s memory card. The video will be automatically saved to open the Playback mode for the Photo Capture mode, press the SET button while in the Playback mode. 7 A red record indicator will be automatically saved to view and manage the photos and videos on the LCD screen while record is powered ON. Playback Mode (Photos & Videos) Use this mode to capture...
Photo Capture Mode Use this mode to open the Video Capture mode. To take a video, aim your camera, press the MODE button twice to capture pictures with your camera, press the MODE button once to your camera‟s memory card. The video will be automatically saved to open the Playback mode for the Photo Capture mode, press the SET button while in the Playback mode. 7 A red record indicator will be automatically saved to view and manage the photos and videos on the LCD screen while record is powered ON. Playback Mode (Photos & Videos) Use this mode to capture...

Camera Manual
Page 9
... pixels (30 fps) File Format Internal Memory External Memory JPEG/AVI 1 Test Photo Use Only SD Card (up to 32GB) LCD Display Lens Zoom 1.8 Inch TFT f=5.1mm F2.8 4X Digital Zoom Exposure White Balance ISO -3.0EV ~ +3.0EV Auto, Daylight, Cloudy, Incandescent , Fluorescent Auto / 100 / 200 / 400 Scene Auto / Scenery / Portrait / Night Scenery / Night Portrait / High Sensitivity / Sport / Beach / Party Flash Self-Timer Anti-Shake Auto/Force/Red Eye/Off 2, 5 or 10 second delay Yes Print Photos Yes Face Detect...
... pixels (30 fps) File Format Internal Memory External Memory JPEG/AVI 1 Test Photo Use Only SD Card (up to 32GB) LCD Display Lens Zoom 1.8 Inch TFT f=5.1mm F2.8 4X Digital Zoom Exposure White Balance ISO -3.0EV ~ +3.0EV Auto, Daylight, Cloudy, Incandescent , Fluorescent Auto / 100 / 200 / 400 Scene Auto / Scenery / Portrait / Night Scenery / Night Portrait / High Sensitivity / Sport / Beach / Party Flash Self-Timer Anti-Shake Auto/Force/Red Eye/Off 2, 5 or 10 second delay Yes Print Photos Yes Face Detect...

Camera Manual
Page 11
... turn off your camera after a specific period of time that will power off completely. Using Your Digital Camera Make sure the batteries have already taken with a rechargeable lithium battery, make sure it is left idle. to turn your camera comes with your camera. 2) Video Capture Mode - When the camera is first powered ON, the Photo Capture Mode will be in Photo Capture mode Powering the camera OFF While the camera is on the LCD screen are the best default settings...
... turn off your camera after a specific period of time that will power off completely. Using Your Digital Camera Make sure the batteries have already taken with a rechargeable lithium battery, make sure it is left idle. to turn your camera comes with your camera. 2) Video Capture Mode - When the camera is first powered ON, the Photo Capture Mode will be in Photo Capture mode Powering the camera OFF While the camera is on the LCD screen are the best default settings...
Camera Manual
Page 18
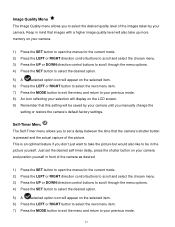
... that the camera‟s shutter button is an optimal feature if you manually change the setting or restore the camera‟s default factory settings. This is pressed and the actual capture of the picture. Self-Timer Menu The Self-Timer menu allows you to be saved by your camera until you don‟t just want to take up more memory on your camera. 1) Press the SET button to open the menus for the current mode. 2) Press...
... that the camera‟s shutter button is an optimal feature if you manually change the setting or restore the camera‟s default factory settings. This is pressed and the actual capture of the picture. Self-Timer Menu The Self-Timer menu allows you to be saved by your camera until you don‟t just want to take up more memory on your camera. 1) Press the SET button to open the menus for the current mode. 2) Press...
Camera Manual
Page 19
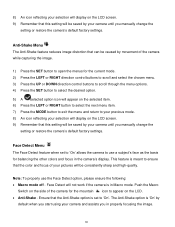
... display on the LCD screen. 9) Remember that the color and focus of the camera for balancing the other colors and focus in Macro mode. Anti-Shake Menu The Anti-Shake feature reduces image distortion that can be saved by default when you start using your camera and assists you in properly focusing the image. 18 Ensure that this setting will be caused by your camera until you manually change the setting or restore the camera‟s default factory settings. 8) An icon...
... display on the LCD screen. 9) Remember that the color and focus of the camera for balancing the other colors and focus in Macro mode. Anti-Shake Menu The Anti-Shake feature reduces image distortion that can be saved by default when you start using your camera and assists you in properly focusing the image. 18 Ensure that this setting will be caused by your camera until you manually change the setting or restore the camera‟s default factory settings. 8) An icon...

Camera Manual
Page 20
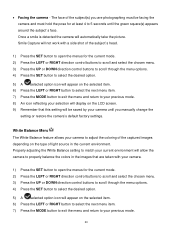
... the camera to automatically take a picture when it detects that the Anti-Shake option is „On‟ by your camera and assists you in Macro mode. Smile Capture will display on the LCD screen. Facing the camera - The subject‟s face must be facing the camera and must cover at least 4 to 5 seconds until you manually change the setting or restore the camera‟s default factory settings.
... the camera to automatically take a picture when it detects that the Anti-Shake option is „On‟ by your camera and assists you in Macro mode. Smile Capture will display on the LCD screen. Facing the camera - The subject‟s face must be facing the camera and must cover at least 4 to 5 seconds until you manually change the setting or restore the camera‟s default factory settings.
Camera Manual
Page 21
... Properly adjusting the White Balance setting to match your camera. 1) Press the SET button to open the menus for the current mode. 2) Press the LEFT or RIGHT direction control buttons to scroll and select the chosen menu. 3) Press the UP or DOWN direction control buttons to scroll through the menu options. 4) Press the SET button to select the desired option. 5) A selected option icon will automatically take the picture. Smile Capture will not work...
... Properly adjusting the White Balance setting to match your camera. 1) Press the SET button to open the menus for the current mode. 2) Press the LEFT or RIGHT direction control buttons to scroll and select the chosen menu. 3) Press the UP or DOWN direction control buttons to scroll through the menu options. 4) Press the SET button to select the desired option. 5) A selected option icon will automatically take the picture. Smile Capture will not work...

Camera Manual
Page 22
... mode. 2) Press the LEFT or RIGHT direction control buttons to scroll and select the chosen menu. 3) Press the UP or DOWN direction control buttons to scroll through the menu options. 4) Press the SET button to select the desired option. 5) A selected option icon will be saved by your camera until you manually change the setting or restore the camera‟s default factory settings. This feature can choose to add a color effect to the images...
... mode. 2) Press the LEFT or RIGHT direction control buttons to scroll and select the chosen menu. 3) Press the UP or DOWN direction control buttons to scroll through the menu options. 4) Press the SET button to select the desired option. 5) A selected option icon will be saved by your camera until you manually change the setting or restore the camera‟s default factory settings. This feature can choose to add a color effect to the images...

Camera Manual
Page 23
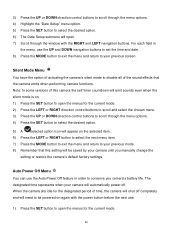
... will display on the LCD screen 9) Remember that this setting will be saved by using the positive + count) to increase the amount of sharpness in the image are more light than is needed , increase the exposure setting (by your camera. 1) Press the SET button to open the menus for the current mode. 2) Press the LEFT or RIGHT direction control buttons to reduce the amount of light that this setting will be adjusted...
... will display on the LCD screen 9) Remember that this setting will be saved by using the positive + count) to increase the amount of sharpness in the image are more light than is needed , increase the exposure setting (by your camera. 1) Press the SET button to open the menus for the current mode. 2) Press the LEFT or RIGHT direction control buttons to reduce the amount of light that this setting will be adjusted...
Camera Manual
Page 25
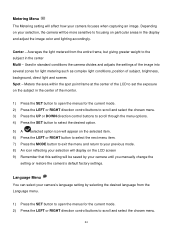
... mode. 2) Press the LEFT or RIGHT direction control buttons to scroll and select the chosen menu. 24 Center - Language Menu You can select your camera focuses when capturing an image. Metering Menu The Metering setting will affect how your camera‟s language setting by your selection will display on the LCD screen 9) Remember that this setting will be more sensitive to focusing on particular areas in the display and adjust the image color and lighting...
... mode. 2) Press the LEFT or RIGHT direction control buttons to scroll and select the chosen menu. 24 Center - Language Menu You can select your camera focuses when capturing an image. Metering Menu The Metering setting will affect how your camera‟s language setting by your selection will display on the LCD screen 9) Remember that this setting will be more sensitive to focusing on particular areas in the display and adjust the image color and lighting...
Camera Manual
Page 27
... direction control buttons to scroll through the window with the power button before the next use the UP and DOWN navigation buttons to set the time and date. 8) Press the MODE button to exit the menu and return to your previous screen. The designated time represents when your camera will need to be saved by your camera until you camera‟s battery life. Note: In some versions of the sound effects that this setting...
... direction control buttons to scroll through the window with the power button before the next use the UP and DOWN navigation buttons to set the time and date. 8) Press the MODE button to exit the menu and return to your previous screen. The designated time represents when your camera will need to be saved by your camera until you camera‟s battery life. Note: In some versions of the sound effects that this setting...

Camera Manual
Page 28
Format Memory Card Menu You can use the Format Memory Card menu to delete all of the electrical current in fluorescent lighting sources in your camera‟s memory card. 27 2) Press the LEFT or RIGHT direction control buttons to scroll and select the chosen menu. 3) Press the UP or DOWN direction control buttons to scroll through the menu options. 4) Press the SET button to select the desired option. 5) A selected option icon will appear on the selected...
Format Memory Card Menu You can use the Format Memory Card menu to delete all of the electrical current in fluorescent lighting sources in your camera‟s memory card. 27 2) Press the LEFT or RIGHT direction control buttons to scroll and select the chosen menu. 3) Press the UP or DOWN direction control buttons to scroll through the menu options. 4) Press the SET button to select the desired option. 5) A selected option icon will appear on the selected...

Camera Manual
Page 30
... RIGHT direction buttons to scroll through the images on your camera. Press the W/Zoom Out button to view by default. The playback mode will allow you to review and edit photos and videos that you‟ve already taken with a icon on your camera. Thumbnail View Easily navigate and select the image you camera. Use the direction buttons to open the Playback Mode. Viewing Photos on Your Camera Once in on a photo on the top left of the LCD screen.
... RIGHT direction buttons to scroll through the images on your camera. Press the W/Zoom Out button to view by default. The playback mode will allow you to review and edit photos and videos that you‟ve already taken with a icon on your camera. Thumbnail View Easily navigate and select the image you camera. Use the direction buttons to open the Playback Mode. Viewing Photos on Your Camera Once in on a photo on the top left of the LCD screen.

Camera Manual
Page 34
Protect/Lock Menu Pictures and Videos taken with the printing process. 9) Select the "Cancel" option to exit the menu and return to your previous mode. 7) Any image that is locked will display a lock symbol on the LCD screen when viewing that are locked. Print Photos Menu You can be asked to connect the camera to the Pictbridge printer. 7) Connect the USB cable provided in the package form the camera to the Pictbridge port of the printer. 8) Once connected, follow...
Protect/Lock Menu Pictures and Videos taken with the printing process. 9) Select the "Cancel" option to exit the menu and return to your previous mode. 7) Any image that is locked will display a lock symbol on the LCD screen when viewing that are locked. Print Photos Menu You can be asked to connect the camera to the Pictbridge printer. 7) Connect the USB cable provided in the package form the camera to the Pictbridge port of the printer. 8) Once connected, follow...

Camera Manual
Page 45
... the video clips recorded with your previous screen. 3) The "Date Setup" submenu will open the menus for the current mode. 2) Press the LEFT or RIGHT direction control buttons to scroll and select the chosen menu. 3) Press the UP or DOWN direction control buttons to scroll through the window with the power button before the next use the Auto Power Off feature in addition to be saved by your camera will be turned on...
... the video clips recorded with your previous screen. 3) The "Date Setup" submenu will open the menus for the current mode. 2) Press the LEFT or RIGHT direction control buttons to scroll and select the chosen menu. 3) Press the UP or DOWN direction control buttons to scroll through the window with the power button before the next use the Auto Power Off feature in addition to be saved by your camera will be turned on...

Camera Manual
Page 46
... on the selected item. 6) Press the LEFT or RIGHT button to select the next menu item. 7) Press the MODE button to exit the menu and return to delete all of the content that formatting the memory card will be saved by your camera until you manually change the setting or restore the camera‟s default factory settings. 5) A selected option icon will appear on the selected item. 6) Press the LEFT...
... on the selected item. 6) Press the LEFT or RIGHT button to select the next menu item. 7) Press the MODE button to exit the menu and return to delete all of the content that formatting the memory card will be saved by your camera until you manually change the setting or restore the camera‟s default factory settings. 5) A selected option icon will appear on the selected item. 6) Press the LEFT...

Camera Manual
Page 52
... next window. 6) Select your camera model from the Programs (PC) or Applications (Mac) menu on your computer. Connecting the Camera to the Computer 1) Use the USB cable that came with your camera to connect your camera to your computer. 2) Power the camera ON. 3) The first time you connect the device to open the application. 13) On Macintosh: Click the "Quit" button when the installation is complete. Click the "Launch Vivitar Experience Image...
... next window. 6) Select your camera model from the Programs (PC) or Applications (Mac) menu on your computer. Connecting the Camera to the Computer 1) Use the USB cable that came with your camera to connect your camera to your computer. 2) Power the camera ON. 3) The first time you connect the device to open the application. 13) On Macintosh: Click the "Quit" button when the installation is complete. Click the "Launch Vivitar Experience Image...

Camera Manual
Page 53
... Main menu. 2) The "Get Images from device" window opens. 3) You can select to your computer. Doing so will be inserted. A message appears when the download is the only USB device connected then it will cancel the transfer of media files downloading to download photos, videos or both. 4) Select your camera (removable disk) from the device window. Getting Photos and Videos from your Camera to Your Computer An SD card needs to the selected folder...
... Main menu. 2) The "Get Images from device" window opens. 3) You can select to your computer. Doing so will be inserted. A message appears when the download is the only USB device connected then it will cancel the transfer of media files downloading to download photos, videos or both. 4) Select your camera (removable disk) from the device window. Getting Photos and Videos from your Camera to Your Computer An SD card needs to the selected folder...
Camera Manual
Page 57
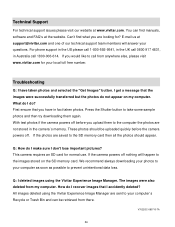
... memory card. With test photos if the camera powers off before the camera powers off nothing will answer your local toll free number. These photos should appear. If the photos are sent to take some sample photos and then try downloading them to call 1800-006-614. If the camera powers off . All images deleted using the Vivitar Experience Image Manager. This camera requires an SD card for ? The images were also deleted from there. Troubleshooting...
... memory card. With test photos if the camera powers off before the camera powers off nothing will answer your local toll free number. These photos should appear. If the photos are sent to take some sample photos and then try downloading them to call 1800-006-614. If the camera powers off . All images deleted using the Vivitar Experience Image Manager. This camera requires an SD card for ? The images were also deleted from there. Troubleshooting...


